2013 MERCEDES-BENZ CLA-CLASS fuel
[x] Cancel search: fuelPage 163 of 352

Problems with the fuel and fuel tankProblemPossible causes/consequences and M SolutionsFuel is leaking from the
vehicle.The fuel line or the fuel tank is faulty.GWARNING
Risk of explosion or fire.
XTurn the key to position 0 in the ignition lock and remove it
immediately ( Y page 145).XDo not restart the engine under any circumstances.XConsult a qualified specialist workshop.The engine does not
start.The fuel tank of a vehicle with a diesel engine has been run com-
pletely dry.XRefuel the vehicle with at least 5 litres of diesel.XTurn the ignition on for approximately ten seconds
( Y page 145).XStart the engine continuously for a maximum of ten seconds
until it runs smoothly.
orXStart the engine using the touch-start function. To do this, turn
the key to position 3 in the ignition lock and then release it
immediately ( Y page 145).
If the engine does not start:
XTurn the ignition on again a maximum of ten seconds
( Y page 145).XStart the engine again continuously for a maximum of ten sec-
onds until it runs smoothly.
orXStart the engine again via the touch-start function.
If the engine does not start after three attempts:
XConsult a qualified specialist workshop.Refuelling161Driving and parkingZProCarManuals.com
Page 164 of 352
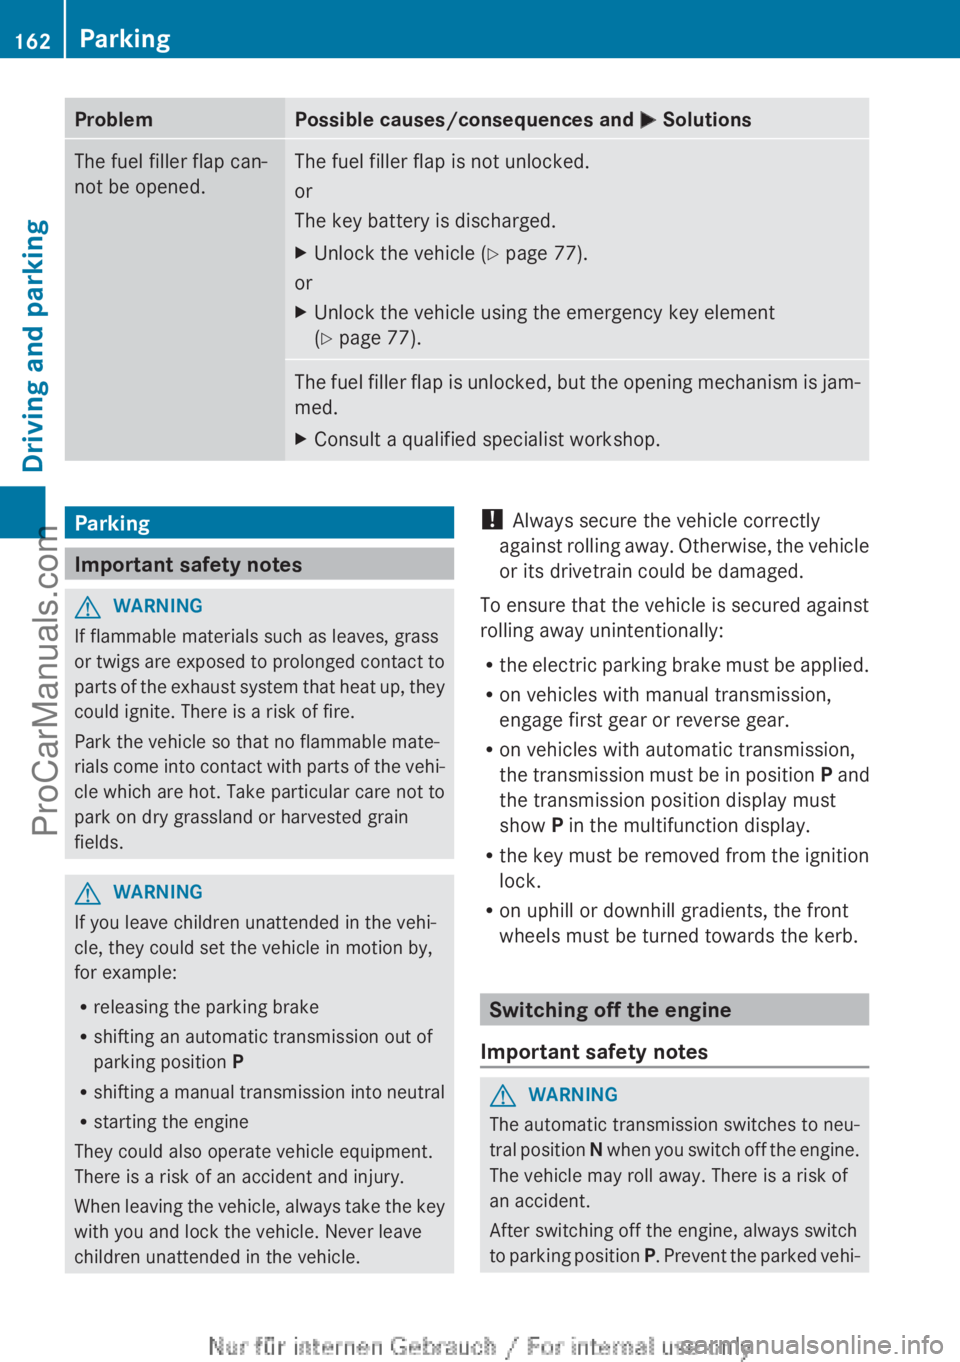
ProblemPossible causes/consequences and M SolutionsThe fuel filler flap can-
not be opened.The fuel filler flap is not unlocked.
or
The key battery is discharged.XUnlock the vehicle ( Y page 77).
or
XUnlock the vehicle using the emergency key element
( Y page 77).The fuel filler flap is unlocked, but the opening mechanism is jam-
med.XConsult a qualified specialist workshop.Parking
Important safety notes
GWARNING
If flammable materials such as leaves, grass
or twigs are exposed to prolonged contact to
parts of the exhaust system that heat up, they
could ignite. There is a risk of fire.
Park the vehicle so that no flammable mate-
rials come into contact with parts of the vehi-
cle which are hot. Take particular care not to
park on dry grassland or harvested grain
fields.
GWARNING
If you leave children unattended in the vehi-
cle, they could set the vehicle in motion by,
for example:
R releasing the parking brake
R shifting an automatic transmission out of
parking position P
R shifting a manual transmission into neutral
R starting the engine
They could also operate vehicle equipment.
There is a risk of an accident and injury.
When leaving the vehicle, always take the key
with you and lock the vehicle. Never leave
children unattended in the vehicle.
! Always secure the vehicle correctly
against rolling away. Otherwise, the vehicle
or its drivetrain could be damaged.
To ensure that the vehicle is secured against
rolling away unintentionally:
R the electric parking brake must be applied.
R on vehicles with manual transmission,
engage first gear or reverse gear.
R on vehicles with automatic transmission,
the transmission must be in position P and
the transmission position display must
show P in the multifunction display.
R the key must be removed from the ignition
lock.
R on uphill or downhill gradients, the front
wheels must be turned towards the kerb.
Switching off the engine
Important safety notes
GWARNING
The automatic transmission switches to neu-
tral position N when you switch off the engine.
The vehicle may roll away. There is a risk of
an accident.
After switching off the engine, always switch
to parking position P. Prevent the parked vehi-
162ParkingDriving and parking
ProCarManuals.com
Page 167 of 352
Driving tips
General notes
GWARNING
If you switch off the ignition while driving,
safety-relevant functions are only available
with limitations, or not at all. This could affect,
for example, the power steering and the brake
boosting effect. You will require considerably
more effort to steer and brake. There is a risk
of an accident.
Do not switch off the ignition while driving.
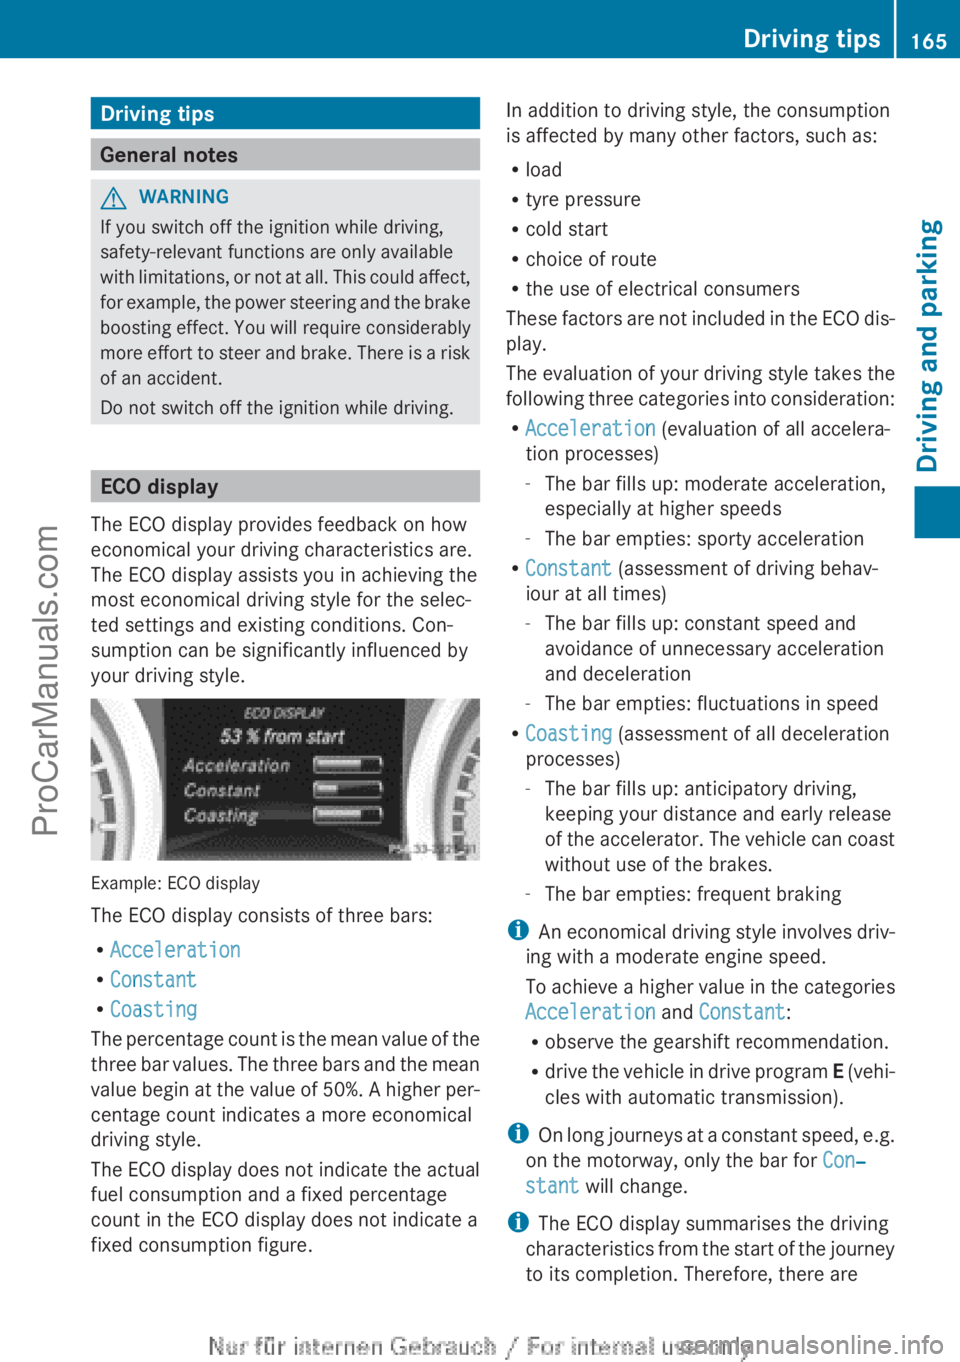
ECO display
The ECO display provides feedback on how
economical your driving characteristics are.
The ECO display assists you in achieving the
most economical driving style for the selec-
ted settings and existing conditions. Con-
sumption can be significantly influenced by
your driving style.
Example: ECO display
The ECO display consists of three bars:
R Acceleration
R Constant
R Coasting
The percentage count is the mean value of the
three bar values. The three bars and the mean
value begin at the value of 50%. A higher per-
centage count indicates a more economical
driving style.
The ECO display does not indicate the actual
fuel consumption and a fixed percentage
count in the ECO display does not indicate a
fixed consumption figure.
In addition to driving style, the consumption
is affected by many other factors, such as:
R load
R tyre pressure
R cold start
R choice of route
R the use of electrical consumers
These factors are not included in the ECO dis-
play.
The evaluation of your driving style takes the
following three categories into consideration:
R Acceleration (evaluation of all accelera-
tion processes)
- The bar fills up: moderate acceleration,
especially at higher speeds
- The bar empties: sporty acceleration
R Constant (assessment of driving behav-
iour at all times)
- The bar fills up: constant speed and
avoidance of unnecessary acceleration
and deceleration
- The bar empties: fluctuations in speed
R Coasting (assessment of all deceleration
processes)
- The bar fills up: anticipatory driving,
keeping your distance and early release
of the accelerator. The vehicle can coast
without use of the brakes.
- The bar empties: frequent braking
i An economical driving style involves driv-
ing with a moderate engine speed.
To achieve a higher value in the categories
Acceleration and Constant :
R observe the gearshift recommendation.
R drive the vehicle in drive program E (vehi-
cles with automatic transmission).
i On long journeys at a constant speed, e.g.
on the motorway, only the bar for Con‐
stant will change.
i The ECO display summarises the driving
characteristics from the start of the journey
to its completion. Therefore, there areDriving tips165Driving and parkingZProCarManuals.com
Page 204 of 352

To avoid hazardous situations:
R make sure to check the noseweight before
each journey.
R use a drawbar noseweight as close as pos-
sible to the maximum noseweight.
R do not exceed the maximum permissible
noseweight.
R do not use a noseweight lower than the
minimum permissible trailer drawbar nose-
weight.
You can use carrier systems, e.g. bicycle
racks or load-bearing implements, on the ball
coupling. The maximum noseweight of
75 kg applies when using carrier systems on
the ball coupling.
When reversing the vehicle towards the
trailer, make sure there is nobody between
the trailer and the vehicle.
Couple and uncouple the trailer carefully. If
you do not couple the trailer to the towing
vehicle correctly, the trailer could become
detached.
Make sure that the following values are not
exceeded:
R the permissible trailer drawbar noseweight
R the permissible trailer load
R the permissible rear axle load of the towing
vehicle
R the maximum permissible gross vehicle
weight of both the towing vehicle and the
trailer
The applicable permissible values, which
must not be exceeded, can be found:
R in your vehicle documents
R on the identification plates of the trailer tow
hitch and the trailer
R on the vehicle identification plate
If the values differ, the lowest value applies.
You will find the values approved by the man-
ufacturer on the vehicle identification plates
and those for the towing vehicle in the "Tech-
nical data" section.When towing a trailer, your vehicle's handling
characteristics will be different in comparison
to when driving without a trailer.
The vehicle/trailer combination:
R is heavier
R is restricted in its acceleration and gradi-
ent-climbing capability
R has an increased braking distance
R is affected more by strong crosswinds
R demands more sensitive steering
R has a larger turning circle
This can impair the vehicle's handling char-
acteristics. Adapt your style of driving accord-
ingly. Maintain a safe distance. Drive care-
fully.
When towing a trailer, always adjust your
speed to the current road and weather con-
ditions. Do not exceed the maximum permis-
sible speed for your vehicle/trailer combina-
tion.
General notes
! Use a drawbar noseweight as close as
possible to the maximum permissible nose-
weight. Do not use a noseweight of less
than 50 kg, otherwise the trailer may come
loose.
Note that the payload and the rear axle load
are reduced by the actual payload.
XWhen towing a trailer, set the tyre pressure
on the rear axle of the towing vehicle for a
maximum load; see the tyre pressure table
in the fuel filler flap ( Y page 319).
You will find fitting dimensions and loads in
the "Technical data" section ( Y page 344).
The actual noseweight may not though be
higher than the value which is given:
R on the type plate of the trailer tow hitch and
R on the type plate of the trailer
The lowest weight applies.
Please note that when towing a trailer, PARK-
TRONIC ( Y page 182) and Blind Spot Assist
202Towing a trailerDriving and parking
ProCarManuals.com
Page 205 of 352

(Y page 197) availability is limited or not avail-
able at all.
i The height of the ball coupling changes
with the load of the vehicle. If necessary,
use a trailer with a height-adjustable draw-
bar.
Driving tips
i Observe the notes on ESP ®
trailer stabi-
lisation ( Y page 70).
The maximum permissible speed for vehicle/
trailer combinations depends on the type of
trailer. Before beginning the journey, check
the trailer's documents to see what the max-
imum permitted speed is. Observe the legally
prescribed maximum speed in the relevant
country.
For certain Mercedes-Benz vehicles, the max-
imum permissible rear axle load is increased
when towing a trailer. Refer to the "Technical
data" section to find out whether this applies
to your vehicle. If you utilise any of the added
maximum rear axle load when towing a trailer,
the vehicle/trailer combination may not
exceed a maximum speed of 100 km/h for
reasons concerning the operating permit.
This also applies in countries in which the
permissible maximum speed for vehicle/
trailer combinations is above 100 km/h.
When towing a trailer, your vehicle's handling
characteristics will be different in comparison
to when driving without a trailer and it will
consume more fuel.
Change into a lower gear in good time on long
and steep downhill gradients. For vehicles
with automatic transmission, you need to
have selected manual drive program
M (Y page 156).
i This also applies if you have activated
cruise control, SPEEDTRONIC or DIS-
TRONIC PLUS.
This will use the braking effect of the engine,
so less braking will be required to maintain
vehicle speed. This relieves the load on the
brake system and prevents the brakes from
overheating and wearing too quickly. If you
need additional braking, depress the brake
pedal repeatedly rather than continuously.
i Briefly depressing the accelerator pedal
on downhill gradients while the manual
drive program M is temporarily activated
(vehicles with automatic transmission): the
automatic transmission may switch back to
the last active automatic drive program E
or S. The automatic transmission may shift
to a higher gear. This can reduce the
engine's braking effect.
Driving tips
If the trailer swings from side to side:
XDo not accelerate.XDo not countersteer.XBrake if necessary.
R Maintain a greater distance from the vehi-
cle in front than when driving without a
trailer.
R Avoid braking abruptly. If possible, brake
gently at first to allow the trailer to run on.
Then, increase the braking force rapidly.
R The values given for gradient-climbing
capabilities from a standstill refer to sea
level. When driving in mountainous areas,
note that the power output of the engine,
and consequently the vehicle's gradient-
climbing capability, decrease with increas-
ing altitude.
Folding out the ball coupling
GWARNING
If you release the ball coupling or it does not
engage correctly when folding in, it will swing
out. Within pivoting range of the ball coupling,
there is an increased risk of an accident and
injury.
Only release the ball coupling if the pivoting
range is unobstructed. Always make sure that
the ball coupling engages when folding in.
Towing a trailer203Driving and parkingZProCarManuals.com
Page 211 of 352
At high outside temperatures and when driv-
ing uphill, the coolant temperature may rise
to the end of the scale.
Rev counter
! Do not drive in the overrevving range.
Doing so will damage the engine.
The red band in the rev counter indicates the
engine's overrevving range.
The fuel supply is interrupted to protect the
engine when the red band is reached.
Outside temperature display
You should pay special attention to road con-
ditions when temperatures are around the
freezing point.
The outside temperature display is in the mul-
tifunction display.
Changes in the outside temperature are dis-
played after a short delay.
Speedometer with segments
The speedometer is divided into segments on
vehicles with DISTRONIC PLUS.
The segments in the speedometer indicate
which speed range is available.
R Cruise control activated ( Y page 168):
The segments light up from the stored
speed to the maximum speed.
R Variable SPEEDTRONIC activated
( Y page 171):
The segments light up from the start of the
scale to the selected limit speed.
R DISTRONIC PLUS activated ( Y page 173):
One or two segments in the set speed
range light up.
R DISTRONIC PLUS detects a vehicle in front:
The segments between the speed of the
vehicle in front and the stored speed light
up.
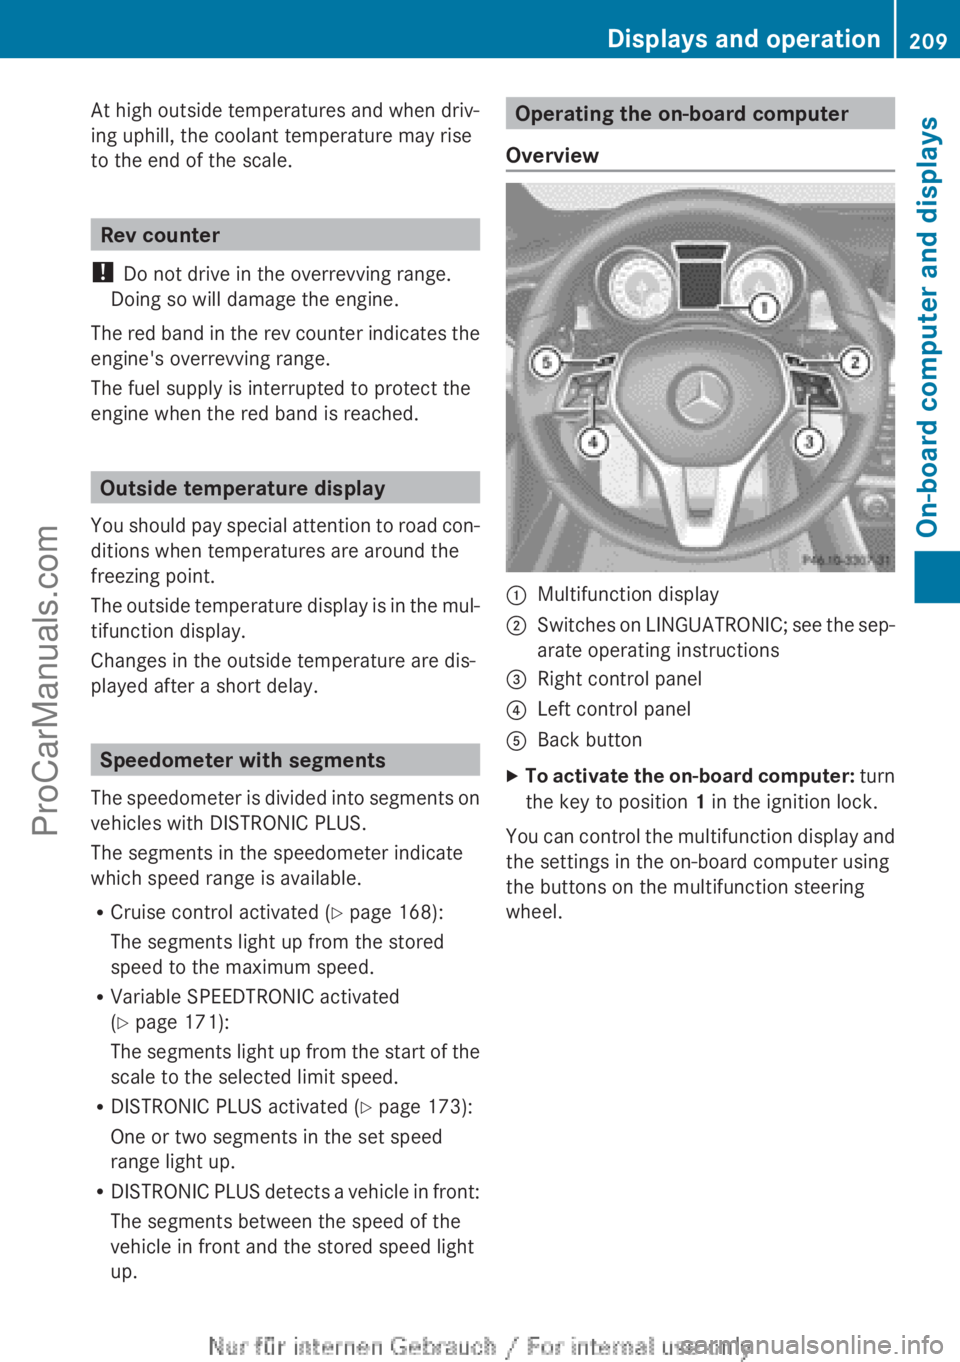
Operating the on-board computer
Overview:Multifunction display;Switches on LINGUATRONIC; see the sep-
arate operating instructions=Right control panel?Left control panelABack buttonXTo activate the on-board computer: turn
the key to position 1 in the ignition lock.
You can control the multifunction display and
the settings in the on-board computer using
the buttons on the multifunction steering
wheel.
Displays and operation209On-board computer and displaysZProCarManuals.com
Page 213 of 352
?Menu barAPermanent display: outside temperature
or speed ( Y page 220)BTimeXTo show the menu bar ?: press the
= or ; button on the steering wheel.
Menu bar ? disappears after a few seconds.
Text field = shows the selected menu or
submenu as well as display messages.
i You can set the time using the audio sys-
tem or COMAND Online, see the separate
operating instructions.
The following messages may appear in the
multifunction display:
ZGearshift recommendation
( Y page 152)Xj YActive Parking Assist
( Y page 186)¯Cruise control ( Y page 168)ÈSPEEDTRONIC ( Y page 171)_Adaptive Highbeam Assist
( Y page 111)¤ECO start/stop function
( Y page 148)ëHOLD function ( Y page 181)120 km/h!Maximum permissible speed
exceeded (only for certain coun-
tries)
Menus and submenus
Menu overview
Operating the on-board computer
( Y page 209).
Depending on the equipment fitted in the
vehicle, you can call up the following menus:
R Trip menu ( Y page 211)
R Navi menu (navigation instructions)
( Y page 213)
R Audio menu ( Y page 214)
R Tel (telephone) menu ( Y page 215)
R
Assist. (Assistance) menu ( Y page 217)
R Service menu (Y page 219)
R Settings menu (Y page 219)
The Audio , Navi and Tel menus differ slightly
in vehicles with Audio 20 and in vehicles with
COMAND Online. The examples given in this
Owner's Manual apply to vehicles equipped
with COMAND Online.
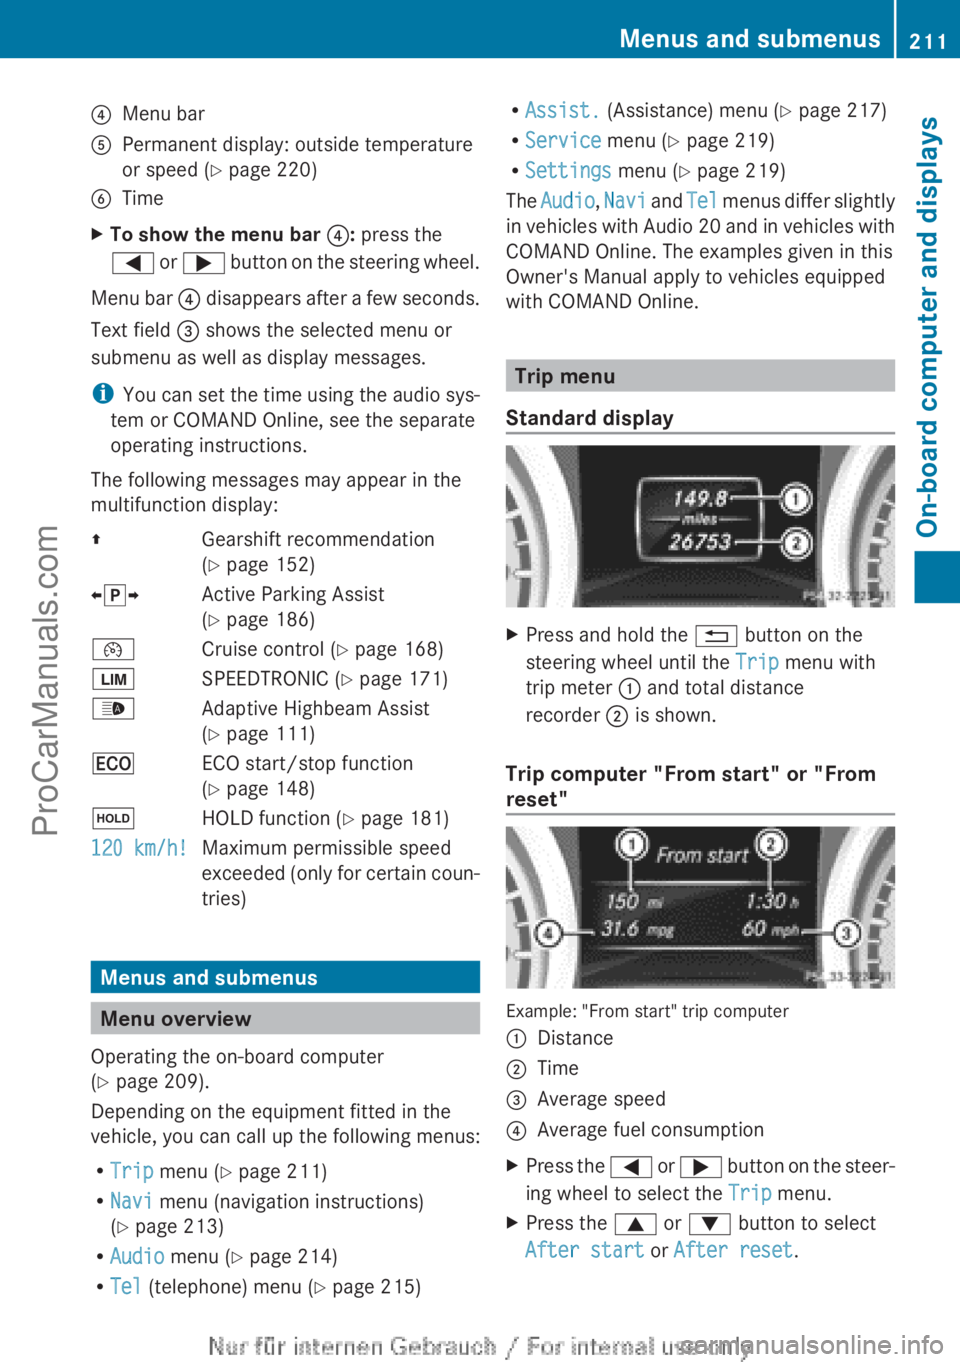
Trip menu
Standard display
XPress and hold the % button on the
steering wheel until the Trip menu with
trip meter : and total distance
recorder ; is shown.
Trip computer "From start" or "From
reset"
Example: "From start" trip computer
:Distance;Time=Average speed?Average fuel consumptionXPress the = or ; button on the steer-
ing wheel to select the Trip menu.XPress the 9 or : button to select
After start or After reset .Menus and submenus211On-board computer and displaysZProCarManuals.com
Page 214 of 352
The values in the From start submenu are
calculated from the start of a journey, whilst
the values in the From reset submenu are
calculated from the last time the submenu
was reset ( Y page 212).
The From start trip computer is automati-
cally reset when:
R the ignition has been switched off for more
than four hours.
R 999 hours have been exceeded.
R 9,999 kilometres have been exceeded.
If the value exceeds 9,999 hours or
99,999 kilometres, the From reset trip com-
puter is automatically reset.
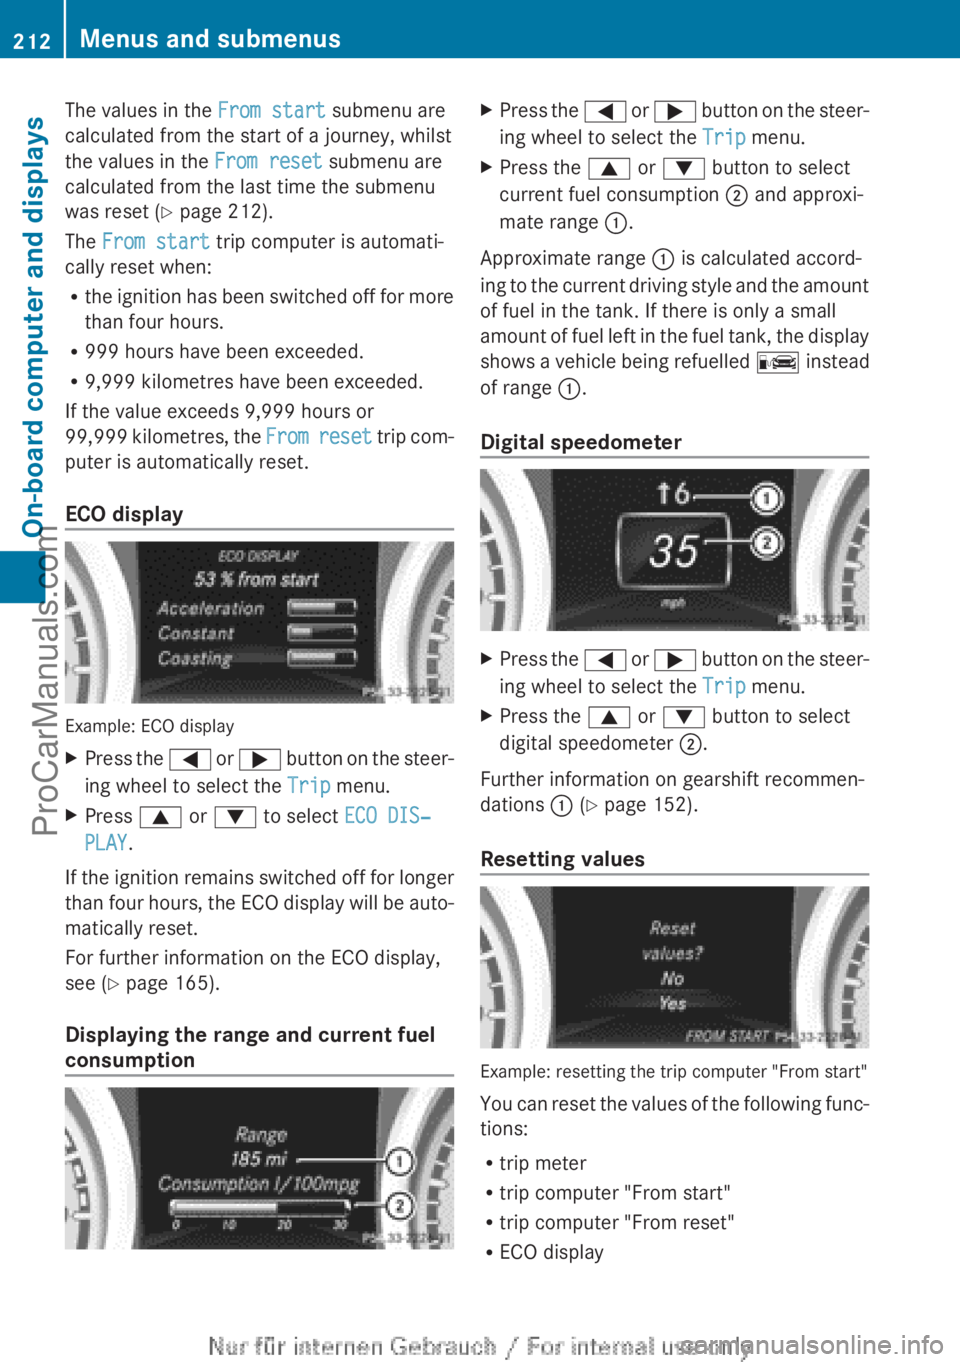
ECO display
Example: ECO display
XPress the = or ; button on the steer-
ing wheel to select the Trip menu.XPress 9 or : to select ECO DIS‐
PLAY .
If the ignition remains switched off for longer
than four hours, the ECO display will be auto-
matically reset.
For further information on the ECO display,
see ( Y page 165).
Displaying the range and current fuel
consumption
XPress the = or ; button on the steer-
ing wheel to select the Trip menu.XPress the 9 or : button to select
current fuel consumption ; and approxi-
mate range :.
Approximate range : is calculated accord-
ing to the current driving style and the amount
of fuel in the tank. If there is only a small
amount of fuel left in the fuel tank, the display
shows a vehicle being refuelled C instead
of range :.
Digital speedometer
XPress the = or ; button on the steer-
ing wheel to select the Trip menu.XPress the 9 or : button to select
digital speedometer ;.
Further information on gearshift recommen-
dations : (Y page 152).
Resetting values
Example: resetting the trip computer "From start"
You can reset the values of the following func-
tions:
R trip meter
R trip computer "From start"
R trip computer "From reset"
R ECO display
212Menus and submenusOn-board computer and displays
ProCarManuals.com