2013 MERCEDES-BENZ CLA-CLASS turn signal
[x] Cancel search: turn signalPage 199 of 352
Rthe traffic signs are poorly illuminated
R there are ambiguous traffic signs, for
instance near roadworks or on multi-lane
roads
Information in the multifunction display
Briefly showing detected traffic signs in
the multifunction display
XActivate the Speed Limit Assist warning
function using the on-board computer
( Y page 218).
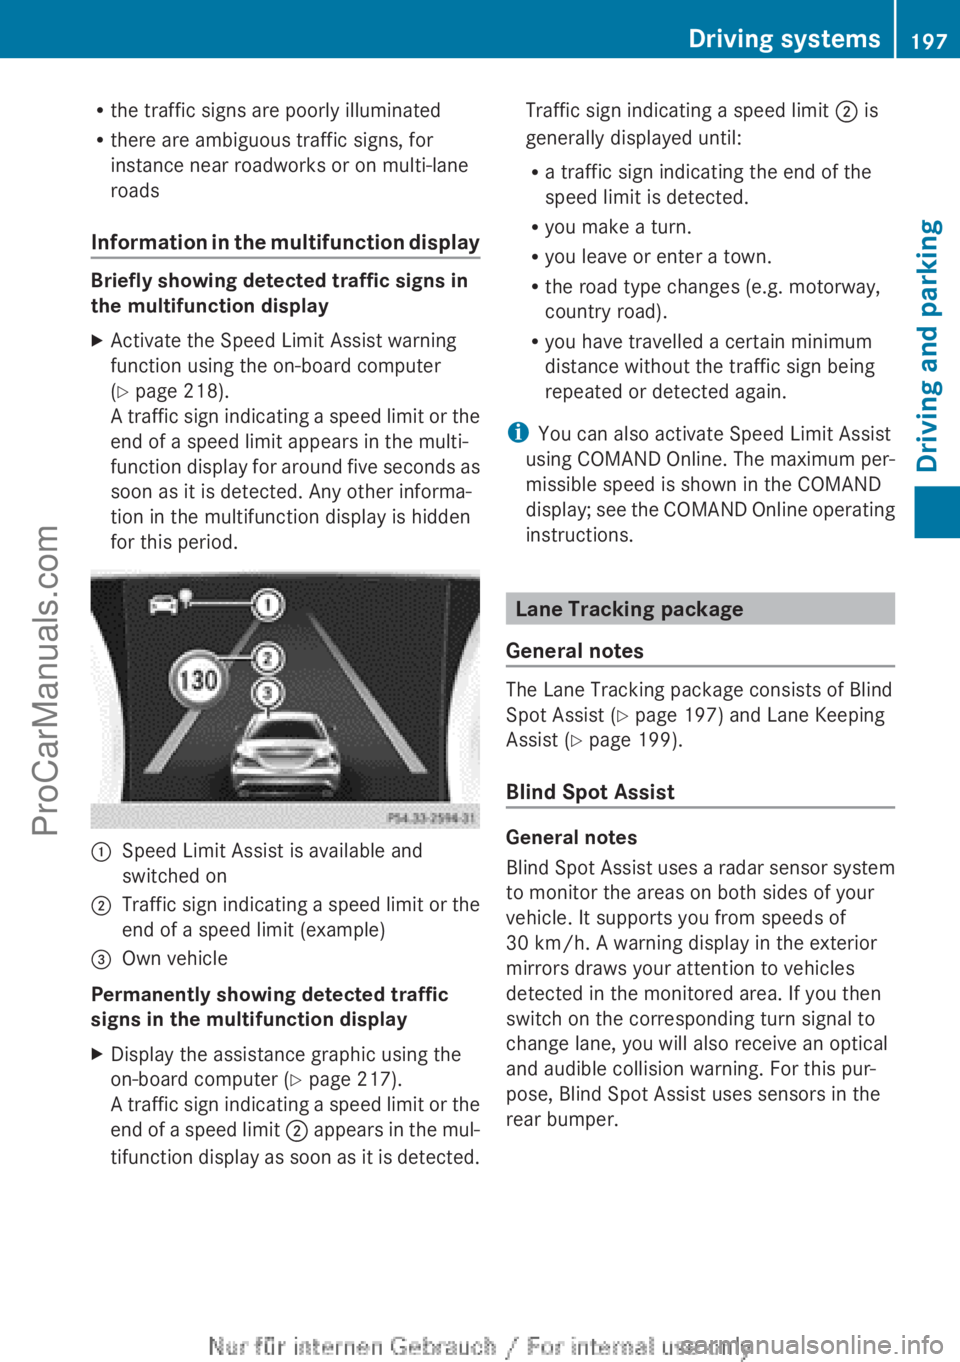
A traffic sign indicating a speed limit or the
end of a speed limit appears in the multi-
function display for around five seconds as
soon as it is detected. Any other informa-
tion in the multifunction display is hidden
for this period.:Speed Limit Assist is available and
switched on;Traffic sign indicating a speed limit or the
end of a speed limit (example)=Own vehicle
Permanently showing detected traffic
signs in the multifunction display
XDisplay the assistance graphic using the
on-board computer ( Y page 217).
A traffic sign indicating a speed limit or the
end of a speed limit ; appears in the mul-
tifunction display as soon as it is detected.Traffic sign indicating a speed limit ; is
generally displayed until:
R a traffic sign indicating the end of the
speed limit is detected.
R you make a turn.
R you leave or enter a town.
R the road type changes (e.g. motorway,
country road).
R you have travelled a certain minimum
distance without the traffic sign being
repeated or detected again.
i You can also activate Speed Limit Assist
using COMAND Online. The maximum per-
missible speed is shown in the COMAND
display; see the COMAND Online operating
instructions.
Lane Tracking package
General notes
The Lane Tracking package consists of Blind
Spot Assist ( Y page 197) and Lane Keeping
Assist ( Y page 199).
Blind Spot Assist
General notes
Blind Spot Assist uses a radar sensor system
to monitor the areas on both sides of your
vehicle. It supports you from speeds of
30 km/h. A warning display in the exterior
mirrors draws your attention to vehicles
detected in the monitored area. If you then
switch on the corresponding turn signal to
change lane, you will also receive an optical
and audible collision warning. For this pur-
pose, Blind Spot Assist uses sensors in the
rear bumper.
Driving systems197Driving and parkingZProCarManuals.com
Page 201 of 352
Indicator and warning display
Blind Spot Assist is not active at speeds below
approximately 30 km/h. Vehicles in the mon-
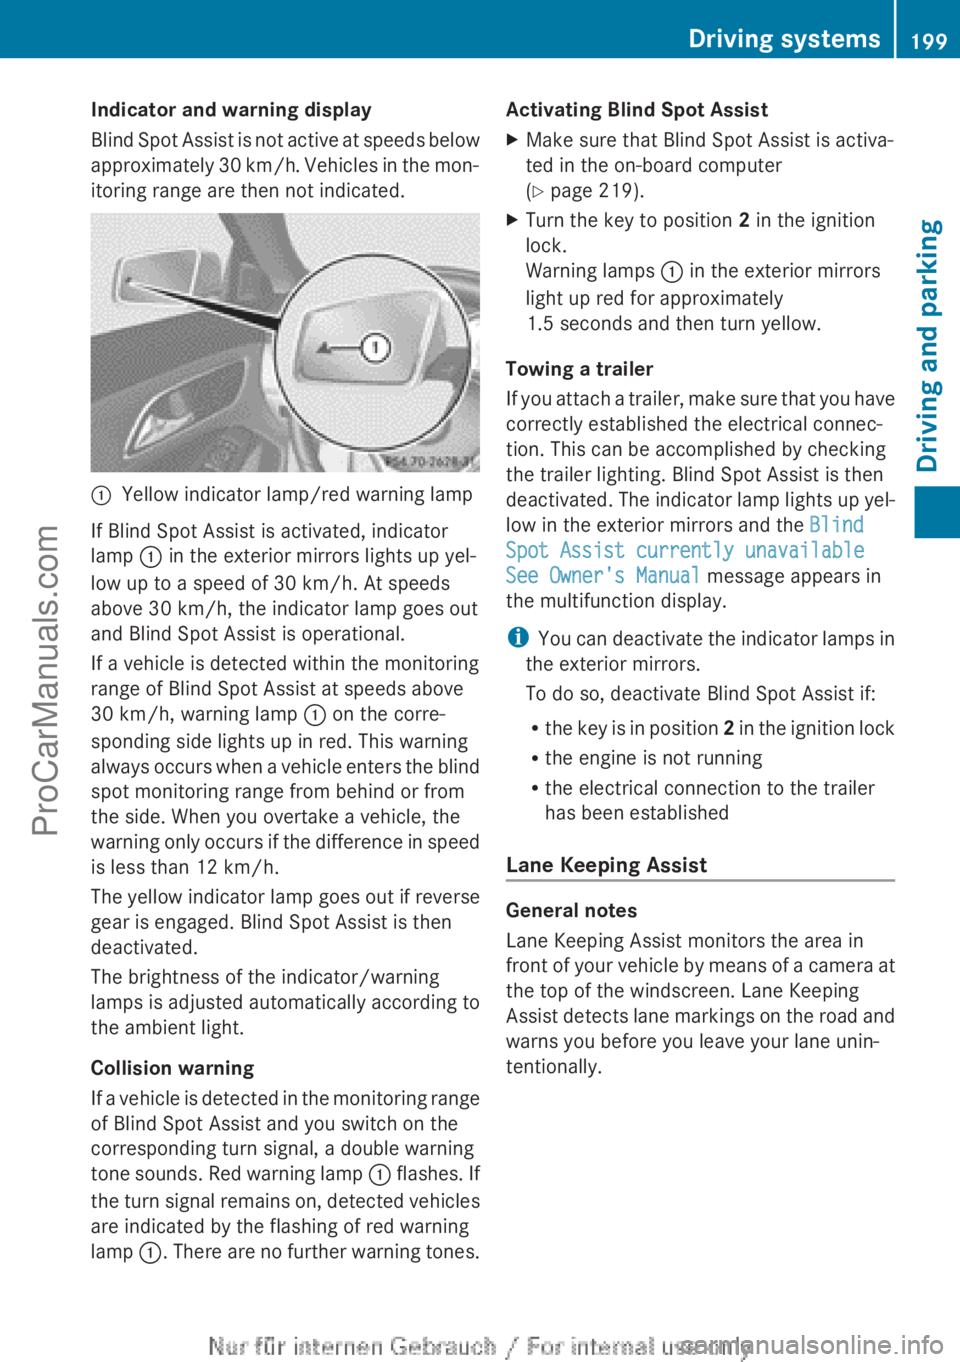
itoring range are then not indicated.:Yellow indicator lamp/red warning lamp
If Blind Spot Assist is activated, indicator
lamp : in the exterior mirrors lights up yel-
low up to a speed of 30 km/h. At speeds
above 30 km/h, the indicator lamp goes out
and Blind Spot Assist is operational.
If a vehicle is detected within the monitoring
range of Blind Spot Assist at speeds above
30 km/h, warning lamp : on the corre-
sponding side lights up in red. This warning
always occurs when a vehicle enters the blind
spot monitoring range from behind or from
the side. When you overtake a vehicle, the
warning only occurs if the difference in speed
is less than 12 km/h.
The yellow indicator lamp goes out if reverse
gear is engaged. Blind Spot Assist is then
deactivated.
The brightness of the indicator/warning
lamps is adjusted automatically according to
the ambient light.
Collision warning
If a vehicle is detected in the monitoring range
of Blind Spot Assist and you switch on the
corresponding turn signal, a double warning
tone sounds. Red warning lamp : flashes. If
the turn signal remains on, detected vehicles
are indicated by the flashing of red warning
lamp :. There are no further warning tones.
Activating Blind Spot AssistXMake sure that Blind Spot Assist is activa-
ted in the on-board computer
( Y page 219).XTurn the key to position 2 in the ignition
lock.
Warning lamps : in the exterior mirrors
light up red for approximately
1.5 seconds and then turn yellow.
Towing a trailer
If you attach a trailer, make sure that you have
correctly established the electrical connec-
tion. This can be accomplished by checking
the trailer lighting. Blind Spot Assist is then
deactivated. The indicator lamp lights up yel-
low in the exterior mirrors and the Blind
Spot Assist currently unavailable
See Owner's Manual message appears in
the multifunction display.
i You can deactivate the indicator lamps in
the exterior mirrors.
To do so, deactivate Blind Spot Assist if:
R the key is in position 2 in the ignition lock
R the engine is not running
R the electrical connection to the trailer
has been established
Lane Keeping Assist
General notes
Lane Keeping Assist monitors the area in
front of your vehicle by means of a camera at
the top of the windscreen. Lane Keeping
Assist detects lane markings on the road and
warns you before you leave your lane unin-
tentionally.
Driving systems199Driving and parkingZProCarManuals.com
Page 203 of 352
When Standard is selected, no warning vibra-
tion occurs if:
R you have switched on the turn signals. In
this event, the warnings are suppressed for
a certain period of time.
R a driving safety system intervenes, such as
ABS, BAS or ESP ®
.
When Adaptive is selected, no warning vibra-
tion occurs if:
R you have switched on the turn signals. In
this case, the warnings are suppressed for
a certain period of time.
R a driving safety system intervenes, such as
ABS, BAS or ESP ®
.
R you accelerate hard, e.g. kickdown.
R you brake hard.
R you steer actively, e.g. swerve to avoid an
obstacle or change lane quickly.
R you cut the corner on a sharp bend.
In order that you are warned only when nec-
essary and in good time if you cross the lane
marking, the system recognises certain con-
ditions and warns you accordingly.
The warning vibration occurs earlier if:
R you approach the outer lane marking on a
bend.
R the road has very wide lanes, e.g. a motor-
way.
R the system recognises solid lane markings.
The warning vibration occurs later if:
R the road has narrow lanes.
R you cut the corner on a bend.
Towing a trailer
Notes on towing a trailer
Important safety notes
GWARNING
The braking system can overheat if you leave
your foot on the brake pedal while driving.
This increases the braking distance and could
even cause the braking system to fail. There
is a risk of an accident.
Never use the brake pedal as a footrest. Do
not simultaneously depress both the brake
pedal and the accelerator pedal while driving.GWARNING
You could lose control of the vehicle/trailer
combination if it begins to swerve. The vehi-
cle/trailer combination could even overturn.
There is a risk of an accident.
On no account should you attempt to
straighten out the vehicle/trailer combina-
tion by increasing speed. Decrease your
speed and do not countersteer. Brake if nec-
essary.
GWARNING
If you exceed the permissible noseweight
while carrying a load, the carrier system could
detach from the vehicle and fall on the road.
There is a risk of an accident and injury.
Always maintain the permissible noseweight
when carrying loads.
! Depressing the brake pedal constantly
results in excessive and premature wear to
the brake pads.
If you exceed the maximum permissible nose-
weight of the trailer drawbar on the ball cou-
pling, the following may become damaged:
R your vehicle
R the trailer
R the ball coupling
R trailer tow hitch
The vehicle/trailer combination could
become unstable.
If the noseweight used is lower than the min-
imum permissible noseweight, the vehicle/
trailer combination could also become unsta-
ble.
Towing a trailer201Driving and parkingZProCarManuals.com
Page 239 of 352
Display messagesPossible causes/consequences and M Solutionsb
Trailer Left-hand
tail lamp orTrailer
Right-hand tail
lampThe left or right-hand trailer tail lamp is faulty.XObserve the separate operating instructions provided by the
trailer manufacturer.b
Trailer left indi‐
cator or Trailer
right indicatorThe left or right-hand trailer turn signal lamp is faulty.XObserve the separate operating instructions provided by the
trailer manufacturer.b
Trailer brake lampThe trailer brake lamp is faulty.XObserve the separate operating instructions provided by the
trailer manufacturer.b
Rear left indica‐
tor or Rear right
indicatorThe rear left-hand or rear right-hand turn signal is faulty.XCheck whether you are permitted to replace the bulb yourself
( Y page 114).
or
XVisit a qualified specialist workshop.b
Front left indica‐
tor or Front right
indicatorThe front left-hand or front right-hand turn signal is faulty.XCheck whether you are permitted to replace the bulb yourself
( Y page 114).
or
XVisit a qualified specialist workshop.b
Left mirror indica‐
tor or Right mir‐
ror indicatorThe turn signal in the left-hand or right-hand exterior mirror is
faulty.XCheck whether you are permitted to replace the bulb yourself
( Y page 114).
or
XVisit a qualified specialist workshop.b
3rd brake lampThe third brake lamp is faulty.XCheck whether you are permitted to replace the bulb yourself
( Y page 114).
or
XVisit a qualified specialist workshop.Display messages237On-board computer and displaysZProCarManuals.com
Page 293 of 352
Cleaning the wiper bladesGWARNING
If the windscreen wipers are set in motion
when cleaning the windscreen or wiper
blades, you could become trapped. There is a
danger of injury.
Always switch off the windscreen wipers and
the ignition before cleaning the windscreen or
wiper blades.
! Only fold the windscreen wipers away
from the windscreen when vertical. Other-
wise, you will damage the bonnet.
! Do not pull on the wiper blade. Otherwise,
the wiper blade could be damaged.
! Do not clean wiper blades too often and
do not rub them too hard. Otherwise, the
graphite coating could be damaged. This
could cause wiper noise.
XFold the wiper arms away from the wind-
screen.XClean the wiper blades carefully using a
damp cloth.XFold the windscreen wipers back again
before switching on the ignition.
! Hold the wiper arm securely when folding
back. The windscreen could be damaged if
the wiper arm hits against it suddenly.
Cleaning the exterior lighting
! Only use cleaning agents or cleaning
cloths that are suitable for plastic lenses.
Unsuitable cleaning agents or cleaning
cloths could scratch or damage the plastic
lenses of the exterior lighting.
XClean the plastic lenses of the exterior
lighting using a wet sponge and a mild
cleaning agent, e.g. Mercedes-Benz car
shampoo or cleaning cloths.Cleaning the mirror turn signal
! Only use cleaning agents or cleaning
cloths that are suitable for plastic lenses.
Unsuitable cleaning agents or cleaning
cloths could scratch or damage the plastic
lenses of the mirror turn signals.
XClean the plastic lenses of the mirror turn
signals in the exterior mirror housing using
a wet sponge and a mild cleaning agent,
e.g. Mercedes-Benz car shampoo or clean-
ing cloths.
Cleaning the sensors
! If you clean the sensors with a high-pres-
sure cleaner, make sure that you keep a
distance of at least 30 cm between the
vehicle and the high-pressure cleaner noz-
zle. Information about the correct distance
is available from the equipment manufac-
turer.
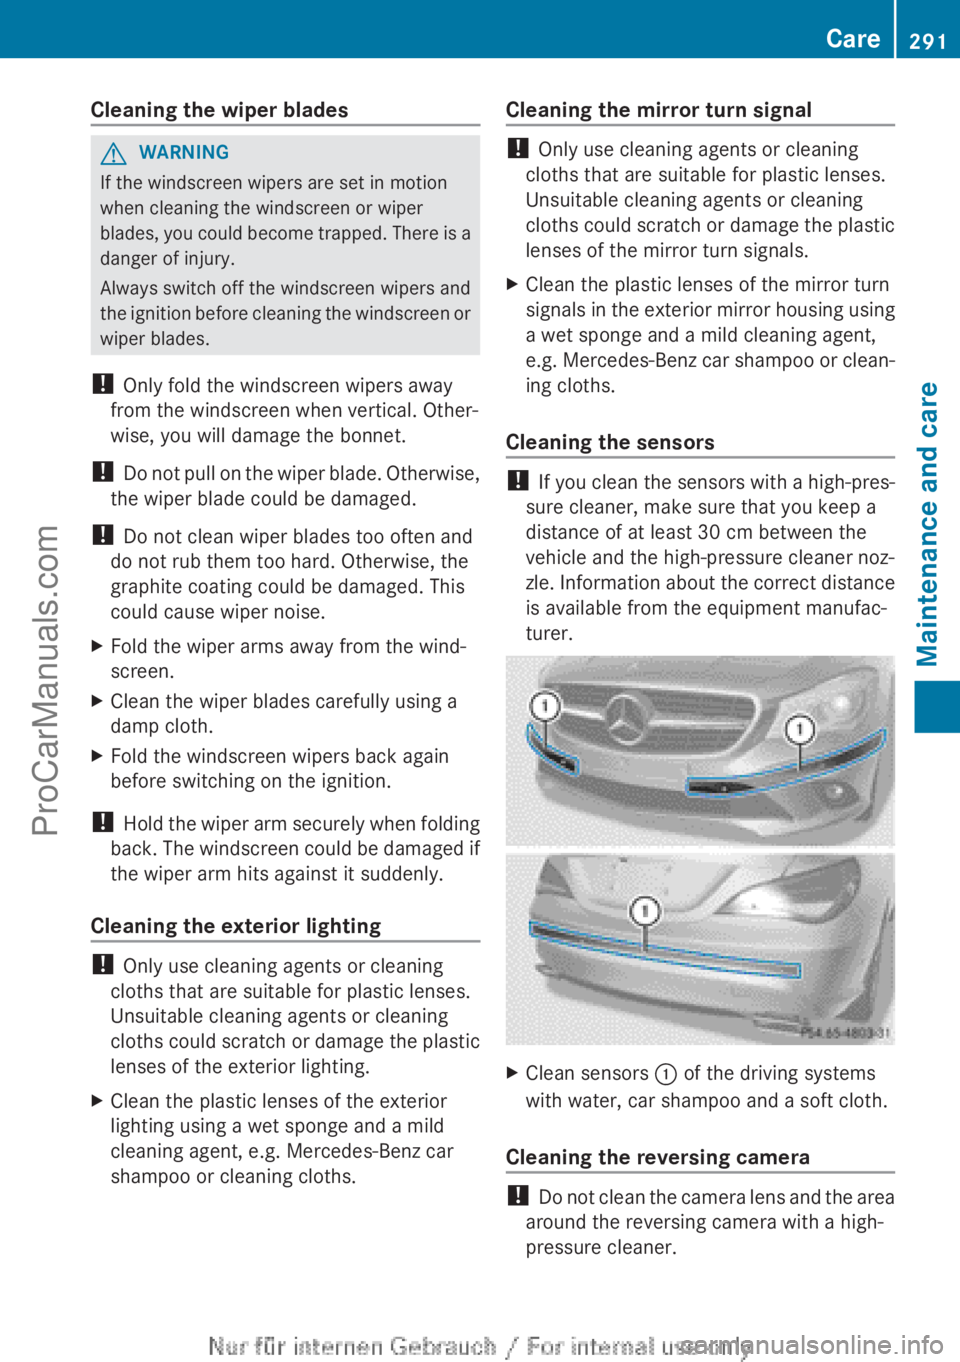
XClean sensors : of the driving systems
with water, car shampoo and a soft cloth.
Cleaning the reversing camera
! Do not clean the camera lens and the area
around the reversing camera with a high-
pressure cleaner.
Care291Maintenance and careZProCarManuals.com
Page 312 of 352
Fitting/removing the towing eye
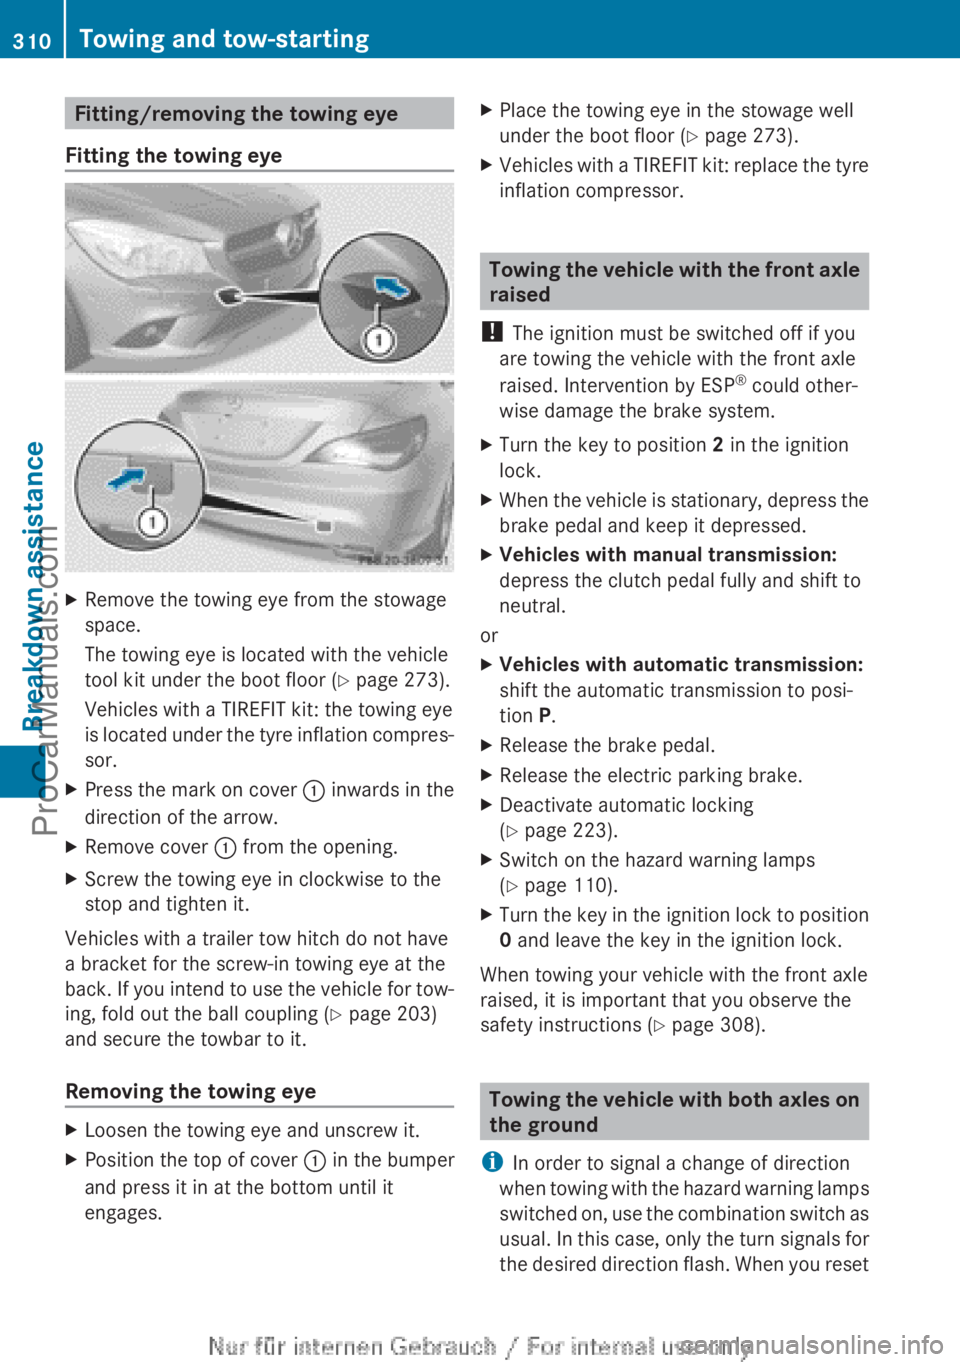
Fitting the towing eyeXRemove the towing eye from the stowage
space.
The towing eye is located with the vehicle
tool kit under the boot floor ( Y page 273).
Vehicles with a TIREFIT kit: the towing eye
is located under the tyre inflation compres-
sor.XPress the mark on cover : inwards in the
direction of the arrow.XRemove cover : from the opening.XScrew the towing eye in clockwise to the
stop and tighten it.
Vehicles with a trailer tow hitch do not have
a bracket for the screw-in towing eye at the
back. If you intend to use the vehicle for tow-
ing, fold out the ball coupling ( Y page 203)
and secure the towbar to it.
Removing the towing eye
XLoosen the towing eye and unscrew it.XPosition the top of cover : in the bumper
and press it in at the bottom until it
engages.XPlace the towing eye in the stowage well
under the boot floor ( Y page 273).XVehicles with a TIREFIT kit: replace the tyre
inflation compressor.
Towing the vehicle with the front axle
raised
! The ignition must be switched off if you
are towing the vehicle with the front axle
raised. Intervention by ESP ®
could other-
wise damage the brake system.
XTurn the key to position 2 in the ignition
lock.XWhen the vehicle is stationary, depress the
brake pedal and keep it depressed.XVehicles with manual transmission:
depress the clutch pedal fully and shift to
neutral.
or
XVehicles with automatic transmission:
shift the automatic transmission to posi-
tion P.XRelease the brake pedal.XRelease the electric parking brake.XDeactivate automatic locking
( Y page 223).XSwitch on the hazard warning lamps
( Y page 110).XTurn the key in the ignition lock to position
0 and leave the key in the ignition lock.
When towing your vehicle with the front axle
raised, it is important that you observe the
safety instructions ( Y page 308).
Towing the vehicle with both axles on
the ground
i In order to signal a change of direction
when towing with the hazard warning lamps
switched on, use the combination switch as
usual. In this case, only the turn signals for
the desired direction flash. When you reset
310Towing and tow-startingBreakdown assistance
ProCarManuals.com