2013 MERCEDES-BENZ CLA-CLASS brake
[x] Cancel search: brakePage 314 of 352
XDepress the clutch pedal fully and shift to
neutral.XRelease the brake pedal.XTow-start the vehicle.XDepress the clutch pedal fully and engage
second gear.XRelease the clutch pedal slowly without
depressing the accelerator pedal.
The engine is started.XDepress the clutch pedal fully and shift to
neutral.XStop at a suitable place.XSecure the vehicle by applying the electric
parking brake.XRemove the rigid towing bar or towing rope.XRemove the towing eye ( Y page 310).XSwitch off the hazard warning lamps.
When tow-starting, it is important that you
observe the safety notes (Y page 308) and the
legal requirements in each respective coun-
try.
Electrical fuses
Important safety notes
GWARNING
If you manipulate, bridge or replace a faulty
fuse with a fuse of a higher amperage, the
electric cables could be overloaded. This may
result in a fire. There is a risk of an accident
and injury.
Always replace faulty fuses with specified new
fuses of the correct amperage.
! Only use fuses that have been approved
for Mercedes-Benz vehicles and which
have the correct fuse rating for the system
concerned. Only use fuses marked with an
"S". Components or systems could other-
wise be damaged.
The fuses in your vehicle serve to disconnect
faulty circuits. If a fuse blows, all the compo-
nents on the circuit and their functions will
fail.
Blown fuses must be replaced with fuses of
the same rating, which you can recognise by
the colour and fuse rating. The fuse ratings
are listed in the fuse allocation chart.
If the newly inserted fuse also blows, have the
cause traced and rectified at a qualified spe-
cialist workshop, e.g. a Mercedes-Benz
Service Centre.
Before replacing a fuse
XSecure the vehicle against rolling away
( Y page 162).XSwitch off all electrical consumers.XTurn the key to position 0 in the ignition
lock and remove it ( Y page 145). All indi-
cator lamps in the instrument cluster must
be off.
The fuses are located in various fuse boxes:
R fuse box in the engine compartment on the
left-hand side of the vehicle, when viewed
in the direction of travel
R fuse box in the front-passenger footwell
The fuse allocation chart is on the fuse box in
the front-passenger footwell ( Y page 313).
Fuse box in the engine compartment
GWARNING
When the bonnet is open, and the windscreen
wipers are set in motion, you can be injured
by the wiper linkage. There is a risk of injury.
Always switch off the windscreen wipers and
the ignition before opening the bonnet.
! Make sure that no moisture can enter the
fuse box when the cover is open.
! When closing the cover, make sure that it
is lying correctly on the fuse box. Moisture
seeping in or dirt could otherwise impair
the operation of the fuses.
312Electrical fusesBreakdown assistance
ProCarManuals.com
Page 318 of 352
Useful information
i This Owner's Manual describes all mod-
els, series and optional equipment for your
vehicle that were available at the time of
going to press. National variations are pos-
sible. Note that your vehicle may not be
equipped with all of the functions descri-
bed. This is also the case for systems and
functions relevant to safety.
i Read the information on qualified special-
ist workshops: ( Y page 24).
Important safety notes
GWARNING
If wheels and tyres of the wrong size are used,
the wheel brakes or suspension components
may be damaged. There is a risk of an acci-
dent.
Always replace wheels and tyres with those
that fulfil the specifications of the original
part.
When replacing wheels, make sure to fit the
correct:
R designation
R type
When replacing tyres, make sure to fit the
correct:
R designation
R manufacturer
R type
GWARNING
A flat tyre severely impairs the driving, steer-
ing and braking characteristics of the vehicle.
There is a risk of accident.
Tyres without run-flat characteristics:
R do not drive with a flat tyre.
R immediately replace the flat tyre with your
emergency spare wheel or spare wheel, or
consult a qualified specialist workshop.
Tyres with run-flat characteristics:
R pay attention to the information and warn-
ing notices on MOExtended tyres (tyres
with run-flat characteristics).
Accessories that are not approved for your
vehicle by Mercedes-Benz or that are not
being used correctly can impair operating
safety.
Before purchasing and using non-approved
accessories, visit a qualified specialist work-
shop and enquire about:
R suitability
R legal stipulations
R factory recommendations
Information on dimensions and types of
wheels and tyres for your vehicle can be
found ( Y page 329).
Information on air pressure for the tyres on
your vehicle can be found:
R on the tyre pressure label on the fuel filler
flap
R under "Tyre pressure"
Modification work on the brake system and
wheels is not permitted. The use of wheel
spacers or brake dust shields is not permit-
ted. This invalidates the general operating
permit for the vehicle.
i Further information on wheels and tyres
can be obtained at any qualified specialist
workshop.
Operation
Information on driving
R Check the tyre pressures when the vehicle
is heavily laden and, if necessary, adjust.
R While driving, pay attention to vibrations,
noises and unusual handling characteris-
tics, e.g. pulling to one side. This may indi-
cate that the wheels or tyres are damaged.
If you suspect that a tyre is defective,
reduce your speed immediately. Stop the
vehicle as soon as possible to check the
316OperationWheels and tyres
ProCarManuals.com
Page 326 of 352
Restarting the tyre pressure monitor
When you restart the tyre pressure monitor,
all existing warning messages are deleted and
the warning lamps go out. The monitor uses
the currently set tyre pressures as the refer-
ence values for monitoring. In most cases, the
tyre pressure monitor will automatically
detect the new reference values after you
have changed the tyre pressure. However,
you can also define reference values man-
ually as described here. The tyre pressure
monitor then monitors the new tyre pressure
values.
XUse the table on the inside of the fuel filler
flap to ensure that the tyre pressure is set
correctly in all four tyres for the current
operating conditions.
Also observe the notes in the section on
tyre pressures ( Y page 319).XMake sure that the key is in position 2 in
the ignition lock.XPress the = or ; button on the steer-
ing wheel to select the Service menu.XPress the 9 or : button to select
Tyre pressure .XPress the a button.
The multifunction display shows the cur-
rent tyre pressure for the individual tyres or
the Tyre pressures will be dis‐
played after a few minutes of driv‐
ing message.XPress the : button.
The Use current pressures as new
reference values message appears in
the multifunction display.
If you wish to confirm the restart:
XPress the a button.
The Tyre press. monitor restarted
message appears in the multifunction dis-
play.
After you have driven for a few minutes, the
system checks whether the current tyre
pressures are within the specified range.The new tyre pressures are then accepted
as reference values and monitored.
If you wish to cancel the restart:
XPress the % button.
The tyre pressure values stored at the last
restart will continue to be monitored.
Changing a wheel
Flat tyre
You can find information on what to do in the
event of flat tyre in the "Flat tyre" section
( Y page 298). Information on driving with
MOExtended tyres in the event of a flat tyre
can be found under "Breakdown assistance"
( Y page 298).
Vehicles with an emergency spare
wheel: in the event of a flat tyre, the emer-
gency spare wheel is fitted according to the
description under "Fitting a wheel"
( Y page 325).
Interchanging the wheels
GWARNING
Interchanging the front and rear wheels may
severely impair the driving characteristics if
the wheels or tyres have different dimensions.
The wheel brakes or suspension components
may also be damaged. There is a risk of acci-
dent.
Interchange front and rear wheels only if the
wheels and tyres are of the same dimensions.
! On vehicles fitted with a tyre pressure
monitor, electronic components are loca-
ted in the wheel.
Tyre-fitting tools should not be applied in
the area of the valve, as this could damage
the electronic components.
Only have tyres changed at a qualified spe-
cialist workshop.
324Changing a wheelWheels and tyres
ProCarManuals.com
Page 327 of 352
Interchanging the front and rear wheels of
differing dimensions can render the general
operating permit invalid.
Always pay attention to the instructions and
safety notes when changing a wheel
( Y page 324).
The wear patterns on the front and rear tyres
differ, depending on the operating conditions.
Interchange the wheels before a clear wear
pattern has formed on the tyres. Front tyres
typically wear more on the shoulders and the
rear tyres in the centre.
On vehicles that have the same size front and
rear wheels, you can interchange the wheels
every 5,000 to 10,000 km depending on the
degree of tyre wear. Ensure the direction of
rotation is maintained.
Clean the contact surfaces of the wheel and
the brake disc thoroughly every time a wheel
is interchanged. Check the tyre pressure and,
if necessary, restart the tyre pressure loss
warning system or the tyre pressure monitor.
Direction of rotation
Tyres with a specified direction of rotation
have additional benefits, e.g. if there is a risk
of aquaplaning. You will only gain these ben-
efits if the correct direction of rotation is
observed.
An arrow on the sidewall of the tyre indicates
its correct direction of rotation.
Storing wheels
Store wheels that are not being used in a cool,
dry and preferably dark place. Protect the
tyres against oil, grease, petrol and diesel.
Cleaning the wheels
GWARNING
The water jet of circular-jet nozzles (dirt grind-
ers) can cause damage not visible from the
outside to tyres or chassis components. Com-
ponents damaged in this way can unexpect-
edly fail. There is a risk of an accident.
Do not use high-pressure cleaners with circu-
lar-jet nozzles to clean the vehicle. Have dam-
aged tyres or chassis components replaced
immediately.
Fitting a wheel
Preparing the vehicle
XStop the vehicle on solid, non-slippery and
level ground.XApply the electric parking brake manually
( Y page 163).XBring the front wheels into the straight-
ahead position.XVehicles with manual transmission:
fully depress the clutch pedal and engage
first or reverse gear.XVehicles with automatic transmission:
move the DIRECT SELECT lever to P.XSwitch off the engine.XRemove the key from the ignition lock.XIf a trailer is coupled to the vehicle, uncou-
ple it.XIf included in the vehicle equipment,
remove the tyre-change tool kit from the
vehicle.XSecure the vehicle to prevent it from rolling
away.
i Apart from certain country-specific varia-
tions, vehicles are not equipped with a tyre-
change tool kit. For information on which
tools are required to perform a wheel
change on your vehicle, consult a
Mercedes-Benz Service Centre.
Necessary wheel-changing tools can
include, for example:
R Jack
R Wheel chock
R Wheel wrench
Changing a wheel325Wheels and tyresZProCarManuals.com
Page 328 of 352
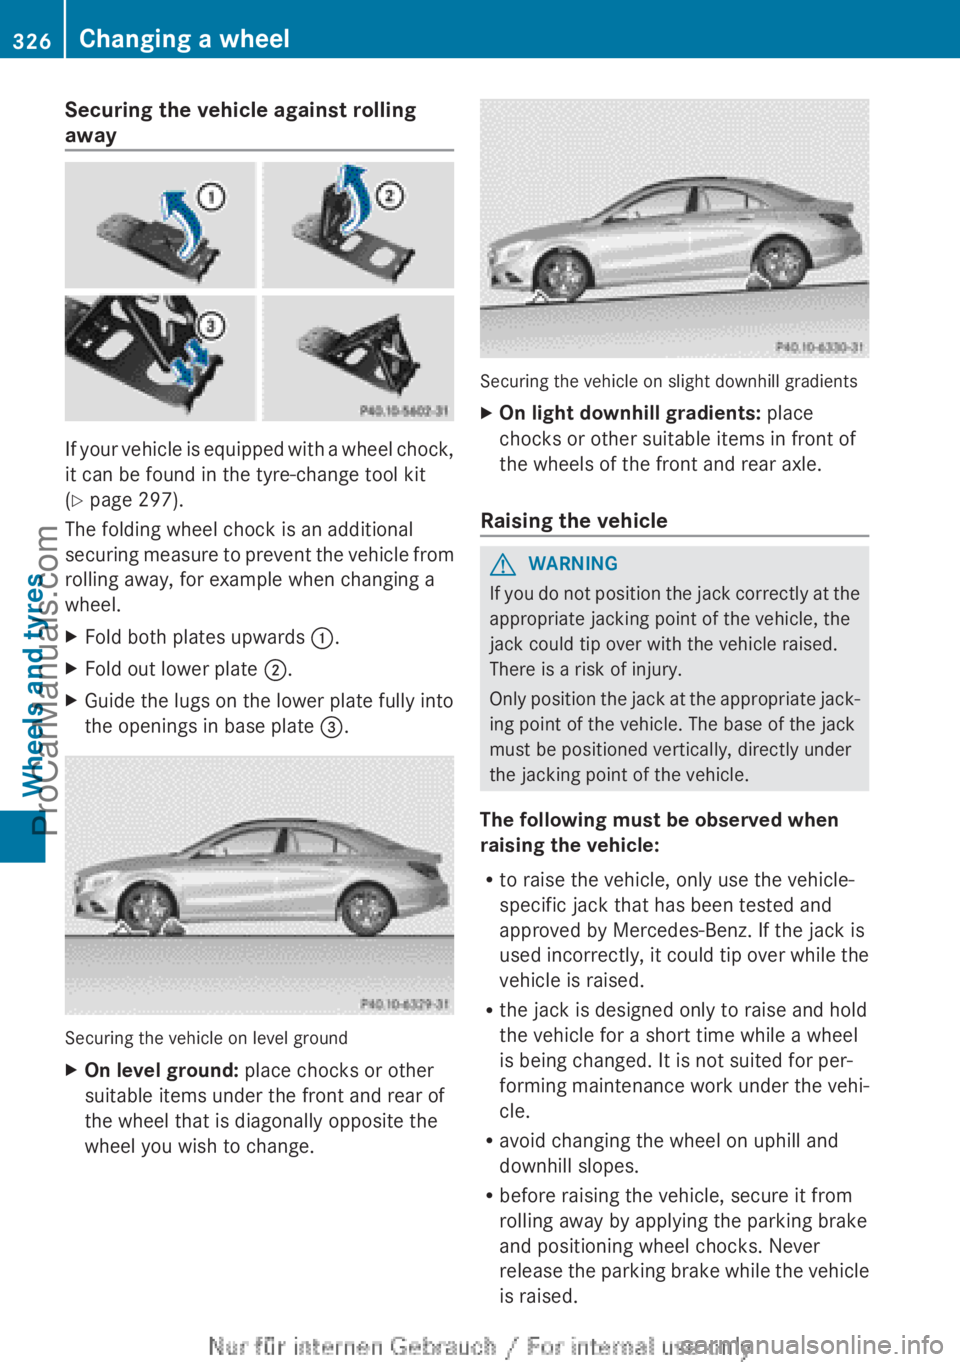
Securing the vehicle against rolling
away
If your vehicle is equipped with a wheel chock,
it can be found in the tyre-change tool kit
( Y page 297).
The folding wheel chock is an additional
securing measure to prevent the vehicle from
rolling away, for example when changing a
wheel.
XFold both plates upwards :.XFold out lower plate ;.XGuide the lugs on the lower plate fully into
the openings in base plate =.
Securing the vehicle on level ground
XOn level ground: place chocks or other
suitable items under the front and rear of
the wheel that is diagonally opposite the
wheel you wish to change.
Securing the vehicle on slight downhill gradients
XOn light downhill gradients: place
chocks or other suitable items in front of
the wheels of the front and rear axle.
Raising the vehicle
GWARNING
If you do not position the jack correctly at the
appropriate jacking point of the vehicle, the
jack could tip over with the vehicle raised.
There is a risk of injury.
Only position the jack at the appropriate jack-
ing point of the vehicle. The base of the jack
must be positioned vertically, directly under
the jacking point of the vehicle.
The following must be observed when
raising the vehicle:
R to raise the vehicle, only use the vehicle-
specific jack that has been tested and
approved by Mercedes-Benz. If the jack is
used incorrectly, it could tip over while the
vehicle is raised.
R the jack is designed only to raise and hold
the vehicle for a short time while a wheel
is being changed. It is not suited for per-
forming maintenance work under the vehi-
cle.
R avoid changing the wheel on uphill and
downhill slopes.
R before raising the vehicle, secure it from
rolling away by applying the parking brake
and positioning wheel chocks. Never
release the parking brake while the vehicle
is raised.
326Changing a wheelWheels and tyres
ProCarManuals.com
Page 339 of 352

HEnvironmental note
Dispose of service products in an environ-
mentally-responsible manner.
Service products include the following:
R Fuels (e.g. petrol, diesel)
R Lubricants (e.g. engine oil, transmission oil)
R Coolant
R Brake fluid
R Windscreen washer fluid
R Climate control system refrigerant
Components and service products must be
matched. Mercedes-Benz recommends that
you use products tested and approved by
Mercedes-Benz. They are listed in this
Mercedes-Benz Owner's Manual in the appro-
priate section.
You can identify service products approved
by Mercedes-Benz by the following inscrip-
tions on the container:
R MB-Freigabe (e.g. MB-Freigabe 229.51)
R MB Approval (e.g. MB Approval 229.51)
Other designations or recommendations indi-
cate a level of quality or a specification in
accordance with an MB Sheet Number (e.g.
MB 229.5). They have not necessarily been
approved by Mercedes-Benz.
Further information can be obtained from any
Mercedes-Benz Service Centre or on the
Internet at http://bevo.mercedes-benz.com.
Fuel
Important safety notes
GWARNING
Fuel is highly flammable. If you handle fuel
incorrectly, there is a risk of fire and explo-
sion.
You must avoid fire, naked flames, creating
sparks and smoking. Switch off the engine
and, if applicable, the auxiliary heating before
refuelling.
GWARNING
Fuels are poisonous and hazardous to health.
There is a danger of injury.
Do not swallow fuel or let it come into contact
with skin, eyes or clothing. Do not inhale fuel
vapours. Keep fuels out of the reach of chil-
dren.
If you or others come into contact with fuel,
observe the following:
R Wash the fuel off any affected areas of skin
with water and soap immediately.
R If you get fuel in your eyes, rinse them thor-
oughly with clean water immediately. Seek
immediate medical attention.
R If fuel is swallowed, seek immediate medi-
cal attention. Do not induce vomiting.
R Change any clothing that has come into
contact with fuel immediately.
Tank capacity
ModelTotal capa- cityAll models50.0 lModelOf which
reserve fuelAll modelsApprox. 6.0 l
Petrol (EN 228, E DIN 51626-1)
Fuel grade
! Do not use diesel to refuel vehicles with a
petrol engine. Do not switch on the ignition
if you accidentally refuel with the wrong
fuel. Otherwise, fuel can enter the fuel sys-
tem. Even small amounts of the wrong fuel
could result in damage to the fuel system
and the engine. Notify a qualified specialist
workshop and have the fuel tank and fuel
lines drained completely.
Service products and capacities337Technical dataZProCarManuals.com
Page 343 of 352

ModelReplacementamountCLA 180
CLA 2005.8 lCLA 2505.6 lCLA 220 CDI7.0 l
Additives
! Do not use any additives with the engine
oil. This could damage the engine.
Engine oil viscosity
Viscosity describes the flow characteristics
of a fluid. If an engine oil has a high viscosity
rating, it flows slowly; the lower the viscosity,
the faster it flows.
Engine oil selection is based on the respective
outside temperatures and in accordance with
the SAE classification (viscosity). The table
shows you which SAE classifications are to be
used. The low-temperature properties of
engine oils can be significantly impaired dur-
ing operation due to, for example, ageing or
soot and fuel accretion. It is therefore
strongly recommended to observe regular oil
changes using an approved engine oil with the
appropriate SAE classification.
Brake fluidGWARNING
The brake fluid continuously absorbs mois-
ture from the air. This results in the boiling
point of the brake fluid lowering. If the boiling
point of the brake fluid is too low, vapour
pockets may form when the brakes are sub-
jected to a heavy load. This would impair brak-
ing efficiency. There is a risk of an accident.
Have the brake fluid renewed at the prescri-
bed intervals.
When handling brake fluid, observe the
important safety notes on service products
( Y page 336).
The brake fluid change intervals can be found
in the Service Booklet.
Only use brake fluid approved by Mercedes-
Benz according to MB Approval 331.0.
Information about approved brake fluid can
be obtained at any qualified specialist work-
shop or on the Internet at:
http://bevo.mercedes-benz.com.
i Have the brake fluid regularly replaced at
a qualified specialist workshop.
Coolant
Important safety notes
GWARNING
If antifreeze comes into contact with hot com-
ponents in the engine compartment, it may
ignite. There is a risk of fire and injury.
Let the engine cool down before you top up
the antifreeze. Make sure that antifreeze is
not spilled next to the filler neck. Thoroughly
clean the antifreeze from components before
starting the engine.
! Only add coolant that has been premixed
with the desired antifreeze protection. You
could otherwise damage the engine.
Further information on coolants can be
found in the Mercedes-Benz Specifications
Service products and capacities341Technical dataZProCarManuals.com
Page 347 of 352

Trailer loads
Vehicles with manual transmission
Missing values were not available at the time of going to print.
Permissible trailer load,
braked 13Permissible
trailer load,
braked 14Permissible
trailer load, unbrakedMaximum drawbar nose-
weight 15Permissible
rear axle
load when towing a trailerCLA 180CLA 200
Vehicles with automatic transmission
Missing values were not available at the time of going to print.
Permissible trailer load,
braked 13Permissible
trailer load,
braked 14Permissible
trailer load, unbrakedMaximum drawbar nose-
weight 15Permissible
rear axle
load when towing a trailerCLA 180CLA 200CLA 250CLA 220 CDI13 At a minimum gradient-climbing capability of 8% from a standstill.
14 At a minimum gradient-climbing capability of 12% from a standstill.
15 The drawbar noseweight is not included in the trailer load.Trailer tow hitch345Technical dataZProCarManuals.com