2013 MERCEDES-BENZ C-Class SEDAN buttons
[x] Cancel search: buttonsPage 104 of 358

Adjusting the steering wheel
manually
0002
Release lever
0003 To adjust the steering wheel height
0022 To adjust the steering wheel position
(fore-and-aft adjustment)
X Push release lever 0002down completely.
The steering column is unlocked.
X Adjus tthe steering wheel to the desired
position.
X Push release lever 0002up completely.
The steering column is locked.
X Check if the steering column is locked.
When doing so, try to push the steering
wheel up or down or try to move it in the
fore-and-aft direction. Adjusting the steering wheel
electrically
0002
To adjust the steering wheel height
0003 To adjust the steering wheel position
(fore-and-aft adjustment) i
Further related subjects:
R EASY-ENTRY/EXIT feature
(Y page 102)
R Storing settings (Y page 106) EASY-ENTRY/EXIT feature
Important safety notes G
WARNING
Make sure that nobody can become trapped
when you activate the EASY-ENTRY/EXIT
feature.
If there is a risk of someone becoming
trapped, stop the adjustment procedure. To
halt the procedure:
R press the steering column adjustment
button.
R press one of the memory function position
buttons.
The steering column stops moving
immediately.
Do not keep the memory function position
button pressed as this will start the memory
function and set the steering wheel and seat
in motion.
Do not leave children unattended in the
vehicle. They could open the driver's door and
thereby unintentionally activate the EASY-
ENTRY/EXIT feature and become trapped. G
WARNING
Let the system complete the adjustment
procedure before setting the vehicle in
motion. All steering wheel adjustment must
be completed before setting the vehicle in
motion. Driving off with the steering wheel
still adjusting could cause the driver to lose
control of the vehicle.
The EASY-ENTRY/EXIT feature makes getting
in and out of your vehicle easier.
You can activate and deactivate the EASY-
ENTRY/EXIT feature in the on-board
computer (Y page 211).102
Steering wheelSeats, steering wheel and mirrors
Page 130 of 358

USA only
0002
To set the temperature, left (Y page 133)
0003 To defrost the windshield (Y page 134)
0022 To switch maximum cooling on/off (Y page 135)
0021 To switch cooling with air dehumidification on/off (Y page 131)
001F To switch the rear window defroster on/off (Y page 135)
0020 To set the temperature, right (Y page 133)
0012 To activate/deactivate air-recirculation mode (Y page 136)
0013 To set the air distribution (Y page 133)
0014 To increase the airflow (Y page 134)
0015 To reduce the airflow (Y page 134)
0016 To switch climate control on/off (Y page 131)
0018 To set climate control to automatic (Y page 132)Notes on using dual-zone automatic
climate control
Automatic climate control The following contains notes and
recommendations on optimum use of dual-
zone automatic climate control.
R
Activate climate control using the 0004and
0005 buttons. The indicator lamps in the
0004 and0005 buttons light up.
R Set the temperature to 72 ‡ (22 †). R
Only use the "windshield defrosting"
function briefly until the windshield is clear
again.
R Only use air-recirculation mode briefly, e.g.
if there are unpleasant outside odors or
when in a tunnel. The windows could
otherwise fog up, since no fresh air is drawn
into the vehicle in air-recirculation mode.
R Use the ZONE function to adopt the
temperature settings on the driver's side
for the front-passenger side as well.T he
indicator lamp in the 0003button goes out. 128
Overview of climate control systemsClimate control
Page 133 of 358

Notes on using 3-zone automatic
climate control
Automatic climate control The following contains instructions and
recommendations to enable you to ge tthe
most out of your automatic climate control.
R Activate climate control using the 0004and
0005 buttons. The indicator lamps in the
0004 and0005 buttons light up.
R In automatic mode, you can also use the
000A button to adjust airflow (FOCUS/
MEDIUM/DIFFUSE). The MEDIUM level is
recommended.
R Set the temperature to 72 ‡ (22 †).
R Only use the "windshield defrosting"
function briefly until the windshield is clear
again.
R Only use air-recirculation mode briefly, e.g.
if there are unpleasant outside odors or
when in a tunnel. The windows could
otherwise fog up, since no fresh air is drawn
into the vehicle in air-recirculation mode.
R Use the ZONE function to adopt the
temperature settings on the driver's side
for the front-passenger side and the rear
compartmenta s well.The indicator lamp in
the 0003 button goes out.
R Use the residual heat function if you want
to heat or ventilate the vehicle interior
when the ignition is switched off. The
residual heat function can only be activated
or deactivated with the ignition switched
off.
ECO start/stop function During automatic engine switch-off, the ECO
start/stop function only operates at a
reduced capacity. If you require the full
climate control output, you can switch off the
ECO start/stop function by pressing the ECO
button (Y page 146).
i The ECO start/stop function is not
available on AMG vehicles. Operating the climate control
systems
Switching climate control on/off
Points to observe before use When the climate control is switched off, the
air supply and air circulation are also
switched off. Only use this setting for a brief
period. The windows could otherwise fog up.
Only switch off climate control briefly to
prevent the windows from fogging up.
i
Switch on climate control primarily using
the 0004 button (Y page 132).
Activating/deactivating X
Turn the SmartKey to position 2in the
ignition lock (Y page 141).
X To activate: press the0004button.
The indicator lamp in the 0004button lights
up. Airflow and air distribution are set to
automatic mode.
or
X Press the 000Cbutton.
The indicator lamp in the 000Cbutton goes
out. The previously selected settings are
restored.
X To deactivate: press the000Cbutton.
The indicator lamp in the 000Cbutton lights
up. Activating/deactivating cooling with
air dehumidification
Points to observe before use If you switch off the cooling function, the
vehicle will not be cooled when weather
conditions are warm. The windows can fog up
more quickly. Only deactivate the cooling
with air dehumidification function for a short
time to prevent the windows from fogging up.
The cooling with air dehumidification function
is only available when the engine is running.
The air inside the vehicle is cooled andOperating the climate control systems
131Climate control
Page 136 of 358

Adjusting
X
Turn the SmartKey to position 2in the
ignition loc k(Ypage 141).
X Press the 0015button repeatedly until the
desired symbol appears in the display.
The indicator lamp in the 0004button goes
out. Automatic control is deactivated and
the air distribution is controlled according
to the selected setting. Setting the airflow
X Turn the SmartKey to position 2in the
ignition lock (Y page 141).
X To increase/reduce: press the0017or
0016 button.
i You can use 3-zone automatic climate
control to set the airflow in the rear
compartment separately.
If the battery is not sufficiently charged,
blower output may be reduced. As soon as
the battery is sufficiently charged, full blower
output will be available. Switching the ZONE function on/off
This function is only available in vehicles for
Canada.
X To activate: press the0003button.
The indicator lamp in the 0003button lights
up.
Dual-zone automatic climate control: the
temperature setting for the driver's side is
not adopted for the front-passenger side.
3-zone automatic climate control: the
temperature setting for the driver's side is
not adopted for the front-passenger side
and the rear compartment.
When the buttons for temperature, airflow or
air distribution are activated, the temperature
setting for the driver's side is not adopted for
the other climate control zones. X
To deactivate: press the0003button.
The indicator lamp in the 0003button goes
out.
Dual-zone automatic climate control: the
temperature setting for the driver's side is
adopted for the front-passenger side.
3-zone automatic climate control: the
temperature setting for the driver's side is
adopted for the front-passenger side and
the rear compartment. Defrosting the windshield
You can use this function to defrost the
windshield or to defrost the inside of the
windshield and the side windows.
i You should only select the "windshield
defrosting" function until the windshield is
clear again.
X Turn the SmartKey to position 2in the
ignition lock (Y page 141).
X To activate: press the0007button.
The indicator lamp in the 0007button lights
up.
The climate control system switches to the
following functions:
R high airflow
R high temperature
R air distribution to the windshield and
fron tside windows
R air-recirculation mode off
If the battery is not sufficiently charged,
blower output may be reduced. As soon as
the battery is sufficiently charged, full blower
output will be available.
X To deactivate: press the0007button.
The indicator lamp in the 0007button goes
out. The previously selected settings are
restored. Air-recirculation mode remains
deactivated.
or 134
Operating the climate control systemsClimate control
Page 201 of 358
Under normal operating conditions and with
the specified coolant level, the coolant
temperature may rise to 248 ‡ (120 †).
!
Adisplay message is shown if the coolant
temperature is too high.
If the coolant temperature is over
248 ‡(120 †), do not continue driving. The
engine will otherwise be damaged. Tachometer
The red band in the tachometer indicates the
engine's overrevving range.
! Do not drive in the overrevving range, as
this could damage the engine.
The fuel supply is interrupted to protect the
engine when the red band is reached. Outside temperature display
You should pay special attention to road
conditions when temperatures are around
freezing point.
The outside temperature display is in the
multifunction display (Y page 200).
Changes in the outside temperature are
displayed after a shor tdelay. Speedometer with segments
The segments in the speedometer indicate
which speed range is available.
R Cruise control activated (Y page 165):
The segments light up from the stored
speed to the maximum speed.
R DISTRONIC PLUS activated (Y page 167):
One or two segments in the set speed
range light up.
R DISTRONIC PLUS detects avehicle in front:
The segments between the speed of the
vehicle in fron tand the stored speed light
up. Operating the on-board computer
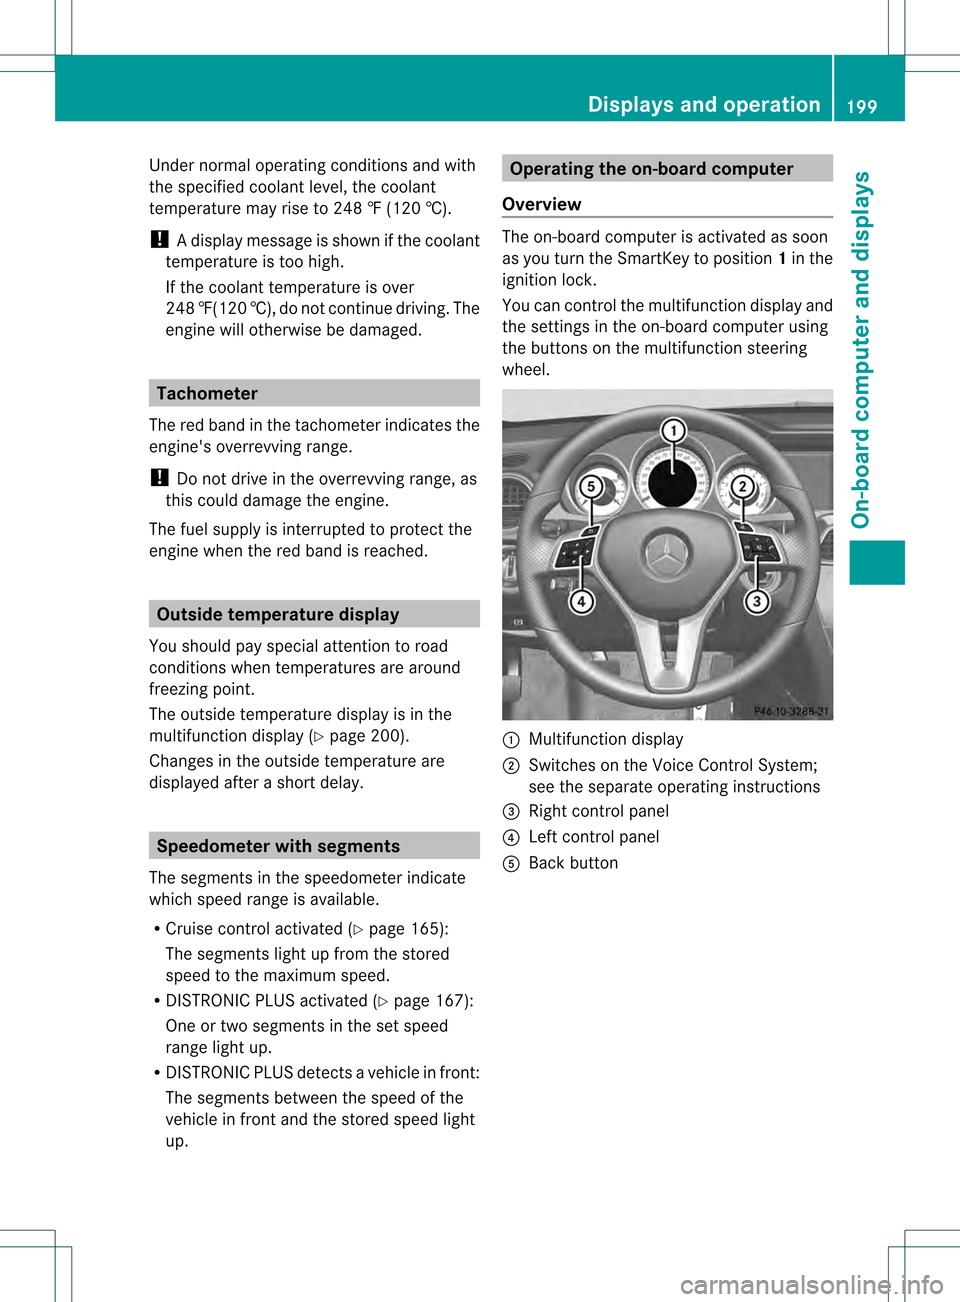
Overview The on-board compute
ris activated as soon
as you turn the SmartKey to position 1in the
ignition lock.
You can control the multifunction display and
the settings in the on-board computer using
the buttons on the multifunction steering
wheel. 0002
Multifunction display
0003 Switches on the Voice Control System;
see the separate operating instructions
0022 Right control panel
0021 Left control panel
001F Back button Displays and operation
199On-board computer and displays Z
Page 213 of 358

Vehicle
Activating/deactivating the automatic
doo rlocking mechanism
X Press the 0002or0005 button on the
steering wheel to selec tthe Sett. menu.
X Press the 0004or0003 button to select the
Vehicle submenu.
X Press 000Bto confirm.
X Press the 0004or0003 button to select the
Auto. Door Locks function.
When the Auto. Door Locks function is
activated, the vehicle doors are displayed
in red in the multifunction display.
X Press the 000Bbutton to save the setting.
If you activate the Auto. Door Locks function, the vehicle is centrally locked above
a speed of around 9 mph (15 km/h).
For further information on the automatic
locking feature, see (Y page 81).
Activating/deactivating the acoustic
locking verification signal
If you switch on the Acoustic Lock function,
an acoustic signal sounds when you lock the
vehicle.
X Press the 0002or0005 button on the
steering wheel to select the Sett. menu.
X Press the 0004or0003 button to select the
Vehicle submenu.
X Press 000Bto confirm.
X Press the 0004or0003 button to select the
Acoustic Lock function.
If the Acoustic Lock function is activated,
the 000A symbol in the multifunction
display lights up red.
X Press the 000Bbutton to save the setting.
Activating/deactivating the radar sensor
system
X Press the 0002or0005 button on the
steering wheel to select the Sett. menu.
X Press the 0004or0003 button to select the
Vehicle submenu. X
Press 000Bto confirm.
X Press the 0003or0004 button to select
Radar Sensor (See Oper. Manual): .
You will see the selected setting: Enabled or
Disabled .
X Press the 000Bbutton to save the setting.
The following systems are switched off when
the radar sensor system is deactivated:
R DISTRONIC PLUS (Y page 167)
R BAS PLUS (Y page 65)
R PRE-SAFE ®
Brake (Y page 69)
R Blind Spot Assist (Y page 186) or Active
Blind Spot Assist (Y page 190)
Convenience Activating/deactivating the EASY-
ENTRY/EXIT feature
G
WARNING
When the EASY-ENTRY/EXIT feature adjusts
the steering wheel and the driver's seat, you
and other vehicle occupants –particularly
childre n–could become trapped. There is a
risk of injury.
While the EASY-ENTRY/EXIT feature is
making adjustments, make sure that no one
has any body parts in the sweep of the seat
and the steering wheel.
If somebody becomes trapped:
R press one of the memory function position
buttons, or
R move the switch for steering wheel
adjustmen tinthe opposite direction to that
in which the steering wheel is moving.
The adjustment process is stopped.
X Press the 0002or0005 button on the
steering wheel to select the Sett. menu.
X Press the 0004or0003 button to select the
Convenience submenu.
X Press 000Bto confirm. Menus and submenus
211On-board computer and displays Z
Page 215 of 358

0022
Upshift indicator
0021 Engine oil temperature
001F Coolant temperature
Upshift indicator UP 0022
indicates that the
engine has reached the overrevving range
when in the manual gearshift program.
Upshift indicator UP 0022
fades out other
messages until you have shifted up.
If the engine oil temperature is below 176 ‡
(80 †) the oil temperature is shown in blue.
Avoid driving at full engine output during this
time.
SETUP SETUP shows the drive program, the ESP
®
(Electronic Stability Program) mode and the
SPORT handling mode.
X Press 0002or0005 on the steering wheel
to select the AMG menu.
X Press the 0003button repeatedly until
SETUP is displayed. 0002
Drive program (C /SS+ /M )
0003 ESP ®
mode (ON /OFF ) or SPORT handling
mode (SPORT )
RACETIMER Displaying and starting RACETIMER
The RACETIMER is only intended for use on a
closed race circuit. Do not use the function
on public roads.
You can use the RACETIMER to store lap
times. X
Press 0002or0005 on the steering wheel
to select the AMG menu.
X Press the 0003button repeatedly until the
RACETIMER is shown.
i If the RACETIMER is selected, the 0002
and 0005 buttons cannot be used to call up
the menu bar. 0002
Lap
0003 RACETIMER
You can start the RACETIMER when the
engine is running or if the SmartKey is in
position 2in the ignition lock.
X To start: press the 000Bbutton to start the
RACETIMER.
Displaying the intermediate time X
Press the 0002or0005 button to select
Interm. Time .
X Press 000Bto confirm.
The intermediate time is displayed for five
seconds.
Starting a new lap
X Press 000Bto confirm New Lap .Menus and submenus
213On-board computer and displays Z
Page 270 of 358

The mbrace system
To adjus
tthe volume during an mbrace call,
proceed as follows:
X Press the 0009or000A button on the
multifunction steering wheel.
or
X Use the volume controller of the audio
system/COMAND.
The mbrace system provides various
services, e.g.:
R automatic and manual emergency call
R Roadside Assistance call
R MB Info call
USA only: you can find information and a
description of all available features under
"Owners Online" at http://www.mbusa.com.
System self-test After you have switched on the ignition, the
system carries out a self-diagnosis.
Am
alfunction in the system has been
detected if one of the following occurs:
R The indicator lamp in the SO Sbutton does
not come on during the system self-test.
R The indicator lamp in the 0007Roadside
Assistance butto ndoes not light up during
self-diagnosis of the system.
R The indicator lamp in the 0009MB Info call
button does not light up during self-
diagnosis of the system.
R The indicator lamp in one or more of the
following buttons continues to light up red
after the system self-diagnosis:
- SOS button
- the 0007 Roadside Assistance call
button
- the 0009 MB Info call button
R The mbrace Inoperative or
mbrace Service Not Activated message
appears in the multifunction display after
the system self-diagnosis. If a malfunction is indicated as outlined
above, the system may not operate as
expected. In the event of an emergency, help
will have to be summoned by other means.
Have the system checked at the nearest
authorized Mercedes-Benz Center or contact
the following service hotlines:
R
USA: Mercedes-Benz Customer Assistance
Center at
1-800-FOR-MERCedes (1-800-367-6372)
or 1-866-990-9007
R Canada: Customer Service at
1-888-923-8367
Emergency call Important safety notes
!
You must have a license agreement to
activate the mbrace service. Make sure
that your system is activated and ready for
use. To register, press the 0009MB Info call
button. If any of the steps mentioned are
not carried out, the system may not be
activated.
If you have questions about the activation,
contact one of the following telephone
hotlines:
R USA: Mercedes-Benz Customer
Assistance Center at
1-800-FOR-MERCedes
(1-800-367-6372) or 1-866-990-9007
R Canada: Customer Service at
1-888-923-8367
General notes
An emergency call is dialed automatically if
an air bag or Emergency Tensioning Device is
triggered.
i You cannot end an automatically
triggered emergency call yourself.
An emergency call can also be initiated
manually.
As soon as the emergenc ycall has been
initiated, the indicator lamp in the SO Sbutton 268
FeaturesStowage and featu
res