2013 MERCEDES-BENZ B-CLASS SPORTS belt
[x] Cancel search: beltPage 211 of 336
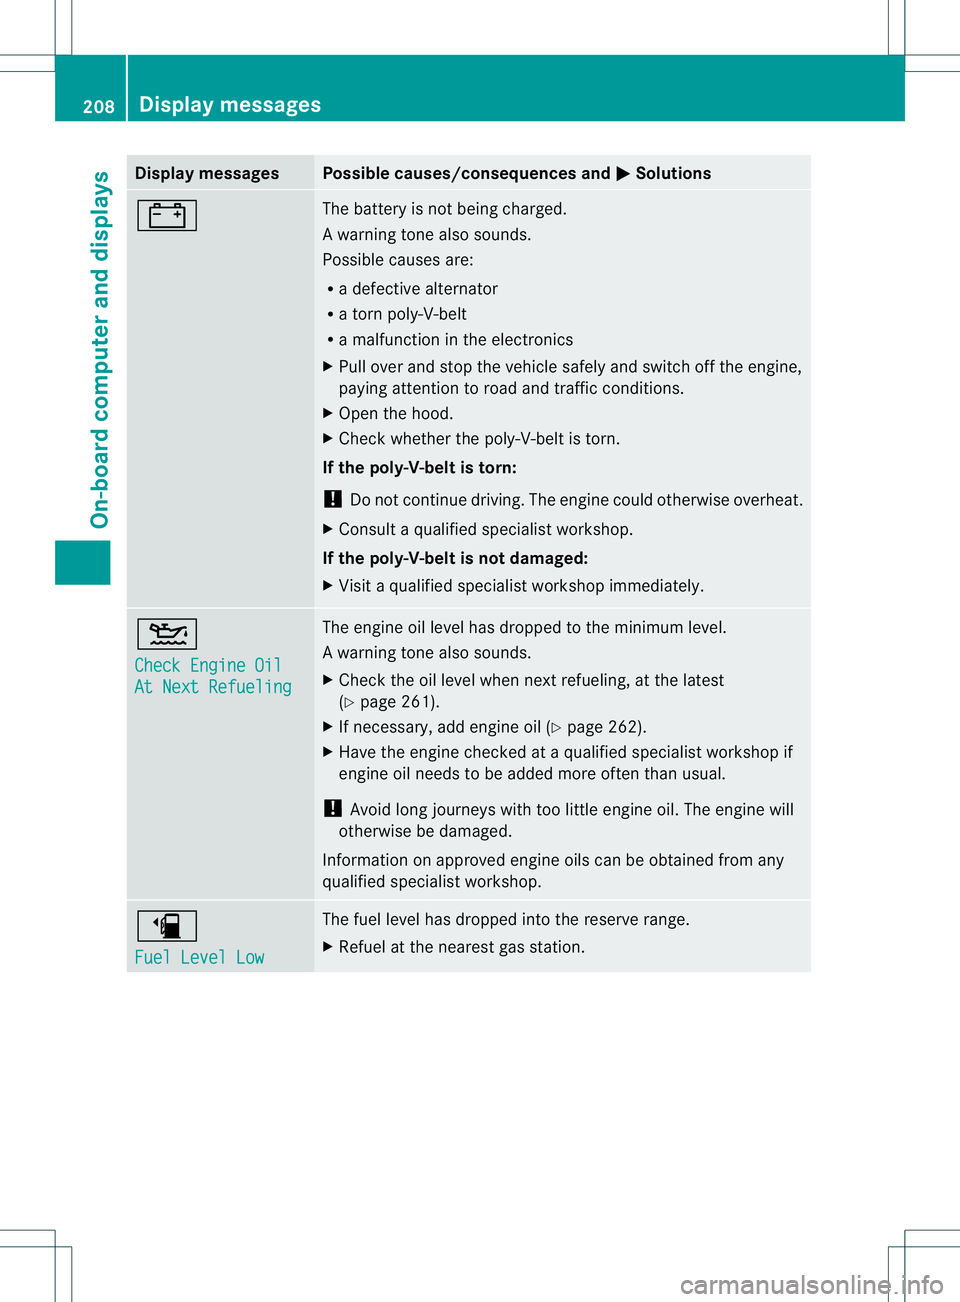
Display messages Possible causes/consequences and
M Solutions
# The battery is no
tbeing charged.
Aw arning tone also sounds.
Possible causes are:
R a defective alternator
R a torn poly-V-belt
R a malfunction in the electronics
X Pull ove rand stop the vehicle safely and switch off the engine,
paying attention to road and traffic conditions.
X Ope nthe hood.
X Check whether the poly-V-belt is torn.
If the poly-V-belt is torn:
! Do not continue driving. The engine could otherwise overheat.
X Consult a qualified specialist workshop.
If the poly-V-belt is not damaged:
X Visit a qualified specialist workshop immediately. 4
Check Engine Oil
At Next Refueling The engine oil level has dropped to the minimum level.
Aw
arning tone also sounds.
X Chec kthe oil level when next refueling, at the latest
(Y page 261).
X If necessary, add engine oil (Y page 262).
X Have the engine checked at a qualified specialist workshop if
engine oil needs to be added more often than usual.
! Avoid long journeys with too little engine oil. The engine will
otherwise be damaged.
Information on approved engine oils can be obtained from any
qualified specialist workshop. æ
Fuel Level Low The fuel level has dropped into the reserve range.
X
Refuel at the nearest gas station. 208
Display messagesOn-board computer and displays
Page 214 of 336
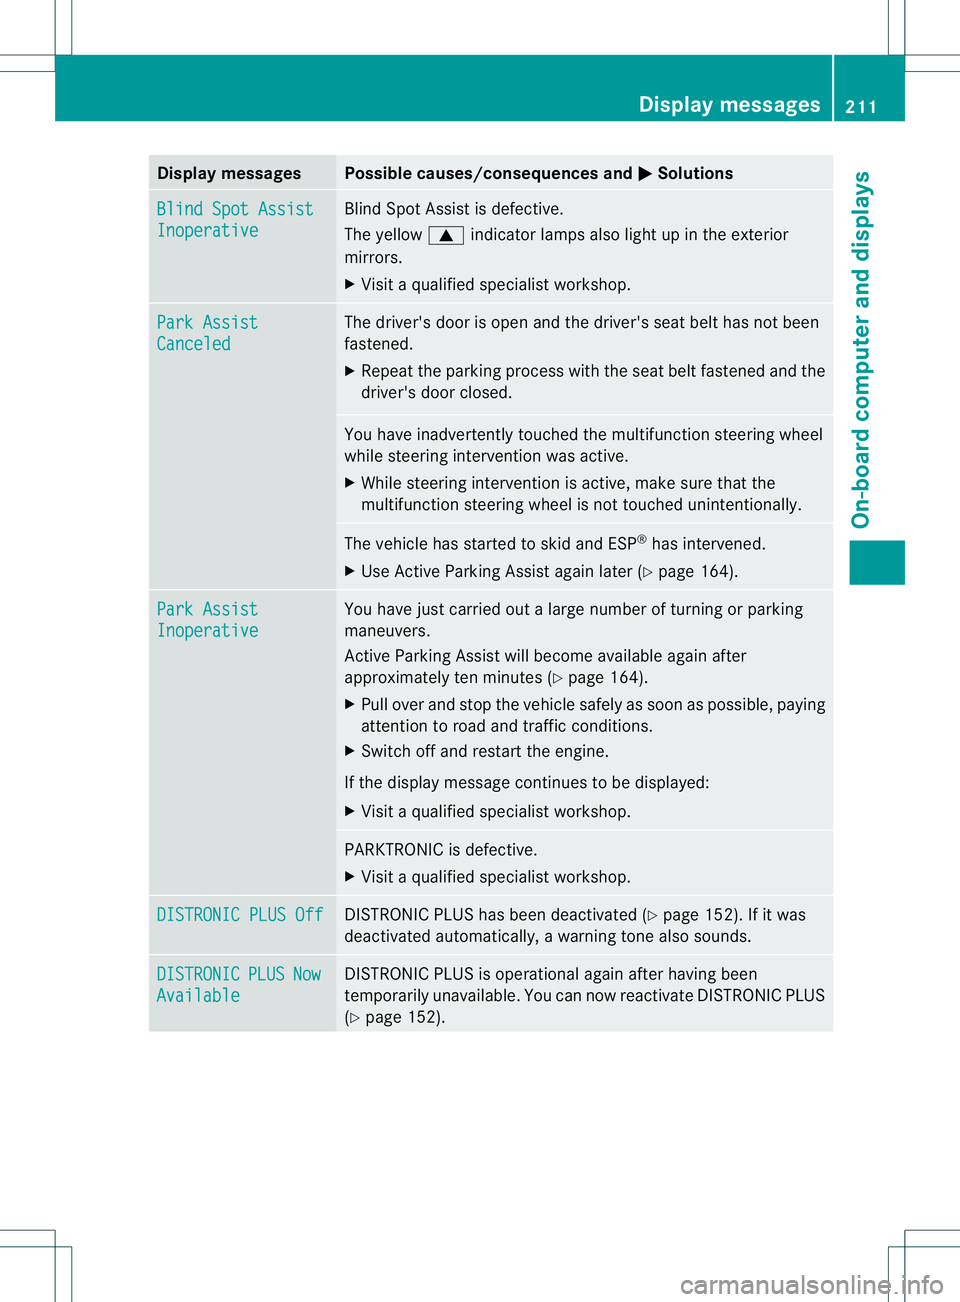
Display messages Possible causes/consequences and
M Solutions
Blind Spot Assist
Inoperative Blind Spot Assis
tis defective.
The yellow 9indicator lamps also light up in the exterior
mirrors.
X Visit a qualified specialist workshop. Park Assist
Canceled The driver's door is open and the driver's seat belt has not been
fastened.
X
Repeatt he parking process with the seat belt fastened and the
driver's door closed. You have inadvertently touched the multifunction steering wheel
while steering intervention was active.
X
While steering intervention is active, make sure that the
multifunction steering wheel is not touched unintentionally. The vehicle has started to skid and ESP
®
has intervened.
X Use Active Parking Assist again later (Y page 164).Park Assist
Inoperative You have just carried out a large number of turning or parking
maneuvers.
Active Parking Assist will become available again after
approximately ten minutes (Y
page 164).
X Pull over and stop the vehicle safely as soon as possible, paying
attention to road and traffic conditions.
X Switch off and restart the engine.
If the display message continues to be displayed:
X Visit a qualified specialist workshop. PARKTRONIC is defective.
X
Visit a qualified specialist workshop. DISTRONIC PLUS Off DISTRONIC PLUS has been deactivated (Y
page 152). If it was
deactivated automatically, a warning tone also sounds. DISTRONIC PLUS Now
Available DISTRONIC PLUS is operational again after having been
temporarily unavailable. You can now reactivate DISTRONIC PLUS
(Y
page 152). Display messages
211On-board computer and displays Z
Page 221 of 336
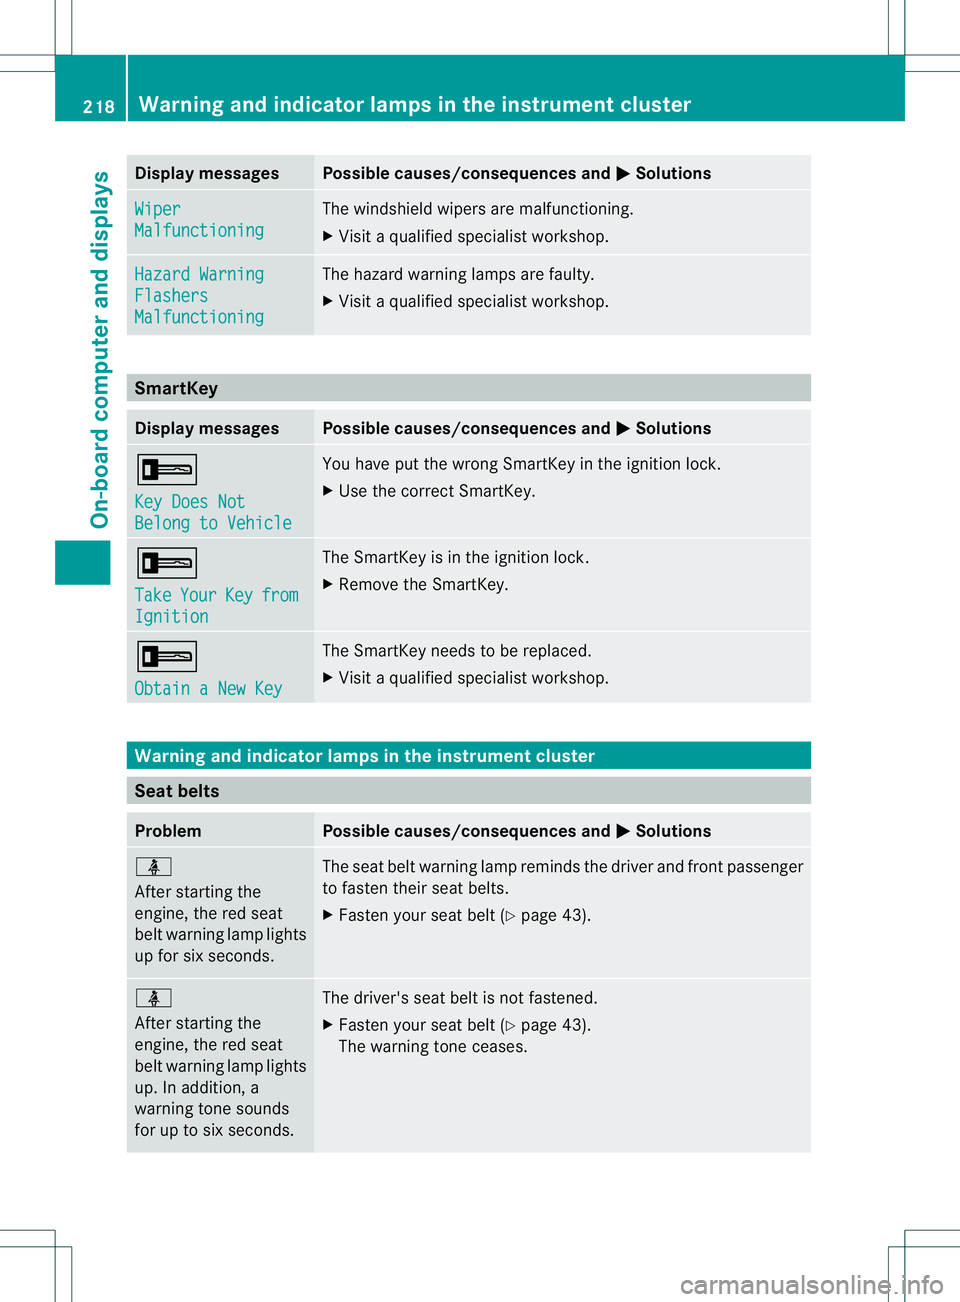
Display messages Possible causes/consequences and
M Solutions
Wiper
Malfunctioning The windshield wipers are malfunctioning.
X
Visit a qualified specialist workshop. Hazard Warning
Flashers
Malfunctioning The hazard warning lamps are faulty.
X
Visit a qualified specialist workshop. SmartKey
Display messages Possible causes/consequences and
M Solutions
+
Key Does Not
Belong to Vehicle You have put the wrong SmartKey in the ignition lock.
X
Use the correct SmartKey. +
Take
Your Key from
Ignition The SmartKey is in the ignition lock.
X
Remove the SmartKey. +
Obtain a New Key The SmartKey needs to be replaced.
X
Visit a qualified specialist workshop. Warning and indicator lamps in the instrument cluster
Sea
tbelts Problem Possible causes/consequences and
M Solutions
ü
After starting the
engine, the red seat
belt warning lamp lights
up for six seconds.
The seat belt warning lamp reminds the driver and fron
tpassenger
to fasten their seat belts.
X Faste nyour seat belt (Y page 43). ü
After starting the
engine, the red seat
belt warning lamp lights
up. In addition, a
warning tone sounds
for up to six seconds.
The driver's seat belt is not fastened.
X
Fasten your seat belt (Y page 43).
The warning tone ceases. 218
Warning and indicator lamps in the instrument clusterOn-board computer and displays
Page 222 of 336
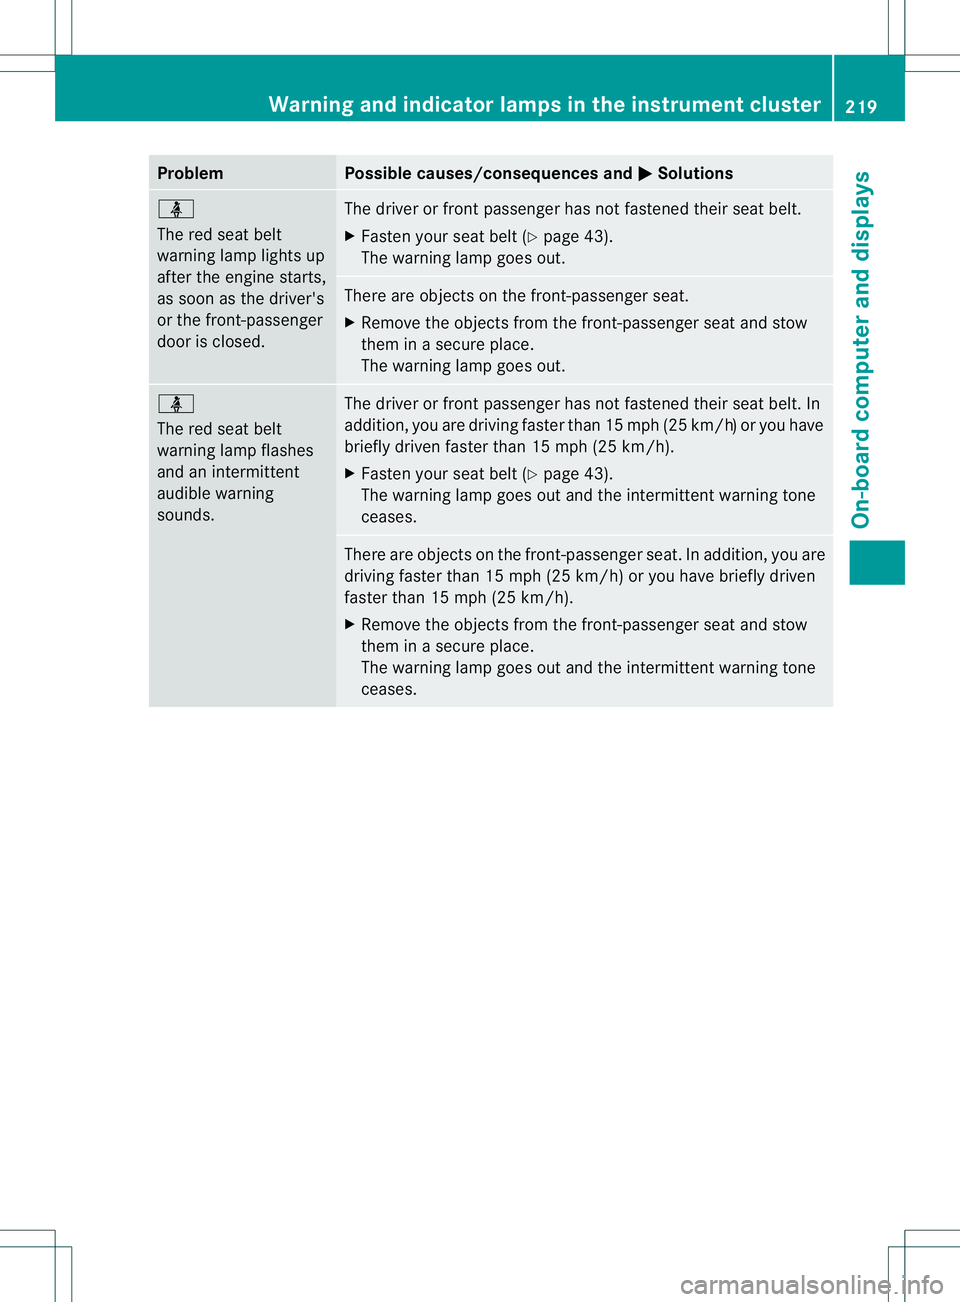
Problem Possible causes/consequences and
M Solutions
ü
The red seat belt
warning lamp lights up
after the engine starts,
as soon as the driver's
or the front-passenger
door is closed.
The driver or front passenger has not fastened their seat belt.
X
Fasten your seat belt (Y page 43).
The warning lamp goes out. There are objects on the front-passenger seat.
X
Remove the objects from the front-passenger seat and stow
them in a secure place.
The warning lamp goes out. ü
The red seat belt
warning lamp flashes
and an intermittent
audible warning
sounds.
The driver or front passenger has not fastened their seat belt. In
addition, you are driving faster than 15 mph (25 km/h)
or you have
briefly driven faster than 15 mph (25 km/h).
X Fasten your seat belt (Y page 43).
The warning lamp goes out and the intermittentw arning tone
ceases. There are objects on th
efront-passenge rseat. In addition, you are
driving faster than 15 mph (25 km/h) or you have briefly driven
faster than 15 mph (25 km/h).
X Remove the objects from the front-passenger seat and stow
them in a secure place.
The warning lamp goes out and the intermittentw arning tone
ceases. Warning and indicator lamps in the instrument cluster
219On-board computer and displays Z
Page 238 of 336
X
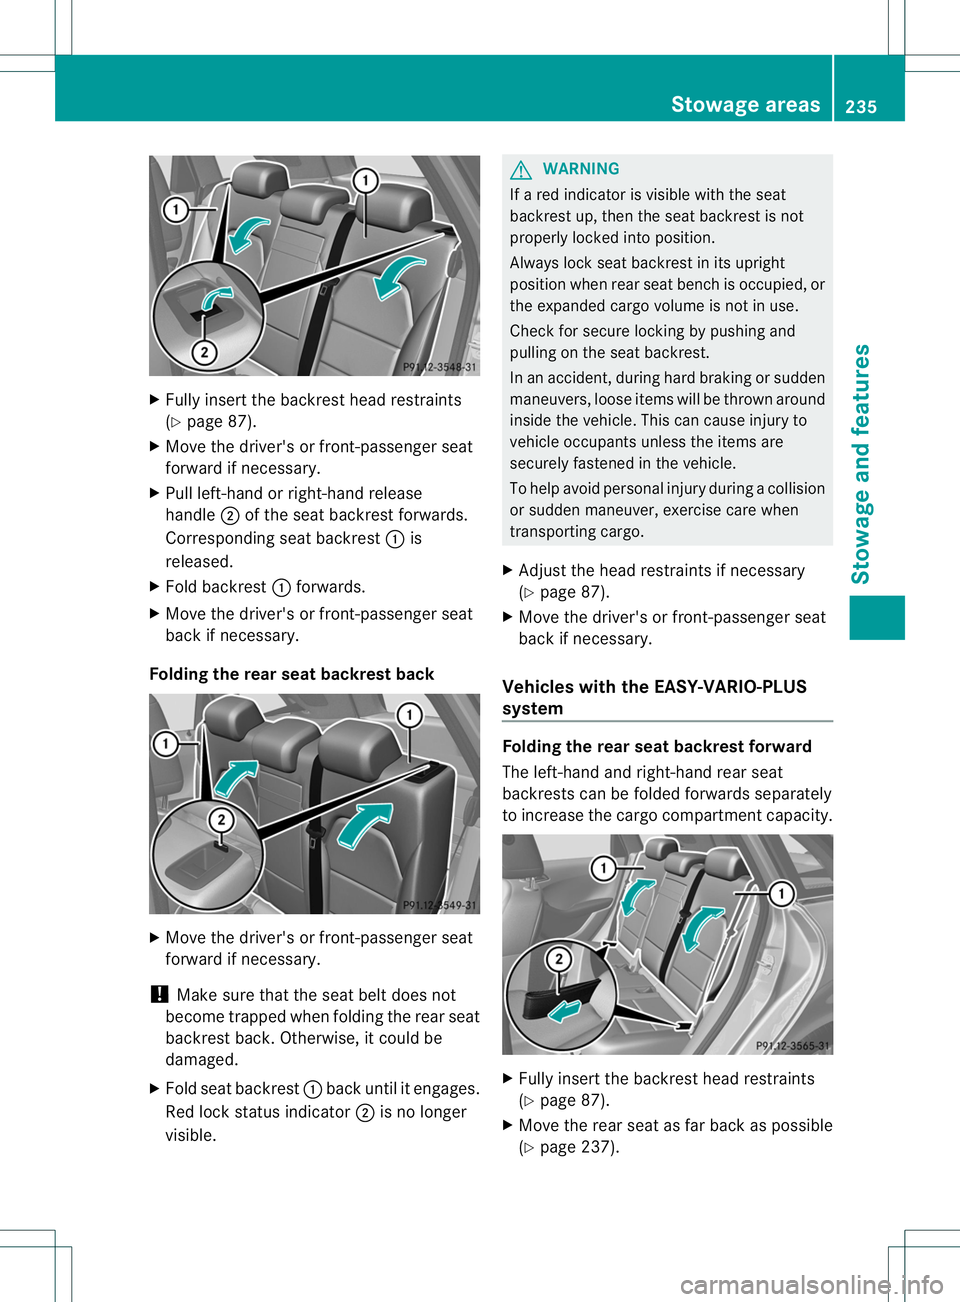
Fully insert the backrest head restraints
(Y page 87).
X Move the driver's or front-passenger seat
forward if necessary.
X Pull left-hand or right-hand release
handle ;of the seatb ackrestforwards.
Corresponding seat backrest :is
released.
X Fold backrest :forwards.
X Move the driver's or front-passenger seat
back if necessary.
Folding the rear seat backrest back X
Move the driver's or front-passenger seat
forward if necessary.
! Make sure that the seat belt does not
become trapped when folding the rear seat
backrest back. Otherwise, it could be
damaged.
X Fold seat backrest :back until it engages.
Red lock status indicator ;is no longer
visible. G
WARNING
If a red indicator is visible with the seat
backrest up, then the seat backrest is not
properly locked into position.
Always lock seat backrest in its upright
position when rear seat bench is occupied, or
the expanded cargo volume is not in use.
Check for secure locking by pushing and
pulling on the seat backrest.
In an accident, during hard braking or sudden
maneuvers, loose items will be thrown around
inside the vehicle. This can cause injury to
vehicle occupants unless the items are
securely fastened in the vehicle.
To help avoid personal injury during a collision
or sudden maneuver, exercise care when
transporting cargo.
X Adjust the head restraints if necessary
(Y page 87).
X Move the driver's or front-passenger seat
back if necessary.
Vehicles with the EASY-VARIO-PLUS
system Folding the rear seat backrest forward
The left-hand and right-hand rear seat
backrests can be folded forwards separately
to increase the cargo compartment capacity.
X
Fully insert the backrest head restraints
(Y page 87).
X Move the rear seat as far back as possible
(Y page 237). Stowage areas
235Stowage and features Z
Page 239 of 336
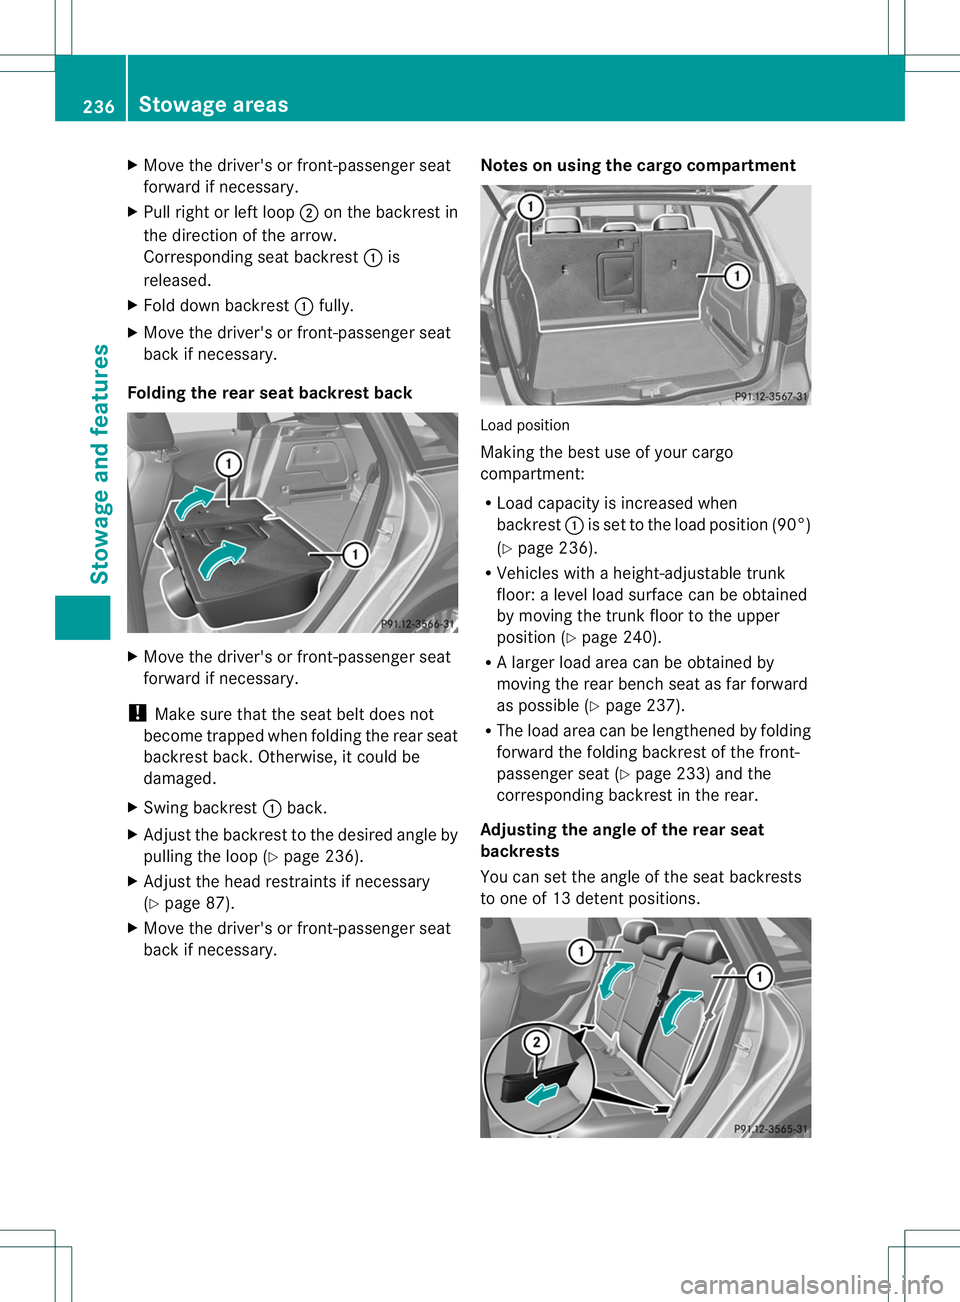
X
Move the driver's or front-passenger seat
forward if necessary.
X Pull right or left loop ;on the backrest in
the direction of the arrow.
Corresponding seat backrest :is
released.
X Fold down backrest :fully.
X Move the driver's or front-passenger seat
back if necessary.
Folding the rear seat backrest back X
Move the driver's or front-passenger seat
forward if necessary.
! Make sure that the seat belt does not
become trapped when folding the rear seat
backrest back. Otherwise, it could be
damaged.
X Swing backrest :back.
X Adjust the backrest to the desired angle by
pulling the loop (Y page 236).
X Adjust the head restraints if necessary
(Y page 87).
X Move the driver's or front-passenger seat
back if necessary. Notes on using the cargo compartment Load position
Making the best use of your cargo
compartment:
R
Load capacity is increased when
backrest :is set to the load position (90°)
(Y page 236).
R Vehicles with a height-adjustable trunk
floor: a level load surface can be obtained
by moving the trunk floor to the upper
position (Y page 240).
R Al arge rload area can be obtained by
moving the rear bench seat as far forward
as possible (Y page 237).
R The load area can be lengthened by folding
forward the folding backrest of the front-
passenger seat (Y page 233) and the
corresponding backrest in the rear.
Adjusting the angle of the rear seat
backrests
You can set the angle of the seat backrests
to one of 13 detent positions. 236
Stowage areasStowage and features
Page 242 of 336
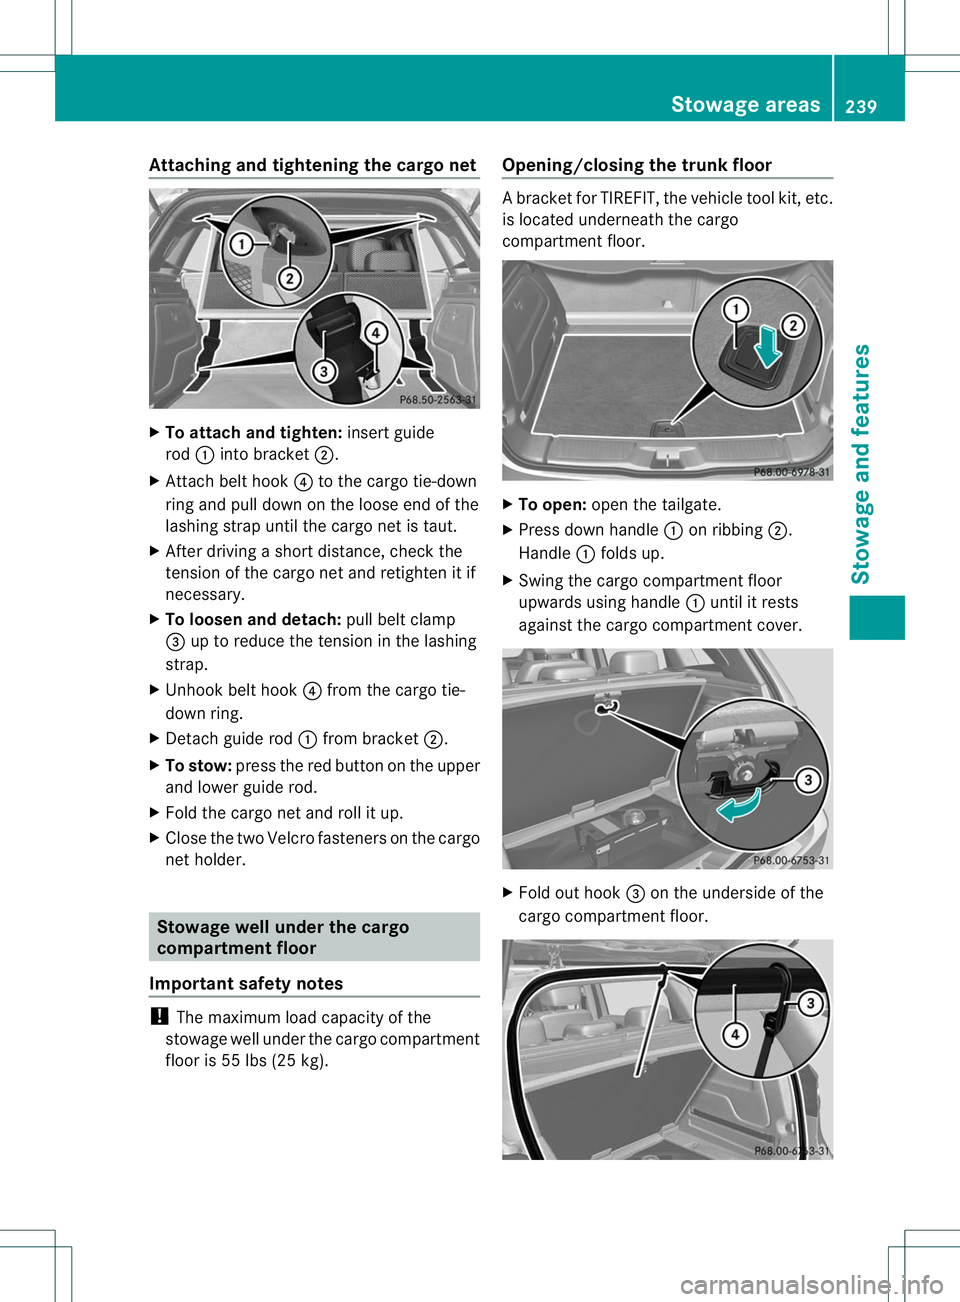
Attaching and tightening the cargo net
X
To attach and tighten: insert guide
rod :into bracket ;.
X Attach belt hook ?to the cargo tie-down
ring and pull down on th eloose end of the
lashing strap until the cargo net is taut.
X After driving a short distance, check the
tension of the cargo net and retighten it if
necessary.
X To loosen and detach: pull belt clamp
= up to reduce the tension in the lashing
strap.
X Unhook belt hook ?from the cargo tie-
down ring.
X Detach guide rod :from bracket ;.
X To stow: press the red button on the upper
and lower guide rod.
X Fold the cargo net and roll it up.
X Close the two Velcro fasteners on the cargo
net holder. Stowage well under the cargo
compartment floor
Important safety notes !
The maximum load capacity of the
stowage well under the cargo compartment
floor is 55 lbs (25 kg). Opening/closing the trunk floor Ab
racket for TIREFIT, the vehicle tool kit, etc.
is located underneath the cargo
compartment floor. X
To open: open the tailgate.
X Press downh andle:on ribbing ;.
Handle :folds up.
X Swing the cargo compartment floor
upwards using handle :until it rests
against the cargo compartment cover. X
Fold out hook =on the underside of the
cargo compartment floor. Stowage areas
239Stowage and features Z
Page 274 of 336
Benz. You can obtain these from a
qualified specialist workshop.
Seat covers of other materials
! Observe the following whe ncleaning:
R Clean artificial leathe rcovers with a cloth
moistened with a solution containing
1% detergent (e.g. dish washing liquid).
R Clean cloth covers with a microfiber
cloth moistened with a solution
containing 1% detergent (e.g. dish
washing liquid). Rub carefully and always
wipe entire seat sections to avoid leaving
visible lines. Leave the seat to dry
afterwards. Cleaning results depend on
the type of dirt and how long it has been
there.
R Clean Alcantara® covers with a damp
cloth. Make sure that you wipe entire
seat sections to avoid leaving visible
lines.
Cleaning the seat belts G
WARNING
Do not bleach or dye seat belts as this may
severely weaken them. In a crash, they may
not be able to provide adequate protection.
! Do not clean the seat belts using chemical
cleaning agents. Do not dry the seat belts
by heating at temperatures above 176 ‡
(80 †) or in direct sunlight.
X Use clean, lukewarm water and soap
solution.
Cleaning the headliner and carpets X
Headliner: if it is very dirty, use a soft brush
or a cleaning agent recommended and
approved by Mercedes-Benz.
X Carpets: use the carpet and textile
cleaning agents recommended and
approved by Mercedes-Benz. Care
271Maintenance and care Z