2013 MERCEDES-BENZ B-CLASS SPORTS oil
[x] Cancel search: oilPage 273 of 336
cleaning agents containing solvents. Cleaning
agents containing solvents cause the surface
to become porous, and as
aresult, plastic
parts may break away and be thrown around
the interior when an air bag is deployed, which
may result in severe injuries.
! Do not affix the following to plastic
surfaces:
R stickers
R films
R scented oil bottles or similar items
You can otherwise damage the plastic.
! Do not allow cosmetics, insect repellent
or sunscreen to come into contact with the
plastic trim .This maintains the high-quality
look of the surfaces.
X Wipe the plastic trim with a damp, lint-free
cloth, e.g. a microfiber cloth.
X Heavy soiling: use car care and cleaning
products recommended and approved by
Mercedes-Benz.
The surface may change color temporarily.
Wait until the surface is dry again.
Cleaning the steering wheel and gear or
selector lever X
Thoroughly wipe with a damp cloth or use
leather care agents that have been
recommended and approved by Mercedes-
Benz.
Cleaning genuine wooda nd trim
elements !
Do not use solvent-based cleaning agents
such as tar remover, wheel cleaners,
polishes or waxes. There is otherwise a risk
of damaging the surface.
! Do not use chrome polish on trim pieces.
The trim pieces have a chrome look but are
mostly made of anodized aluminum and
can lose their shine if chrome polish is
used. Use a damp, lint-free cloth instead
when cleaning the trim pieces. If the chrome-plated trim pieces are very
dirty, you can use a chrome polish. If you
are unsure as to whether the trim pieces
are chrome-plated or not, consult an
authorized Mercedes-Benz Center.
X Wipe the wooden trim and trim pieces with
a damp, lint-free cloth,e .g. a microfiber
cloth.
X Heavy soiling: use car care and cleaning
products recommended and approved by
Mercedes-Benz.
Cleaning the seat covers General notes
!
Do not use microfibe rcloths to clean
genuine leather, artificial leathe ror
Alcantara® covers. If used often, these can
damage the cover.
i Note tha tregular care is essential to
ensure that the appearance and comfort of
the covers is retained over time.
Genuine leather seat covers
Leather is a natural product.
It exhibits natural surface characteristics, for
example:
R Differences in the texture
R Signs of stretching and marking
R Slight nuances of color
These are characteristics of leather and not
material defects.
! To retain the natural appearance of the
leather, observe the following cleaning
instructions:
R Clean genuine leather covers carefully
with a damp cloth and then wipe the
covers down with a dry cloth.
R Make sure that the leather does not
become soaked. It may otherwise
become rough and cracked.
R Only use leather care agents that have
been tested and approved by Mercedes- 270
CareMaintenance and care
Page 281 of 336
i
If tire sealant leaks out, allow it to dry. It
can then be removed like a layer of film.
If yourc lothes are soiled with tire sealant,
have the mcleaned with perchloroethylene
at a dry cleaner as soon as possible.
Tire pressure not reached If
ap ressure of 200 kPa (2.0 bar/ 29 psi) has
not been achieved after ten minutes:
X Switch off the tire inflation compressor.
X Unscrew the filler hose from the valve of
the faulty tire.
X Very slowly drive forwards or reverse
approximately 30 ft (10 m).
X Pump up the tire again.
After a maximum of ten minutes, the tire
pressure must be at least 200 kPa (2.0 bar/
29 psi). G
WARNING
If the required tire pressure is not reached
after the specified time, the tire is too badly
damaged. The tire sealant cannot repair the
tire in this instance. Damaged tires and a tire
pressure that is too low can significantly
impair the vehicle's braking and driving
characteristics. There is a risk of accident.
Do not continue driving. Contact a qualified
specialist workshop.
Tire pressure reached G
WARNING
At ire temporarily sealed with tire sealant
impairs the driving characteristics and is not
suitable for higher speeds. There is a risk of
accident.
You should therefore adapt your driving style
accordingly and drive carefully. Do not exceed
the specified maximum speed with a tire that
has been repaired using tire sealant.
! After use, excess tire sealant may run out
of the filler hose. This could cause stains. Therefore, place the filler hose in the plastic
bag that contained the TIREFIT kit. H
Environmental note
Have the used tire sealant bottle disposed of
professionally, e.g. at aqualified specialist
workshop.
If ap ressure of 200 kPa (2.0 bar/ 29 psi) has
been attained after a maximum of ten
minutes:
X Switch off the tire inflation compressor.
X Unscrew the filler hose from the valve of
the faulty tire.
X Stow the tire sealant bottle and the tire
inflation compressor.
X Pull away immediately.
The maximu mspeed for atire treated with tire
sealant is 50 mph (80k m/h). The upper part
of the TIREFIT sticker must be affixed to the
instrument cluster in the driver's field of
vision.
X Stop after driving for approximately ten
minutes and check the tire pressure with
the tire inflation compressor.
The tire pressure must now be at least
130 kPa (1.3 bar/19 psi). G
WARNING
If the required tire pressure is not reached
after driving for a short period, the tire is too
badly damaged. The tire sealant cannot repair
the tire in this instance. Damaged tires and a
tire pressure that is too low can significantly
impair the vehicle's braking and driving
characteristics. There is a risk of accident.
Do not continue driving. Contact a qualified
specialist workshop.
X Correct the tire pressure if it is still at least
130 kPa (1.3 bar/19 psi) (for the values,
see the Tire and Loading Information
placard on the driver's side B-pillar or tire
pressure table on the fuel filler flap).
X To increase the tire pressure: switch on
the tire inflation compressor. 278
Flat tireBreakdown assistance
Page 313 of 336
GAWR (Gross Axle Weight Rating)
The GAWR is the maximu mgross axle weight
rating. The actual load on an axle must never
exceed the gross axle weight rating. The
gross axle weight rating can be found on the
vehicle identification plate on the B-pillar on
the driver's side. Speed rating
The speed rating is part of the tire
identification. It specifies the speed range for
which the tire is approved. GVW (Gross Vehicle Weight)
The gross vehicle weight includes the weight
of the vehicle including fuel, tools, the spare
wheel, accessories installed, occupants,
luggage and the drawbar noseweight, if
applicable.T he gross vehicle weight must not
exceed the gross vehicle weight rating GVWR
as specified on the vehicle identification plate
on the B-pillar on the driver's side. GVWR (Gross Vehicle Weight Rating)
The GVWR is the maximum permissible gross
weight of a fully loaded vehicle (the weight of
the vehicle including all accessories,
occupants, fuel, luggage and the drawbar
noseweight, if applicable). The gross vehicle
weight rating is specified on the vehicle
identification plate on the B-pillar on the
driver's side. Maximum loaded vehicle weight
The maximum weight is the sum of:
R the curb weight of the vehicle
R the weight of the accessories
R the load limit
R the weight of the factory installed optional
equipment Kilopascal (kPa)
Metric unit for tire pressure. 6.9 kPa
corresponds to 1 psi. Another unit for tire
pressure is bar. 100 kilopascal (kPa) is the
equivalent of 1bar. Load index
In addition to the load-bearing index, the load
index may also be imprinted on the sidewall
of the tire. This specifie sthe load-bearing
capacity more precisely. Curb weight
The weight of a vehicle with standard
equipment including the maximum capacity
of fuel, oil and coolant. It also includes the air-
conditioning system and optional equipment
if these are installed in the vehicle, but does
not include passengers or luggage. Maximum load rating
The maximum load rating in kilograms or
pounds is the maximum weight for which a
tire is approved. Maximum permissible tire pressure
Maximum permissible tire pressure for one
tire. Maximum load on one tire
Maximum load on one tire. This is calculated
by dividing the maximum axle load of one axle
by two. PSI (pounds per square inch)
As tandard uni tofmeasure for tire pressure. 310
Definition of terms for tires and loadingWheels and tires
Page 315 of 336
Changing
awheel Flat tire
You can find information on whatt o do in the
event of a flat tire in the "Flat tire" section
(Y page 275). You will also find information
on driving with MOExtended tires in the event
of a flat tire.
Vehicle with emergency spare wheel: in
the event of a flat tire, the emergency spare
wheel is mounted as described under
"Mounting a wheel" ( Ypage 312). Interchanging the wheels
G
WARNING
Interchanging the front and rear wheels may
severely impair the driving characteristics if
the wheels or tires have different dimensions.
The wheel brakes or suspension components
may also be damaged. There is a risk of
accident.
Rotate front and rear wheels only if the wheels
and tires are of the same dimensions.
Always pay attention to the instructions and
safety notes when changing a wheel
(Y page 312).
The wear patterns on the front and rear tires
differ, depending on the operating conditions.
Rotate the wheels before a clear wear pattern
has formed on the tires. Front tires typically
wear more on the shoulders and the rear tires
in the center.
If your vehicle's tire configuration allows, you
can rotate the wheels according to the
intervals in the tire manufacturer's warranty
book in your vehicle documents. If no
warranty book is available, the tires should be
interchanged every 3,000 to 6,000 miles
(5,000 to 10,000 km), or earlier if tire wear
requires. Do not change the direction of
wheel rotation.
Clean the contact surfaces of the wheel and
the brake disc thoroughly every time a wheel
is interchanged. Check the tire pressure and, if necessary, restart the tire pressure loss
warning system. Direction of rotation
Tires with a specified direction of rotation
have additional benefits, e.g. if there is a risk
of hydroplaning. You will only gain these
benefits if the correct direction of rotation is
maintained.
An arrow on the sidewall of the tire indicates
its correct direction of rotation. Storing wheels
Store wheels that are not being used in a cool,
dry and preferably dark place. Protec tthe
tires from oil, grease, gasoline and diesel. Cleaning the wheels
G
WARNING
The water jet from a circular jet nozzle (dirt
blasters) can cause invisible exterior damage
to the tires or chassis components.
Components damaged in this way may fail
unexpectedly. There is a risk of an accident.
Do not use power washers with circular jet
nozzles to clean the vehicle. Have damaged
tires or chassis components replaced
immediately. Mounting
awheel
Preparing the vehicle X
Park the vehicle on firm, non-slippery and
level ground.
X Apply the electric parking brake manually
(Y page 142).
X Bring the front wheels into the straight-
ahead position.
X Move the DIRECT SELECT levert o position
P. 312
Changing
awheelWheels and tires
Page 318 of 336
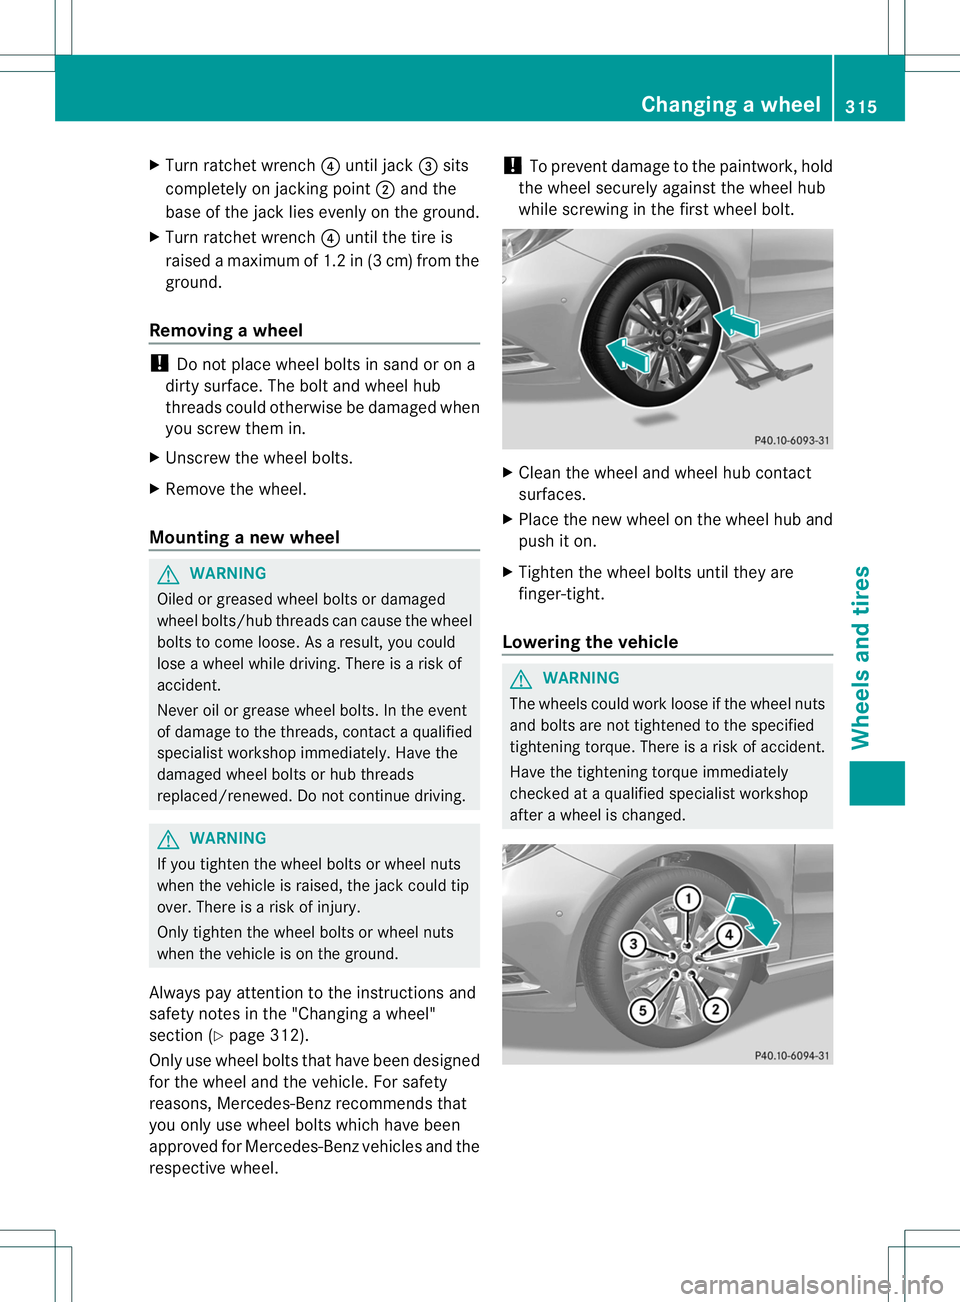
X
Turn ratchet wrench ?until jack =sits
completely on jacking point ;and the
base of the jack lies evenly on the ground.
X Turn ratchet wrench ?until the tire is
raised amaximum of 1.2 in (3 cm )from the
ground.
Removing awheel !
Do not place wheel bolts in sand or on a
dirty surface. The bolta nd wheel hub
threads could otherwise be damaged when
you screw them in.
X Unscrew the wheel bolts.
X Remove the wheel.
Mounting anew wheel G
WARNING
Oiled or greased wheel bolts or damaged
wheel bolts/hub threads can cause the wheel
bolts to come loose .As a result, you could
lose a wheel while driving. There is a risk of
accident.
Never oil or grease wheel bolts. In the event
of damage to the threads, contact a qualified
specialist workshop immediately.H ave the
damaged wheel bolts or hub threads
replaced/renewed. Do notc ontinue driving.G
WARNING
If you tighten the wheel bolts or wheel nuts
when the vehicle is raised, the jack could tip
over. There is a risk of injury.
Only tighten the wheel bolts or wheel nuts
when the vehicle is on the ground.
Always pay attention to the instructions and
safety notes in the "Changing a wheel"
section (Y page 312).
Only use wheel bolts that have been designed
for the wheel and the vehicle. For safety
reasons, Mercedes-Benz recommends that
you only use wheel bolts which have been
approved for Mercedes-Benz vehicles and the
respective wheel. !
To prevent damage to the paintwork, hold
the wheel securely against the wheel hub
while screwing in the first wheel bolt. X
Clean the wheel and wheel hub contact
surfaces.
X Place the new wheel on the wheel hub and
push it on.
X Tighten the wheel bolts until they are
finger-tight.
Lowering the vehicle G
WARNING
The wheels could work loose if the wheel nuts
and bolts are not tightened to the specified
tightening torque. There is a risk of accident.
Have the tightening torque immediately
checked at a qualified specialist workshop
after a wheel is changed. Changing
awheel
315Wheels and tires Z
Page 327 of 336
The VIN can also be found in the following
locations:
R
at the lower edge of the windshield
(Y page 324)
R on the vehicle identification plate
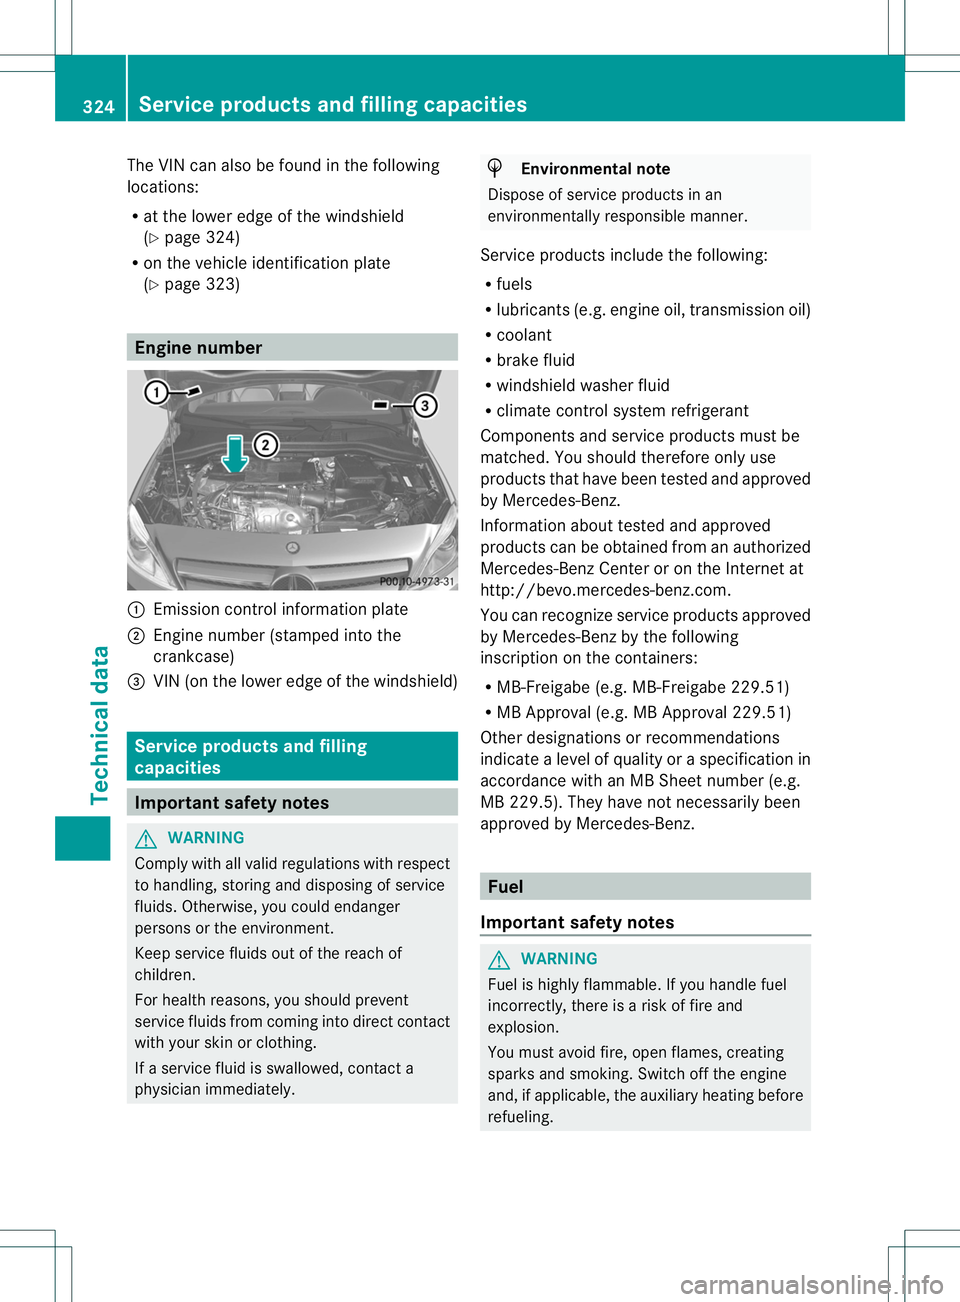
(Y page 323) Engine number
:
Emission control information plate
; Engine number (stamped into the
crankcase)
= VIN (on the lower edge of the windshield) Service products and filling
capacities
Important safety notes
G
WARNING
Comply with all valid regulations with respect
to handling, storing and disposing of service
fluids. Otherwise, you could endanger
persons or the environment.
Keep service fluids out of the reach of
children.
For health reasons, you should prevent
service fluids from coming into direct contact
with your skin or clothing.
If a service fluid is swallowed, contact a
physician immediately. H
Environmental note
Dispose of service products in an
environmentally responsible manner.
Service products include the following:
R fuels
R lubricants (e.g. engine oil, transmission oil)
R coolant
R brake fluid
R windshield washer fluid
R climate control system refrigerant
Components and service products must be
matched. You should therefore only use
products that have been tested and approved
by Mercedes-Benz.
Information about tested and approved
products can be obtained from an authorized
Mercedes-Benz Center or on the Internet at
http://bevo.mercedes-benz.com.
You can recognize service products approved
by Mercedes-Benz by the following
inscription on the containers:
R MB-Freigabe (e.g. MB-Freigabe 229.51)
R MB Approval (e.g. MB Approval 229.51)
Other designations or recommendations
indicate a level of quality or a specification in
accordance with an MB Sheet number (e.g.
MB 229.5). They have not necessarily been
approved by Mercedes-Benz. Fuel
Important safety notes G
WARNING
Fuel is highly flammable. If you handle fuel
incorrectly, there is a risk of fire and
explosion.
You must avoid fire, open flames, creating
sparks and smoking. Switch off the engine
and, if applicable, the auxiliary heating before
refueling. 324
Service products and filling capacitiesTechnical data
Page 329 of 336

For MTBE, the concentration should not
exceed 15%.
The concentration of methanol in gasoline,
including other additives, mus
tnot exceed
3%.
Using mixtures of methanol and ethanol is not
permitted. Gasohol, a mixture of 10% ethanol
and 90% unleaded gasoline, may be used.
All of these mix fuels must fulfill the fuel
requirements, e.g.:
R knock resistance
R boiling point
R vapor pressure
You will usually find information about the fuel
grade on the pump. If you cannot find the
label on the pump, ask the staff for
assistance.
i Please consult an authorized Mercedes-
Benz Center for further information.
Information on refueling (Y page 139).
Additives
! Operating the engine with fuel additives
can increase wear and tear to the fuel
system high-pressure pump and lead to
contamination of the entire fuel system.
The repair costs are high. This does not
include additives for the removal and
prevention of residue buildup. gasoline
must only be mixed with additives
recommended by Mercedes-Benz. More
information about recommended additives
can be obtained from any authorized
Mercedes-Benz Center.
One of the main problems of poor fuel quality
is the forming of deposits that are created
during the gasoline combustion process.
Mercedes-Benz recommends that you use
branded fuels that have additives.
If you use fuels without these additives over
a longer period of time, carbon deposits may
build up. These deposits form at the inlet
valves and in the combustion chamber in
particular. This could lead to engine problems, e.g.:
R
longer engine warm-up phase
R uneven idle
R engine noise
R misfiring
R loss of power
Carbon deposits may form if the availability
of gasoline with relevant additives is
insufficient (in certain regions). In this case,
Mercedes-Benz recommends additives
approved for use in Mercedes-Benz vehicles;
see http://bevo.mercedes-benz.com.
For a list of approved products, consult an
authorized Mercedes-Benz Center. Comply
with the instructions for use on the product
label.
Do not mix other fuel additives with fuel. This
causes unnecessary costs and could damage
the engine. Engine oil
Points to note !
Never use engine oil or an oil filter of a
specification other than is necessary to
fulfill the prescribed service intervals. Do
not change the engine oil or oil filter in
order to achieve longer replacement
intervals than those prescribed. You could
otherwise cause engine damage or damage
to the exhaust gas aftertreatment.
Follow the instructions in the service
interval display regarding the oil change.
Otherwise, you may damage the engine and
the exhaust gas aftertreatment.
The engine oils are matched to the
performance of Mercedes-Benz engines and
service intervals. You should therefore only
use engine oils and oil filters that are
approved for vehicles with maintenance
systems.
For a list of approved engine oils and oil filters,
consult an authorized Mercedes-Benz 326
Service products and filling capacitiesTechnical data
Page 330 of 336

Center. Or visit the website
http://bevo.mercedes-benz.co
m.
The table shows which engine oils have been
approved for your vehicle. Model Engine
model MB
Approval B2
50
BlueEFFICIENCY 270 229.5
i
MB approval is indicated on the oil
containers.
Filling capacities The following values refer to an oil change
including the oil filter.
Model Capacity
B2
50 BlueEFFICIENCY 5.9 US qt
(5.6 l) Additives
!
Do no tuse any additives in the engine oil.
This could damage the engine.
Engine oil viscosity Viscosity describes the flow characteristics
of a fluid. If an engine oil has a high viscosity,
this means that it is thick; a low viscosity
means that it is thin.
Select an engine oil with an SAE (viscosity)
classification suitable for the prevailing
outside temperatures. The table shows you
which SAE classifications are to be used. The
low-temperature characteristics of engine oils can deteriorate significantly, e.g. as a
result of aging, soot and fuel deposits. It is
therefore strongly recommended that you
carry out regularo
il changes using an
approved engine oil with the appropriate SAE
classification. Brake fluid
G
WARNING
Over a period of time, the brake fluid absorbs
moisture fromt he air; this lowers its boiling
point.
If the boiling point of the brake fluid is too low,
vapor pockets may form in the brake system
when the brakes are applied hard (e.g. when
driving downhill). This would impair braking
efficiency.
You should have the brake fluid renewed at
regular intervals. The brake fluid change
intervals can be found in the Maintenance
Booklet.
Only use brake fluid approved by Mercedes-
Benz according to MB Approval 331.0.
Information about approved brake fluid can
be obtained at any qualified specialist
workshop or on the Internet at
http://bevo.mercedes-benz.com.
i Have the brake fluid renewed regularly at
a qualified specialist workshop. Coolant
Important safety notes G
WARNING
Antifreeze is highly flammable. Fire, open
flames and smoking are prohibited when
handling antifreeze.
If antifreeze comes into contact with hot
engine parts, it may ignite and you could burn
yourself. Do not spill any antifreeze on hot
engine parts. Service products and fillingc
apacities
327Technical data Z