2013 MERCEDES-BENZ B-CLASS SPORTS audio
[x] Cancel search: audioPage 172 of 336
Activating/deactivating the rea
rview
camera X
To activate: make sure that the SmartKey
is in position 2in the ignition lock.
X Make sure that in the audio system/
COMAND, the "Activation by R gear"
function is selected; see the separate
operating instructions for the audio
system/COMAND.
X Engage reverse gear.
Guide lines are used to show the area
behind the vehicle in the Audio/COMAND
display.
To deactivate: the rear view camera is
deactivated if you:
R selec ttransmission position P(vehicles
with automatic transmission)
R drive forward ten meters
R shift the transmission from Rto another
position (after 15 seconds)
R drive forwards at a speed of over 5mph
(10km/h)
Displays in the Audio/COMAND display The rear view camera may show a distorted
view of obstacles, show them incorrectly or
not at all. The rear view camera does not show
objects in the following positions:
R
very close to the rear bumper
R under the rear bumper
R in the area immediately above the tailgate
handle
! Objects not at ground level may appear to
be further away than they actually are, e.g.:
R the bumper of a parked vehicle
R the drawbar of a trailer
R the ball coupling of a trailer tow hitch
R the rear section of an HGV
R a slanted post
Use the guidelines only for orientation.
Approach objects no further than the
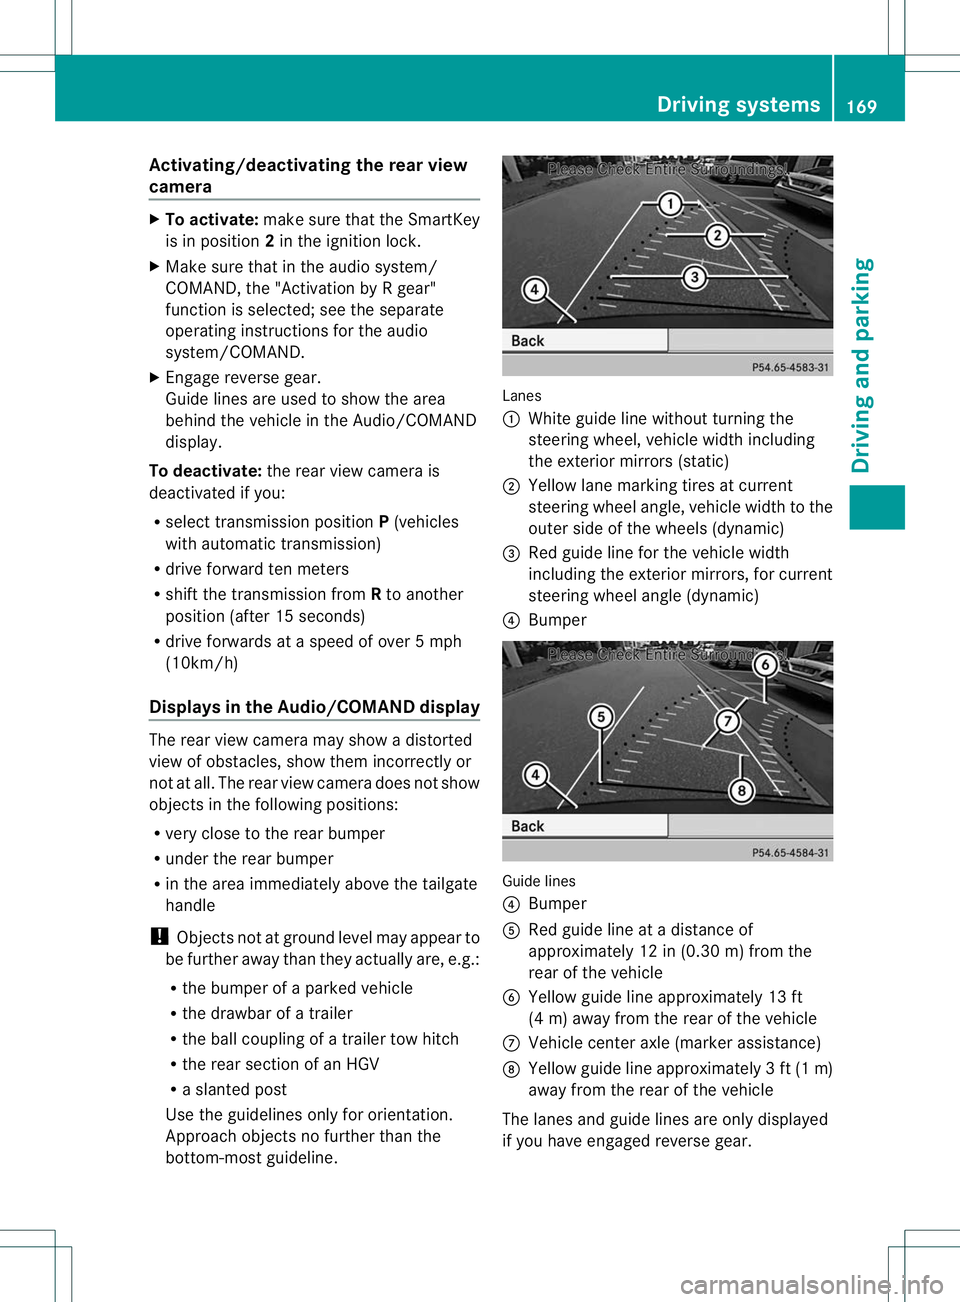
bottom-most guideline. Lanes
:
White guide line without turning the
steering wheel, vehicle width including
the exterior mirrors (static)
; Yellow lane marking tires at current
steering wheel angle, vehicle width to the
outer side of the wheels (dynamic)
= Red guide line for the vehicle width
including the exterior mirrors, for current
steering wheel angle (dynamic)
? Bumper Guide lines
?
Bumper
A Red guide line at a distance of
approximately 12 in (0.30 m) from the
rear of the vehicle
B Yellow guide line approximately 13 ft
(4 m) away from the rear of the vehicle
C Vehicle center axle (marker assistance)
D Yellow guide line approximately 3ft(1m)
away from the rear of the vehicle
The lanes and guide lines are only displayed
if you have engaged revers egear. Driving systems
169Driving and parking Z
Page 173 of 336
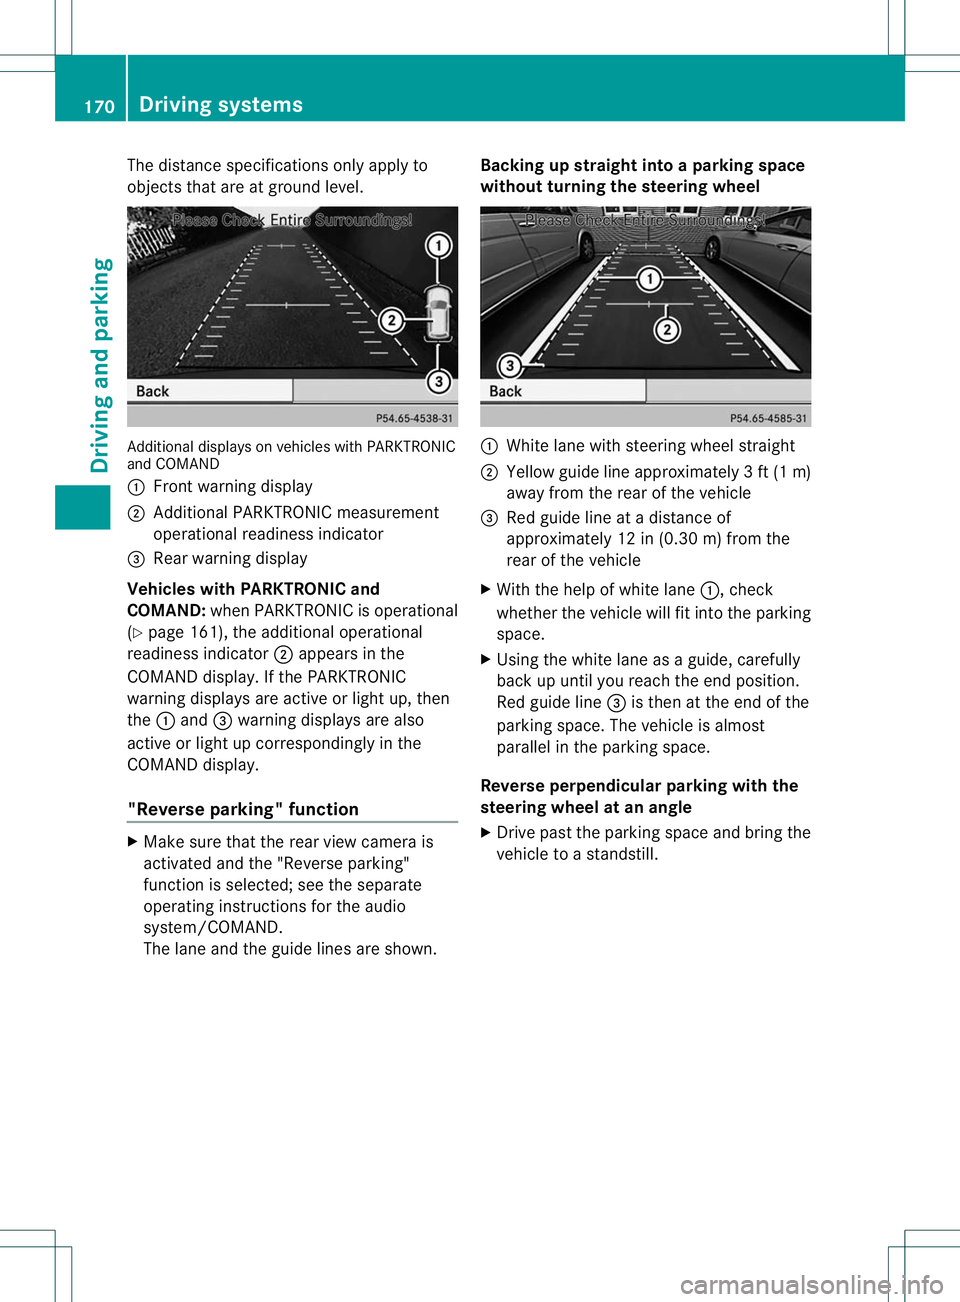
The distance specifications only apply to
objects that are at ground level.
Additional displays on vehicles with PARKTRONIC
and COMAND
:
Frontw arning display
; Additional PARKTRONIC measurement
operational readiness indicator
= Rear warning display
Vehicles with PARKTRONIC and
COMAND: when PARKTRONIC is operational
(Y page 161), the additional operational
readiness indicator ;appears in the
COMAND display. If the PARKTRONIC
warning displays are active or light up, then
the :and =warning displays are also
active or light up correspondingly in the
COMAND display.
"Reverse parking" function X
Make sure that the rear view camera is
activated and the "Reverse parking"
function is selected; see the separate
operating instructions for the audio
system/COMAND.
The lane and the guide lines are shown. Backing up straight into a parking space
without turning the steering wheel :
White lane with steering wheel straight
; Yellow guide line approximately 3ft(1m)
away from the rear of the vehicle
= Red guide line at a distanc eof
approximately 12 in (0.30 m) from the
rear of the vehicle
X With the help of white lane :, check
whether the vehicle will fit into the parking
space.
X Using the white lane as a guide, carefully
back up until you reach the end position.
Red guide line =is then at the end of the
parking space. The vehicle is almost
parallel in the parking space.
Reverse perpendicular parking with the
steering wheel at an angle
X Drive past the parking space and bring the
vehicle to a standstill. 170
Driving systemsDriving and parking
Page 183 of 336
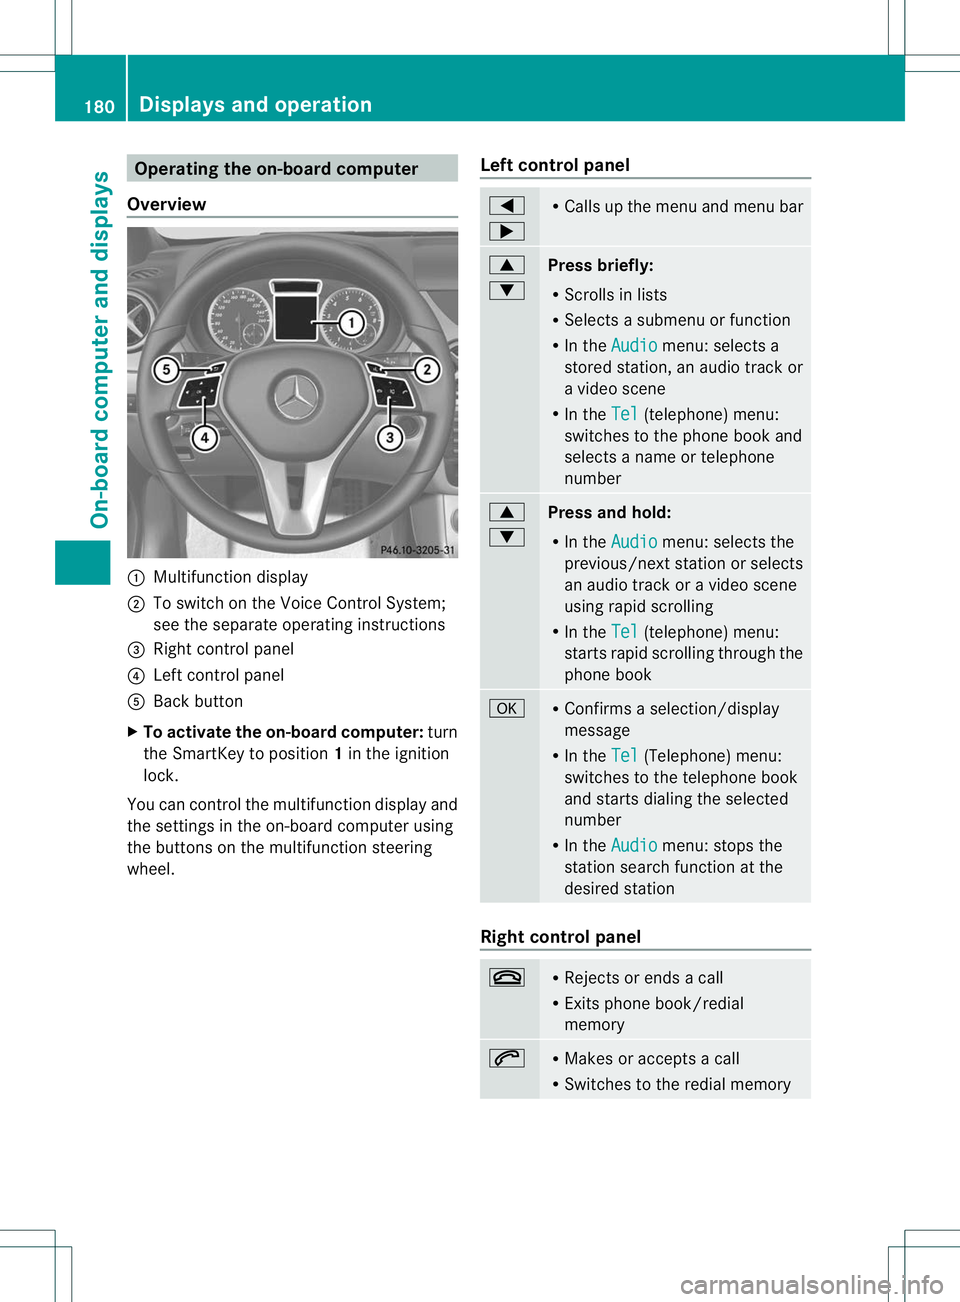
Operating the on-board computer
Overview :
Multifunction display
; To switch on the Voice Control System;
see the separate operating instructions
= Right control panel
? Left control panel
A Back button
X To activate the on-board computer: turn
the SmartKey to position 1in the ignition
lock.
You can control the multifunction display and
the settings in the on-board computer using
the buttons on the multifunction steering
wheel. Left control panel =
; R
Calls up the menu and menu bar 9
:
Press briefly:
R
Scrolls in lists
R Selects a submenu or function
R In the Audio menu: selects a
stored station, an audio trackor
a video scene
R In the Tel (telephone) menu:
switches to the phone book and
selects a name or telephone
number 9
:
Press and hold:
R
In the Audio menu: selects the
previous/next statio norselects
an audio trac koravideo scene
using rapid scrolling
R In the Tel (telephone) menu:
starts rapid scrolling through the
phone book a R
Confirms a selection/display
message
R In the Tel (Telephone) menu:
switches to the telephone book
and starts dialing the selected
number
R In the Audio menu: stops the
station search function at the
desired station Right control panel
~ R
Rejects or ends a call
R Exits phone book/redial
memory 6 R
Makes or accepts a call
R Switches to the redial memory 180
Displays and operationOn-board computer and displays
Page 184 of 336
W
X R
Adjusts the volume 8 R
Mute Back button
%
Press briefly:
R
Back
R Switches off the Voice Control
System; see the separate
operating instructions
R Hides display messages/calls
up the last Trip menu function
used
R Exits the telephone book/redial
memory %
Press and hold:
R
Calls up the standard display in
the Trip menu
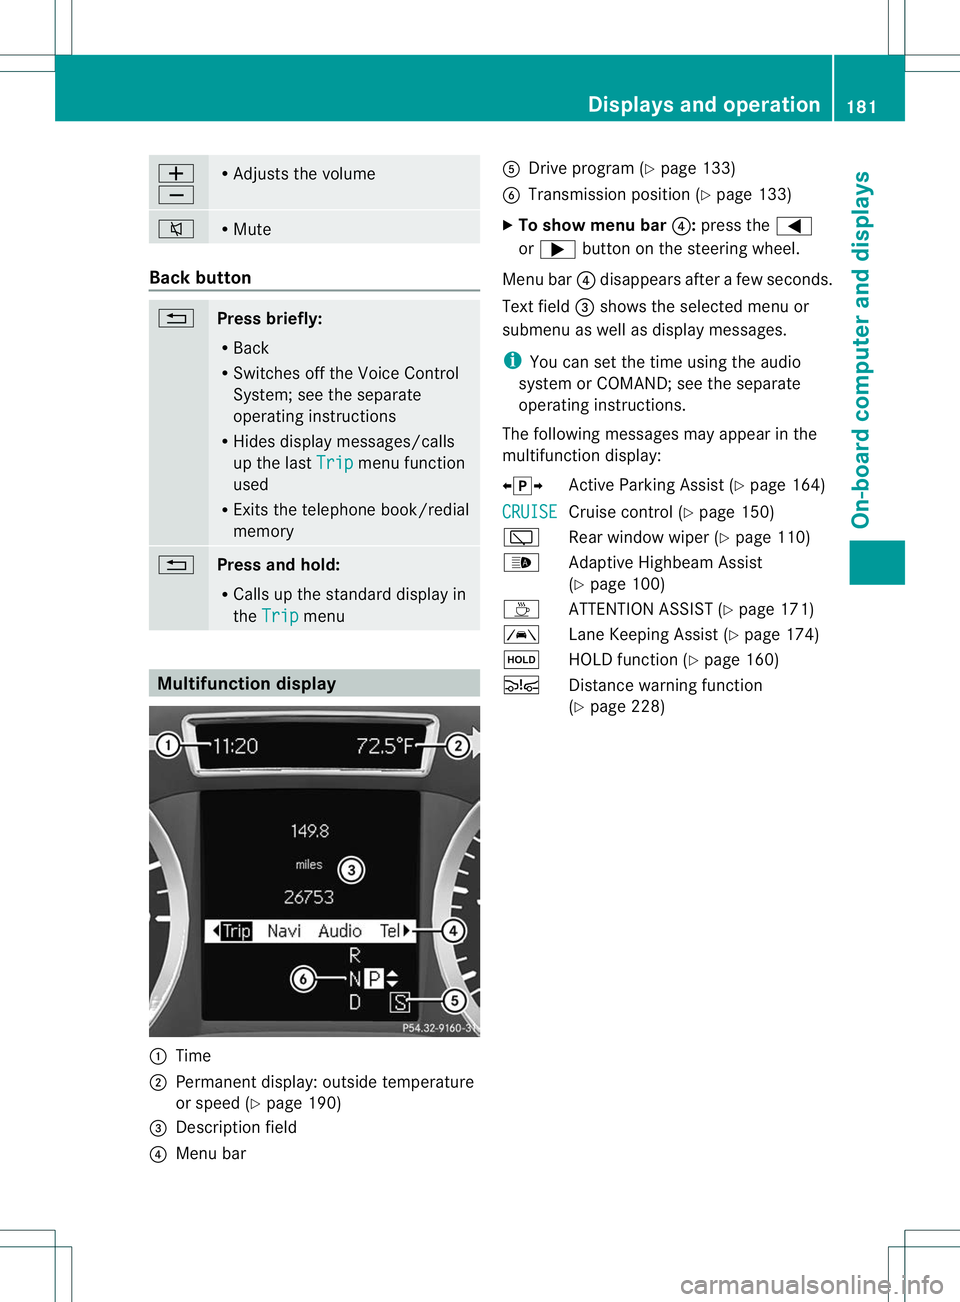
Multifunction display
:
Time
; Permanent display: outside temperature
or speed (Y page 190)
= Descriptio nfield
? Menu bar A
Drive program (Y page 133)
B Transmission position (Y page 133)
X To show menu bar ?:press the =
or ; button on the steering wheel.
Menu bar ?disappears after a few seconds.
Text field =shows the selected menu or
submenu as well as display messages.
i You can set the time using the audio
system or COMAND; see the separate
operating instructions.
The following messages may appear in the
multifunction display:
XjY Active Parking Assist (Y page 164)
CRUISE Cruise control (Y
page 150)
è Rear window wiper (Y page 110)
_ Adaptive Highbeam Assist
(Ypage 100)
À ATTENTION ASSIST( Ypage 171)
à Lane Keeping Assist (Y page 174)
ë HOLD function (Y page 160)
Ä Distance warning function
(Ypage 228) Displays and operation
181On-board computer and displays Z
Page 185 of 336
Menus and submenus
Menu overview
Operating the on-board computer (Y page 180).
Depending on the equipment installed in the vehicle, you can call up the following menus:
R Trip menu (Y
page 182)
R Navi menu (navigationi
nstructions) (Ypage 184)
R Audio menu (Y
page 185)
R Tel menu (telephone) (Y
page 186)
R DriveAssist menu (assistance) (Y
page 187)
R Serv. menu (Y
page 189)
R Sett. menu (Y
page 189)
The Audio ,
Navi and
Tel menus differ slightly in vehicles with Audio 20 and in vehicles with
COMAND. The examples given in this Operator's Manual apply to vehicles equipped with
COMAND. Trip menu
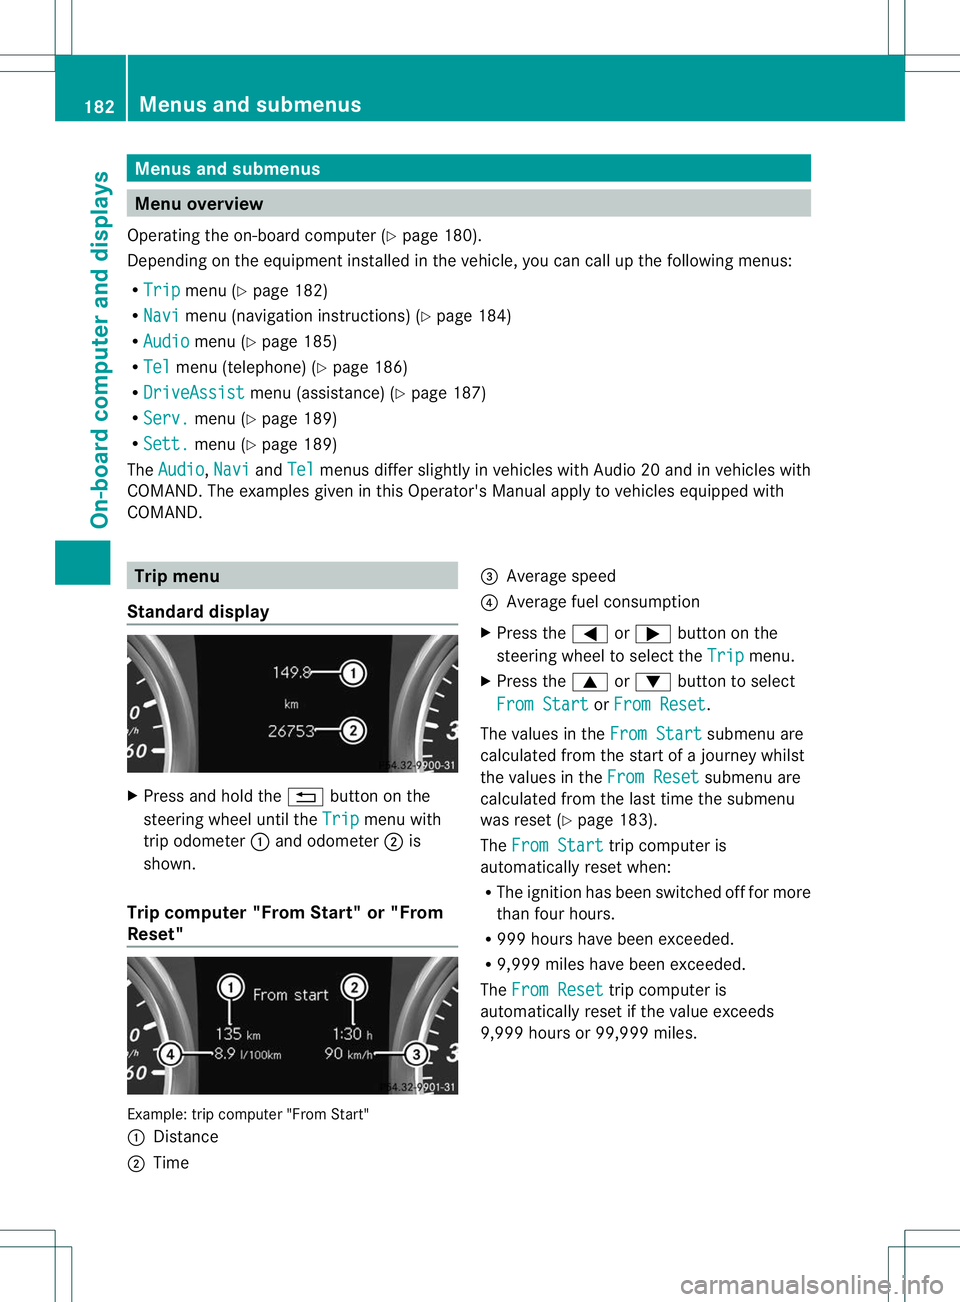
Standard display X
Press and hold the %button on the
steering wheel until the Trip menu with
trip odometer :and odometer ;is
shown.
Trip computer "From Start" or "From
Reset" Example: trip computer "From Start"
:
Distance
; Time =
Average speed
? Average fuel consumption
X Press the =or; button on the
steering wheel to select the Trip menu.
X Press the 9or: button to select
From Start or
From Reset .
The values in the From Start submenu are
calculated from the start of a journey whilst
the values in the From Reset submenu are
calculated from the last time the submenu
was reset (Y page 183).
The From Start trip computer is
automatically reset when:
R The ignition has been switched off for more
tha nfour hours.
R 999 hours have been exceeded.
R 9,999 miles have been exceeded.
The From Reset trip computer is
automatically reset if the value exceeds
9,999 hours or 99,999 miles. 182
Menus and submenusOn-board computer and displays
Page 187 of 336
Navigation syste
mmenu
Displaying navigation instructions X
Switch on Audio 20 with Becker ®
MAP
PILOT or COMAND (see th eseparate
operating instructions).
X Press the =or; button on the
steering wheel to select the Navi menu.
In the Navi menu, the multifunction display
shows navigation instructions. For more
information, see the separate operating
instructions.
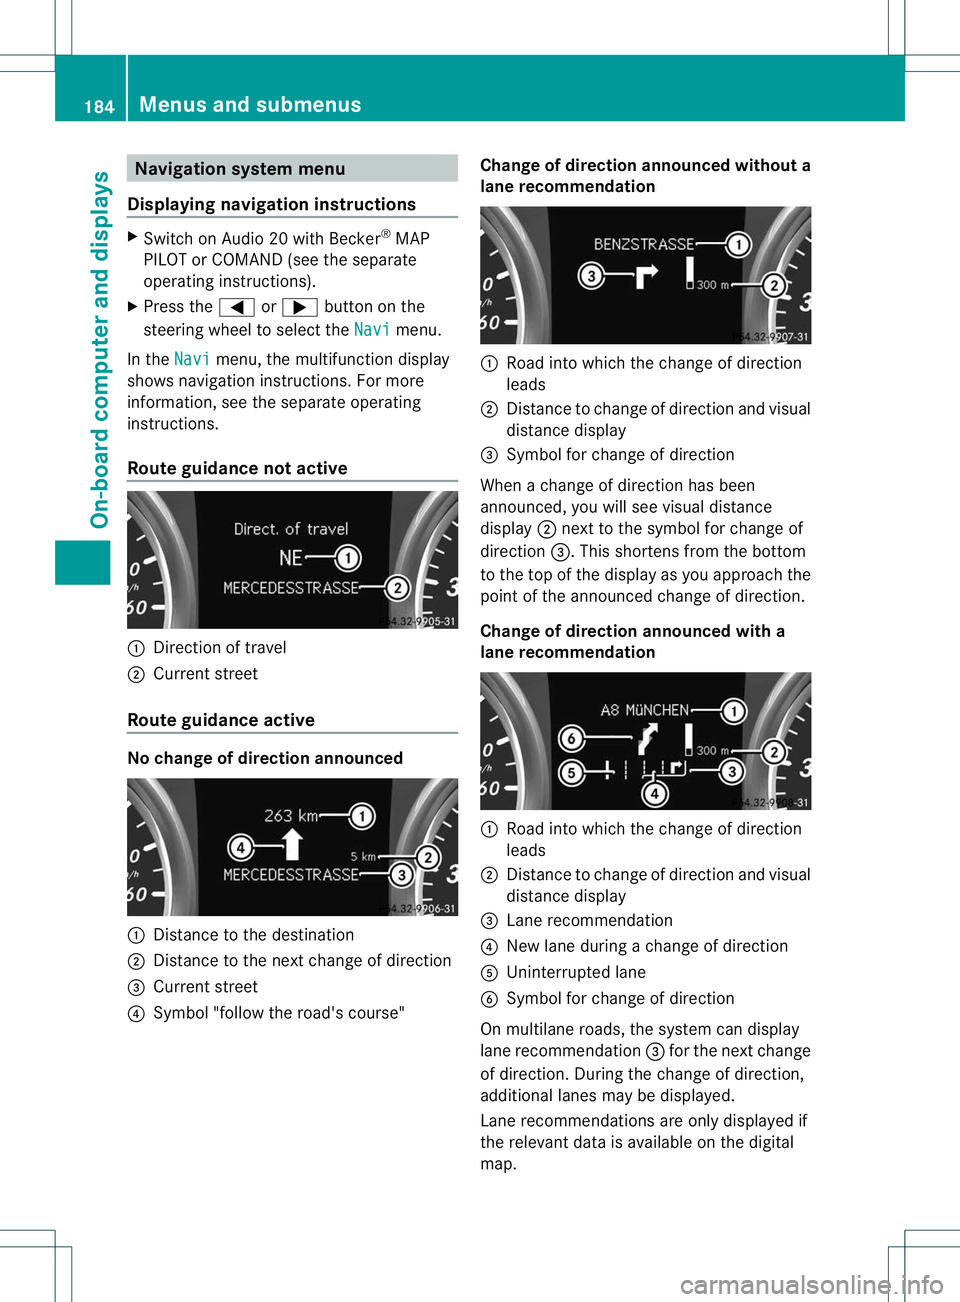
Route guidance not active :
Direction of travel
; Current street
Route guidance active No change of direction announced
:
Distance to the destination
; Distance to the next change of direction
= Current street
? Symbol "follow the road's course" Change of direction announced without a
lane recommendation :
Road into which the change of direction
leads
; Distance to change of direction and visual
distance display
= Symbol for change of direction
When a change of direction has been
announced, you will see visual distance
display ;next to the symbol for change of
direction =.This shortens from the bottom
to the top of the display as you approach the
point of the announced change of direction.
Change of direction announced with a
lane recommendation :
Road into which the change of direction
leads
; Distance to change of direction and visual
distance display
= Lane recommendation
? New lane during a change of direction
A Uninterrupted lane
B Symbol for change of direction
On multilane roads, the system can display
lane recommendation =for the next change
of direction. During the change of direction,
additional lanes may be displayed.
Lane recommendations are only displayed if
the relevant data is available on the digital
map. 184
Menus and submenusOn-board computer and displays
Page 188 of 336
Other status indicators of the
navigation system
R
O:y ou have reached the destination or an
intermediate destination.
R New Route... or
Calculating Route :
calculating a new route
R Off Map or
Off Mapped Road :t
he vehicle
position is outside the area of the digital
map (off-map position).
R No Route :n
o route could be calculated to
the selected destination. Audio menu
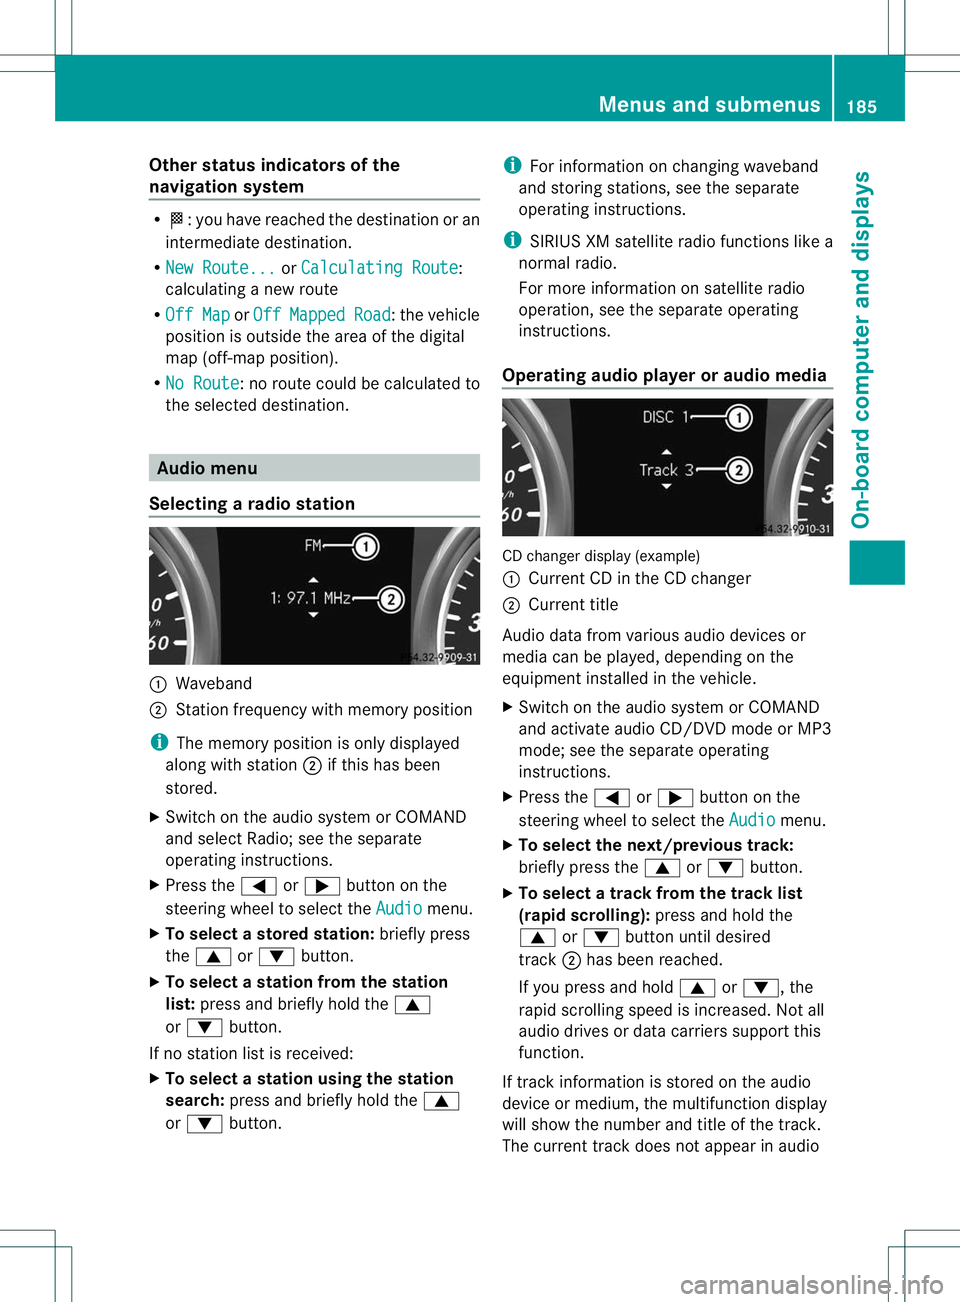
Selecting aradio station :
Waveband
; Station frequency with memory position
i The memory position is only displayed
along with station ;if this has been
stored.
X Switch on the audio system or COMAND
and select Radio; see the separate
operating instructions.
X Press the =or; button on the
steering wheel to select the Audio menu.
X To selectas toredstation: briefly press
the 9 or: button.
X To select a station from the station
list: press and briefly hold the 9
or : button.
If no statio nlist is received:
X To select astation using the station
search: press and briefly hold the 9
or : button. i
For information on changing waveband
and storing stations, see the separate
operating instructions.
i SIRIUS XM satellite radio functions like a
normal radio.
For more informatio nonsatellite radio
operation, see the separate operating
instructions.
Operating audio player or audio media CD changer display (example)
:
Current CD in the CD changer
; Current title
Audio data from various audio devices or
media can be played, dependin gonthe
equipment installed in the vehicle.
X Switch on the audio system or COMAND
and activate audio CD/DVDm ode or MP3
mode; see the separate operating
instructions.
X Press the =or; button on the
steering wheel to select the Audio menu.
X To select the next/previous track:
briefly press the 9or: button.
X To select a track from the track list
(rapid scrolling): press and hold the
9 or: button until desired
track ;has been reached.
If you press and hold 9or:, the
rapid scrolling speed is increased. Not all
audio drives or data carriers support this
function.
If track information is stored on the audio
device or medium, the multifunction display
will show the number and title of the track.
The current track does not appear in audio Menus and submenus
185On-board computer and displays Z
Page 189 of 336
AUX mode (Auxiliary audio mode: external
audio source connected).
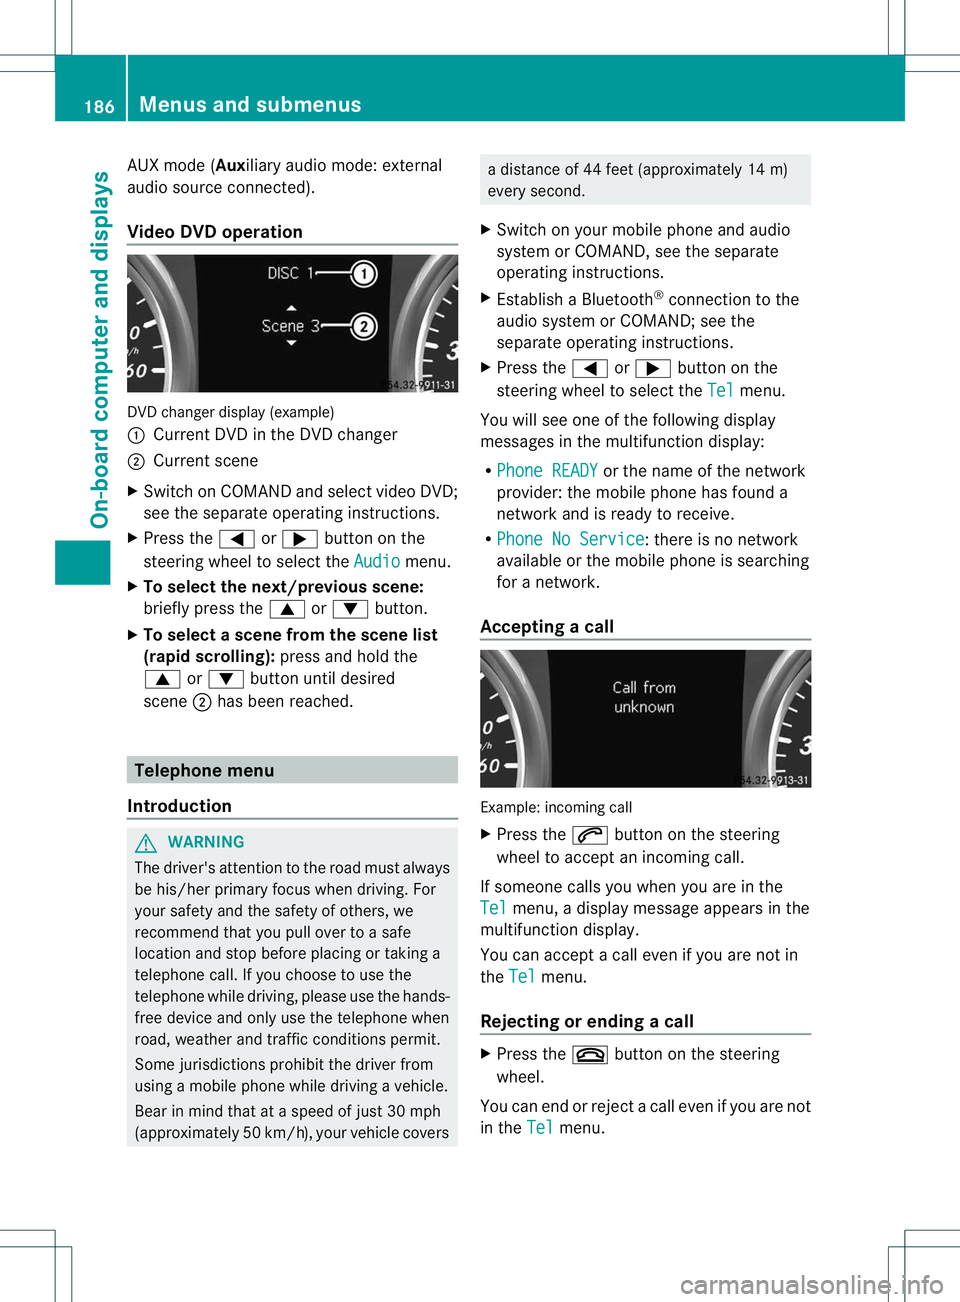
Video DVD operation
DVD change
rdisplay (example)
: Current DVD in the DVD changer
; Current scene
X Switch on COMANDa nd select video DVD;
see the separate operating instructions.
X Press the =or; button on the
steering wheel to select the Audio menu.
X To select the next/previous scene:
briefly press the 9or: button.
X To select ascene from the scene list
(rapid scrolling): press and hold the
9 or: buttonuntil desired
scene ;has been reached. Telephone menu
Introduction G
WARNING
The driver's attentio nto the road must always
be his/her primary focus when driving. For
your safety and the safety of others, we
recommend that you pull over to a safe
location and stop before placing or taking a
telephone call. If you choose to use the
telephone while driving, please use the hands-
free device and only use the telephone when
road, weather and traffic conditions permit.
Some jurisdictions prohibit the driver from
using a mobile phone while driving a vehicle.
Bear in mind that at a speed of just 30 mph
(approximately 50 km/h) , your vehicle covers a distance of 44 feet (approximately 14 m)
every second.
X Switch on your mobile phone and audio
system or COMAND, see the separate
operating instructions.
X Establish a Bluetooth ®
connection to the
audio system or COMAND; see the
separate operating instructions.
X Press the =or; button on the
steering wheel to select the Tel menu.
You will see one of the following display
messages in the multifunction display:
R Phone READY or the name of the network
provider :the mobile phone has found a
network and is ready to receive.
R Phone No Service : there is no network
available or the mobile phone is searching
for a network.
Accepting acall Example: incoming call
X
Press the 6button on the steering
wheel to accep tanincoming call.
If someone calls you when you are in the
Tel menu, a display message appears in the
multifunctio ndisplay.
You can accept a call even if you are not in
the Tel menu.
Rejecting or ending acall X
Press the ~button on the steering
wheel.
You can end or reject a call even if you are not
in the Tel menu.186
Menus and submenusOn-board computer and displays