Page 325 of 611
Sound
Refer to Power/Volume/Display/Sound
Controls on page 6-64.
Language
1. Press the setup button (
).
2. Touch the
on-screen tab to
display the language setting screen.
3. Touch the desired language from the
list.
4. Touch the
on-screen button.
NOTE
Only the available languages are displayed.
Audio Control Switch
Operation
í
When the audio unit is turned on,
operation of the audio unit from the
steering wheel is possible.
NOTE
Because the audio unit will be turned off under
the following conditions, the switches will be
inoperable.
lWhen the ignition is switched off.lWhen the power button on the audio unit is
pressed and the audio unit is turned off.
Without Bluetooth® Hands-Free
With Bluetooth® Hands-Free only
Talk button
Pick-up buttonTalk button
Hang-up button Pick-up button
6-84
Interior Comfort
íSome models.
Audio System
Page 331 of 611

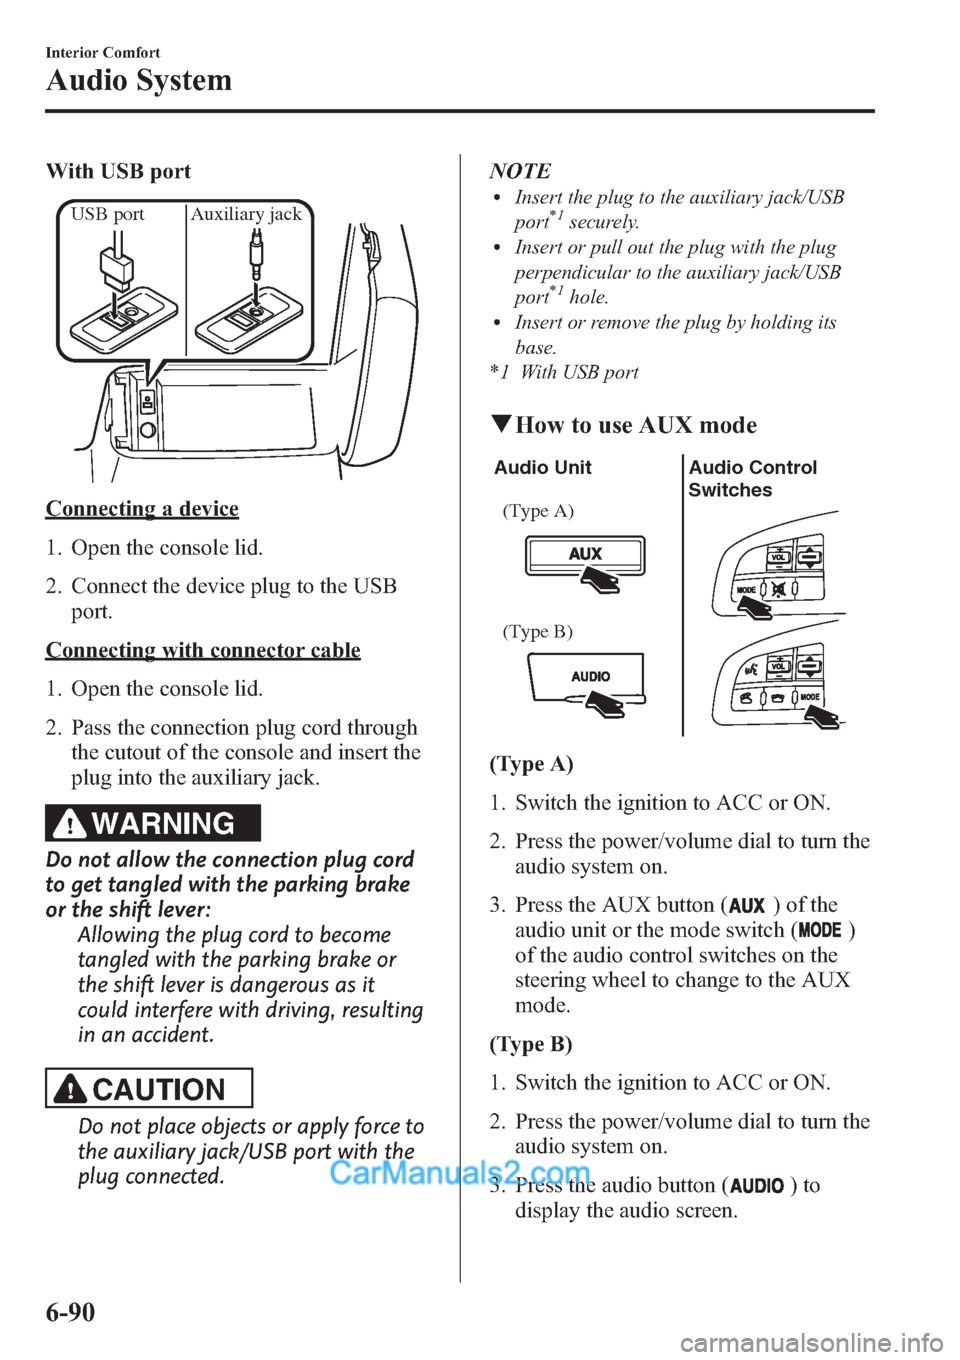
With USB port
USB port Auxiliary jack
Connecting a device
1. Open the console lid.
2. Connect the device plug to the USB
port.
Connecting with connector cable
1. Open the console lid.
2. Pass the connection plug cord through
the cutout of the console and insert the
plug into the auxiliary jack.
WARNING
Do not allow the connection plug cord
to get tangled with the parking brake
or the shift lever:
Allowing the plug cord to become
tangled with the parking brake or
the shift lever is dangerous as it
could interfere with driving, resulting
in an accident.
CAUTION
Do not place objects or apply force to
the auxiliary jack/USB port with the
plug connected.NOTE
lInsert the plug to the auxiliary jack/USB
port*1securely.lInsert or pull out the plug with the plug
perpendicular to the auxiliary jack/USB
port
*1hole.lInsert or remove the plug by holding its
base.
*1 With USB port
qHow to use AUX mode
Audio Unit Audio Control
Switches
(Type A)
(Type B)
(Type A)
1. Switch the ignition to ACC or ON.
2. Press the power/volume dial to turn the
audio system on.
3. Press the AUX button (
) of the
audio unit or the mode switch (
)
of the audio control switches on the
steering wheel to change to the AUX
mode.
(Type B)
1. Switch the ignition to ACC or ON.
2. Press the power/volume dial to turn the
audio system on.
3. Press the audio button (
)to
display the audio screen.
6-90
Interior Comfort
Audio System
Page 333 of 611

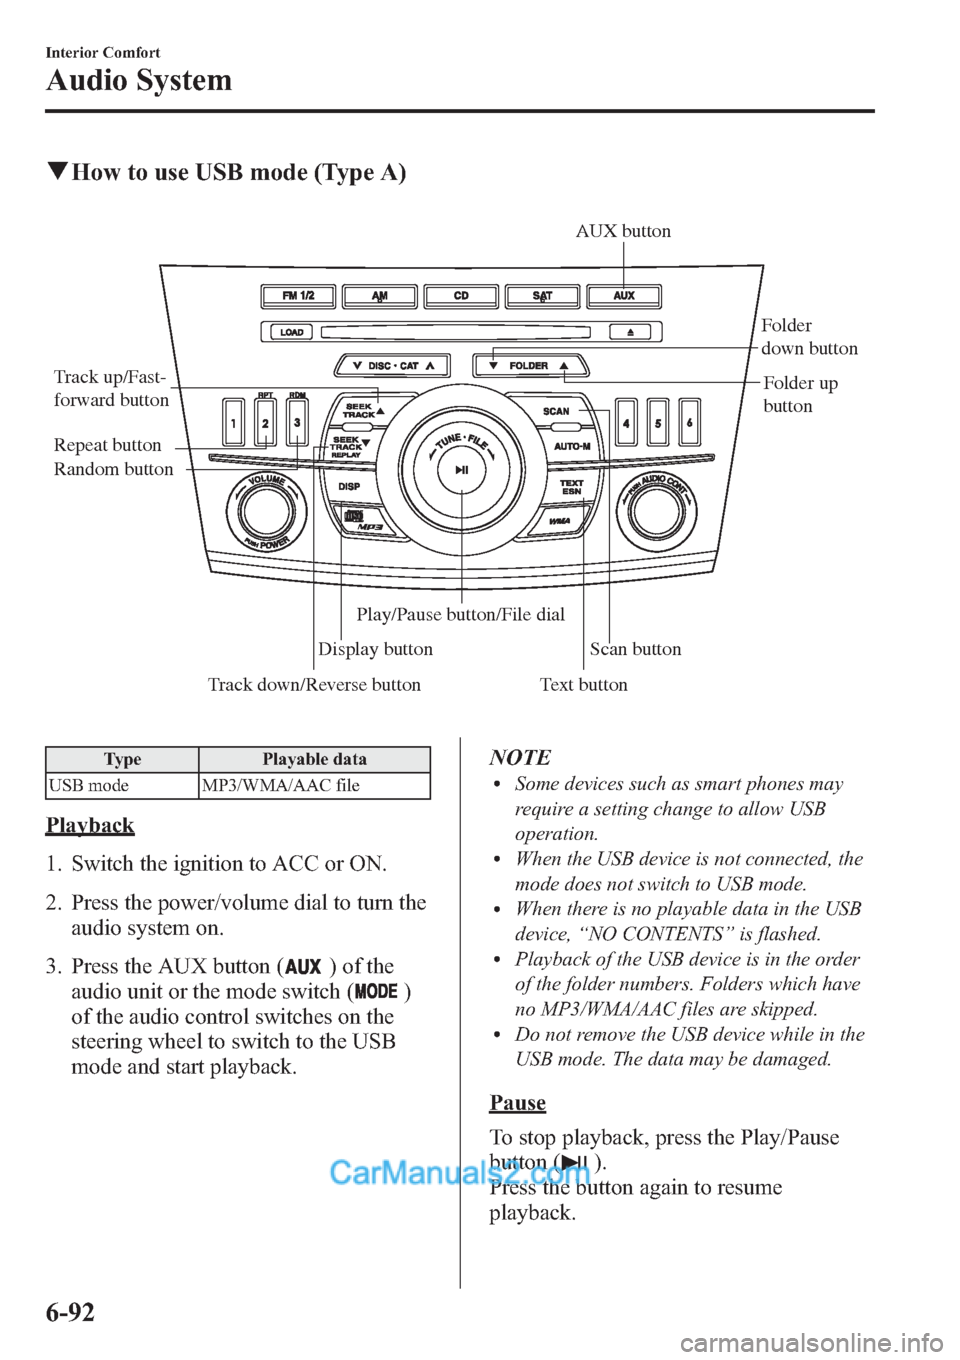
qHow to use USB mode (Type A)
Track down/Reverse button Track up/Fast-
forward button
Display buttonFolder
down button
Folder up
button
Random button Repeat button
Text buttonScan button AUX button
Play/Pause button/File dial
Type Playable data
USB mode MP3/WMA/AAC file
Playback
1. Switch the ignition to ACC or ON.
2. Press the power/volume dial to turn the
audio system on.
3. Press the AUX button (
) of the
audio unit or the mode switch (
)
of the audio control switches on the
steering wheel to switch to the USB
mode and start playback.NOTE
lSome devices such as smart phones may
require a setting change to allow USB
operation.
lWhen the USB device is not connected, the
mode does not switch to USB mode.
lWhen there is no playable data in the USB
device,“NO CONTENTS”is flashed.
lPlayback of the USB device is in the order
of the folder numbers. Folders which have
no MP3/WMA/AAC files are skipped.
lDo not remove the USB device while in the
USB mode. The data may be damaged.
Pause
To stop playback, press the Play/Pause
button (
).
Press the button again to resume
playback.
6-92
Interior Comfort
Audio System
Page 341 of 611

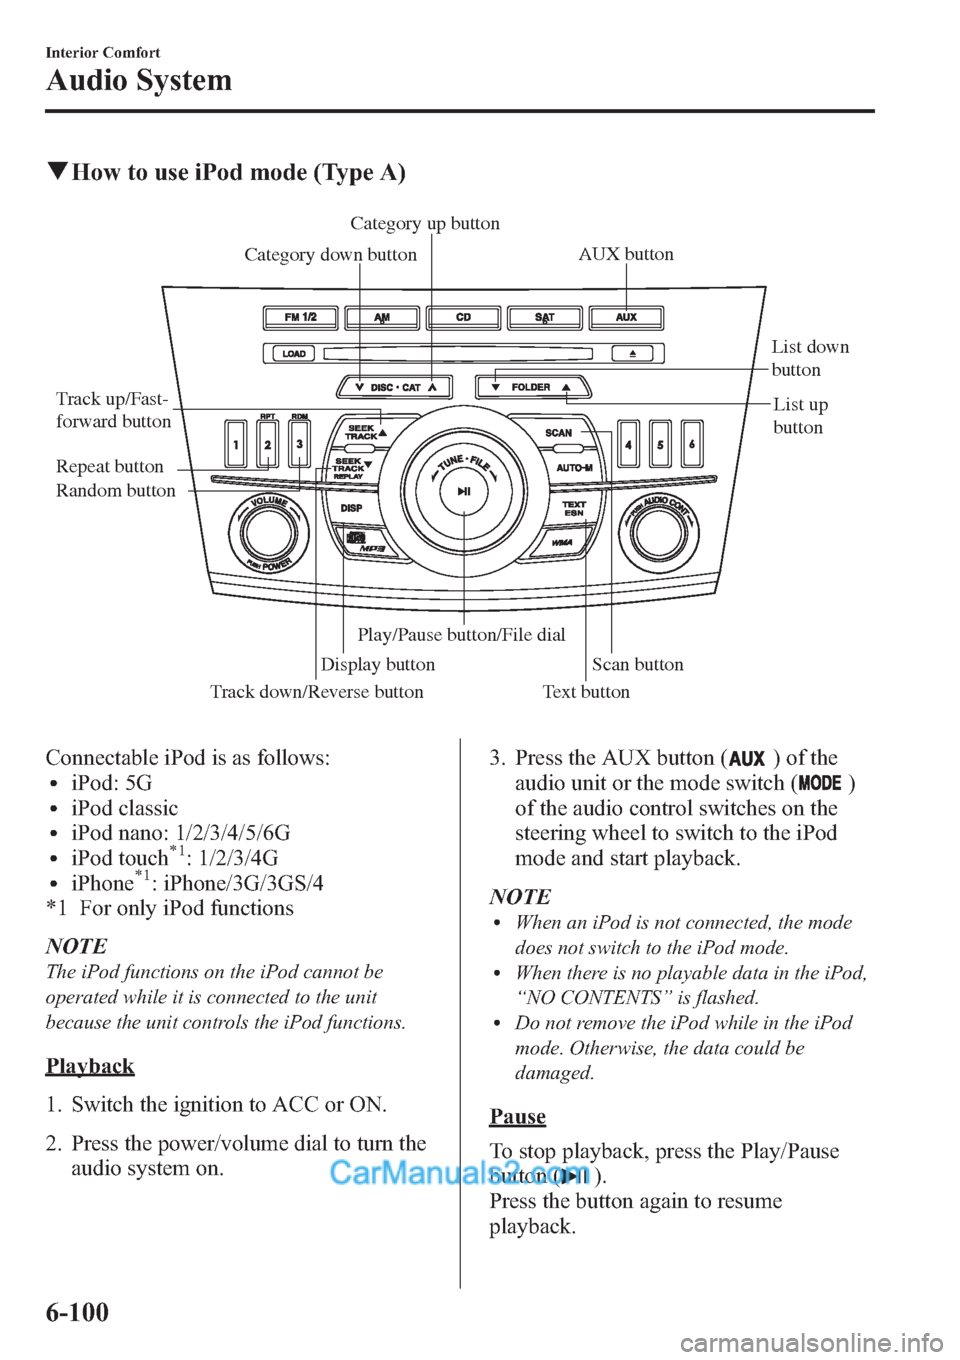
qHow to use iPod mode (Type A)
Track down/Reverse button Track up/Fast-
forward buttonCategory up button
Category down button
Display buttonList down
button
List up
button
Random button Repeat button
Text button
Scan button
Play/Pause button/File dialAUX button
Connectable iPod is as follows:liPod: 5GliPod classicliPod nano: 1/2/3/4/5/6GliPod touch*1: 1/2/3/4GliPhone*1: iPhone/3G/3GS/4
*1 For only iPod functions
NOTE
The iPod functions on the iPod cannot be
operated while it is connected to the unit
because the unit controls the iPod functions.
Playback
1. Switch the ignition to ACC or ON.
2. Press the power/volume dial to turn the
audio system on.3. Press the AUX button (
) of the
audio unit or the mode switch (
)
of the audio control switches on the
steering wheel to switch to the iPod
mode and start playback.
NOTE
lWhen an iPod is not connected, the mode
does not switch to the iPod mode.
lWhen there is no playable data in the iPod,
“NO CONTENTS”is flashed.
lDo not remove the iPod while in the iPod
mode. Otherwise, the data could be
damaged.
Pause
To stop playback, press the Play/Pause
button (
).
Press the button again to resume
playback.
6-100
Interior Comfort
Audio System
Page 367 of 611
qReceiving an Incoming Call
1.Prompt:“Incoming call, press the
pickup button to answer”.
2. To accept the call, press the pick-up
button.
To reject the call, press the hang-up
button.
Talk button
Pick-up buttonTalk button
Hang-up button Pick-up button
qHanging Up a Call
Press the hang-up button during the call.
A beep sound will confirm that call is
ended.
qVolume Adjustment
The power/volume dial of the audio unit
is used to adjust the volume. Turn the dial
to the right to increase volume, to the left
to decrease it.
NOTElThe volume can also be adjusted using the
volume button on the steering wheel.
lThe music volume of the audio unit cannot
be adjusted while Bluetooth® Hands-Free
is being used.
6-126
Interior Comfort
Bluetooth® Hands-Free (Type A)
Page 383 of 611

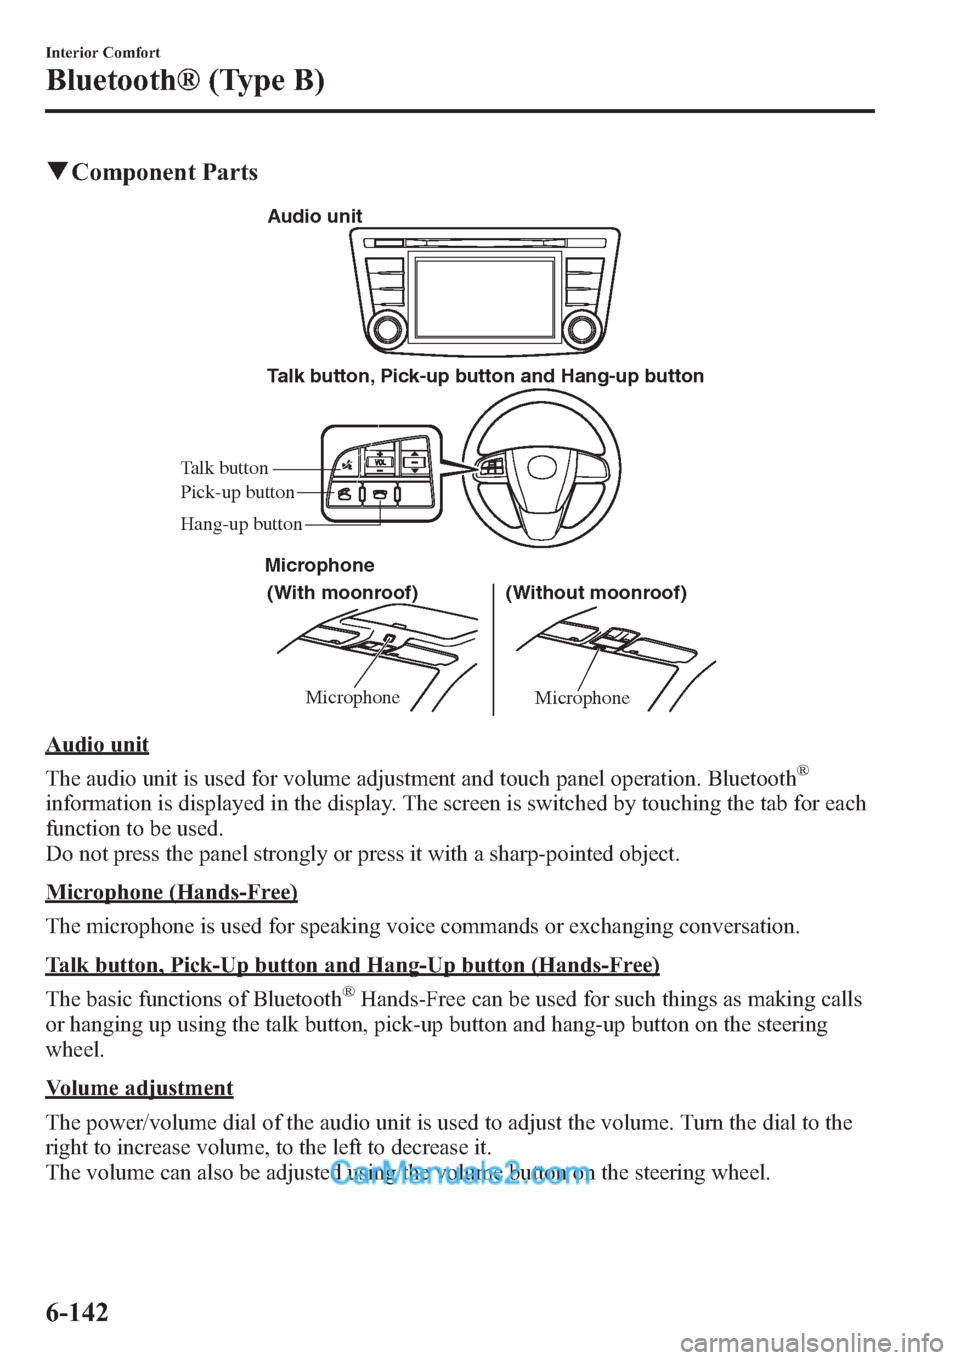
qComponent Parts
MicrophoneMicrophone
Talk button, Pick-up button and Hang-up button
(With moonroof) Microphone
(Without moonroof) Audio unit
Talk button
Hang-up button Pick-up button
Audio unit
The audio unit is used for volume adjustment and touch panel operation. Bluetooth
®
information is displayed in the display. The screen is switched by touching the tab for each
function to be used.
Do not press the panel strongly or press it with a sharp-pointed object.
Microphone (Hands-Free)
The microphone is used for speaking voice commands or exchanging conversation.
Talk button, Pick-Up button and Hang-Up button (Hands-Free)
The basic functions of Bluetooth
®Hands-Free can be used for such things as making calls
or hanging up using the talk button, pick-up button and hang-up button on the steering
wheel.
Volume adjustment
The power/volume dial of the audio unit is used to adjust the volume. Turn the dial to the
right to increase volume, to the left to decrease it.
The volume can also be adjusted using the volume button on the steering wheel.
6-142
Interior Comfort
Bluetooth® (Type B)
Page 466 of 611

8Maintenance and Care
How to keep your Mazda in top condition.
Introduction .................................................................................. 8-2
Introduction ............................................................................... 8-2
Scheduled Maintenance ................................................................ 8-4
Scheduled Maintenance (USA, Canada, and Puerto Rico) ....... 8-4
Scheduled Maintenance (Mexico) ............................................. 8-9
Owner Maintenance ................................................................... 8-16
Owner Maintenance Schedule ................................................ 8-16
Owner Maintenance Precautions ............................................. 8-17
Engine Compartment Overview .............................................. 8-19
Engine Oil ............................................................................... 8-21
Engine Coolant ....................................................................... 8-25
Brake/Clutch Fluid .................................................................. 8-27
Power Steering Fluid ............................................................... 8-27
Automatic Transaxle Fluid (ATF)
í........................................ 8-28
Washer Fluid ........................................................................... 8-29
Body Lubrication .................................................................... 8-30
Wiper Blades ........................................................................... 8-31
Battery ..................................................................................... 8-35
Tires ........................................................................................ 8-39
Light Bulbs ............................................................................. 8-46
Fuses ....................................................................................... 8-58
Appearance Care ........................................................................ 8-65
How to Minimize Environmental Paint Damage .................... 8-65
Exterior Care ........................................................................... 8-67
Interior Care ............................................................................ 8-71
8-1íSome models.
Page 473 of 611

Maintenance IntervalNumber of months or kilometers (miles), whichever comes first
Months 4 8 12 16 20 24 28 32 36 40 44 48
×1000 km 8 16 24 32 40 48 56 64 72 80 88 96
×1000 miles 5 10 15 20 25 30 35 40 45 50 55 60
CHASSIS and BODY
Brake lines, hoses and connections I I
Brake fluid levelIIIIIIIIIIII
Disc brakesIIII
Tire (Rotation) Rotate every 8,000 km (5,000 miles)
Tire inflation pressure and tire wearIIIIIIIIIIII
Steering operation and linkages I I
Power steering fluid levelIIIIIIIIIIII
Front and rear suspension, ball joints and wheel
bearing axial playII
Driveshaft dust boots I I
Bolts and nuts on chassis and body T T
Body condition
*4
(for rust, corrosion and perforation)IIII
Exhaust system and heat shields Inspect every 72,000 km (45,000 miles) or 5 years
All locks and hingesLLLLLLLLLLLL
Washer fluid levelIIIIIIIIIIII
AIR CONDITIONER SYSTEM
Cabin air filter Replace every 40,000 km (25,000 miles) or 2 years
Chart symbols:
I:Inspect: Inspect and clean, repair, adjust, fill up, or replace if necessary.
R:Replace
L:Lubricate
T:Tighten
Remarks:
*1 Use FL22 type coolant in vehicles with the inscription“FL22”on the radiator cap itself or the surrounding
area. Use FL22 when replacing the coolant.
*2 According to state/provincial and federal regulations, failure to perform maintenance on these items will not
void your emissions warranties. However, Mazda recommends that all maintenance services be performed at
the recommended time or mileage/kilometer period to ensure long-term reliability.
*3 If the vehicle is operated primarily under any of the following conditions, replace the spark plugs at every
96,000 km (60,000 miles) or shorter.
a) Repeated short-distance driving
b) Extended periods of idling or low-speed operation
c) Driving for long periods in cold temperatures or extremely humid climates
*4 Canada only.
8-8
Maintenance and Care
Scheduled Maintenance