Page 293 of 611
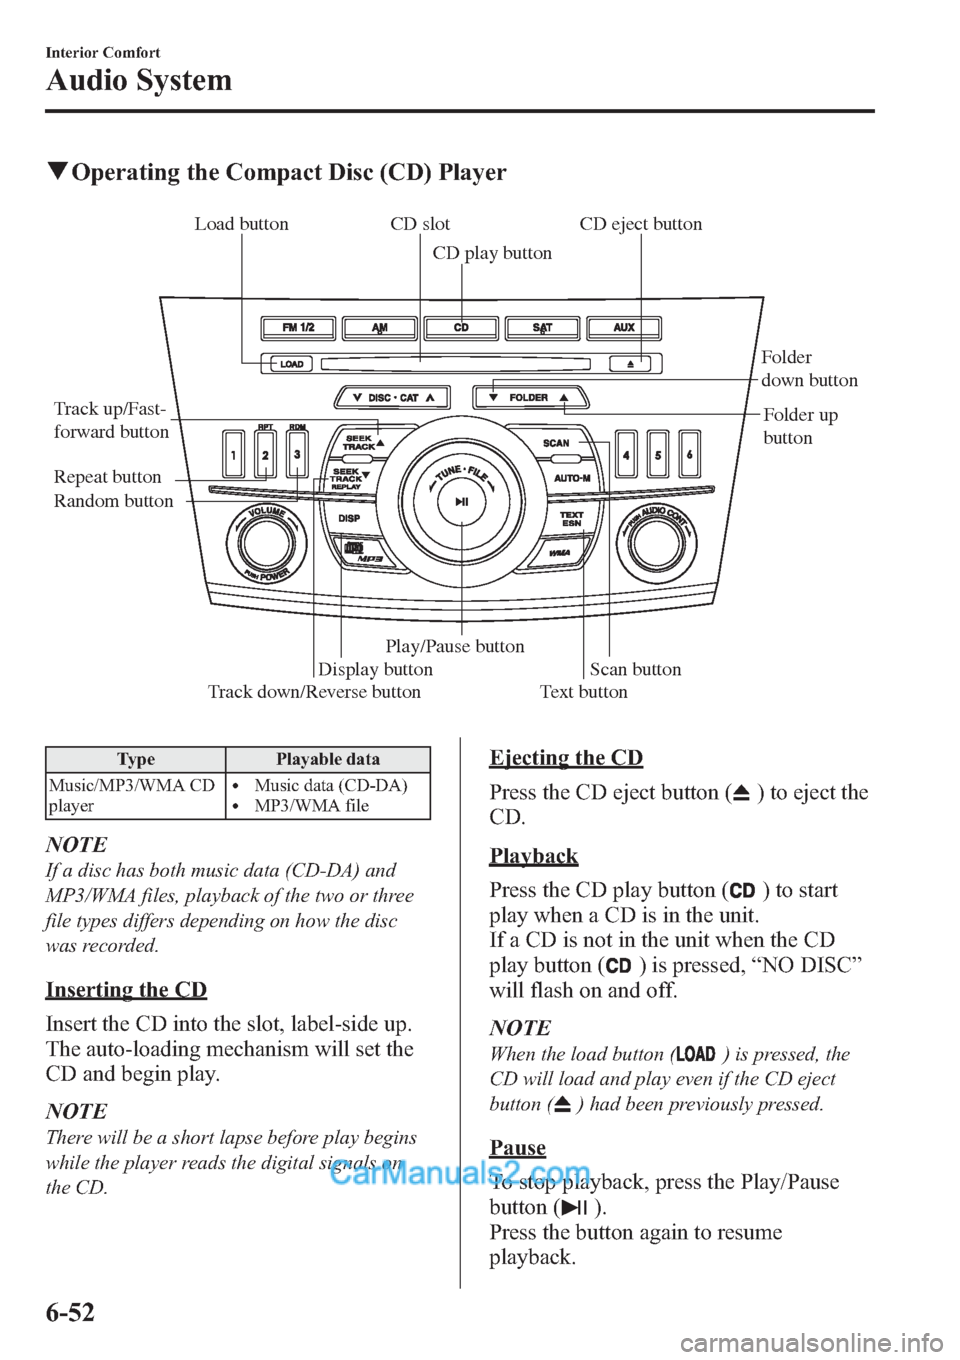
qOperating the Compact Disc (CD) Player
Track down/Reverse button Track up/Fast-
forward buttonCD eject button CD slot
CD play button
Display buttonFolder
down button
Folder up
button
Random button Repeat button
Text button Load buttonScan button
Play/Pause button
Type Playable data
Music/MP3/WMA CD
player
lMusic data (CD-DA)lMP3/WMA file
NOTE
If a disc has both music data (CD-DA) and
MP3/WMA files, playback of the two or three
file types differs depending on how the disc
was recorded.
Inserting the CD
Insert the CD into the slot, label-side up.
The auto-loading mechanism will set the
CD and begin play.
NOTE
There will be a short lapse before play begins
while the player reads the digital signals on
the CD.
Ejecting the CD
Press the CD eject button (
) to eject the
CD.
Playback
Press the CD play button (
) to start
play when a CD is in the unit.
If a CD is not in the unit when the CD
play button (
) is pressed,“NO DISC”
will flash on and off.
NOTE
When the load button () is pressed, the
CD will load and play even if the CD eject
button (
) had been previously pressed.
Pause
To stop playback, press the Play/Pause
button (
).
Press the button again to resume
playback.
6-52
Interior Comfort
Audio System
Page 297 of 611
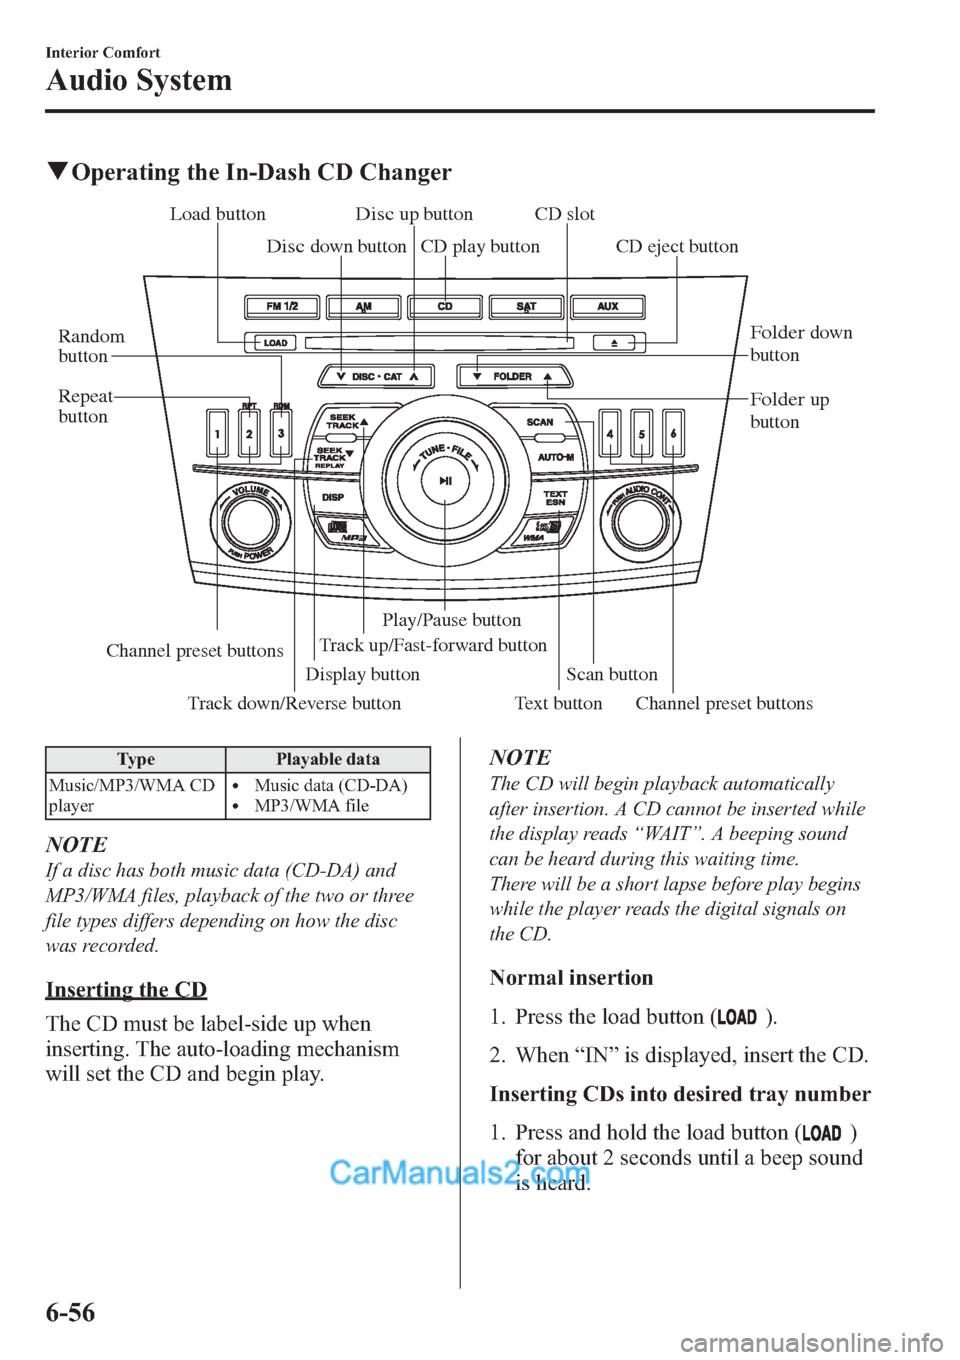
qOperating the In-Dash CD Changer
Track up/Fast-forward buttonCD eject button
Display button
Load button
Channel preset buttons Channel preset buttons
Track down/Reverse button
Text button
Disc down button
Folder down
button
Folder up
button
Disc up button
Random
button
Repeat
button
CD slot
CD play button
Scan button
Play/Pause button
Type Playable data
Music/MP3/WMA CD
player
lMusic data (CD-DA)lMP3/WMA file
NOTE
If a disc has both music data (CD-DA) and
MP3/WMA files, playback of the two or three
file types differs depending on how the disc
was recorded.
Inserting the CD
The CD must be label-side up when
inserting. The auto-loading mechanism
will set the CD and begin play.NOTE
The CD will begin playback automatically
after insertion. A CD cannot be inserted while
the display reads“WAIT”. A beeping sound
can be heard during this waiting time.
There will be a short lapse before play begins
while the player reads the digital signals on
the CD.
Normal insertion
1. Press the load button (
).
2. When“IN”is displayed, insert the CD.
Inserting CDs into desired tray number
1. Press and hold the load button (
)
for about 2 seconds until a beep sound
is heard.
6-56
Interior Comfort
Audio System
Page 304 of 611
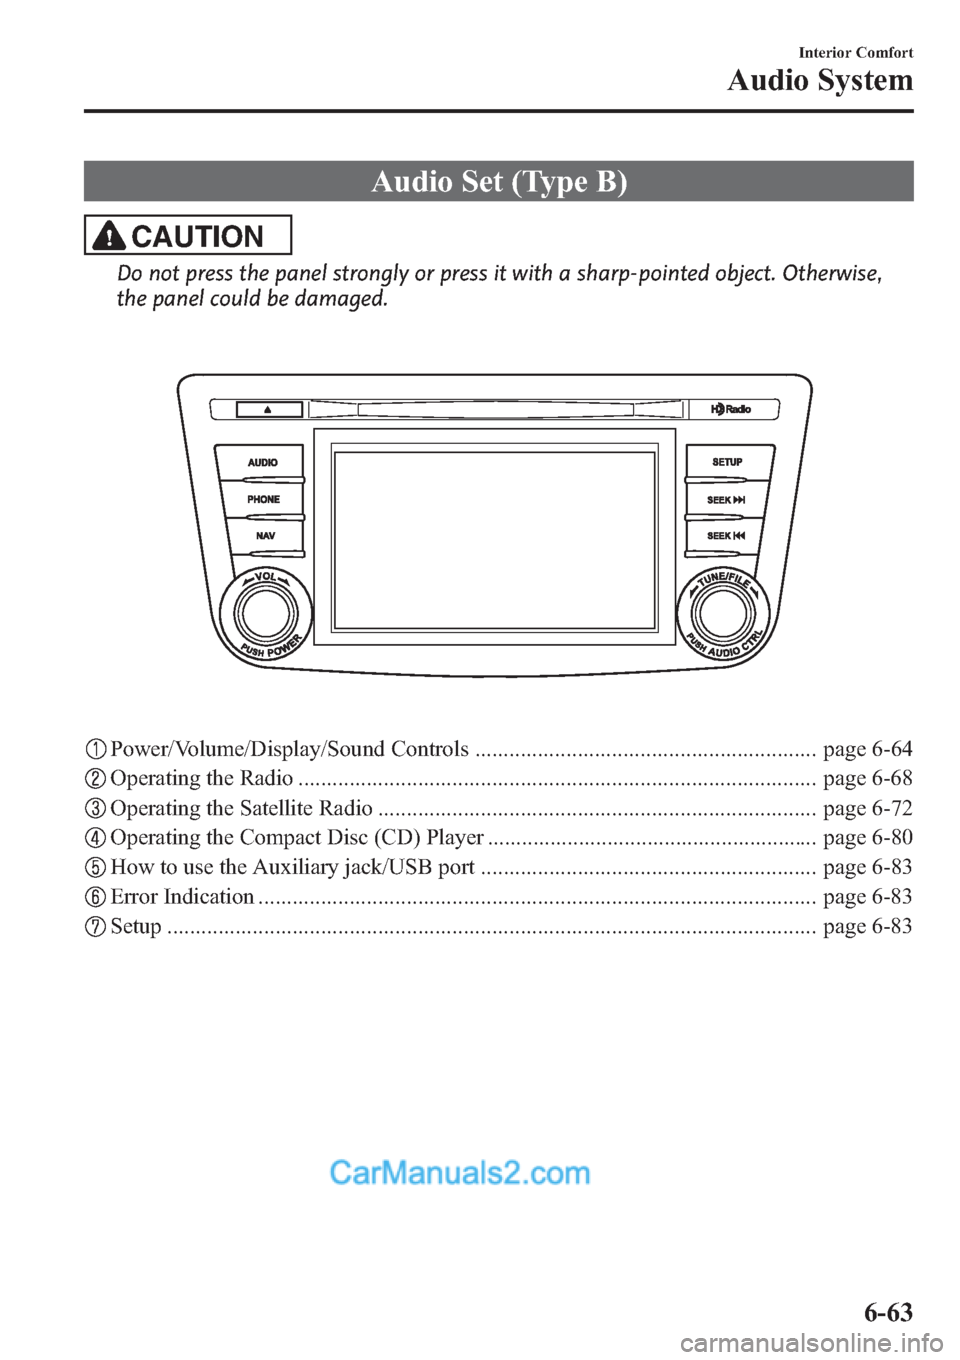
Audio Set (Type B)
CAUTION
Do not press the panel strongly or press it with a sharp-pointed object. Otherwise,
the panel could be damaged.
Power/Volume/Display/Sound Controls ............................................................ page 6-64
Operating the Radio ........................................................................................... page 6-68
Operating the Satellite Radio ............................................................................. page 6-72
Operating the Compact Disc (CD) Player .......................................................... page 6-80
How to use the Auxiliary jack/USB port ........................................................... page 6-83
Error Indication .................................................................................................. page 6-83
Setup .................................................................................................................. page 6-83
Interior Comfort
Audio System
6-63
Page 321 of 611
qOperating the Compact Disc (CD) Player
Audio button
Track up/Fast-
forward button
File dial
CD eject buttonCD slot
Track down/
Reverse button
Type Playable data
Music/MP3/WMA/
AAC CD player
lMusic data (CD-DA)lMP3/WMA/AAC file
NOTE
If a disc has both music data (CD-DA) and
MP3/WMA/AAC files, playback of the two or
three file types differs depending on how the
disc was recorded.
Inserting the CD
Insert the CD into the slot, label-side up.
The auto-loading mechanism will set the
CD and begin play.
NOTE
There will be a short lapse before play begins
while the player reads the digital signals on
the CD.
Ejecting the CD
Press the CD eject button (
) to eject the
CD.
Playback
Press the audio button (
)or
on-screen tab with a CD inserted.
Pause
To pause playback, touch the
on-
screen button.
Touch the
on-screen button during
a pause to cancel it.
6-80
Interior Comfort
Audio System
Page 326 of 611
With Bluetooth® Hands-Free and
navigation system
Talk button
Pick-up buttonTalk button
Hang-up button Pick-up button
NOTElThe talk button, pick-up button, and hang-
up button are operable with the audio unit
turned off.
lMazda has installed this system to prevent
distraction while driving the vehicle and
using audio controls on the dashboard.
Always make safe driving your first priority.
qAdjusting the Volume
To increase the volume, press up the
volume switch.
To decrease the volume, press down the
volume switch.
Without Bluetooth® Hands-Free
With Bluetooth® Hands-Free
qChanging the Sourceí
Press the mode switch () to change
the audio source (FM1 radio→FM2
radio→AM radio→CD player or CD
changer→SIRIUS1→SIRIUS2→
SIRIUS3→AUX→BT audio→USB/
iPod→cyclical).
Without Bluetooth® Hands-Free
Interior Comfort
Audio System
6-85íSome models.
Page 327 of 611
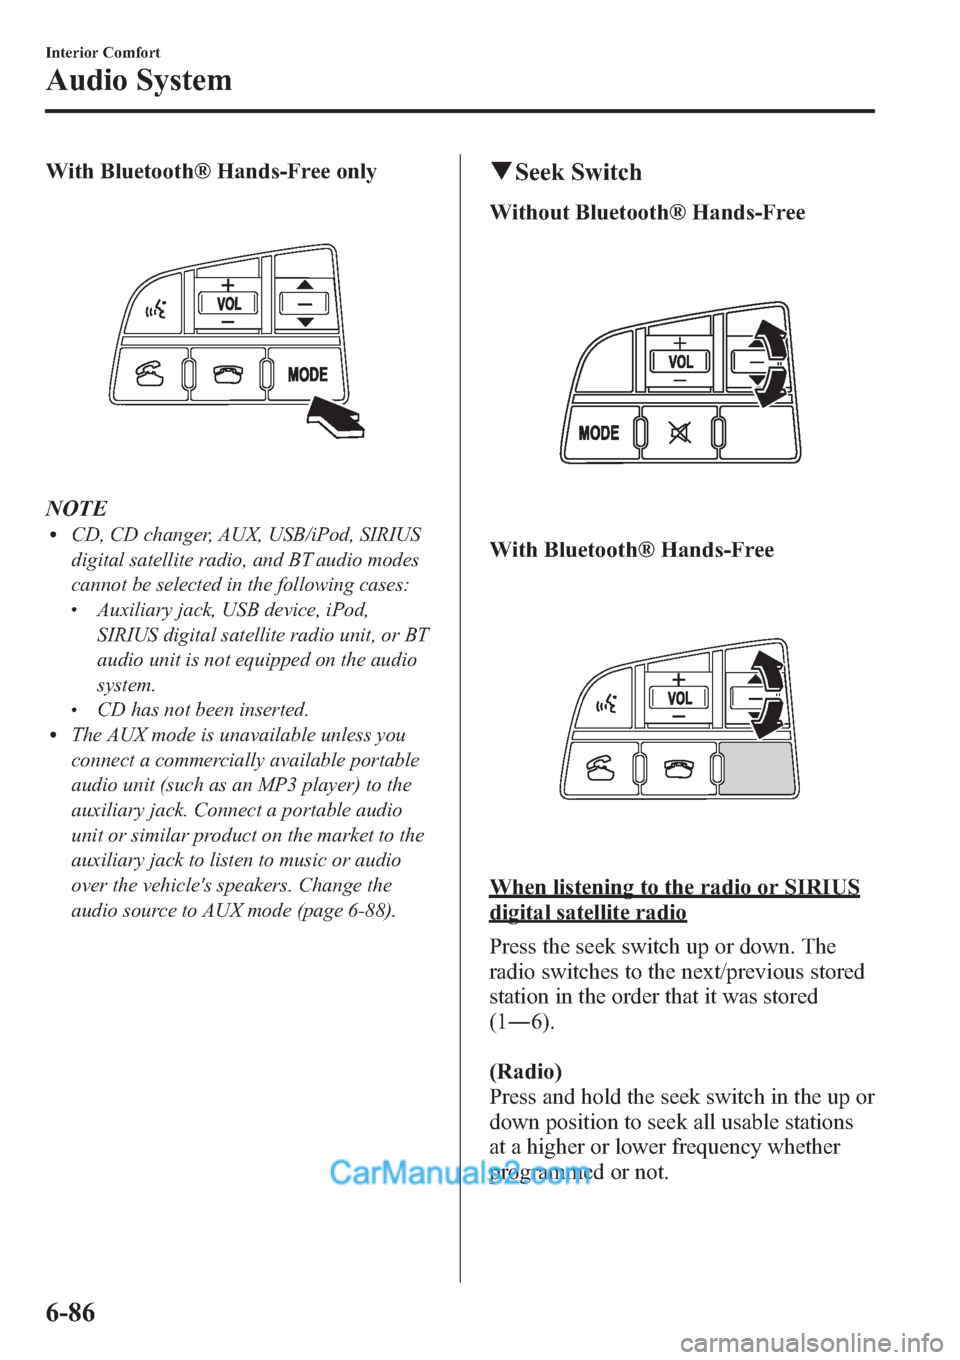
With Bluetooth® Hands-Free only
NOTElCD, CD changer, AUX, USB/iPod, SIRIUS
digital satellite radio, and BT audio modes
cannot be selected in the following cases:
lAuxiliary jack, USB device, iPod,
SIRIUS digital satellite radio unit, or BT
audio unit is not equipped on the audio
system.
lCD has not been inserted.lThe AUX mode is unavailable unless you
connect a commercially available portable
audio unit (such as an MP3 player) to the
auxiliary jack. Connect a portable audio
unit or similar product on the market to the
auxiliary jack to listen to music or audio
over the vehicle's speakers. Change the
audio source to AUX mode (page 6-88).
qSeek Switch
Without Bluetooth® Hands-Free
With Bluetooth® Hands-Free
When listening to the radio or SIRIUS
digital satellite radio
Press the seek switch up or down. The
radio switches to the next/previous stored
station in the order that it was stored
(1―6).
(Radio)
Press and hold the seek switch in the up or
down position to seek all usable stations
at a higher or lower frequency whether
programmed or not.
6-86
Interior Comfort
Audio System
Page 348 of 611
Safety Certification
This CD player is made and tested to meet exacting safety standards. It meets FCC
requirements and complies with safety performance standards of the U.S. Department of
Health and Human Services.
CAUTION
ØThis CD player should not be adjusted or repaired by anyone except qualified
service personnel.
If servicing is required, contact an Authorized Mazda Dealer.
ØUse of controls or adjustments or performance of procedures other than those
specified herein may result in hazardous laser exposure. Never operate the CD
player with the top case of the unit removed.
ØChanges or modifications not expressly approved by the party responsible for
compliance could void the user's authority to operate this equipment.
NOTE
For CD player section:
This device complies with part 15 of the FCC Rules. Operation is subject to the following two
conditions: (1) This device may not cause harmful interference, and (2) this device must accept any
interference received, including interference that may cause undesired operation.
NOTE
This equipment has been tested and found to comply with the limits for a Class B digital device,
pursuant to part 15 of the FCC Rules. These limits are designed to provide reasonable protection
against harmful interference in a residential installation. This equipment generates, uses, and can
radiate radio frequency energy and, if not installed and used in accordance with the instructions,
may cause harmful interference to radio communications. However, there is no guarantee that
interference will not occur in a particular installation.
Interior Comfort
Audio System
6-107
Page 363 of 611
Voice guidance interrupt operation
Voice guidance can be skipped by
pressing the talk button with a short press
while it is being heard. A new voice input
command can then be spoken by the user.
Voice recognition mode cancel
If you want to cancel the voice
recognition mode during a call, the voice
recognition mode can be canceled without
having to end the call.
Press the talk button with a long press.
Basic Bluetooth® Hands-
Free Operation
qBluetooth® Hands-Free Preparation
Language setting
The available languages are English,
Spanish, and Canadian French. If the
language setting is changed, all of the
voice guidance and voice input
commands are done in the selected
language.
NOTE
lIf the language setting is changed, device
registration is maintained.
Phonebook records are not cleared, but
each language has a separate phonebook.
Therefore, entries created in one language
will need to be re-entered in the phonebook
of the new language.
lDo these steps before you start driving.
These less used functions are too
distracting to undertake while driving until
you are fully familiar with the system.
Method 1
1. Press the pick-up button or talk button
with a short press.
2.Say:[Beep]“Setup”
3.Prompt:“Select one of the following:
Pairing options, confirmation prompts,
language, passcode, select phone or
select music player.”
4.Say:[Beep]“Language”
5.Prompt:“Select a language: English,
French, or Spanish.”
6.Say:[Beep]“French”(Speak the
desired language:“English”,“French”
or“Spanish”)
6-122
Interior Comfort
Bluetooth® Hands-Free (Type A)