2013 MAZDA MODEL CX-5 battery
[x] Cancel search: batteryPage 197 of 488

Black plate (197,1)
NOTE
Because this system detects slight changes in tire conditions, the timing of the warning may be faster
or slower in the following cases:
lThe size, manufacturer, or the type of tires is different from the specification.lThe size, manufacturer, or the type of a tire is different from the others, or the level of tire wear is
excessively different between them.
lA run-flat tire, studless tire, snow tire, or tire chains are used.lAn emergency tire is used (The tire pressure monitoring system warning light may flash and then
continue illuminating).
lA tire is repaired using the emergency flat tire repair kit.lThe tire pressure is excessively higher than the specified pressure, or the tire pressure is suddenly
lowered for some reason such as a tire burst during driving.
lThe vehicle speed is lower than about 15 km/h (9.3 mph) (including when the vehicle is stopped),
or the drive period is shorter than 5 minutes.
lThe vehicle is driven on an extremely rough road or a slippery, icy road.lHard steering and rapid acceleration/deceleration are repeated such as during aggressive driving
on a winding road.
lLoad on the vehicle is applied to a tire such as by loading heavy luggage to one side of the
vehicle.
lSystem initialization has not been implemented with the specified tire pressure.
qTire Pressure Monitoring System
Initialization
In the following cases, system
initialization must be performed so that
the system operates normally.
lA tire pressure is adjusted.lTire rotation is performed.lA tire or wheel is replaced.lThe battery is replaced or completely
drained.
lThe tire pressure monitoring system
warning light is illuminated.
Initialization method
1. Park the car in a safe place and firmly
apply the parking brake.2. Let the tires cool, then adjust the tire
pressure of all four (4) tires to the
specified pressure indicated on the tire
pressure label located on the door jamb
of the driver's door (door open). Refer
to Tires on page 9-7.
3. Switch the ignition ON.
When Driving
Tire Pressure Monitoring System
4-73
CX-5_8CA5-EA-11L_Edition3 Page197
Friday, June 22 2012 3:45 PM
Form No.8CA5-EA-11L
Page 216 of 488

Black plate (216,1)
Operating Tips
lOperate the climate control system
with the engine running.
lTo prevent the battery from being
discharged, do not leave the fan control
dial on for a long period of time with
the ignition switched ON when the
engine is not running.
lClear all obstructions such as leaves,
snow and ice from the hood and the air
inlet in the cowl grille to improve the
system efficiency.
lUse the climate control system to defog
the windows and dehumidify the air.
lThe recirculate mode should be used
when driving through tunnels or while
in a traffic jam, or when you would like
to shut off outside air for quick cooling
of the interior.
lUse the outside air mode for ventilation
or windshield defrosting.
lIf the vehicle has been parked in direct
sunlight during hot weather, open the
windows to let warm air escape, then
run the climate control system.
lRun the air conditioner about 10
minutes at least once a month to keep
internal parts lubricated.
lHave the air conditioner checked
before the weather gets hot. Lack of
refrigerant may make the air
conditioner less efficient.
The refrigerant specifications are
indicated on a label attached to the
inside of the engine compartment.
Check the label before refilling the
refrigerant. If the wrong type of
refrigerant is used, it could result in a
serious malfunction of the air
conditioner.
For details, consult an Authorized
Mazda Dealer.
Label
5-2
Interior Features
Climate Control System
CX-5_8CA5-EA-11L_Edition3 Page216
Friday, June 22 2012 3:46 PM
Form No.8CA5-EA-11L
Page 227 of 488

Black plate (227,1)
Antennaí
qType A
The antenna is incorporated into the
window glass.
CAUTION
When washing the inside of the
window which has an antenna, use a
soft cloth dampened in lukewarm
water, gently wiping the antenna
lines.
Use of glass cleaning products could
damage the antenna.
qType B
Operating Tips for Audio
System
WARNING
Always adjust the audio while the
vehicle is stopped:
Do not adjust the audio control
switches while driving the vehicle.
Adjusting the audio while driving the
vehicle is dangerous as it could
distract your attention from the
vehicle operation which could lead to
a serious accident.
Even if the audio control switches are
equipped on the steering wheel, learn
to use the switches without looking
down at them so that you can keep
your maximum attention on the road
while driving the vehicle.
CAUTION
For the purposes of safe driving,
adjust the audio volume to a level
that allows you to hear sounds
outside of the vehicle including car
horns and particularly emergency
vehicle sirens.
NOTE
lTo prevent the battery from being
discharged, do not leave the audio system
on for a long period of time when the
engine is not running.
lIf a cellular phone or CB radio is used in
or near the vehicle, it could cause noise to
occur from the audio system, however, this
does not indicate that the system has been
damaged.
Interior Features
Audio System
5-13íSome models. CX-5_8CA5-EA-11L_Edition3 Page227
Friday, June 22 2012 3:46 PM
Form No.8CA5-EA-11L
Page 238 of 488

Black plate (238,1)
CAUTION
ØRemove the iPod when it is not in
use. Because the iPod is not
designed to withstand excessive
changes in temperature inside the
cabin, it could be damaged or the
battery may deteriorate due to the
excessive temperature or humidity
inside the cabin if it is left in the
vehicle.
ØIf data in the iPod is lost while it is
connected to the unit, Mazda
cannot guarantee recovery of any
lost data.
ØIf the iPod battery is deteriorated,
the iPod may not recharge and
playback may not be possible
when it is connected to the unit.
Replace the iPod battery
immediately.
ØBe careful not to pinch the iPod
connecting cable when opening/
closing the glove compartment.
ØFor the details on using the iPod,
refer to the iPod instruction
manual.
ØWhen connecting the iPod to a
USB port, all commands are made
from the audio unit. Control on
the iPod side is impossible.
NOTE
lThis unit cannot display the images and
video in an iPod.
lThe iPod functions on the iPod cannot be
operated while it is connected to the USB
port because the audio unit controls the
iPod functions.
5-24
Interior Features
Audio System
CX-5_8CA5-EA-11L_Edition3 Page238
Friday, June 22 2012 3:46 PM
Form No.8CA5-EA-11L
Page 242 of 488

Black plate (242,1)
qOperating the Radio
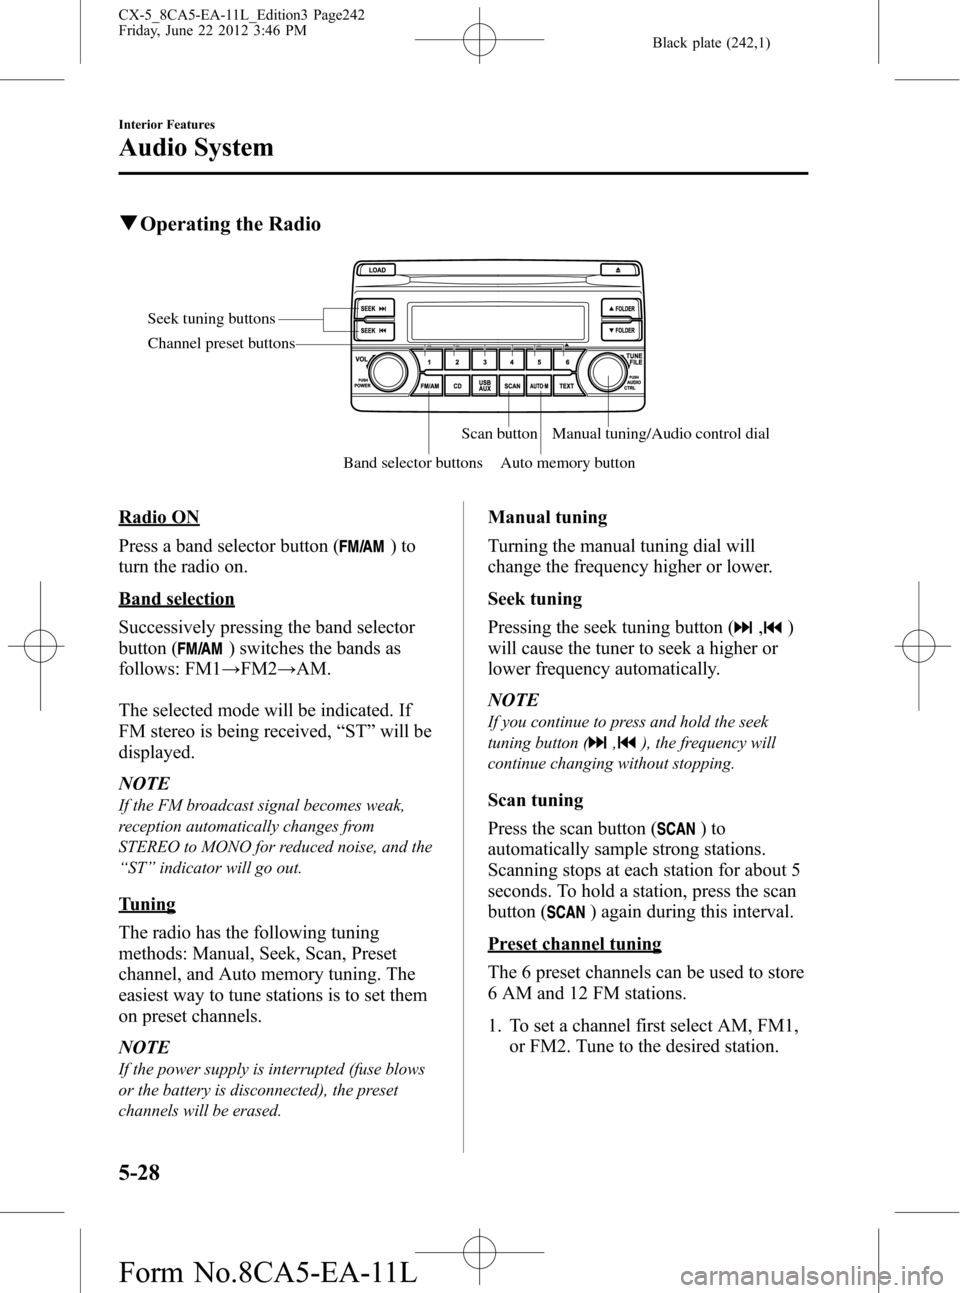
Seek tuning buttons
Band selector buttonsScan button
Auto memory buttonManual tuning/Audio control dial Channel preset buttons
Radio ON
Press a band selector button (
)to
turn the radio on.
Band selection
Successively pressing the band selector
button (
) switches the bands as
follows: FM1→FM2→AM.
The selected mode will be indicated. If
FM stereo is being received,“ST”will be
displayed.
NOTE
If the FM broadcast signal becomes weak,
reception automatically changes from
STEREO to MONO for reduced noise, and the
“ST”indicator will go out.
Tuning
The radio has the following tuning
methods: Manual, Seek, Scan, Preset
channel, and Auto memory tuning. The
easiest way to tune stations is to set them
on preset channels.
NOTE
If the power supply is interrupted (fuse blows
or the battery is disconnected), the preset
channels will be erased.
Manual tuning
Turning the manual tuning dial will
change the frequency higher or lower.
Seek tuning
Pressing the seek tuning button (
,)
will cause the tuner to seek a higher or
lower frequency automatically.
NOTE
If you continue to press and hold the seek
tuning button (
,), the frequency will
continue changing without stopping.
Scan tuning
Press the scan button (
)to
automatically sample strong stations.
Scanning stops at each station for about 5
seconds. To hold a station, press the scan
button (
) again during this interval.
Preset channel tuning
The 6 preset channels can be used to store
6 AM and 12 FM stations.
1. To set a channel first select AM, FM1,
or FM2. Tune to the desired station.
5-28
Interior Features
Audio System
CX-5_8CA5-EA-11L_Edition3 Page242
Friday, June 22 2012 3:46 PM
Form No.8CA5-EA-11L
Page 254 of 488

Black plate (254,1)
qOperating the Radio
Seek tuning buttons
Manual tuning dial Audio button
Radio ON
Press the audio button (
) and touch
the
on-screen tab.
Band selection
Touch the
on-screen tab to switch
the band as follows:
FM1→FM2→AM
NOTE
lis displayed when FM1 is selected,
is displayed when FM2 is
selected, and
is displayed when AM
is selected.
lIf the FM broadcast signal becomes weak,
reception automatically changes from
STEREO to MONO for reduced noise, and
the“STEREO”indicator will no longer
display.
Tuning
The radio has the following tuning
methods: Manual, Seek, Scan, Preset
channel, and Auto memory tuning. The
easiest way to tune stations is to set them
on preset channels.
NOTE
If the power supply is interrupted (fuse blows
or the battery is disconnected), the preset
channels will be erased.
Manual tuning
Turning the manual tuning dial will
change the frequency higher or lower.
NOTE
When anbroadcast is being
received, a receivable multicast channel is also
received.
Seek tuning
Pressing the seek tuning button (
,)
will cause the tuner to seek a higher or
lower frequency automatically.
NOTE
lIf you continue to press and hold the seek
tuning button (
,) the frequency will
continue changing without stopping.
lWhen anbroadcast is being
received, a receivable multicast channel is
also received.
5-40
Interior Features
Audio System
CX-5_8CA5-EA-11L_Edition3 Page254
Friday, June 22 2012 3:46 PM
Form No.8CA5-EA-11L
Page 273 of 488

Black plate (273,1)
WARNING
Do not adjust the portable audio unit
or a similar product while driving the
vehicle:
Adjusting the portable audio unit or
a similar product while driving the
vehicle is dangerous as it could
distract your attention from the
vehicle operation which could lead to
a serious accident. Always adjust the
portable audio unit or a similar
product while the vehicle is stopped.
CAUTION
ØAlways close the auxiliary jack/
USB port lid when it is not in use.
If foreign matter or liquid
penetrates the auxiliary jack/USB
port, it may cause a malfunction.
ØDepending on the portable audio
device, noise may occur when the
device is connected to the vehicle
accessory socket. (If noise occurs,
do not use the accessory socket.)NOTE
lBefore using the auxiliary jack/USB port,
refer to the instruction manual for the
portable audio device.
lUse a commercially-available, non-
impedance (3.5
) stereo mini plug for
connecting the portable audio unit to the
auxiliary jack. Before using the auxiliary
jack, read the manufacturer's instructions
for connecting a portable audio unit to the
auxiliary jack.
lTo prevent discharging of the battery, do
not use the auxiliary input for long periods
with the engine off or idling.
lWhen connecting a device to the auxiliary
jack or USB port, noise may occur
depending on the connected device. If the
device is connected to the vehicle's
accessory socket, the noise can be reduced
by unplugging it from the accessory socket.
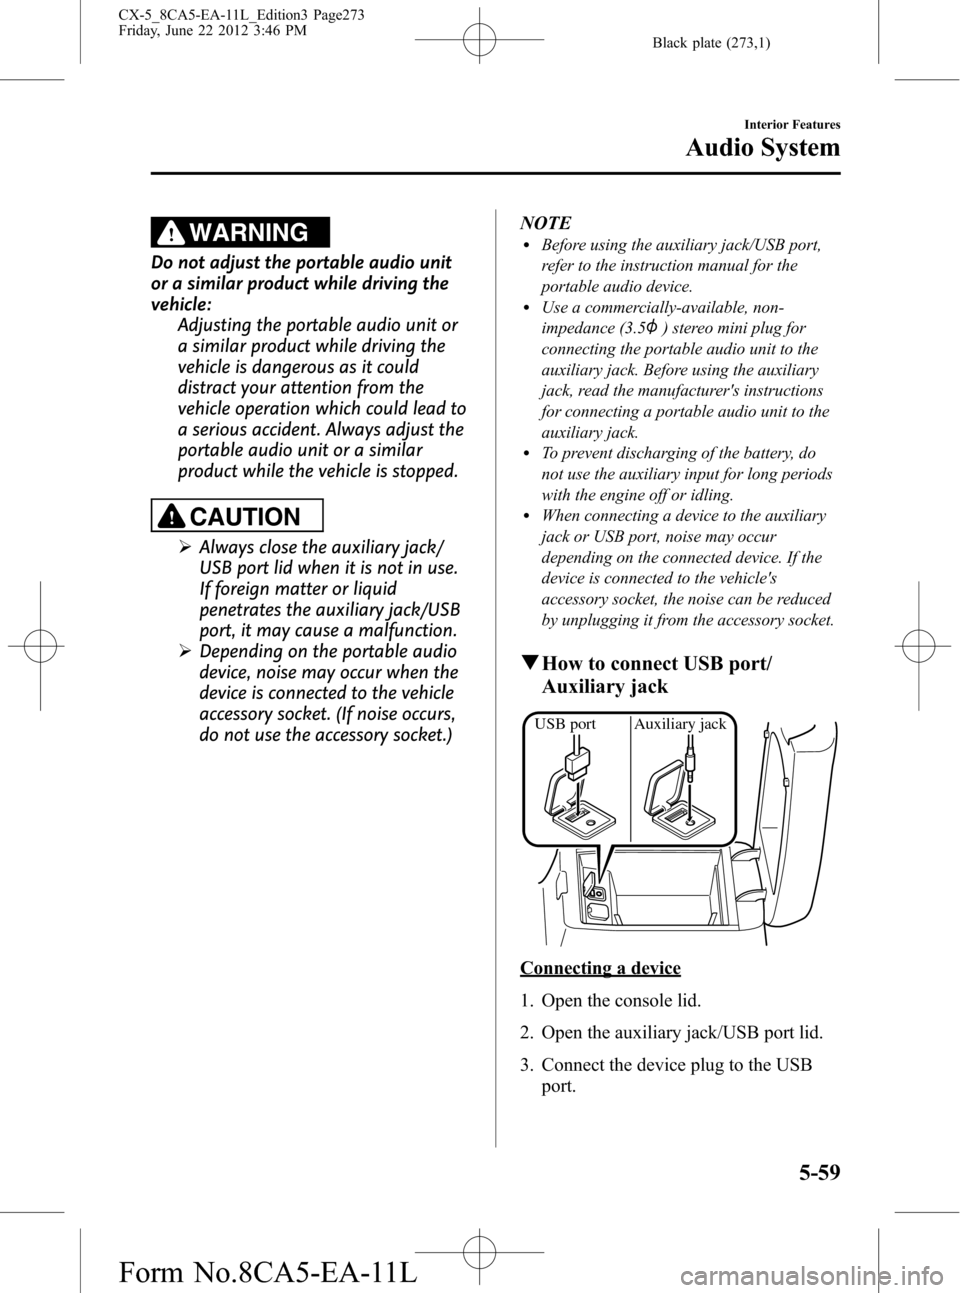
qHow to connect USB port/
Auxiliary jack
USB port Auxiliary jack
Connecting a device
1. Open the console lid.
2. Open the auxiliary jack/USB port lid.
3. Connect the device plug to the USB
port.
Interior Features
Audio System
5-59
CX-5_8CA5-EA-11L_Edition3 Page273
Friday, June 22 2012 3:46 PM
Form No.8CA5-EA-11L
Page 302 of 488

Black plate (302,1)
Bluetooth® Audio
Applicable Bluetooth®specification
Ver. 2.0 or higher
Response profile
lA2DP (Advanced Audio Distribution
Profile) Ver. 1.0/1.2
lAVRCP (Audio/Video Remote Control
Profile) Ver. 1.0/1.3/1.4
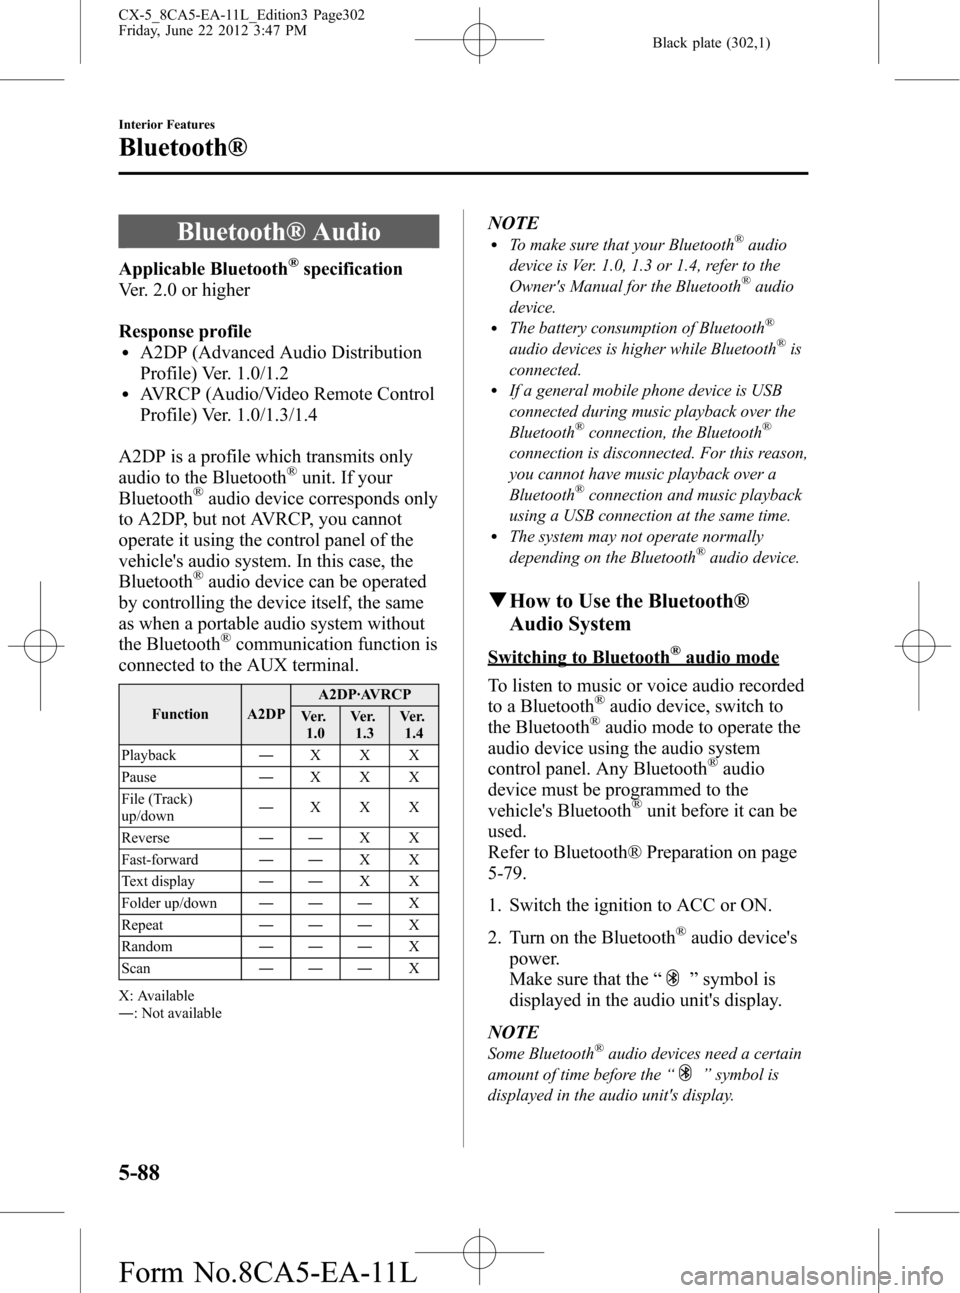
A2DP is a profile which transmits only
audio to the Bluetooth
®unit. If your
Bluetooth®audio device corresponds only
to A2DP, but not AVRCP, you cannot
operate it using the control panel of the
vehicle's audio system. In this case, the
Bluetooth
®audio device can be operated
by controlling the device itself, the same
as when a portable audio system without
the Bluetooth
®communication function is
connected to the AUX terminal.
Function A2DPA2DP·AVRCP
Ve r.
1.0Ve r.
1.3Ve r.
1.4
Playback―XXX
Pause―XXX
File (Track)
up/down―XXX
Reverse――XX
Fast-forward――XX
Text display――XX
Folder up/down―――X
Repeat―――X
Random―――X
Scan―――X
X: Available
―: Not available
NOTElTo make sure that your Bluetooth®audio
device is Ver. 1.0, 1.3 or 1.4, refer to the
Owner's Manual for the Bluetooth
®audio
device.
lThe battery consumption of Bluetooth®
audio devices is higher while Bluetooth®is
connected.
lIf a general mobile phone device is USB
connected during music playback over the
Bluetooth
®connection, the Bluetooth®
connection is disconnected. For this reason,
you cannot have music playback over a
Bluetooth
®connection and music playback
using a USB connection at the same time.
lThe system may not operate normally
depending on the Bluetooth®audio device.
qHow to Use the Bluetooth®
Audio System
Switching to Bluetooth®audio mode
To listen to music or voice audio recorded
to a Bluetooth
®audio device, switch to
the Bluetooth®audio mode to operate the
audio device using the audio system
control panel. Any Bluetooth
®audio
device must be programmed to the
vehicle's Bluetooth
®unit before it can be
used.
Refer to Bluetooth® Preparation on page
5-79.
1. Switch the ignition to ACC or ON.
2. Turn on the Bluetooth
®audio device's
power.
Make sure that the“
”symbol is
displayed in the audio unit's display.
NOTE
Some Bluetooth®audio devices need a certain
amount of time before the“
”symbol is
displayed in the audio unit's display.
5-88
Interior Features
Bluetooth®
CX-5_8CA5-EA-11L_Edition3 Page302
Friday, June 22 2012 3:47 PM
Form No.8CA5-EA-11L