2013 MAZDA MODEL 6 change time
[x] Cancel search: change timePage 95 of 140
95
Audio Operation
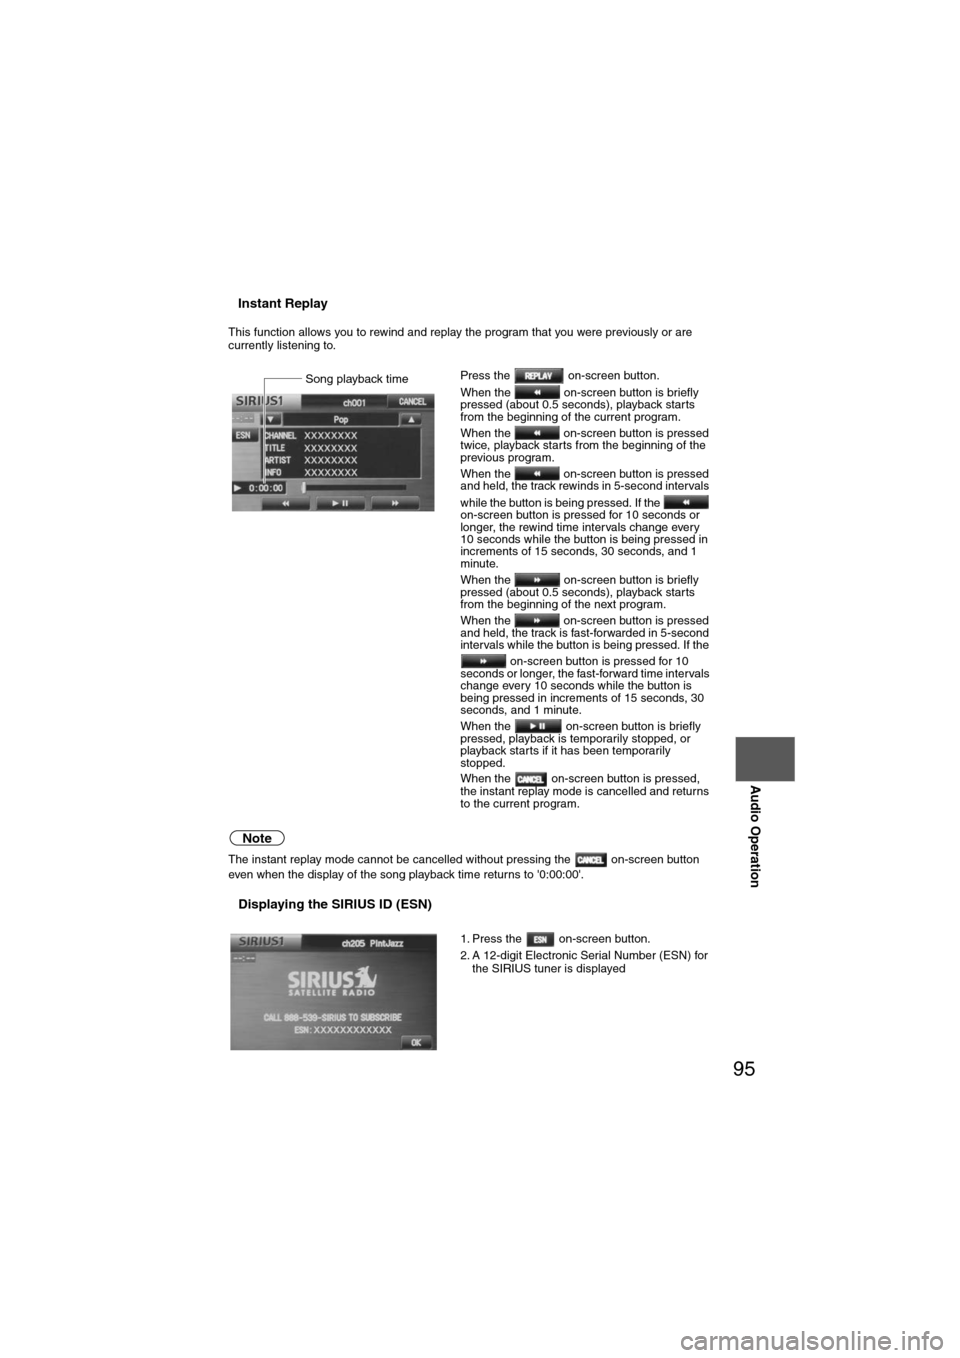
nInstant Replay
This function allows you to rewind and replay the program that you were previously or are
currently listening to.
Note
The instant replay mode cannot be cancelled without pressing the on-screen button
even when the display of the song playback time returns to '0:00:00'.
nDisplaying the SIRIUS ID (ESN)
Press the on-screen button.
When the on-screen button is briefly
pressed (about 0.5 seconds), playback starts
from the beginning of the current program.
When the on-screen button is pressed
twice, playback starts from the beginning of the
previous program.
When the on-screen button is pressed
and held, the track rewinds in 5-second intervals
while the button is being pressed. If the
on-screen button is pressed for 10 seconds or
longer, the rewind time intervals change every
10 seconds while the button is being pressed in
increments of 15 seconds, 30 seconds, and 1
minute.
When the on-screen button is briefly
pressed (about 0.5 seconds), playback starts
from the beginning of the next program.
When the on-screen button is pressed
and held, the track is fast-forwarded in 5-second
intervals while the button is being pressed. If the on-screen button is pressed for 10
seconds or longer, the fast-forward time intervals
change every 10 seconds while the button is
being pressed in increments of 15 seconds, 30
seconds, and 1 minute.
When the on-screen button is briefly
pressed, playback is temporarily stopped, or
playback starts if it has been temporarily
stopped.
When the on-screen button is pressed,
the instant replay mode is cancelled and returns
to the current program.
1. Press the on-screen button.
2. A 12-digit Electronic Serial Number (ESN) for
the SIRIUS tuner is displayedSong playback time
Page 96 of 140
96
Before
UseGetting
started
Routing Address
Book
Vo i c e Recognition
Navigation
Set Up
RDM-TMC
Audio Operation
Navigation
Set Up
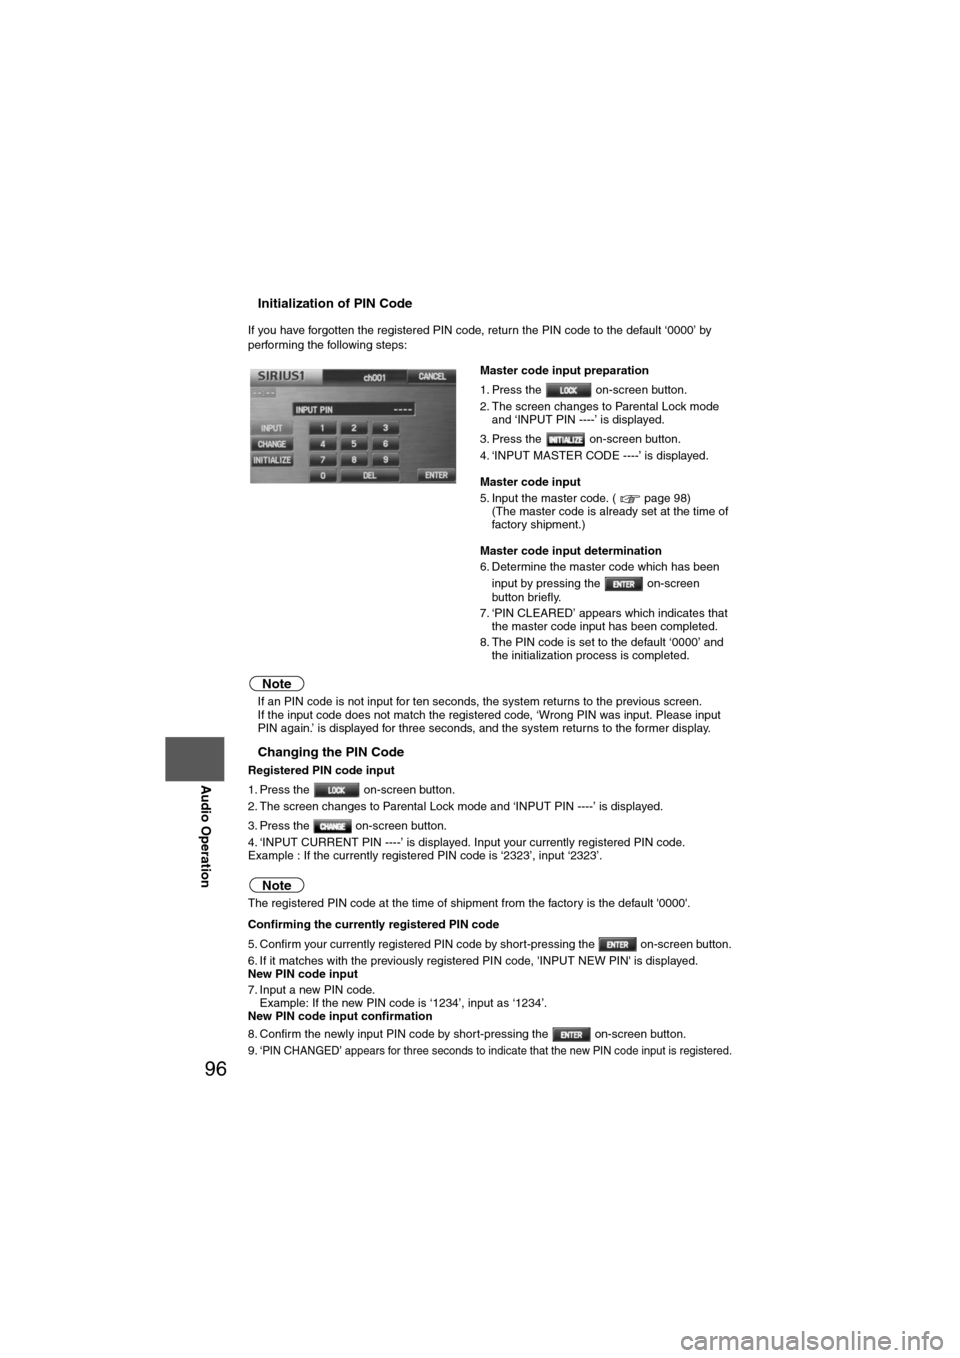
nInitialization of PIN Code
If you have forgotten the registered PIN code, return the PIN code to the default ‘0000’ by
performing the following steps:
Note
l
If an PIN code is not input for ten seconds, the system returns to the previous screen.
l If the input code does not match the registered code, ‘Wrong PIN was input. Please input
PIN again.’ is displayed for three seconds, and the system returns to the former display.
nChanging the PIN Code
Registered PIN code input
1. Press the on-screen button.
2. The screen changes to Parental Lock mode and ‘INPUT PIN ----’ is displayed.
3. Press the on-screen button.
4. ‘INPUT CURRENT PIN ----’ is displayed. Input your currently registered PIN code.
Example : If the currently registered PIN code is ‘2323’, input ‘2323’.
Note
The registered PIN code at the time of shipment from the factory is the default '0000'.
Confirming the currently registered PIN code
5. Confirm your currently registered PIN code by short-pressing the on-screen button.
6. If it matches with the previously registered PIN code, 'INPUT NEW PIN' is displayed.
New PIN code input
7. Input a new PIN code.
Example: If the new PIN code is ‘1234’, input as ‘1234’.
New PIN code input confirmation
8. Confirm the newly input PIN code by short-pressing the on-screen button.
9. ‘
PIN CHANGED’ appears for three seconds to indicate that the new PIN code input is registered.
Master code input preparation
1. Press the on-screen button.
2. The screen changes to Parental Lock mode and ‘INPUT PIN ----’ is displayed.
3. Press the on-screen button.
4. ‘INPUT MASTER CODE ----’ is displayed.
Master code input
5. Input the master code. ( page 98) (The master code is already set at the time of
factory shipment.)
Master code input determination
6. Determine the master code which has been input by pressing the on-screen
button briefly.
7. ‘PIN CLEARED’ appears which indicates that the master code input has been completed.
8. The PIN code is set to the default ‘0000’ and the initialization process is completed.
Page 97 of 140
97
Audio Operation
Note
lIf a PIN code is not input within ten seconds, the system returns to the previous screen.
l If the input PIN code does not match the registered PIN code, ‘Wrong PIN was input.
Please input PIN again.’ is displayed for three seconds and the system returns to the PIN
code input screen.
nIndividual Channel Locking
If a channel is locked, the channel is muted.
Note
If the registered PIN code is forgotten, return the PIN code to the default ‘0000’.
( page 96)
Locking a channel
1. Select a channel to be locked by pressing the TRACK button or turning the TUNE AUDIO dial.
Example: Select channel 100
Registered PIN code input preparation
2. Press the on-screen button.
3. The screen changes to Parental Lock mode and ‘INPUT PIN ----’ is displayed.
Registered PIN code input
4. Press the on-screen button.
5. Input the 4-digit registered PIN code.Example: If the registered PIN code is ‘2323’, input ‘2323’.
Registered PIN code input confirmation
6. Confirm the input PIN code by pressing the on-screen button.
7. If it matches with the registered PIN code, ‘LOCKED’ is displayed.
8. The parental lock is activated. At this time, mute is on and no sound is heard.
Note
l If a PIN code is not input for ten seconds, the system returns to the previous screen.
l If the input PIN code does not match the registered PIN code, ‘Wrong PIN was input.
Please input the PIN again.’ is displayed for three seconds and the system returns to the
PIN code input screen.
nLock Cancellation
Unlocking a channel
1. Select the channel to be unlocked.
Registered PIN code input
2. Press the on-screen button.
3. Screen changes to Parental Lock mode and ‘INPUT PIN ----’ is displayed.
4. Press the on-screen button.
5. Input the 4-digits registered PIN code.
Example :
If the registered PIN code is ‘2323’, input ‘2323’.
Registered PIN code input confirmation
6. Confirm the input PIN code by short-pressing the on-screen button.
Page 112 of 140
112
Before
UseGetting
started
Routing Address
Book
Vo i c e Recognition
Navigation
Set Up
RDM-TMC
Audio Operation
Navigation
Set Up
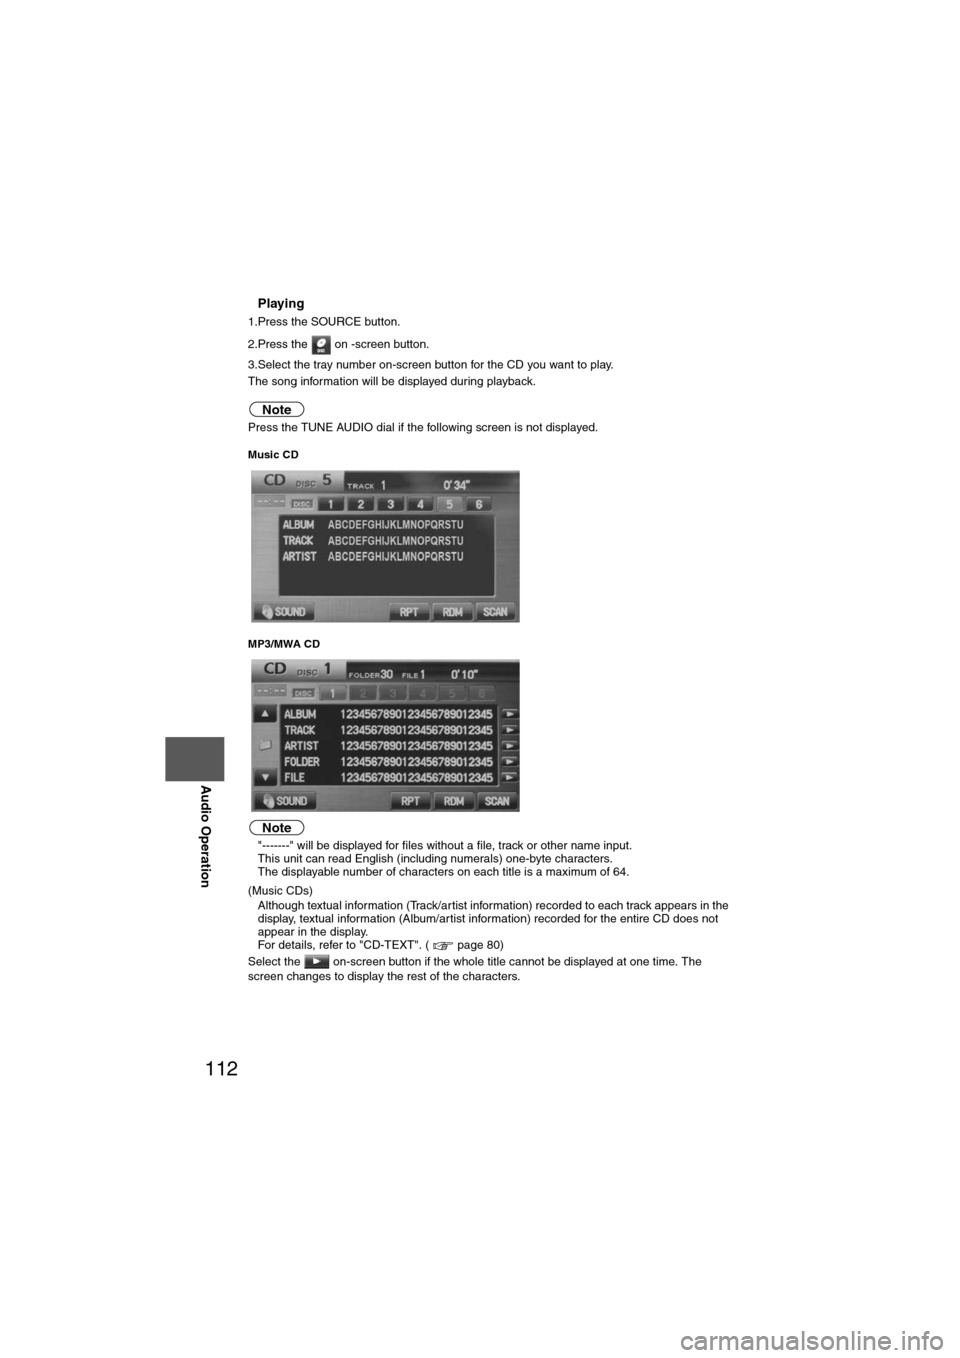
nPlaying
1.Press the SOURCE button.
2.Press the on -screen button.
3.Select the tray number on-screen button for the CD you want to play.
The song information will be displayed during playback.
Note
Press the TUNE AUDIO dial if the following screen is not displayed.
Music CD
MP3/MWA CD
Note
l
"-------" will be displayed for files without a file, track or other name input.
l This unit can read English (including numerals) one-byte characters.
l The displayable number of characters on each title is a maximum of 64.
(Music CDs)
l Although textual information (Track/artist information) recorded to each track appears in the
display, textual information (Album/artist information) recorded for the entire CD does not
appear in the display.
For details, refer to "CD-TEXT". ( page 80)
Select the on-screen button if the whole title cannot be displayed at one time. The
screen changes to display the rest of the characters.
Page 119 of 140
119
Before
UseGetting
started
Routing Address
Book
Vo i c e Recognition
Navigation
Set Up
Bluetooth Hands-Free
Note
l
If the ignition switch is turned off during a hands-free call, the line is transferred to the
mobile telephone automatically.
l If the mobile telephone is in a location where radio reception is difficult such as a metal
container or in the trunk, the call may not be connected using Bluetooth. If communication is
not possible, change the location of the mobile telephone.
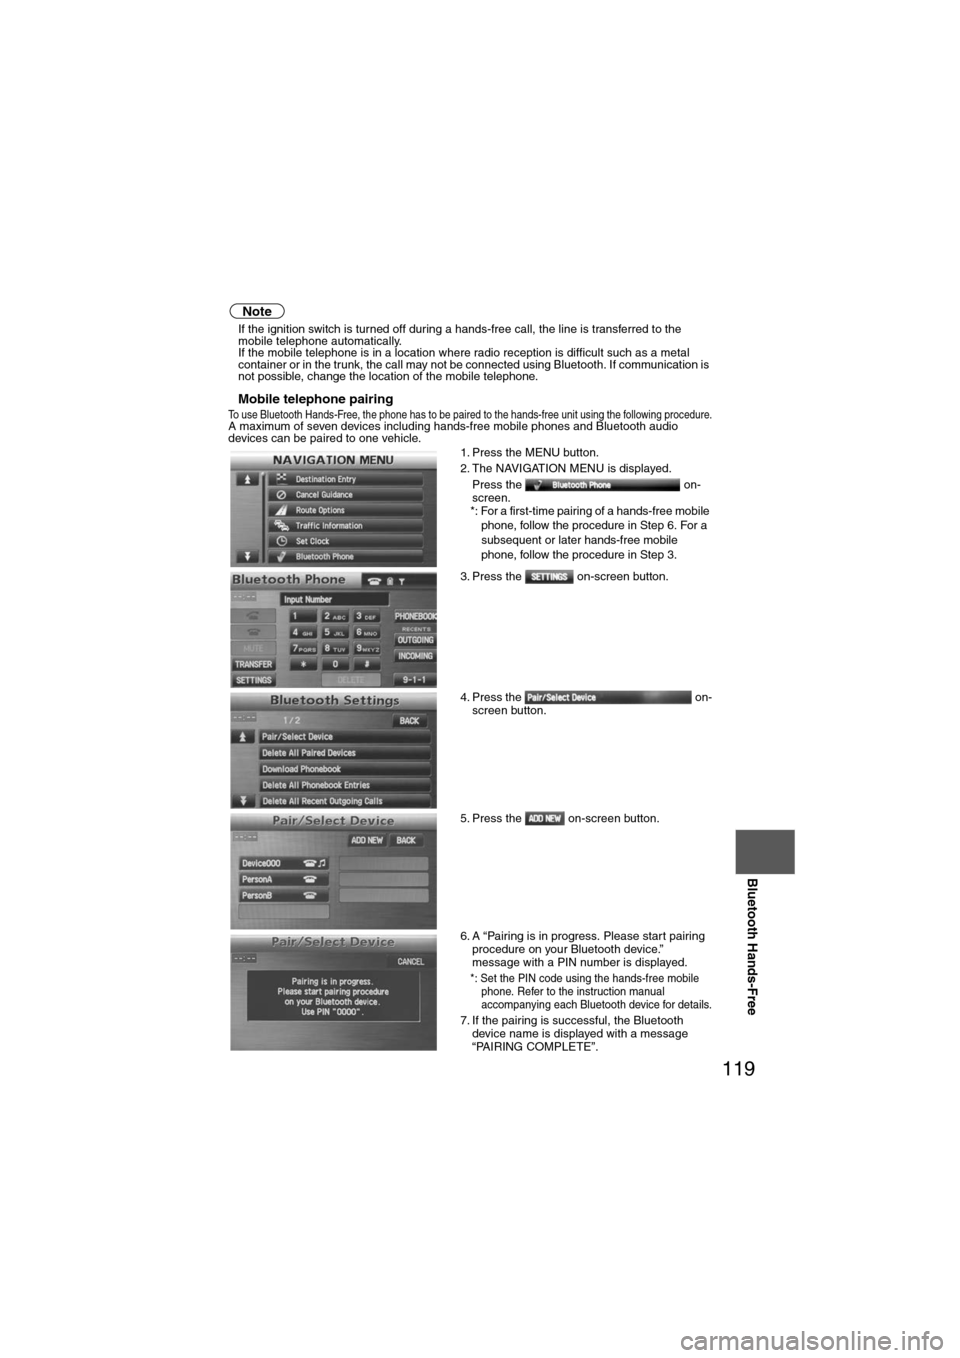
nMobile telephone pairingTo use Bluetooth Hands-Free, the phone has to be paired to the hands-free unit using the following procedure.A maximum of seven devices including hands-free mobile phones and Bluetooth audio
devices can be paired to one vehicle.
1. Press the MENU button.
2. The NAVIGATION MENU is displayed.
Press the on-
screen.
*: For a first-time pairing of a hands-free mobile phone, follow the procedure in Step 6. For a
subsequent or later hands-free mobile
phone, follow the procedure in Step 3.
3. Press the on-screen button.
4. Press the on- screen button.
5. Press the on-screen button.
6. A “Pairing is in progress. Please start pairing procedure on your Bluetooth device.”
message with a PIN number is displayed.
*: Set the PIN code using the hands-free mobile phone. Refer to the instruction manual
accompanying each Bluetooth device for details.
7. If the pairing is successful, the Bluetooth device name is displayed with a message
“PAIRING COMPLETE”.