Page 278 of 688

2784-5. Using the driving support systems
CT200h_OM_OM76102E_(EE)
Conditions that may trigger the system even if there is no possibility of a collision
When there is an object by the roadside at the entrance to a curve
When passing an oncoming vehicle on a curve
When driving over a narrow iron bridge
When there is a metal object on the road surface
When driving on an uneven road surface (nose up, nose down)
When passing an oncoming vehicle on a left-turn (left-hand drive vehicles) or
right-turn (right-hand drive vehicles)
When your vehicle rapidly closes on the vehicle in front
When a grade separation/interchange, sign, billboard, or other structure appears
to be directly in the vehicle’s line of travel
When the steep angle of the road causes a metal object located beneath the road
surface to be seen ahead of the vehicle
When an extreme change in vehicle height occurs
When the axis of the radar is out of adjustment
When passing through certain toll gates
When passing through an overpass
When passing through a tunnel
When the system is activated in the situations described above, there is also a
possibility that the seat belts will retract quickly and the brakes will be applied
with a force greater than normal. When the seat belt is locked in the retracted
position, stop the vehicle in a safe place, release the seat belt and refasten it.
Obstacles not detected
The sensor cannot detect plastic obstacles such as traffic cones. There may also
be occasions when the sensor cannot detect pedestrians, animals, bicycles,
motorcycles, trees, or snowdrifts.
Situations in which the pre-crash safety system does not function properly
The system may not function effectively in situations such as the following:
On roads with sharp bends or uneven surfaces
If a vehicle suddenly moves in front of vehicle, such as at an intersection
If a vehicle suddenly cuts in front of vehicle, such as when overtaking
In inclement weather such as heavy rain, fog, snow or sand storms
When your vehicle is skidding with the VSC system off
When an extreme change in vehicle height occurs
When the axis of the radar is out of adjustment
Automatic cancelation of the pre-crash safety system
When a malfunction occurs due to sensor contamination, etc. that results in the
sensors being unable to detect obstacles, the pre-crash safety system will be auto-
matically disabled. In this case, the system will not activate even if there is a col-
lision possibility.
Page 287 of 688

2854-6. Driving tips
4
Driving
CT200h_OM_OM76102E_(EE)
Accelerate the vehicle slowly, keep a safe distance between you and the
vehicle ahead, and drive at a reduced speed suitable to road conditions.
Park the vehicle and shift the shift position to P and block the wheel
under the vehicle without setting the parking brake. The parking brake
may freeze up, preventing it from being released.
Use the correct tire chain size when mounting the tire chains. Chain size
is regulated for each tire size.
Side chain:
3 mm (0.12 in.) in diameter
Cross chain:
4 mm (0.16 in.) in diameter
Regulations regarding the use of tire chains vary depending on location
and type of road. Always check local regulations before installing chains.
Tire chain installation
Observe the following precautions when installing and removing chains:
Install and remove tire chains in a safe location.
Install tire chains on the front tires only. Do not install tire chains on the rear
tires.
Install tire chains on front tires as tightly as possible. Retighten chains after
driving 0.5 - 1.0 km (1/4 - 1/2 mile).
Install tire chains following the instructions provided with the tire chains.
When driving the vehicle
When parking the vehicle
Selecting tire chains
1
2
Regulations on the use of tire chains
Page 299 of 688
2965-2. Using the audio system
CT200h_OM_OM76102E_(EE)
Adjusting sound quality
Turning the “TUNE•SEL” knob adjusts the level.
*: The sound quality level is adjusted individually in each audio mode.
Turning the “TUNE•SEL” knob clockwise turns on the ASL, and turning
the “TUNE•SEL” knob counterclockwise turns off the ASL.
ASL automatically adjusts the volume and tone quality according to the noise
level as you drive your vehicle.
Mode
displayedSound
quality modeLevelTurn counter-
clockwiseTurn
clockwise
“BAS”Bass*-5 to 5
LowHigh“MID”Mid-range*-5 to 5
“TRE”Treble*-5 to 5
“FAD”Front/rear vol-
ume
balanceF7 to R7Shifts to rearShifts to front
“BAL”
Left/right
volume
balance
L7 to R7Shifts to leftShifts to right
Turning the Automatic Sound Levelizer (ASL) on/off
Page 328 of 688

3255-6. Using Bluetooth® devices
5
Audio system
CT200h_OM_OM76102E_(EE)
Automatic volume adjustment
When vehicle speed reaches 80 km/h (50 mph) or more, the volume automati-
cally increases. The volume returns to the previous volume setting when vehicle
speed drops to 70 km/h (43 mph) or less.
Operations that cannot be performed while driving
Operating the system with the “TUNE•SEL” knob
Registering a portable player or cellular phone to the system
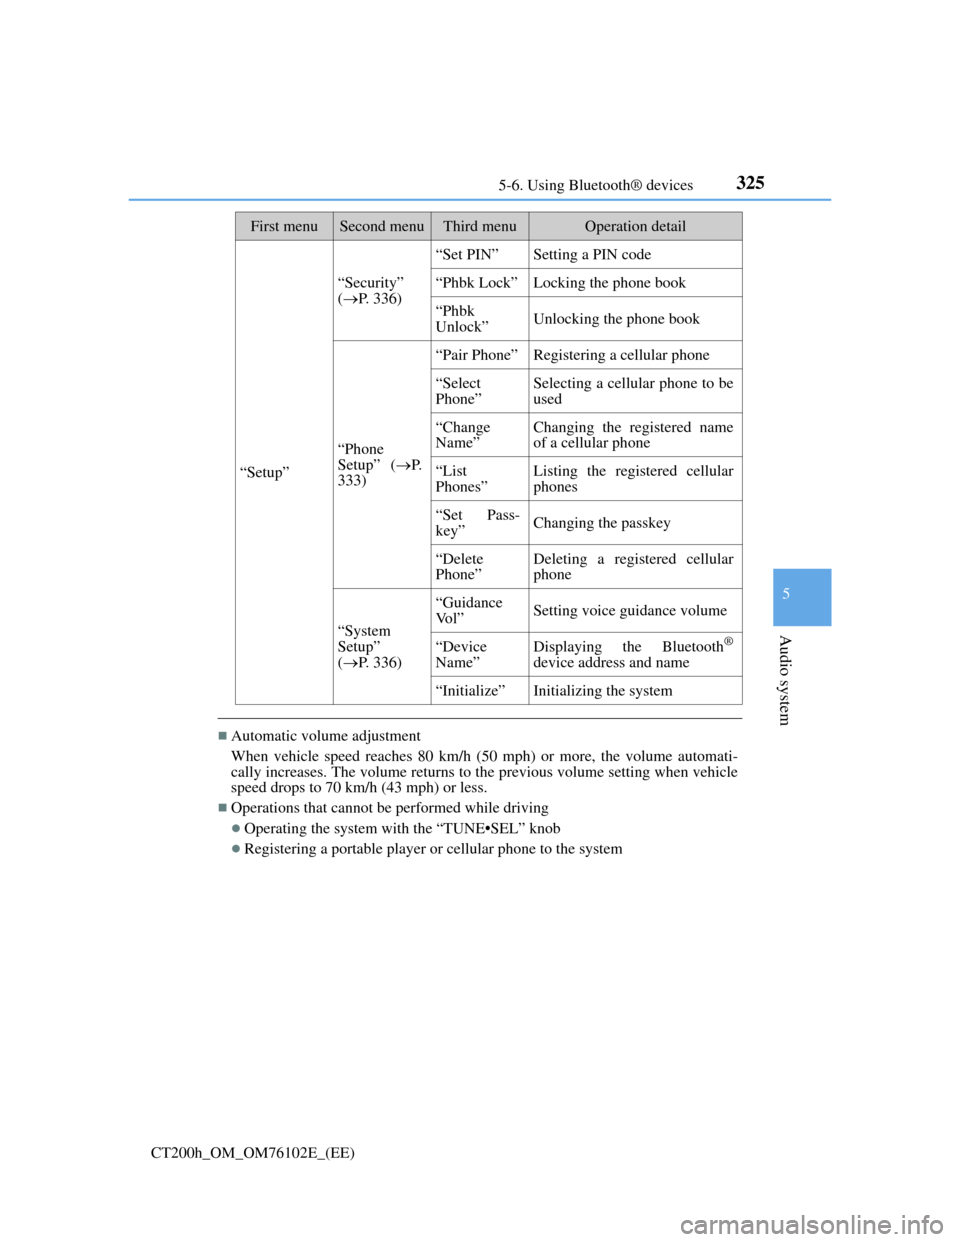
“Setup”
“Security”
(P. 336)
“Set PIN”Setting a PIN code
“Phbk Lock”Locking the phone book
“Phbk
Unlock”Unlocking the phone book
“Phone
Setup” (P.
333)
“Pair Phone”Registering a cellular phone
“Select
Phone”Selecting a cellular phone to be
used
“Change
Name”Changing the registered name
of a cellular phone
“List
Phones”Listing the registered cellular
phones
“Set Pass-
key”Changing the passkey
“Delete
Phone”Deleting a registered cellular
phone
“System
Setup”
(P. 336)
“Guidance
Vo l ”Setting voice guidance volume
“Device
Name”Displaying the Bluetooth®
device address and name
“Initialize”Initializing the system
First menuSecond menuThird menuOperation detail
Page 339 of 688
3365-7. Setup menu
CT200h_OM_OM76102E_(EE)
Security and system setup
To enter the menu of each setting, follow the steps below.
Press the off-hook switch and select “Setup” using the “TUNE•SEL”
knob.
Select “Security” using the knob.
Select one of the following items using the knob:
Setting or changing the PIN (Personal Identification Number)
“Set PIN”
Locking the phone book
“Phbk Lock”
Unlocking the phone book
“Phbk Unlock”
Press the off-hook switch and select “Setup” using the “TUNE•SEL”
knob.
Select “System Setup” using the knob.
Select one of the following items using the knob:
Setting voice guidance volume
“Guidance Vol”
Displaying the Bluetooth® device address and name
“Device Name”
Initializing the system
“Initialize”
Security setting items and operation procedures
System setup items and operation procedures
1
2
3
1
2
3
Page 340 of 688

3375-7. Setup menu
5
Audio system
CT200h_OM_OM76102E_(EE)
Setting a PIN
Select “Set PIN” using the “TUNE•SEL” knob.
Enter a PIN using the knob.
Input the code 1 digit at a time.
Changing the PIN
Select “Set PIN” using the “TUNE•SEL” knob.
Enter the registered PIN using the knob.
Enter a new PIN using the knob.
Input the code 1 digit at a time.
Select “Phbk Lock” or “Phbk Unlock” using the “TUNE•SEL” knob.
Input a PIN by using the knob and select “Confirm” using the knob.
Input the code 1 digit at a time.
Select “Guidance Vol” using the “TUNE•SEL” knob.
Change the voice guidance volume.
To decrease the volume: Turn the knob counterclockwise.
To increase the volume: Turn the knob clockwise.
Select “Device Name” using the “TUNE•SEL” knob.
Turn the knob to display the Bluetooth
® device address and name.
Select “Go Back” using the knob to return to “System Setup”.
Setting or changing the PIN
Locking or unlocking the phone book
Setting voice guidance volume
Displaying the Bluetooth® device address and name
1
2
1
2
3
1
2
1
2
1
2
3
Page 341 of 688
3385-7. Setup menu
CT200h_OM_OM76102E_(EE)
Select “Initialize” and then “Confirm” using the “TUNE•SEL” knob.
Select “Confirm” again using the knob.
Initialization
The following data in the system can be initialized:
• Phone book
• Outgoing and incoming call history
• Speed dials
• Registered cellular phone data
• Security code
• Registered Bluetooth
® enabled portable player data
• Passkeys for the cellular phones
• Passkey for the Bluetooth
® audio players
• Guidance volume
• Receiver volume
• Ring tone volume
Once the initialization has been completed, the data cannot be restored to its
original state.
When the phone book is locked
The following functions cannot be used:
Dialing by inputting a name
Speed dialing
Dialing a number stored in the call history memory
Using the phone book
Initializing the system
1
2
Page 372 of 688

3685-12. Setup (Lexus Display Audio System)
CT200h_OM_OM76102E_(EE)
Display settings
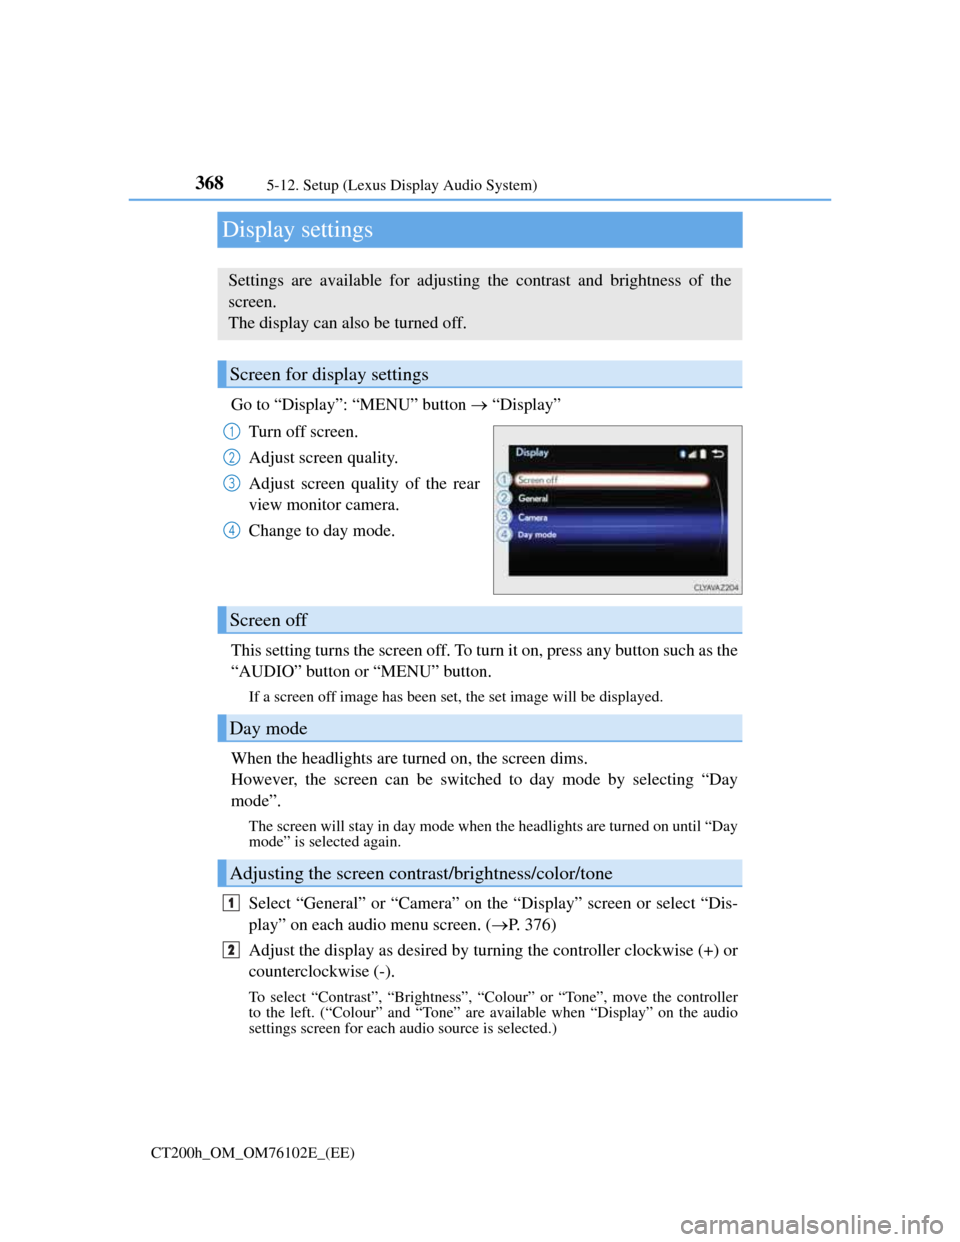
Go to “Display”: “MENU” button “Display”
Turn off screen.
Adjust screen quality.
Adjust screen quality of the rear
view monitor camera.
Change to day mode.
This setting turns the screen off. To turn it on, press any button such as the
“AUDIO” button or “MENU” button.
If a screen off image has been set, the set image will be displayed.
When the headlights are turned on, the screen dims.
However, the screen can be switched to day mode by selecting “Day
mode”.
The screen will stay in day mode when the headlights are turned on until “Day
mode” is selected again.
Select “General” or “Camera” on the “Display” screen or select “Dis-
play” on each audio menu screen. (P. 376)
Adjust the display as desired by turning the controller clockwise (+) or
counterclockwise (-).
To select “Contrast”, “Brightness”, “Colour” or “Tone”, move the controller
to the left. (“Colour” and “Tone” are available when “Display” on the audio
settings screen for each audio source is selected.)
Settings are available for adjusting the contrast and brightness of the
screen.
The display can also be turned off.
Screen for display settings
1
2
3
4
Screen off
Day mode
Adjusting the screen contrast/brightness/color/tone
1
2