Page 387 of 410

387
1. CONNECTED SERVICES
CT200h_Navi_OM76113E_(EE)
13.12.06 15:16
8
CONNECTED SERVICES
4. IMPORTING MEMORY POINTS AND STORED ROUTES
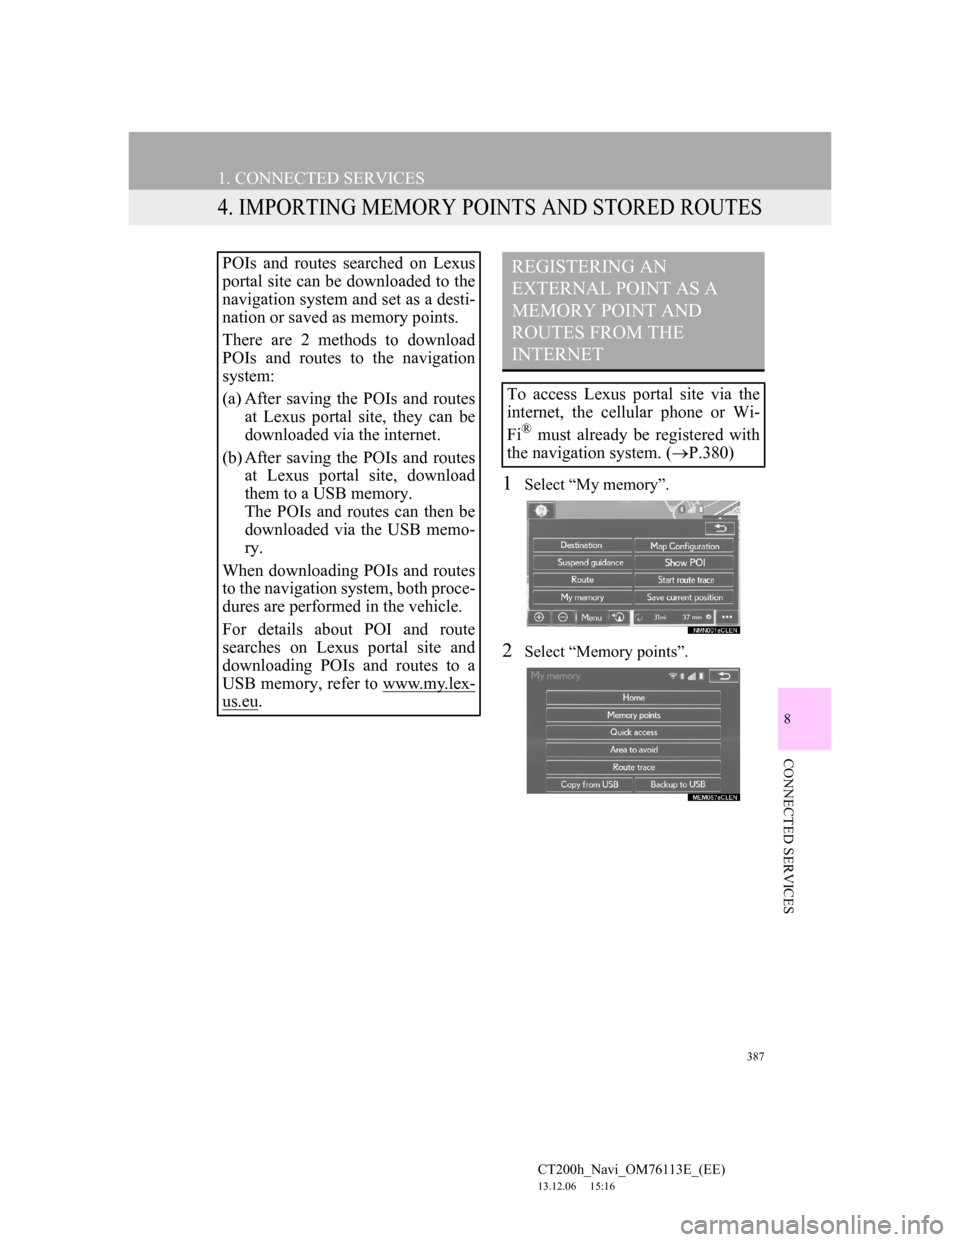
1Select “My memory”.
2Select “Memory points”.
POIs and routes searched on Lexus
portal site can be downloaded to the
navigation system and set as a desti-
nation or saved as memory points.
There are 2 methods to download
POIs and routes to the navigation
system:
(a) After saving the POIs and routes
at Lexus portal site, they can be
downloaded via the internet.
(b) After saving the POIs and routes
at Lexus portal site, download
them to a USB memory.
The POIs and routes can then be
downloaded via the USB memo-
ry.
When downloading POIs and routes
to the navigation system, both proce-
dures are performed in the vehicle.
For details about POI and route
searches on Lexus portal site and
downloading POIs and routes to a
USB memory, refer to www.my.lex-
us.eu.
REGISTERING AN
EXTERNAL POINT AS A
MEMORY POINT AND
ROUTES FROM THE
INTERNET
To access Lexus portal site via the
internet, the cellular phone or Wi-
Fi
® must already be registered with
the navigation system. (P.380)
Page 388 of 410
388
1. CONNECTED SERVICES
CT200h_Navi_OM76113E_(EE)
13.12.06 15:16
3Select “External points”.
4Check that a confirmation screen is
displayed when the operation is
complete.
1Press the lid.
2Open the cover and connect a USB
memory.
Turn on the power of the USB memory
if it is not turned on.
To edit memory points and routes:
P.156, 160
INFORMATION
Setting “Automatic memory point
download” to “Yes” will automati-
cally download external points.
(P.395)
• If a screen related to a memory point
is changed to before automatic
memory point download begins,
automatic memory point download
will be cancelled.
If memory points which have the
same name are already stored in the
navigation system, the system may
not update those memory points.
PROCEDURE FOR
DOWNLOADING MEMORY
POINTS AND ROUTES
FROM A USB MEMORY
Page 390 of 410
390
1. CONNECTED SERVICES
CT200h_Navi_OM76113E_(EE)
13.12.06 15:16
INFORMATION
Memory points that are located out-
side of the map’s data range cannot be
registered.
A maximum of 500 memory points
can be registered.
When there are 21 or more memory
points and routes stored on a USB
memory, only 20 memory points and
routes will be displayed at a time.
Memory points acquired from Lexus
portal site can only be registered with
the registered navigation system at
the time of acquirement.
In some cases, memory points and
routes may not be able to be
imported. If this occurs, “Unable to
read memory point data. (Device ID
error)” will be displayed.
If memory points and routes which
have the same name are already
stored in the navigation system, the
system may not update those memory
points and routes.
Page 395 of 410
395
CT200h_Navi_OM76113E_(EE)
13.12.06 15:16
8
CONNECTED SERVICES
2. SETUP
1. CONNECTED SERVICE SETTINGS
1Press the “MENU” button on the
Remote Touch.
2Select “Setup”.
3Select “Navigation”.
4Select “Connected service”.
5Select the items to be set.
6Select “Save”.
The following detailed connected
service settings can be set.
Page 396 of 410
396
2. SETUP
CT200h_Navi_OM76113E_(EE)
13.12.06 15:16
CONNECTED SERVICE
SETTINGS SCREENNo.Function
When connecting, the cost
warning display can be set on
or off by selecting “Yes” or
“No”.
When the navigation system is
started up, the automatic
downloading of memory
points and routes can be set on
or off by selecting “Yes” or
“No”. For memory points and
routes to be automatically
downloaded, auto connection
needs to be set to “Yes”.
When connecting in a roaming
area, the display of the roam-
ing warning can be set on or
off by selecting “Yes” or
“No”.
When connecting to Lexus
portal site, the required portal
user name and password can
be remembered by selecting
“Yes” or “No”. When “Yes” is
selected, the user name and
password does not need to be
entered when accessing Lexus
portal site.
The desired search engine can
be selected. (P.397)
Page 397 of 410
397
2. SETUP
CT200h_Navi_OM76113E_(EE)
13.12.06 15:16
8
CONNECTED SERVICES
1Display the “Connected service set-
tings” screen. (P.395)
2Select “Select search engine”.
3Select the desired search engine.
The selected search engine indicator
will illuminate.
1Display the “Connected service set-
tings” screen. (P.395)
2Select “Delete search history”.
3Select “Yes” when the confirmation
screen appears.
Online search history can be
deleted. (P.397)
When a different user uses the
navigation system, the user
name and password can be
changed. (P.398)
Your Lexus portal site user
name and password can be de-
leted from the navigation sys-
tem. (P.398)
Select to reset all setup items.
No.FunctionSELECTING A SEARCH
ENGINE
The desired search engine can be set.
Before using a new search engine,
the terms of use must be read and
agreed to on Lexus portal site. De-
pending on the conditions, certain
search engines cannot be selected.
DELETING SEARCH
HISTORY
Page 401 of 410

401
CT200h_Navi_OM76113E_(EE)
13.12.06 15:16
D
Destination search .................................. 116
Destination search screen....................... 116
DVD ....................................................... 215
DVD options....................................... 219
Overview ............................................ 215
E
Editing route........................................... 144
Adding destinations ............................ 145
Deleting destinations .......................... 146
Detour setting ..................................... 147
Reordering destinations ...................... 146
Road preference.................................. 148
Route overview................................... 149
Setting search condition..................... 147
Entering letters and numbers/list screen
operation ............................................... 42
Entering letters and numbers ................ 42
List screen............................................. 43
F
Function index ......................................... 32
G
General settings ....................................... 75
General settings screen ........................ 76
GPS (Global Positioning System) ......... 184
Limitations of the navigation system . 184
H
Home screen ............................................ 16
Status display ....................................... 18
Home screen operation ............................ 40
How to use the Remote Touch ................ 38
I
Importing memory points and
stored routes ....................................... 387
Procedure for downloading
memory points and routes
from a USB memory ...................... 388
Registering an external point as a
memory point and routes from
the internet ...................................... 387
“Information” screen ............................... 22
Initial screen ............................................ 36
iPod ........................................................ 230
iPod audio .......................................... 235
iPod video .......................................... 236
Overview ............................................ 230
Page 402 of 410

402
ALPHABETICAL INDEX
CT200h_Navi_OM76113E_(EE)
13.12.06 15:16
L
Lexus parking assist monitor ................. 292
Driving precautions ............................ 292
Screen display..................................... 294
Switching the parking mode screen.... 298
Using the system when parallel
parking ............................................ 297
Using the system when perpendicular
parking ............................................ 296
When approaching three-dimensional
objects ............................................. 315
Lexus parking assist monitor precautions ....
312
Area displayed on screen.................... 312
Differences between the screen
and the actual road .......................... 314
The camera ......................................... 313
Linking multi-information display
and navigation system .......................... 49
M
Map database version and covered area 187
About the map data ............................ 188
Map data............................................. 187
Map screen information......................... 104
Displaying information about the icon
where the cursor is set .................... 107
Displaying POI icons ......................... 104
Route trace ......................................... 106
Standard map icons ............................ 108
Map screen operation .............................. 96
Adjusting location in small increments....
103
Current position display ....................... 96
Map scale ............................................. 97
Orientation of the map ......................... 98
Screen scroll operation....................... 101
Switching map configurations ............. 99
Media operation ..................................... 209
“Menu” screen ......................................... 14
My memory ........................................... 150
My memory settings .............................. 150
Backup to a USB memory ................. 167
Copying from a USB memory ........... 169
Setting up area to avoid...................... 162
Setting up home ................................. 151
Setting up memory points .................. 155
Setting up quick access ...................... 153
Setting up route trace ......................... 165