2013 Lancia Delta wheel
[x] Cancel search: wheelPage 51 of 295

1
KNOWING YOUR CAR49
IGNITION DEVICE
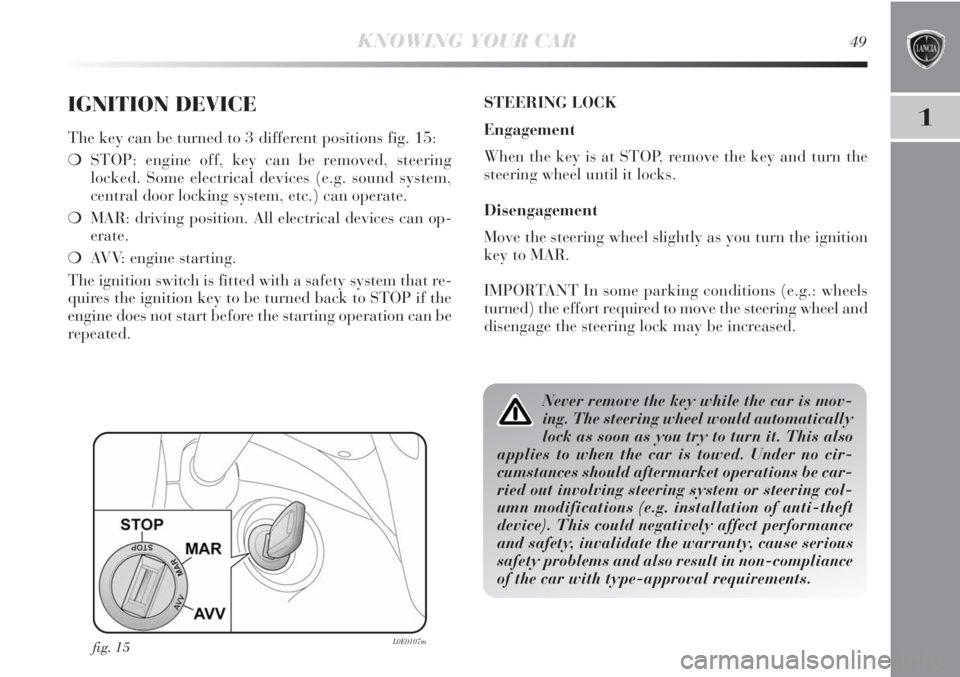
The key can be turned to 3 different positions fig. 15:
❍STOP: engine off, key can be removed, steering
locked. Some electrical devices (e.g. sound system,
central door locking system, etc.) can operate.
❍MAR: driving position. All electrical devices can op-
erate.
❍AVV: engine starting.
The ignition switch is fitted with a safety system that re-
quires the ignition key to be turned back to STOP if the
engine does not start before the starting operation can be
repeated.STEERING LOCK
Engagement
When the key is at STOP, remove the key and turn the
steering wheel until it locks.
Disengagement
Move the steering wheel slightly as you turn the ignition
key to MAR.
IMPORTANT In some parking conditions (e.g.: wheels
turned) the effort required to move the steering wheel and
disengage the steering lock may be increased.
fig. 15L0E0107m
Never remove the key while the car is mov-
ing. The steering wheel would automatically
lock as soon as you try to turn it. This also
applies to when the car is towed. Under no cir-
cumstances should aftermarket operations be car-
ried out involving steering system or steering col-
umn modifications (e.g. installation of anti-theft
device). This could negatively affect performance
and safety, invalidate the warranty, cause serious
safety problems and also result in non-compliance
of the car with type-approval requirements.
Page 52 of 295

50KNOWING YOUR CAR
SEATS
FRONT SEATS
Lengthwise direction adjustment fig. 16
Lift the lever A and push the seat forwards or backwards:
in the driving position your arms should rest on the rim
of the steering wheel.
Backrest angle adjustment fig. 16
Turn knob B.
All adjustments on the front and rear seats
must be made with the car stationary.
After releasing the adjustment levers always
check that the seat is locked into place by try-
ing to move it back and forth. Failure to lock
the seat in place could result in the seat moving sud-
denly and the driver losing control of the car.
fig. 16L0E0008m
Page 56 of 295

54KNOWING YOUR CAR
STEERING WHEEL
It can be adjusted vertically (and axially).
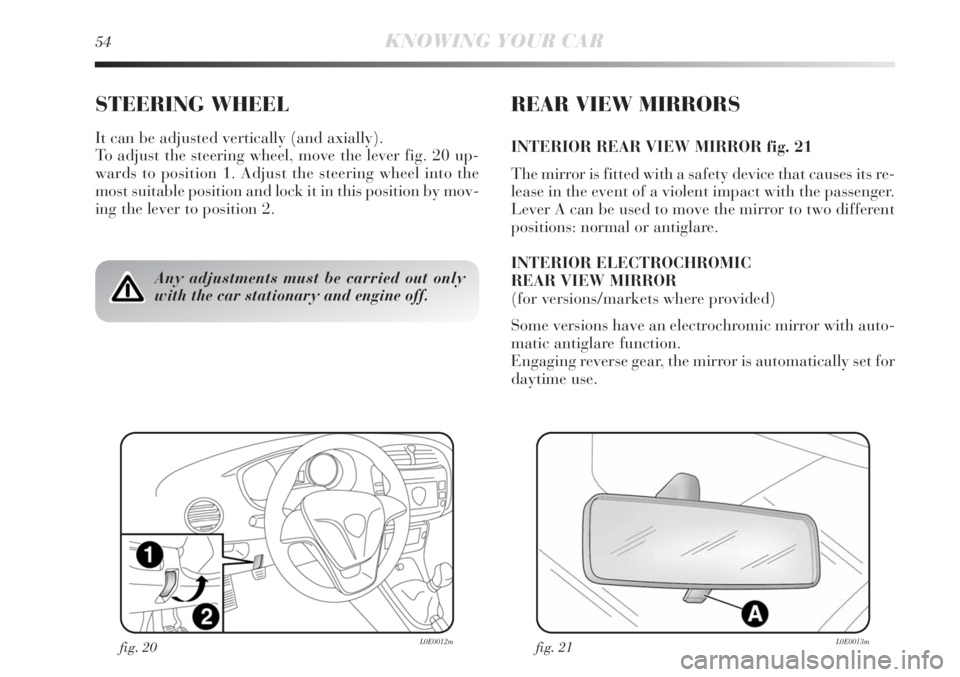
To adjust the steering wheel, move the lever fig. 20 up-
wards to position 1. Adjust the steering wheel into the
most suitable position and lock it in this position by mov-
ing the lever to position 2.
REAR VIEW MIRRORS
INTERIOR REAR VIEW MIRROR fig. 21
The mirror is fitted with a safety device that causes its re-
lease in the event of a violent impact with the passenger.
Lever A can be used to move the mirror to two different
positions: normal or antiglare.
INTERIOR ELECTROCHROMIC
REAR VIEW MIRROR
(for versions/markets where provided)
Some versions have an electrochromic mirror with auto-
matic antiglare function.
Engaging reverse gear, the mirror is automatically set for
daytime use.
Any adjustments must be carried out only
with the car stationary and engine off.
fig. 21L0E0013mfig. 20L0E0012m
Page 68 of 295

66KNOWING YOUR CAR
Deactivation
When the lights are switched off by the sensor, the dipped
beam headlights and side lights are switched off and the
day lights are switched on (if activated).
The sensor is not capable of detecting the presence of fog
therefore, in these circumstances, the lights have to be
turned on manually.
FRONT FOG LIGHTS WITH CORNERING LIGHTS
FUNCTION
When the dipped headlamps are on and the speed is be-
low 40 km/h, if the steering wheel rotation angle is large
or the direction indicators are on, a light (incorporated in
the fog light) will come on on the relevant side to improve
visibility at nightime. The function can be acti-
vated/deactivated via the display menu (see “Display”
paragraph in this chapter). AUTOMATIC HEADLIGHT SENSOR
(dusk sensor) fig. 27
(for versions/markets, where provided)
It detects variations in brightness outside the vehicle de-
pending on the light setting: the greater the sensitivity,
the less outside light needed to activate the exterior lights
being turned on. The sensitivity of the dusk sensor may
be adjusted, using the “Set-up menu” on the instrument
panel.
Activation
When the ring nut is turned to the AUTO position the ex-
ternal lights automatically switch on depending on the
exterior brightness.
The headlights can only be flashed with the sensor on.The daytime running lights are an alterna-
tive to the dipped beam headlights for dri-
ving during the daytime in countries where
it is compulsory to have lights on during the day,
and they are also permitted in those countries
where this not obligatory.
Daytime running lights cannot replace dipped
headlights when driving at night or through tunnels.
The use of daytime running lights is governed by
the highway code of the country in which you are
driving. Comply with legal requirements.
Page 69 of 295

1
KNOWING YOUR CAR67
DIPPED HEADLIGHTS/SIDE LIGHTS
With the ignition key turned to MAR, turn the twist
switch to 2. If the dipped beam headlights are activated,
the day lights are switched off and the side lights, dipped
headlights and number plate lights are switched on. The
warning light
3on the instrument panel comes on.
When the ignition key is turned to STOP or removed and
the twist switch is turned from
Oto2, all the side lights
and taillights and number plate lights come on. The
warning light
3in the instrument panel comes on.
Parking function
With the side lights on and the ignition key in the STOP
position or extracted, it is possible to select the lighting
on the desired side by operating the lights lever down-
wards (left side) or upwards (right side). In this case the
warning light
3in the instrument panel will go out.
MAIN BEAM HEADLIGHTS
With ring nut in position 2, push the stalk forward toward
the dashboard (stable position). The warning light 1on
the instrument panel will come on. They are switched off
by pulling the lever towards the steering wheel.
Flashing the headlights
You can flash the beams by pulling the stalk toward the
steering wheel (unstable position). The warning light
1
on the instrument panel will come on.DIRECTION INDICATORS fig. 28
Place the lever in the (stable) position:
– up (position
a): activates the right direction indicator;
– down (position
b): activates the left direction indicator.
The warning light
¥orÎstars flashing on the instrument
panel. The indicators switch off automatically when the
steering wheel is straightened.
fig. 28L0E0020m
Page 70 of 295

68KNOWING YOUR CAR
LANE CHANGE FUNCTION
If you wish to signal a lane change, place the left lever
in the unstable position for less than half a second. The
direction indicator on the side selected will flash five
times and then switch off automatically.
“FOLLOW ME HOME” DEVICE
This allows the space surrounding the car to be lit up for
a certain period of time.
Activation
With the ignition key in the STOP position or extracted,
pull the stalk towards the steering wheel and move it
within 2 minutes of the engine switching off. At each sin-
gle movement of the stalk, the lights will remain on for
an extra 30 seconds up to a maximum of 210 seconds;
then the lights are switched off automatically. Each time
the lever is operated, the warning light 3 on the instru-
ment panel comes on and the display shows how long the
function will remain active. The warning light comes on
when the stalk is pulled for the first time and stays lit un-
til the function switches itself off automatically. Each time
the stalk is activated the time will extend the time that
the lights remain on.
Deactivation
Keep the stalk pulled towards the steering wheel for more
than 2 seconds.WINDOW WASHING
The right-hand lever fig. 29 controls windscreen wiper/
washer and heated rear window wiper/washer operation.
WINDSCREEN WIPER/WASHER fig. 29
This operates only with the ignition key turned to MAR.
The right hand lever can take up five different positions:
A: windscreen wiper off.
B: intermittent operation.
With the lever in position B, turn control F to select one
of four different speeds for the intermittent operation
mode:
,= very slow intermittent operation
■= slow intermittent operation.
■■= normal intermittent operation
■■■= fast intermittent operation.
C: continuous slow operation;
D: continuous fast operation;
E: temporary fast operation (unstable position).
Page 71 of 295

1
KNOWING YOUR CAR69
“Smart washing” function
Pull the stalk towards the steering wheel (unstable po-
sition) to operate the windscreen washer. Keep the lever
pulled to activate both the windscreen washer jet and the
windscreen wiper with a single movement; the latter
turns on automatically if you keep the lever pulled for
over half a second. The windscreen wiper stops operat-
ing a few strokes after releasing the stalk; a further
“cleaning stroke”, after a few seconds, completes the
wiping operation.
fig. 29L0E0021m
REAR WINDOW WASHER/ WIPER
This operates only with the ignition key turned to MAR.
Turn the ring nut to
'to operate the rear window wiper.
With the windscreen wiper on, turn the ring nut to
'to
turn on the rear window wiper. In this case the wiper
works (in the different positions) timed with the wind-
screen wiper, but at half speed. With the windscreen
wiper on, engaging reverse gear will automatically turn
the rear window wiper on, in continuous slow operation.
Operation stops when reverse is disengaged.
Do not use the windscreen or rear window
wiper to remove layers of snow or ice from
the windscreen. In these conditions, the
windscreen wipers may be submitted to excessive
effort resulting in motor protection cutting in and
wiper operation inhibition for a few seconds. If the
issue persists, contact a Lancia Dealership.
“Smart washing” function
Pushing the stalk towards the dashboard (unstable po-
sition) will activate the rear window washer.
Keep the stalk pressed, with just one movement, to op-
erate the rear window washer jet and the rear window
wiper itself; the latter automatically turns on if you keep
the stalk pressed for more than half a second.
Page 74 of 295

72KNOWING YOUR CAR
When travelling downhill with the device engaged, the
vehicle speed may slightly exceed the preset one.
The engagement of the device is signalled by the Üwarn-
ing light coming on in the instrument panel (together
with a message shown on the display) (see “Instrument
panel warning lights” paragraph in this chapter).
STORING THE SPEED
Proceed as follows:
❍turn the ring nut A-fig. 31 to ON and press the ac-
celerator until the vehicle reaches the desired speed;
❍turn the ring nut to (+) for at least three seconds, then
release it. The vehicle speed is now memorised and
you can therefore release the accelerator pedal.
If needed (when overtaking for instance), you can accel-
erate simply by pressing the accelerator pedal; when you
come off the pedal, the car will return to the speed mem-
orised previously.
RESTORING THE MEMORISED SPEED
If the device has been switched off, for example by de-
pressing the brake or clutch pedal, the memorised speed
can be restored as follows:
❍accelerate gradually until reaching a speed ap-
proaching the memorised speed;
❍engage the gear selected at the time of speed memo-
rising (fourth, fifth or sixth gear);
❍press button C-fig. 31.INCREASING THE MEMORISED SPEED
This can be done in two ways:
❍by pressing the accelerator and then memorising the
new speed reached;
or
❍by temporarily turning ring nut B-fig. 31 to (+).
Each movement of the selector wheel will correspond to
a slight increase in speed (about 1 km/h), while keeping
the selector wheel turned will correspond to a continuous
speed increase.
REDUCING THE MEMORISED SPEED
This can be done in two ways:
❍by disengaging the device and then memorising the
new speed;
or
❍by keeping ring nut B-fig. 31 turned to (–) until the
new speed is reached; it will then be memorised au-
tomatically.
Each movement of the ring nut will corresponds to
a slight reduction in speed (about 1 km/h), while keep-
ing the ring nut turned will correspond to a continuous
reduction in speed.