2013 KIA VENGA steering
[x] Cancel search: steeringPage 260 of 751
Driving your vehicle
56
5
Parking on hills
Generally, if you have a trailer attached to
your vehicle, you should not park your
vehicle on a hill. People can be seriously
or fatally injured, and both your vehicle
and the trailer can be damaged if unex-
pectedly roll down hill.
However, if you ever have to park your
trailer on a hill, here's how to do it:
1. Pull the vehicle into the parking space.
Turn the steering wheel in the direction
of the curb (right if headed down hill,left if headed up hill).
2. If the vehicle has a manual transaxle, place the car in neutral. If the vehicle
has an automatic transaxle, place the
car in P (Park).
3. Set the parking brake and shut off the vehicle.
4. Place chocks under the trailer wheels on the down hill side of the wheels. 5. Start the vehicle, hold the brakes, shift
to neutral, release the parking brake
and slowly release the brakes until the
trailer chocks absorb the load.
6. Reapply the brakes, reapply the park- ing brake and shift the vehicle to R
(Reverse) for manual transaxle or P
(Park) for automatic transaxle.
7. Shut off the vehicle and release the vehicle brakes but leave the parking
brake set.CAUTION
When towing a trailer on steep
grades (in excess of 6%) pay
close attention to the enginecoolant temperature gauge toensure the engine does not over- heat. If the coolant temperature
red warning light illuminates, pullover and stop as soon as it is safeto do so, and allow the engine to
idle until it cools down. You mayproceed once the engine hascooled sufficiently.
You must decide the driving speed depending on trailer
weight and uphill grade to reduce the possibility of engine andtransaxle overheating.
WARNING - Parking on a
hill
Parking your vehicle on a hill with a
trailer attached could cause seri-
ous injury or death, should the trail-
er break loose.
WARNING - Parking brake
It can be dangerous to get out of
your vehicle if the parking brake is
not firmly set.
If you have left the engine running,
the vehicle can move suddenly. You
or others could be seriously or
fatally injured.
YN ENG 5.QXP 4/16/2012 10:04 AM Page 56
Page 279 of 751
615
What to do in an emergency
IF YOU HAVE A FLAT TIRE (WITH TIRE MOBILITY KIT, IF EQUIPPED)
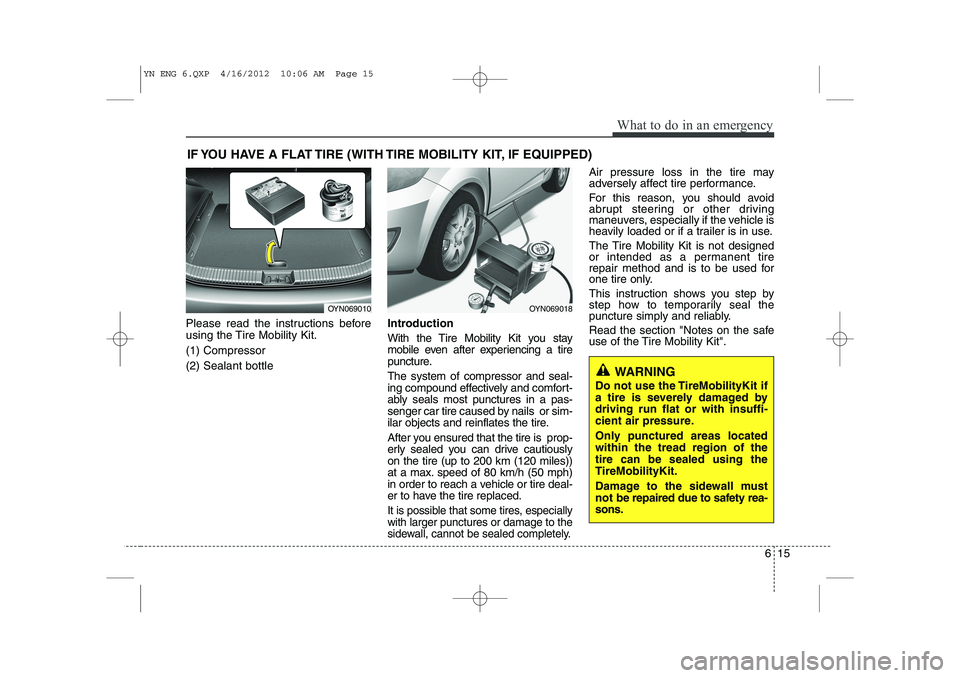
Please read the instructions before
using the Tire Mobility Kit. (1) Compressor(2) Sealant bottle Introduction
With the Tire Mobility Kit you stay
mobile even after experiencing a tire
puncture. The system of compressor and seal-
ing compound effectively and comfort-
ably seals most punctures in a pas-
senger car tire caused by nails or sim-
ilar objects and reinflates the tire.
After you ensured that the tire is prop-
erly sealed you can drive cautiouslyon the tire (up to 200 km (120 miles))
at a max. speed of 80 km/h (50 mph)
in order to reach a vehicle or tire deal-
er to have the tire replaced.
It is possible that some tires, especiallywith larger punctures or damage to the
sidewall, cannot be sealed completely.
Air pressure loss in the tire may
adversely affect tire performance.
For this reason, you should avoid
abrupt steering or other driving
maneuvers, especially if the vehicle is
heavily loaded or if a trailer is in use.
The Tire Mobility Kit is not designed
or intended as a permanent tire
repair method and is to be used for
one tire only.
This instruction shows you step by
step how to temporarily seal the
puncture simply and reliably.
Read the section "Notes on the safe
use of the Tire Mobility Kit".
OYN069010OYN069018
WARNING
Do not use the TireMobilityKit if
a tire is severely damaged bydriving run flat or with insuffi-
cient air pressure.
Only punctured areas located within the tread region of thetire can be sealed using theTireMobilityKit.
Damage to the sidewall must
not be repaired due to safety rea-
sons.
YN ENG 6.QXP 4/16/2012 10:06 AM Page 15
Page 280 of 751
What to do in an emergency
16
6
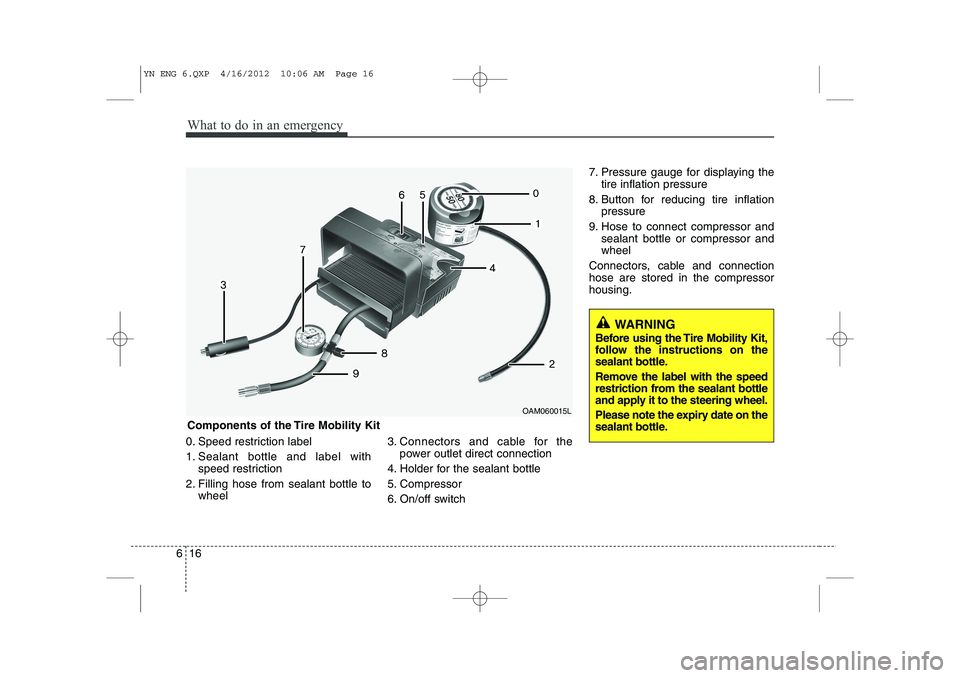
0. Speed restriction label
1. Sealant bottle and label with
speed restriction
2. Filling hose from sealant bottle to wheel 3. Connectors and cable for the
power outlet direct connection
4. Holder for the sealant bottle
5. Compressor
6. On/off switch 7. Pressure gauge for displaying the
tire inflation pressure
8. Button for reducing tire inflation pressure
9. Hose to connect compressor and sealant bottle or compressor and wheel
Connectors, cable and connectionhose are stored in the compressorhousing.
WARNING
Before using the Tire Mobility Kit,
follow the instructions on the
sealant bottle.
Remove the label with the speed
restriction from the sealant bottle
and apply it to the steering wheel.
Please note the expiry date on the
sealant bottle.
Components of the Tire Mobility Kit
OAM060015L
YN ENG 6.QXP 4/16/2012 10:06 AM Page 16
Page 291 of 751
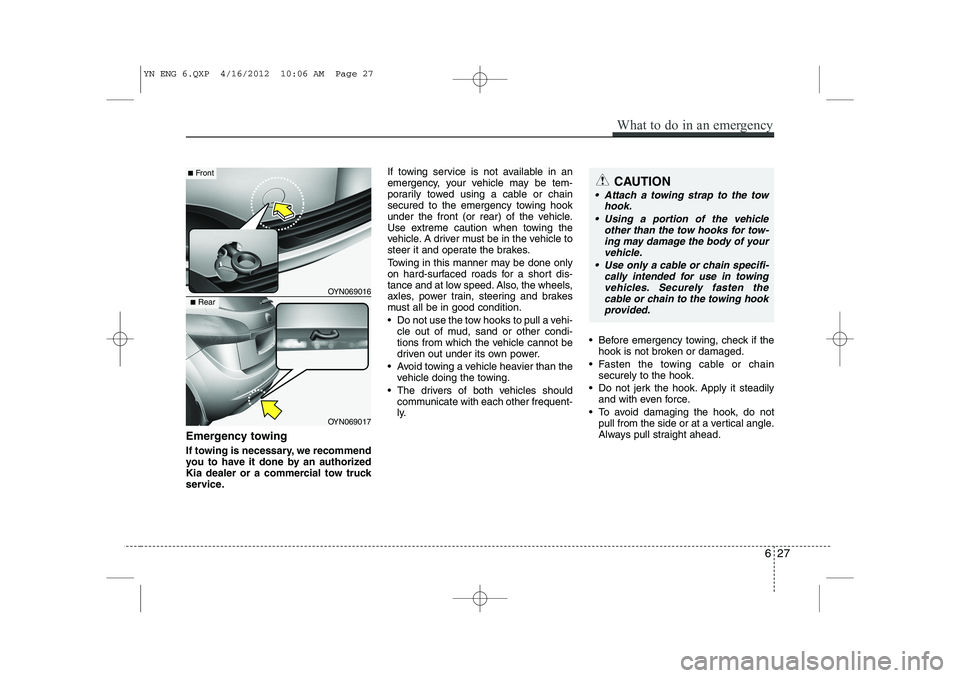
Emergency towing
If towing is necessary, we recommend
you to have it done by an authorized
Kia dealer or a commercial tow truck
service.If towing service is not available in an
emergency, your vehicle may be tem-
porarily towed using a cable or chain
secured to the emergency towing hook
under the front (or rear) of the vehicle.
Use extreme caution when towing the
vehicle. A driver must be in the vehicle to
steer it and operate the brakes.
Towing in this manner may be done only
on hard-surfaced roads for a short dis-
tance and at low speed. Also, the wheels,
axles, power train, steering and brakes
must all be in good condition.
Do not use the tow hooks to pull a vehi-
cle out of mud, sand or other condi-
tions from which the vehicle cannot be
driven out under its own power.
Avoid towing a vehicle heavier than the vehicle doing the towing.
The drivers of both vehicles should communicate with each other frequent-
ly. Before emergency towing, check if the
hook is not broken or damaged.
Fasten the towing cable or chain securely to the hook.
Do not jerk the hook. Apply it steadily and with even force.
To avoid damaging the hook, do not pull from the side or at a vertical angle.
Always pull straight ahead.
CAUTION
Attach a towing strap to the tow
hook.
Using a portion of the vehicle other than the tow hooks for tow-ing may damage the body of yourvehicle.
Use only a cable or chain specifi- cally intended for use in towingvehicles. Securely fasten thecable or chain to the towing hookprovided.
What to do in an emergency
27
6
OYN069016
■ Front
OYN069017
■Rear
YN ENG 6.QXP 4/16/2012 10:06 AM Page 27
Page 292 of 751
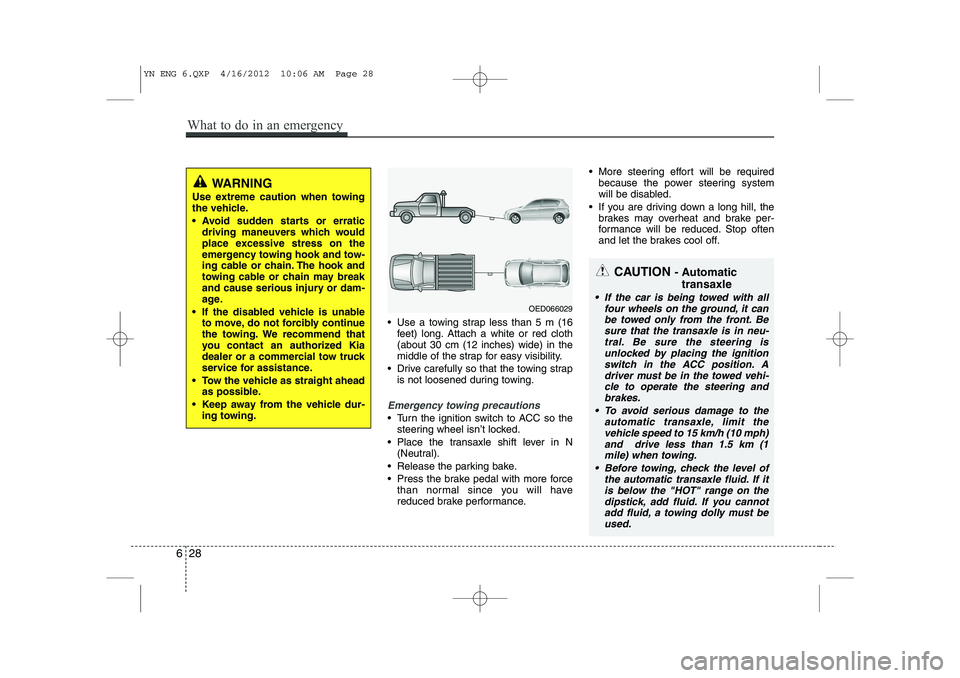
Use a towing strap less than 5 m (16feet) long. Attach a white or red cloth (about 30 cm (12 inches) wide) in the
middle of the strap for easy visibility.
Drive carefully so that the towing strap is not loosened during towing.
Emergency towing precautions
Turn the ignition switch to ACC so thesteering wheel isn’t locked.
Place the transaxle shift lever in N (Neutral).
Release the parking bake.
Press the brake pedal with more force than normal since you will have
reduced brake performance. More steering effort will be required
because the power steering system
will be disabled.
If you are driving down a long hill, the brakes may overheat and brake per-
formance will be reduced. Stop often
and let the brakes cool off.
CAUTION - Automatic
transaxle
If the car is being towed with all four wheels on the ground, it can
be towed only from the front. Besure that the transaxle is in neu- tral. Be sure the steering isunlocked by placing the ignition
switch in the ACC position. Adriver must be in the towed vehi-cle to operate the steering and brakes.
To avoid serious damage to the automatic transaxle, limit thevehicle speed to 15 km/h (10 mph)and drive less than 1.5 km (1
mile) when towing.
Before towing, check the level of the automatic transaxle fluid. If itis below the "HOT" range on thedipstick, add fluid. If you cannot
add fluid, a towing dolly must beused.OED066029
628
What to do in an emergency
WARNING
Use extreme caution when towing
the vehicle.
Avoid sudden starts or erratic driving maneuvers which would
place excessive stress on the
emergency towing hook and tow-
ing cable or chain. The hook and
towing cable or chain may break
and cause serious injury or dam-
age.
If the disabled vehicle is unable to move, do not forcibly continue
the towing. We recommend that
you contact an authorized Kia
dealer or a commercial tow truck
service for assistance.
Tow the vehicle as straight ahead as possible.
Keep away from the vehicle dur- ing towing.
YN ENG 6.QXP 4/16/2012 10:06 AM Page 28
Page 298 of 751
75
Maintenance
OWNER MAINTENANCE
The following lists are vehicle checks and
inspections that should be performed atthe frequencies indicated to help ensure
safe, dependable operation of your vehi-
cle. If you have any question, we recom-
mend that you consult an authorized Kia
dealer.
These Owner Maintenance Checks are
generally not covered by warranties and
you may be charged for labor, parts and
lubricants used. Owner maintenance schedule
When you stop for fuel:
• Check the engine oil level.
Check the coolant level in coolant
reservoir.
Check the windshield washer fluid level.
Look for low or under-inflated tires.
While operating your vehicle:
Note any changes in the sound of the exhaust or any smell of exhaust fumes
in the vehicle.
Check for vibrations in the steering wheel. Notice any increased steering
effort or looseness in the steering
wheel, or change in its straight-aheadposition.
Notice if your vehicle constantly turns slightly or “pulls” to one side when trav-
eling on smooth, level road.
When stopping, listen and check for unusual sounds, pulling to one side,
increased brake pedal travel or “hard-
to-push” brake pedal.
If any slipping or changes in the oper- ation of your transaxle occurs, check
the transaxle fluid level.
Check automatic transaxle P (Park) function.
Check the parking brake.
Check for fluid leaks under your vehicle (water dripping from the air condition-
ing system during or after use is nor-mal).
WARNING
Be careful when checking your
engine coolant level when the
engine is hot. Scalding hot coolant
and steam may blow out under
pressure. This could cause burns
or other serious injury.
YN ENG 7.QXP 4/16/2012 10:07 AM Page 5
Page 301 of 751

Maintenance
8
7
I : Inspect and if necessary, adjust, correct, clean or replace.
R : Replace or change.* 1
: Adjust alternator and power steering (and water pump drive belt) and air conditioner drive belt (if equipped).
Inspect and if necessary correct or replace.
* 2
: Check the engine oil level and leak every 500 km (350 miles) or before starting a long trip.
* 3
: Driving in summer season temperature over 40 °C (104 °F - SAUDI, UAE, OMAN, KUWAIT, BAHRAIN, QATAR, IRAN,
YEMEN ETC) or driving over 170 km/h (106 mile/h) must conform the severe driving condition.
* 4
: Inspect for excessive valve noise and/or engine vibration and adjust if necessary. We recommend that the system be serviced
by an authorized Kia dealer.
* 5
: For your convenience, it can be replaced prior to it's interval when you do maintenance of other items.
MAINTENANCE
INTERVALS
MAINTENANCE ITEM
NORMAL MAINTENANCE SCHEDULE - 1.4L/1.6L GASOLINE ENGINE Number of months or driving distance, whichever comes first
Months 12 24 36 48 60 72 84 96
Miles×1,000 12.5 25 37.5 50 62.5 75 87.5 100
Km×1,000 20 40 60 80 100 120 140 160
Drive belts * 1 For Europe Except Europe
Engine oil and engine For Middle East
oil filter * 2
Except Middle East R R R R R R R R
Air cleaner filter For China, India, Middle East R R R R R R R R Except
China, India, Middle East I R I R I R I R
Spark plugs R R R R
Valve clearance * 4
Replace every 10,000 km or 12 months *
3
Inspect every 80,000 km or 72 months * 5
Inspect every 30,000 km or 24 months
At first, inspect 80,000 km or 72 months
after that, inspect every 20,000 km or 24 months
YN ENG 7.QXP 4/16/2012 10:07 AM Page 8
Page 304 of 751
711
Maintenance
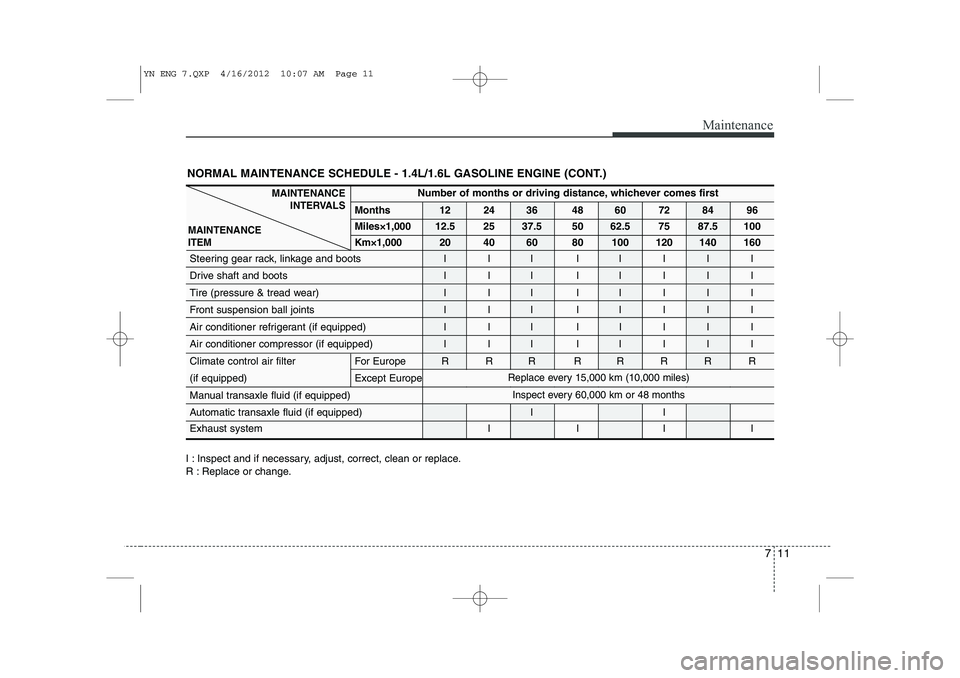
I : Inspect and if necessary, adjust, correct, clean or replace.
R : Replace or change.
Number of months or driving distance, whichever comes first
Months 12 24 36 48 60 72 84 96 Miles×1,000
12.5 25 37.5 50 62.5 75 87.5 100
Km×1,00020 40 60 80 100 120 140 160
Steering gear rack, linkage and boots I I I I I I I I
Drive shaft and boots I I I I I I I I
Tire (pressure & tread wear) I I I I I I I I
Front suspension ball joints I I I I I I I I
Air conditioner refrigerant (if equipped) I I I I I I I I
Air conditioner compressor (if equipped) I I I I I I I I
Climate control air filter For Europe R R R R R R R R
(if equipped) Except Europe
Manual transaxle fluid (if equipped)
Automatic transaxle fluid (if equipped) I I Exhaust system I I I I
MAINTENANCE
INTERVALS
MAINTENANCE ITEM
NORMAL MAINTENANCE SCHEDULE - 1.4L/1.6L GASOLINE ENGINE (CONT.)
Replace every 15,000 km (10,000 miles)
Inspect every 60,000 km or 48 months
YN ENG 7.QXP 4/16/2012 10:07 AM Page 11