2013 KIA VENGA instrument panel
[x] Cancel search: instrument panelPage 527 of 751

463
Features of your vehicle
Headlight position ( )
When the light switch is in the headlight position (2nd position), the head, tail,
position, license and instrument panellights are ON.
✽✽NOTICE
The ignition switch must be in the ON position to turn on the headlights.
Auto light position (if equipped)
When the light switch is in the AUTO light position, the taillights and headlights will
be turned ON or OFF automaticallydepending on the amount of light outside
the vehicle.
OED040800
CAUTION
Never place anything over sensor (1) located on the instrument
panel, this will ensure better auto- light system control.
Don’t clean the sensor using a window cleaner, the cleanser may
leave a light film which could interfere with sensor operation.
If your vehicle has window tint or other types of metallic coating onthe front windscreen, the Auto
light system may not work prop- erly.
OYN049201
YN RHD 4(~99).QXP 11/29/2012 11:03 AM Page 63
Page 528 of 751
Features of your vehicle
64
4
High beam operation
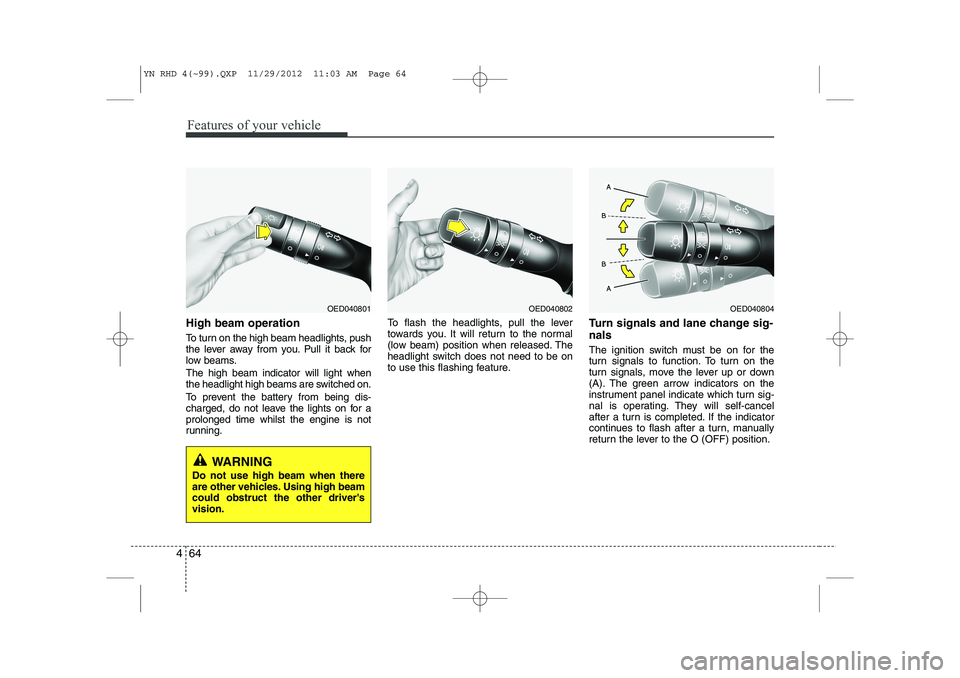
To turn on the high beam headlights, push
the lever away from you. Pull it back for
low beams. The high beam indicator will light when
the headlight high beams are switched on.
To prevent the battery from being dis-
charged, do not leave the lights on for aprolonged time whilst the engine is not
running. To flash the headlights, pull the lever
towards you. It will return to the normal
(low beam) position when released. The
headlight switch does not need to be on
to use this flashing feature.
Turn signals and lane change sig- nals
The ignition switch must be on for the
turn signals to function. To turn on the
turn signals, move the lever up or down
(A). The green arrow indicators on the
instrument panel indicate which turn sig-
nal is operating. They will self-cancel
after a turn is completed. If the indicator
continues to flash after a turn, manually
return the lever to the O (OFF) position.
OED040804OED040802OED040801
WARNING
Do not use high beam when there
are other vehicles. Using high beamcould obstruct the other driver'svision.
YN RHD 4(~99).QXP 11/29/2012 11:03 AM Page 64
Page 535 of 751
471
Features of your vehicle
✽✽NOTICE
If you want to defrost and defog the
front windscreen, refer to “Windscreen
defrosting and defogging” in this sec-tion.
Rear window defroster
The defroster heats the window to
remove frost, fog and thin ice from the
interior and exterior of the rear window,
whilst engine is running.
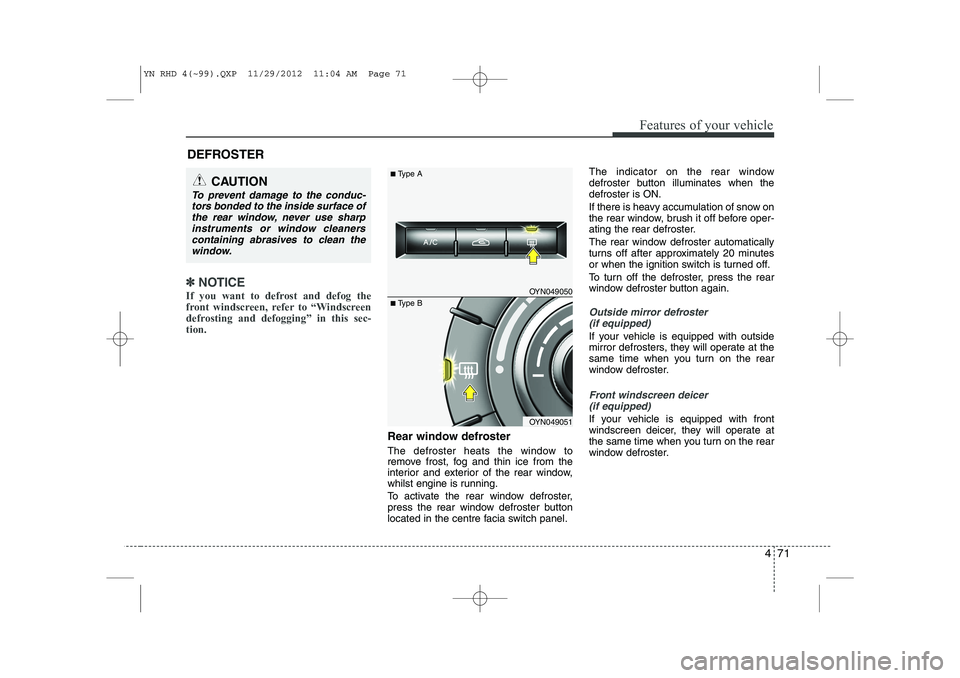
To activate the rear window defroster,
press the rear window defroster button
located in the centre facia switch panel. The indicator on the rear window
defroster button illuminates when thedefroster is ON.
If there is heavy accumulation of snow on
the rear window, brush it off before oper-
ating the rear defroster.
The rear window defroster automatically
turns off after approximately 20 minutes
or when the ignition switch is turned off.
To turn off the defroster, press the rear
window defroster button again.
Outside mirror defroster
(if equipped)
If your vehicle is equipped with outside
mirror defrosters, they will operate at the
same time when you turn on the rear
window defroster.
Front windscreen deicer (if equipped)
If your vehicle is equipped with front
windscreen deicer, they will operate at
the same time when you turn on the rear
window defroster.
DEFROSTER
CAUTION
To prevent damage to the conduc-
tors bonded to the inside surface of
the rear window, never use sharpinstruments or window cleanerscontaining abrasives to clean the window.
OYN049050
OYN049051
■ Type A
■Type B
YN RHD 4(~99).QXP 11/29/2012 11:04 AM Page 71
Page 539 of 751
475
Features of your vehicle
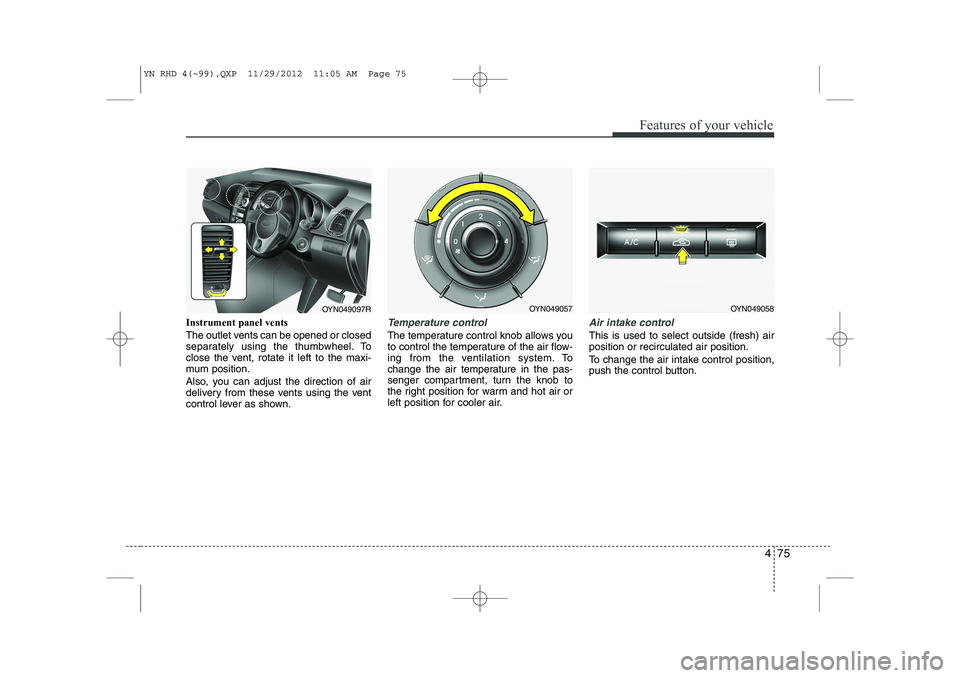
Instrument panel vents
The outlet vents can be opened or closed
separately using the thumbwheel. To
close the vent, rotate it left to the maxi-
mum position.
Also, you can adjust the direction of air
delivery from these vents using the vent
control lever as shown.Temperature control
The temperature control knob allows you
to control the temperature of the air flow-
ing from the ventilation system. To
change the air temperature in the pas-
senger compartment, turn the knob to
the right position for warm and hot air or
left position for cooler air.
Air intake control
This is used to select outside (fresh) air position or recirculated air position.
To change the air intake control position,
push the control button.
OYN049097ROYN049057OYN049058
YN RHD 4(~99).QXP 11/29/2012 11:05 AM Page 75
Page 548 of 751
Features of your vehicle
84
4
Maximum (MAX) defrost mode
When you select the MAX defrost mode,
the following system settings will bemade automatically;
the air conditioning system will be
turned on.
the outside(fresh) air position will be selected.
the fan speed will be set to the high speed.
To turn the MAX defrost mode off, press
the mode button or MAX defrost button
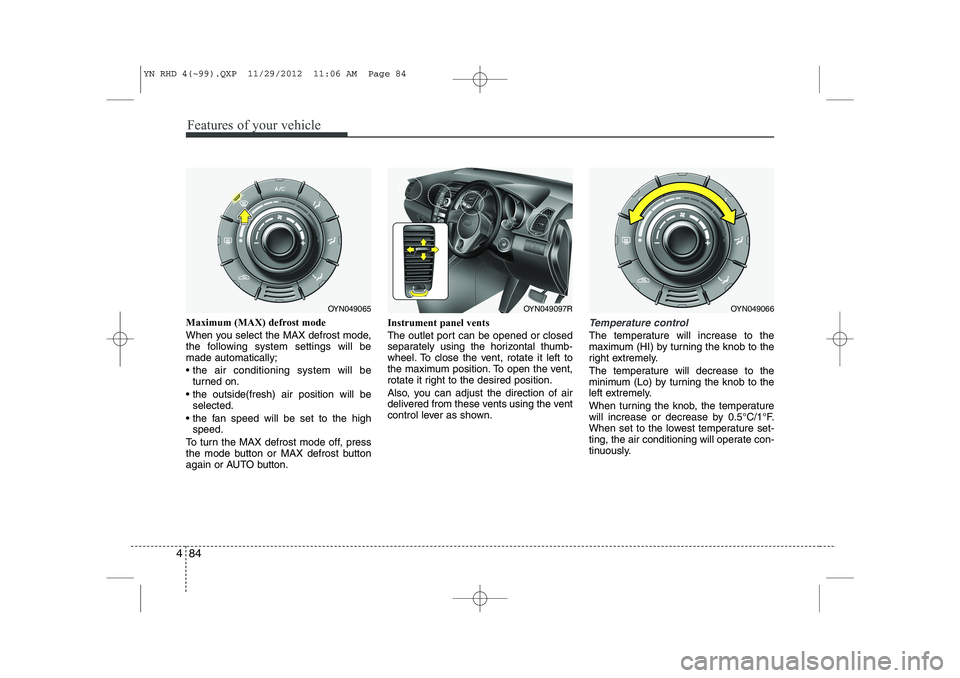
again or AUTO button. Instrument panel vents
The outlet port can be opened or closed
separately using the horizontal thumb-
wheel. To close the vent, rotate it left to
the maximum position. To open the vent,
rotate it right to the desired position.
Also, you can adjust the direction of air
delivered from these vents using the vent
control lever as shown.Temperature control
The temperature will increase to the
maximum (HI) by turning the knob to the
right extremely.
The temperature will decrease to the
minimum (Lo) by turning the knob to the
left extremely.
When turning the knob, the temperature
will increase or decrease by 0.5°C/1°F.
When set to the lowest temperature set-
ting, the air conditioning will operate con-
tinuously.
OYN049065OYN049097ROYN049066
YN RHD 4(~99).QXP 11/29/2012 11:06 AM Page 84
Page 578 of 751
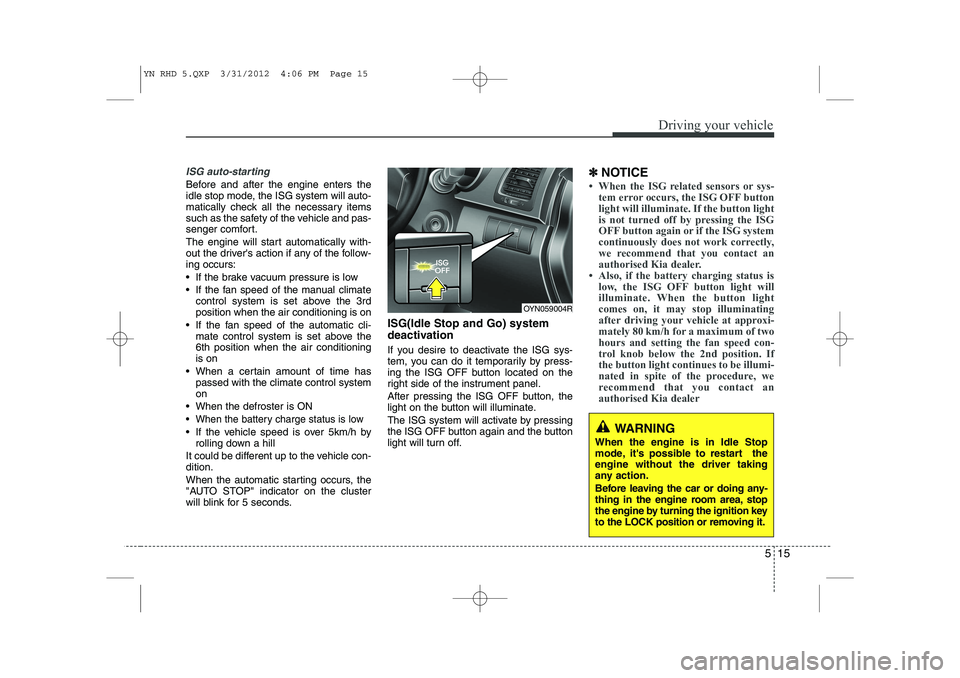
515
Driving your vehicle
ISG auto-starting
Before and after the engine enters the
idle stop mode, the ISG system will auto-
matically check all the necessary items
such as the safety of the vehicle and pas-
senger comfort.
The engine will start automatically with-
out the driver's action if any of the follow-ing occurs:
If the brake vacuum pressure is low
If the fan speed of the manual climatecontrol system is set above the 3rd position when the air conditioning is on
If the fan speed of the automatic cli- mate control system is set above the6th position when the air conditioningis on
When a certain amount of time has passed with the climate control systemon
When the defroster is ON
When the battery charge status is low
If the vehicle speed is over 5km/h by rolling down a hill
It could be different up to the vehicle con-dition.
When the automatic starting occurs, the
"AUTO STOP" indicator on the cluster
will blink for 5 seconds. ISG(Idle Stop and Go) system
deactivation
If you desire to deactivate the ISG sys-
tem, you can do it temporarily by press-
ing the ISG OFF button located on the
right side of the instrument panel.
After pressing the ISG OFF button, the
light on the button will illuminate.
The ISG system will activate by pressing
the ISG OFF button again and the button
light will turn off. ✽
✽
NOTICE
Page 618 of 751

555
Driving your vehicle
Following distance
Stay at least twice as far behind the vehi-
cle ahead as you would when driving
your vehicle without a trailer. This can
help you avoid situations that require
heavy braking and sudden turns.
Passing
You’ll need more passing distance up
ahead when you’re towing a trailer. And,
because of the increased vehicle length,
you’ll need to go much farther beyond the
passed vehicle before you can return to
your lane.
Backing up
Hold the bottom of the steering wheel
with one hand. Then, to move the trailer
to the left, just move your hand to the left.
To move the trailer to the right, move your
hand to the right. Always back up slowly
and, if possible, have someone guide
you.
Making turns
When you’re turning with a trailer, make
wider turns than normal. Do this so your
trailer won’t strike soft shoulders, curbs,
road signs, trees, or other objects. Avoid
jerky or sudden manoeuvres. Signal well
in advance.
Turn signals when towing a trailer
When you tow a trailer, your vehicle has
to have a different turn signal flasher and
extra wiring. The green arrows on your
instrument panel will flash whenever you
signal a turn or lane change. Properly
connected, the trailer lights will also flash
to alert other drivers you’re about to turn,
change lanes, or stop.
When towing a trailer, the green arrows
on your instrument panel will flash for
turns even if the bulbs on the trailer are
burned out. Thus, you may think drivers
behind you are seeing your signals
when, in fact, they are not. It’s important
to check occasionally to be sure the trail-
er bulbs are still working. You must also
check the lights every time you discon-
nect and then reconnect the wires.
Do not connect a trailer lighting system
directly to your vehicle’s lighting system.
Use only an approved trailer wiring har-
ness.We recommend that you contact an
authorised Kia dealer to assist you in
installing the wiring harness.
Driving on grades
Reduce speed and shift to a lower gear
before you start down a long or steep
downgrade. If you don’t shift down, you
might have to use your brakes so much
that they would get hot and no longer
operate efficiently.
On a long uphill grade, shift down and
reduce your speed to around 70 km/h (45mph) to reduce the possibility of engine
and transaxle overheating.
If your trailer weighs more than the max-
imum trailer weight without trailer brakes
and you have an automatic transaxle,
you should drive in D (Drive) when tow-
ing a trailer.
Operating your vehicle in D (Drive) when
towing a trailer will minimize heat build up
and extend the life of your transaxle.
WARNING
Failure to use an approved trailer wiring harness could result in dam-
age to the vehicle electrical system
and/or personal injury.
YN RHD 5.QXP 3/31/2012 4:08 PM Page 55
Page 705 of 751

753
Maintenance
Instrument panel fuse replace- ment
1. Turn the ignition switch and all otherswitches off.
2. Open the fuse panel cover. 3. Pull the suspected fuse straight out.
Use the removal tool provided in the
engine compartment fuse panel cover.
4. Check the removed fuse; replace it if it is blown.
5. Push in a new fuse of the same rating, and make sure it fits tightly in the clips.
If it fits loosely, we recommend that you
consult an authorised Kia dealer.
If you do not have a spare, use a fuse of the same rating from a circuit you may
not need for operating the vehicle, suchas the cigarette lighter fuse.
If the headlights or other electrical com-
ponents do not work and the fuses are
OK, check the fuse panel in the engine
compartment. If a fuse is blown, it mustbe replaced.
OYN079023OYN079018R
CAUTION
When replacing a blown fuse or relay with a new one, make sure
the new fuse or relay fits tightlyinto the clips The incomplete fas-tening fuse or relay may cause the vehicle wiring and electric systems
damage and a possible fire.
Do not remove fuses, relays and terminals fastened with bolts ornuts. The fuses, relays and termi-
nals may be fastened incompletely,and it may cause a possible fire. Iffuses, relays and terminals fas-tened with bolts or nuts are blown,
we recommend that you consultwith an authorised Kia dealer.
Do not input any other objects except fuses or relays into
fuse/relay terminals such as a driv-er or wiring. It may cause contactfailure and system malfunction.
YN RHD 7.QXP 11/29/2012 10:50 AM Page 53