Page 267 of 751

63
What to do in an emergency
2. When the vehicle is stopped, turn onyour emergency hazard flashers, set
the parking brake and put the transaxle
in P (automatic transaxle) or reverse
(manual transaxle).
3. Have all passengers get out of the vehicle. Be sure they all get out on the
side of the vehicle that is away from
traffic.
4. When changing a flat tire, follow the instruction provided later in this sec-tion.
If engine stalls while driving
1. Reduce your speed gradually, keeping a straight line. Move cautiously off the
road to a safe place.
2. Turn on your emergency flashers.
3. Try to start the engine again. If your vehicle will not start, we recommend
that you contact an authorized Kia
dealer. If engine doesn't turn over or
turns over slowly
1. If your vehicle has an automatic
transaxle, be sure the shift lever is in N
(Neutral) or P (Park) and the emer-
gency brake is set.
2. Check the battery connections to be sure they are clean and tight.
3. Turn on the interior light. If the light dims or goes out when you operate the
starter, the battery is discharged.
4. Check the starter connections to be sure they are securely tightened.
5. Do not push or pull the vehicle to start it. See instructions for "Jump starting". If engine turns over normally but
does not start
1. Check the fuel level.
2. With the ignition switch in the LOCK
position, check all connectors at the
ignition coils and spark plugs.
Reconnect any that may be discon-
nected or loose.
3. Check the fuel line in the engine com- partment.
4. If the engine still does not start, we recommend that you call an author-
ized Kia dealer.
IF THE ENGINE WILL NOT START
WARNING
If the engine will not start, do not
push or pull the vehicle to start it.This could result in a collision or
cause other damage. In addition,
push or pull starting may cause the
catalytic converter to be over-
loaded and create a fire hazard.
YN ENG 6.QXP 4/16/2012 10:05 AM Page 3
Page 288 of 751

What to do in an emergency
24
6
You may not be able identify a low
tire by simply looking at it. Alwaysuse a good quality tire pressuregauge to measure the tire's inflation
pressure. Please note that a tire that
is hot (from being driven) will have ahigher pressure measurement than atire that is cold (from sitting station-
ary for at least 3 hours and driven
less than 1 mile (1.6 km) during that
3 hour period).
Allow the tire to cool before measur-
ing the inflation pressure. Always be
sure the tire is cold before inflating to
the recommended pressure.
A cold tire means the vehicle has
been sitting for 3 hours and driven forless than 1 mile (1.6 km) in that 3
hour period.
CAUTION
We recommend to use the Tire
Mobility Kit approved by Kia ifyour vehicle is equipped with a Tire Pressure Monitoring System.The liquid sealant can damagethe tire pressure sensors.
WARNING - Protecting
TPMS
Tampering with, modifying, or
disabling the Tire PressureMonitoring System (TPMS)
components may interfere withthe system's ability to warn the
driver of low tire pressure con-
ditions and/or TPMS malfunc-
tions. Tampering with, modifying,
or disabling the Tire PressureMonitoring System (TPMS) com-
ponents may void the warranty
for that portion of the vehicle.WARNING - TPMS
The TPMS cannot alert you to severe and sudden tire dam-
age caused by external factors
such as nails or road debris.
If you feel any vehicle instabil- ity, immediately take your foot
off the accelerator, apply the
brakes gradually and with
light force, and slowly move to
a safe position off the road.
YN ENG 6.QXP 4/16/2012 10:06 AM Page 24
Page 294 of 751
7
Engine compartment / 7-2 Maintenance services / 7-3
Owner maintenance / 7-5Scheduled maintenance service / 7-7Explanation of scheduled maintenance items / 7-20Engine oil / 7-24Engine coolant / 7-25Brake/clutch fluid / 7-28Automatic transaxle fluid / 7-29
Washer fluid / 7-31Parking brake / 7-31
Fuel filter / 7-32
Air cleaner / 7-33
Climate control air filter / 7-34
Wiper blades / 7-36Battery / 7-39
Tires and wheels / 7-42Fuses / 7-52 Light bulbs / 7-63
Appearance care / 7-72
Emission control system / 7-78
Maintenance
YN ENG 7.QXP 4/16/2012 10:07 AM Page 1
Page 298 of 751

75
Maintenance
OWNER MAINTENANCE
The following lists are vehicle checks and
inspections that should be performed atthe frequencies indicated to help ensure
safe, dependable operation of your vehi-
cle. If you have any question, we recom-
mend that you consult an authorized Kia
dealer.
These Owner Maintenance Checks are
generally not covered by warranties and
you may be charged for labor, parts and
lubricants used. Owner maintenance schedule
When you stop for fuel:
• Check the engine oil level.
Check the coolant level in coolant
reservoir.
Check the windshield washer fluid level.
Look for low or under-inflated tires.
While operating your vehicle:
Note any changes in the sound of the exhaust or any smell of exhaust fumes
in the vehicle.
Check for vibrations in the steering wheel. Notice any increased steering
effort or looseness in the steering
wheel, or change in its straight-aheadposition.
Notice if your vehicle constantly turns slightly or “pulls” to one side when trav-
eling on smooth, level road.
When stopping, listen and check for unusual sounds, pulling to one side,
increased brake pedal travel or “hard-
to-push” brake pedal.
If any slipping or changes in the oper- ation of your transaxle occurs, check
the transaxle fluid level.
Check automatic transaxle P (Park) function.
Check the parking brake.
Check for fluid leaks under your vehicle (water dripping from the air condition-
ing system during or after use is nor-mal).
WARNING
Be careful when checking your
engine coolant level when the
engine is hot. Scalding hot coolant
and steam may blow out under
pressure. This could cause burns
or other serious injury.
YN ENG 7.QXP 4/16/2012 10:07 AM Page 5
Page 299 of 751

Maintenance
6
7
At least monthly:
Check the coolant level in the engine
coolant reservoir.
Check the operation of all exterior lights, including the stoplights, turn sig-
nals and hazard warning flashers.
Check the inflation pressures of all tires including the spare.
At least twice a year
(i.e., every Spring and Fall):
Check the radiator, heater and air con- ditioning hoses for leaks or damage.
Check the windshield washer spray and wiper operation. Clean wiper
blades with clean cloth dampened with
washer fluid.
Check the headlight alignment.
Check the muffler, exhaust pipes, shields and clamps.
Check the lap/shoulder belts for wear and function.
Check for worn tires and loose wheel lug nuts.
At least once a year:
Clean the body and door drain holes.
Lubricate the door hinges and checks,and hood hinges.
Lubricate the door and hood locks and latches.
Lubricate the door rubber weather- strips.
Check the air conditioning system.
Inspect and lubricate automatic transaxle linkage and controls.
Clean the battery and terminals.
Check the brake/clutch fluid level.
YN ENG 7.QXP 4/16/2012 10:07 AM Page 6
Page 350 of 751
757
Maintenance
Inner fuse panel
DescriptionFuse ratingSystemProtected Component
25APOWER WINDOWLeft Power Window
25APOWER WINDOWRight Power Window
10AOUTSIDE MIRROR HEATEDOutside Mirror Defroster
10ABLOWERAir Conditioning System, ECU
20ADOOR LOCKDoor Lock/Unlock
20ASUNROOFSunroof
15ASAFETY POWER WINDOWSafety Power Window (Driver)
10AFOLDING MIRROROutside Mirror Folding Switch, Center Facia Switch
10ATAIL LAMPLeft Tail Light
10ATAIL LAMPRight Tail Light
10ASTARTStart Motor Relay
15AHAZARD WARNING SIGNALCenter Facia Switch
25APOWER DISTRIBUTIONMODULESmk Unit
10APOWER DISTRIBUTIONMODULESmk Unit, SSB
MDPS210AMOTOR DRIVER POWERSTEERINGMDPS
BRAKE SW10ASTOP SWITCHSTOP SWITCH
YN ENG 7.QXP 4/16/2012 10:10 AM Page 57
Page 353 of 751

Maintenance
60
7
Engine compartment fuse panel
DescriptionFuse ratingSystemProtected Component
50AIGNITIONStart Sol, IGN_SW
50ABATTERYI/P Junction(Stop Lamp 15A,Tail Lamp Relay, Room Lamp, Luggage 10A,Tail
Lamp LH 10A, Tail Lamp RH 10A, FOG LP FRT 10A, FOG LP RR 10A)
30AFUEL FILTER HEATERFuel Filter Heater (Diesel)
125A/150AALTERNATORAlternator
40AANTI-LOCK BRAKE SYSTEMABS,ESP
40AANTI-LOCK BRAKE SYSTEMABS,ESP
40AREAR HEAT RAYS JOIN
GLASSI/P Junction(Rear Heater Relay, Heated Mirror 10A)
40ABLOWERBlower Motor
80AMOTOR DRIVEN POWERSTEERINGMDPS(Motor Driven Power Steering)
40AIGNITIONIgnition Switch (IG1, Accessory)
40ACOOLING FANCooling Fan Relay(High), Cooling Fan Relay(Low)
30AELECTRONIC (ENGINE)CONTROL UNIT"Main Relay, ECU 4 10A, ECU 1 20A, ECU 3 10A, Sensor 10A, Injector 15A"
50ABATTERY"I/P Junction(Hazard 15A, Power Window Relay, Power window LH 25A,
Power window RH 25A ,Safety Power window 15A, Sunroof 20A, PDM 3
10A, Deicer 15A, Folding 10A, PDM1 25A, Door Lock 20A)"
10ADAYTIME RUNNING LIGHTBCM
YN ENG 7.QXP 4/16/2012 10:10 AM Page 60
Page 356 of 751

763
Maintenance
LIGHT BULBS
Use only the bulbs of the specifiedwattage.
✽✽ NOTICE
After heavy, driving rain or washing, headlight and taillight lenses could
appear frosty. This condition is caused by
the temperature difference between the
lamp inside and outside. This is similar
to the condensation on your windows
inside your vehicle during the rain and
doesn’t indicate a problem with your
vehicle. If the water leaks into the lamp
bulb circuitry, we recommend that thesystem be checked by an authorized Kia
dealer.
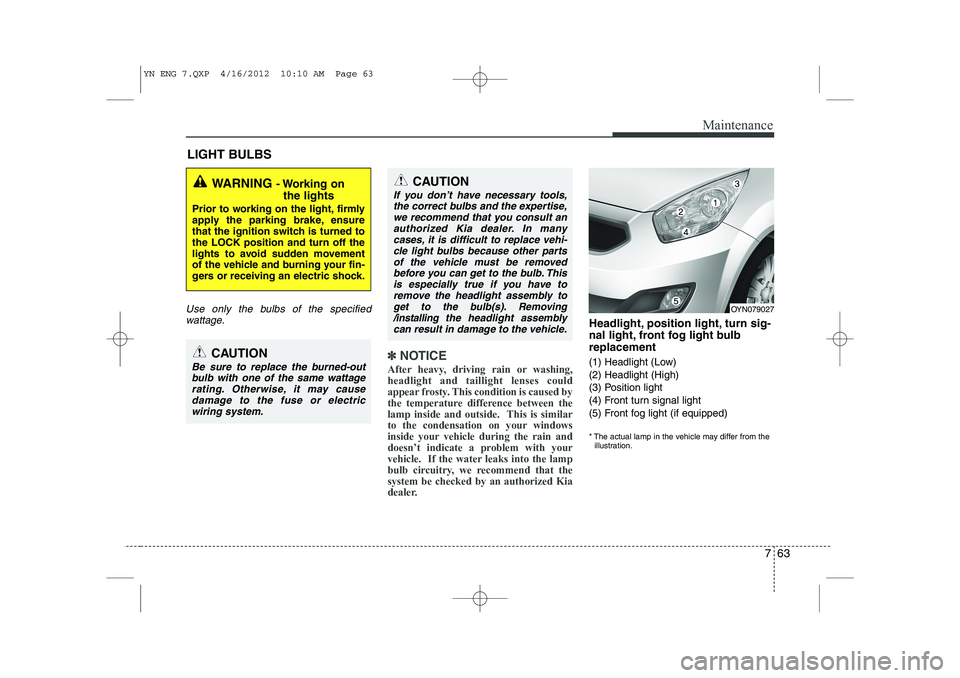
Headlight, position light, turn sig-
nal light, front fog light bulbreplacement
(1) Headlight (Low) (2) Headlight (High)
(3) Position light
(4) Front turn signal light
(5) Front fog light (if equipped)
* The actual lamp in the vehicle may differ from the illustration.
WARNING - Working on
the lights
Prior to working on the light, firmly
apply the parking brake, ensure
that the ignition switch is turned tothe LOCK position and turn off the
lights to avoid sudden movement
of the vehicle and burning your fin-
gers or receiving an electric shock.
CAUTION
Be sure to replace the burned-out bulb with one of the same wattagerating. Otherwise, it may cause
damage to the fuse or electricwiring system.
CAUTION
If you don’t have necessary tools,the correct bulbs and the expertise,
we recommend that you consult anauthorized Kia dealer. In many cases, it is difficult to replace vehi-cle light bulbs because other parts
of the vehicle must be removedbefore you can get to the bulb. This is especially true if you have to
remove the headlight assembly to
get to the bulb(s). Removing/installingthe headlight assembly
can result in damage to the vehicle.OYN079027
YN ENG 7.QXP 4/16/2012 10:10 AM Page 63