2013 KIA VENGA maintenance schedule
[x] Cancel search: maintenance schedulePage 314 of 751

721
Maintenance
Timing belt (if equipped)
Inspect all parts related to the timing belt
for damage and deformation. Replace
any damaged parts immediately.
Vapor hose and fuel filler cap
The vapor hose and fuel filler cap should
be inspected at those intervals specified
in the maintenance schedule. Make sure
that a new vapor hose or fuel filler cap iscorrectly replaced.Vacuum crankcase ventilation hoses (if equipped)
Inspect the surface of hoses for evidence
of heat and/or mechanical damage. Hard
and brittle rubber, cracking, tears, cuts,
abrasions, and excessive swelling indi-
cate deterioration. Particular attention
should be paid to examine those hose
surfaces nearest to high heat sources,
such as the exhaust manifold. Inspect the hose routing to assure that the hoses do not come in contact with
any heat source, sharp edges or movingcomponent which might cause heat dam-
age or mechanical wear. Inspect all hose
connections, such as clamps and cou-
plings, to make sure they are secure, and
that no leaks are present. Hoses should
be replaced immediately if there is any
evidence of deterioration or damage.Air cleaner filter
We recommend that you use air cleaner
filter for replacement from an authorized
Kia dealer.
Spark plugs (for gasoline engine)
Make sure to install new spark plugs of
the correct heat range.
Valve clearance (if equipped)
Inspect for excessive valve noise and/or
engine vibration and adjust if necessary.
We recommend that the system be serv-
iced by an authorized Kia dealer.
YN ENG 7.QXP 4/16/2012 10:07 AM Page 21
Page 315 of 751
Maintenance
22
7
Cooling system
Check cooling system components, such
as radiator, coolant reservoir, hoses and
connections for leakage and damage.
Replace any damaged parts. Coolant The coolant should be changed at the
intervals specified in the maintenance
schedule.
Manual transaxle fluid (if equipped)
Inspect the manual transaxle fluid
according to the maintenance schedule. Automatic transaxle fluid (if equipped)
The fluid level should be in the "HOT"
range of the dipstick, after the engine
and transaxle are at normal operating
temperature. Check the automatic
transaxle fluid level with the engine run-
ning and the transaxle in neutral, with the
parking brake properly applied. Brake hoses and lines
Visually check for proper installation,
chafing, cracks, deterioration and any
leakage. Replace any deteriorated or
damaged parts immediately. Brake fluid
Check brake fluid level in the brake fluid
reservoir. The level should be between
“MIN” and “MAX” marks on the side of
the reservoir. Use only hydraulic brake
fluid conforming to DOT 3 or DOT 4specification.Parking brake
Inspect the parking brake system includ-
ing the parking brake pedal and cables.
Brake discs, pads, calipers and
rotors
Check the pads for excessive wear, discs
for run out and wear, and calipers for fluid
leakage.
For more information on checking the
pads or lining wear limit, we recommend
to refer to the Kia web site. (
http://brakeman
ual.kia.co.kr)
Suspension mounting bolts
Check the suspension connections for
looseness or damage. Retighten to the
specified torque.
YN ENG 7.QXP 4/16/2012 10:07 AM Page 22
Page 323 of 751
Maintenance
30
7
✽✽
NOTICE
New automatic transaxle fluid should be
red. The red dye is added so the assem-bly plant can identify it as automatic
transaxle fluid and distinguish it from
engine oil or antifreeze. The red dye,
which is not an indicator of fluid quali-
ty, is not permanent. As the vehicle isdriven, the automatic transaxle fluid
will begin to look darker. The color may
eventually appear light brown.
Therefore, we recommend that the sys-
tem be replaced by an authorized Kia
dealer according to the ScheduledMaintenance at the beginning of thissection.
Use only specified automatic transaxle
fluid. (Refer to "Recommended lubricantsor capacities" in section 8.) Changing the automatic transaxle fluid
We recommend that the system be
replaced by an authorized Kia dealer.According to the Maintenance Scheduleat the beginning of this section.
YN ENG 7.QXP 4/16/2012 10:08 AM Page 30
Page 326 of 751
733
Maintenance
AIR CLEANER
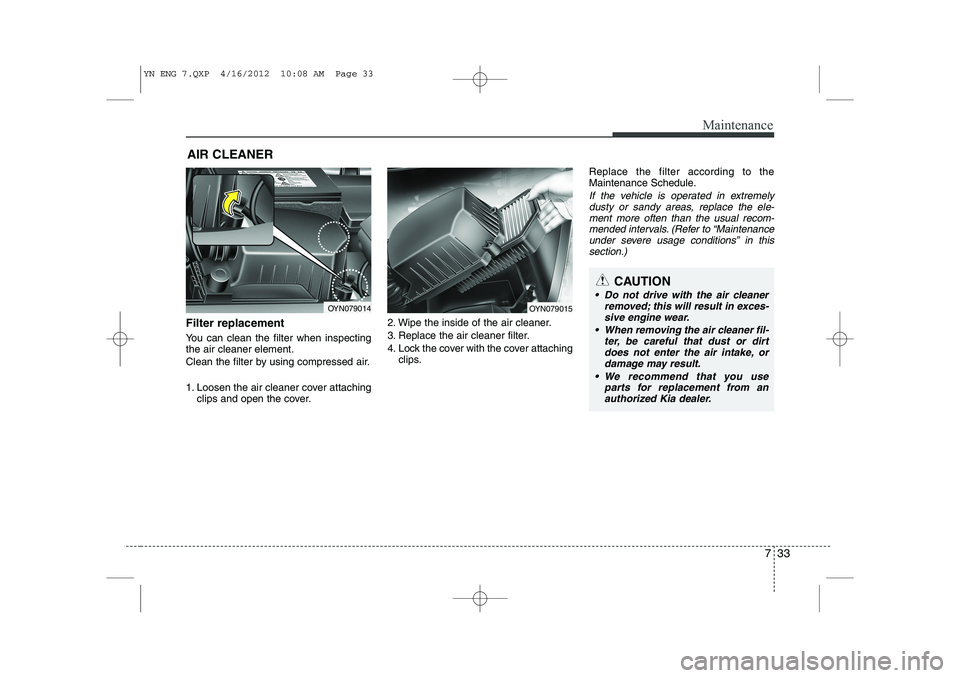
Filter replacement
You can clean the filter when inspecting the air cleaner element.
Clean the filter by using compressed air.
1. Loosen the air cleaner cover attaching clips and open the cover. 2. Wipe the inside of the air cleaner.
3. Replace the air cleaner filter.
4. Lock the cover with the cover attaching
clips. Replace the filter according to the
Maintenance Schedule.
If the vehicle is operated in extremely
dusty or sandy areas, replace the ele- ment more often than the usual recom-
mended intervals. (Refer to “Maintenance under severe usage conditions” in thissection.)
OYN079014OYN079015
CAUTION
Do not drive with the air cleaner
removed; this will result in exces-sive engine wear.
When removing the air cleaner fil- ter, be careful that dust or dirtdoes not enter the air intake, or
damage may result.
We recommend that you use parts for replacement from anauthorized Kia dealer.
YN ENG 7.QXP 4/16/2012 10:08 AM Page 33
Page 327 of 751
Maintenance
34
7
CLIMATE CONTROL AIR FILTER (IF EQUIPPED)
Filter inspection
If the vehicle is operated in the severely air-polluted cities or on dusty rough
roads for a long period, it should beinspected more frequently and replaced
earlier. When you, the owner, replace the
climate control air filter, replace it per-
forming the following procedure, and be
careful to avoid damaging other compo-
nents. Replace the filter according to the main-
tenance Schedule.
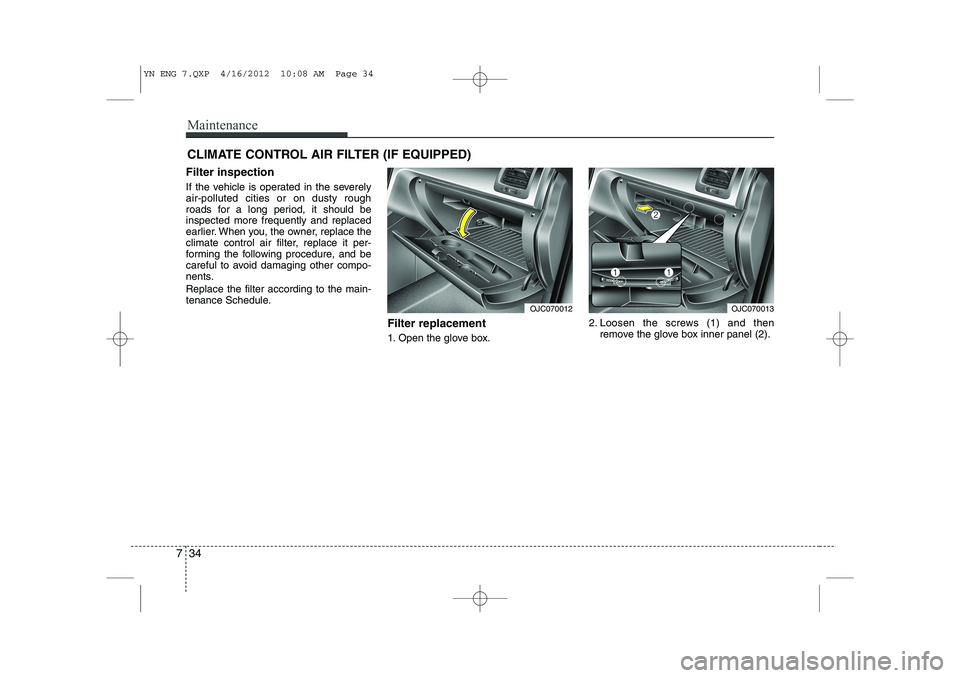
Filter replacement
1. Open the glove box.2. Loosen the screws (1) and then
remove the glove box inner panel (2).
OJC070013OJC070012
YN ENG 7.QXP 4/16/2012 10:08 AM Page 34
Page 371 of 751
Maintenance
78
7
EMISSION CONTROL SYSTEM
The emission control system of your
vehicle is covered by a written limited
warranty. Please see the warranty infor-
mation contained in the Warranty &
Maintenance booklet in your vehicle.
Your vehicle is equipped with an emis- sion control system to meet all emission
regulations. There are three emission control sys-
tems which are as follows.
(1) Crankcase emission control system
(2) Evaporative emission control system(3) Exhaust emission control system In order to assure the proper function of
the emission control systems, it is rec-
ommended that you have your vehicle
inspected and maintained by an author-
ized Kia dealer in accordance with the
maintenance schedule in this manual. Caution for the Inspection and
Maintenance Test (With Electronic
Stability Program (ESP) system)
To prevent the vehicle from misfir-
ing during dynamometer testing,
turn the Electronic Stability
Program (ESP) system off by press-
ing the ESP switch.
After dynamometer testing is com- pleted, turn the ESP system back on
by pressing the ESP switch again. 1. Crankcase emission control
system
The positive crankcase ventilation sys-
tem is employed to prevent air pollution
caused by blow-by gases being emitted
from the crankcase. This system supplies
fresh filtered air to the crankcase through
the air intake hose. Inside the crankcase,
the fresh air mixes with blow-by gases,
which then pass through the PCV valveinto the induction system.
2. Evaporative emission control system
The Evaporative Emission Control
System is designed to prevent fuel
vapors from escaping into the atmos-
phere.
YN ENG 7.QXP 4/16/2012 10:11 AM Page 78
Page 380 of 751
Specifications & Consumer information
6
8
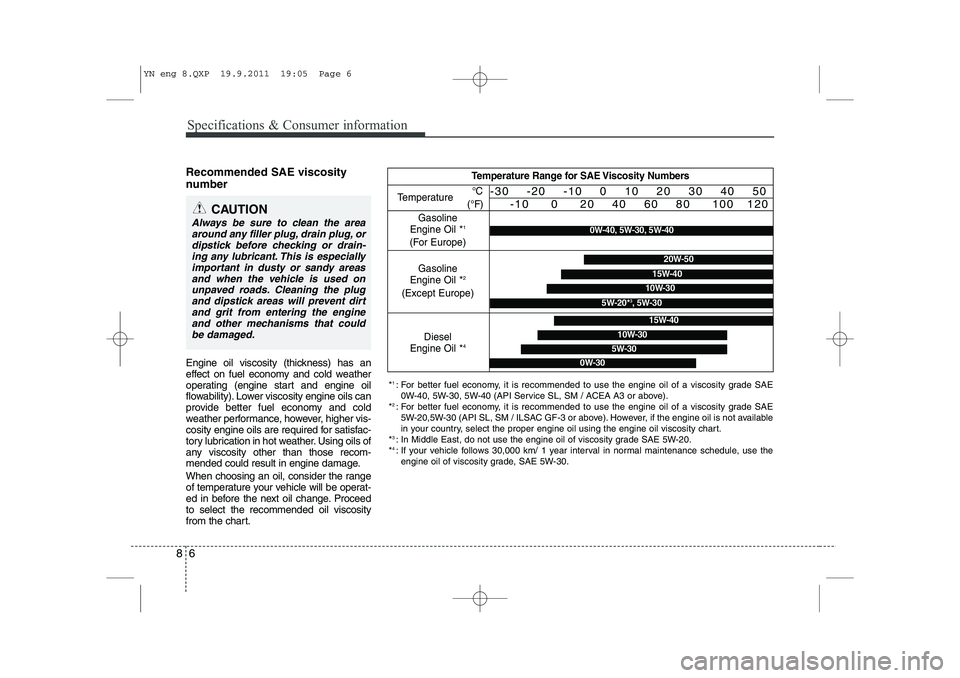
Recommended SAE viscosity
number
Engine oil viscosity (thickness) has an
effect on fuel economy and cold weather
operating (engine start and engine oil
flowability). Lower viscosity engine oils can
provide better fuel economy and cold
weather performance, however, higher vis-
cosity engine oils are required for satisfac-
tory lubrication in hot weather. Using oils of
any viscosity other than those recom-
mended could result in engine damage.
When choosing an oil, consider the range
of temperature your vehicle will be operat-
ed in before the next oil change. Proceedto select the recommended oil viscosity
from the chart.
CAUTION
Always be sure to clean the area
around any filler plug, drain plug, ordipstick before checking or drain-ing any lubricant. This is especially
important in dusty or sandy areas and when the vehicle is used onunpaved roads. Cleaning the plugand dipstick areas will prevent dirt
and grit from entering the engine and other mechanisms that couldbe damaged.
* 1
: For better fuel economy, it is recommended to use the engine oil of a viscosity grade SAE
0W-40, 5W-30, 5W-40 (API Service SL, SM / ACEA A3 or above).
* 2
: For better fuel economy, it is recommended to use the engine oil of a viscosity grade SAE
5W-20,5W-30 (API SL, SM / ILSAC GF-3 or above). However, if the engine oil is not available
in your country, select the proper engine oil using the engine oil viscosity chart.
* 3
: In Middle East, do not use the engine oil of viscosity grade SAE 5W-20.
* 4
: If your vehicle follows 30,000 km/ 1 year interval in normal maintenance schedule, use the
engine oil of viscosity grade, SAE 5W-30.
Temperature Range for SAE Viscosity Numbers
Temperature
Gasoline
Engine Oil * 1
(For Europe) °C
(°F)-30 -20 -10 0 10 20 30 40 50 -10 0 20 40 60 80 100 120
Diesel
Engine Oil * 4
5W-30
15W-40
10W-30
0W-40, 5W-30, 5W-40
Gasoline
Engine Oil * 2
(Except Europe)20W-50
10W-30
15W-40
5W-20* 3
, 5W-30
0W-30
YN eng 8.QXP 19.9.2011 19:05 Page 6
Page 387 of 751
Index
4
I
Drinks holders, see cup holders . . . . . . . . . . . . . . . . . . 4-94
Driver's and passenger's front air bag. . . . . . . . . . . . . . 3-44
Driving at night. . . . . . . . . . . . . . . . . . . . . . . . . . . . . . . 5-45
Driving in flooded areas . . . . . . . . . . . . . . . . . . . . . . . . 5-46
Driving in the rain . . . . . . . . . . . . . . . . . . . . . . . . . . . . 5-46
Economical operation . . . . . . . . . . . . . . . . . . . . . . . . . . 5-41
Electric power steering . . . . . . . . . . . . . . . . . . . . . . . . . 4-33
Electronic stability program (ESP). . . . . . . . . . . . . . . . 5-29
Emergency starting . . . . . . . . . . . . . . . . . . . . . . . . . . . . . 6-4
Jump starting . . . . . . . . . . . . . . . . . . . . . . . . . . . . . . . . 6-4
Push starting . . . . . . . . . . . . . . . . . . . . . . . . . . . . . . . . . 6-5
Emergency while driving . . . . . . . . . . . . . . . . . . . . . . . . 6-2
Emission control system . . . . . . . . . . . . . . . . . . . . . . . . 7-78 Crankcase emission control system . . . . . . . . . . . . . . 7-78
Evaporative emission control System . . . . . . . . . . . . 7-78
Exhaust emission control system . . . . . . . . . . . . . . . . 7-79
Engine compartment . . . . . . . . . . . . . . . . . . . . . . . . . . . . 2-4
Engine coolant . . . . . . . . . . . . . . . . . . . . . . . . . . . . . . . 7-25
Engine number . . . . . . . . . . . . . . . . . . . . . . . . . . . . . . . . 8-8
Engine oil . . . . . . . . . . . . . . . . . . . . . . . . . . . . . . . . . . . 7-24
Engine overheats. . . . . . . . . . . . . . . . . . . . . . . . . . . . . . . 6-6
Engine start/stop button . . . . . . . . . . . . . . . . . . . . . . . . . 5-8
Engine will not start . . . . . . . . . . . . . . . . . . . . . . . . . . . . 6-3
Evaporative emission control system . . . . . . . . . . . . . . 7-78 Exhaust emission control system . . . . . . . . . . . . . . . . . 7-79
Explanation of scheduled maintenance items . . . . . . . 7-20
Exterior care . . . . . . . . . . . . . . . . . . . . . . . . . . . . . . . . . 7-72
Flat tire . . . . . . . . . . . . . . . . . . . . . . . . . . . . . . . . . . . . . . 6-7
Changing tires. . . . . . . . . . . . . . . . . . . . . . . . . . . . . . . . 6-8
Compact spare tire . . . . . . . . . . . . . . . . . . . . . . . . . . . 6-13
Components of the tire mobility kit . . . . . . . . . . . . . . 6-16
Jack and tools . . . . . . . . . . . . . . . . . . . . . . . . . . . . . . . . 6-7
Removing and storing the spare tire . . . . . . . . . . . . . . 6-8
Tiremobilitykit . . . . . . . . . . . . . . . . . . . . . . . . . . . . . . 6-15
Floor mat anchor(s) . . . . . . . . . . . . . . . . . . . . . . . . . . . 4-97Fluid Automatic transaxle fluid . . . . . . . . . . . . . . . . . . . . . . 7-29
Brakes fluid . . . . . . . . . . . . . . . . . . . . . . . . . . . . . . . . 7-28
Washer fluid . . . . . . . . . . . . . . . . . . . . . . . . . . . . . . . . 7-31
Fog light (front) . . . . . . . . . . . . . . . . . . . . . . . . . . . . . . 7-66
Fog light (rear) . . . . . . . . . . . . . . . . . . . . . . . . . . . . . . . 7-69Fog light bulbs replacement Fog light (front) . . . . . . . . . . . . . . . . . . . . . . . . . . . . . 7-66
Fog light (rear) . . . . . . . . . . . . . . . . . . . . . . . . . . . . . . 7-69
Folding the rear seat . . . . . . . . . . . . . . . . . . . . . . . . . . . 3-10
Front seat adjustment . . . . . . . . . . . . . . . . . . . . . . . . . . . 3-5
Fuel filler lid . . . . . . . . . . . . . . . . . . . . . . . . . . . . . . . . . 4-26
Fuel filter . . . . . . . . . . . . . . . . . . . . . . . . . . . . . . . . . . . 7-32
E
F
YN eng INDEX.QXP 2011.09.22. 16:35 Page 4