2013 KIA VENGA lock
[x] Cancel search: lockPage 566 of 751

53
Driving your vehicle
Before entering vehicle
• Be sure that all windows, outside mir-ror(s), and outside lights are clean.
Check the condition of the tyres.
Check under the vehicle for any sign of leaks.
Be sure there are no obstacles behind you if you intend to back up.
Necessary inspections
Fluid levels, such as engine oil, engine
coolant, brake fluid, and washer fluid
should be checked on a regular basis,
with the exact interval depending on the
fluid. Further details are provided in sec-
tion 7, “Maintenance”. Before starting
Close and lock all doors.
Position the seat so that all controls are
easily reached.
Adjust the inside and outside rearview mirrors.
Be sure that all lights work.
Check all gauges.
Check the operation of warning lights when the ignition switch is turned to the ON position.
Release the parking brake and make sure the brake warning light goes out.
For safe operation, be sure you are famil-
iar with your vehicle and its equipment.
BEFORE DRIVING
WARNING
All passengers must be properly
belted whenever the vehicle is mov-
ing. Refer to “Seat belts” in section
3 for more information on their
proper use.
WARNING
Always check the surrounding
areas near your vehicle for people,
especially children, before putting a
car into D (Drive) or R (Reverse).
WARNING - Driving under
the influence of alcohol or drugs
Drinking and driving is dangerous.
Drunk driving is the number one
contributor to the highway death
toll each year. Even a small amount
of alcohol will affect your reflexes,
perceptions and judgment. Drivingwhilst under the influence of drugs
is as dangerous or more dangerousthan driving drunk.
You are much more likely to have a
serious accident if you drink or
take drugs and drive.
If you are drinking or taking drugs,
don’t drive. Do not ride with a driv-er who has been drinking or taking
drugs. Choose a designated driveror call a cab.
WARNING
Driving whilst distracted can result in
a loss of vehicle control, that may
lead to an accident, severe personal
injury, and death. The driver's pri-
mary responsibility is in the safe and
legal operation of a vehicle, and use
of any handheld devices, other
equipment, or vehicle systems which
take the driver's eyes, attention and
focus away from the safe operation
of a vehicle or which are not permis-
sible by law should never be used
during operation of the vehicle.
YN RHD 5.QXP 3/31/2012 4:06 PM Page 3
Page 567 of 751
Driving your vehicle
4
5
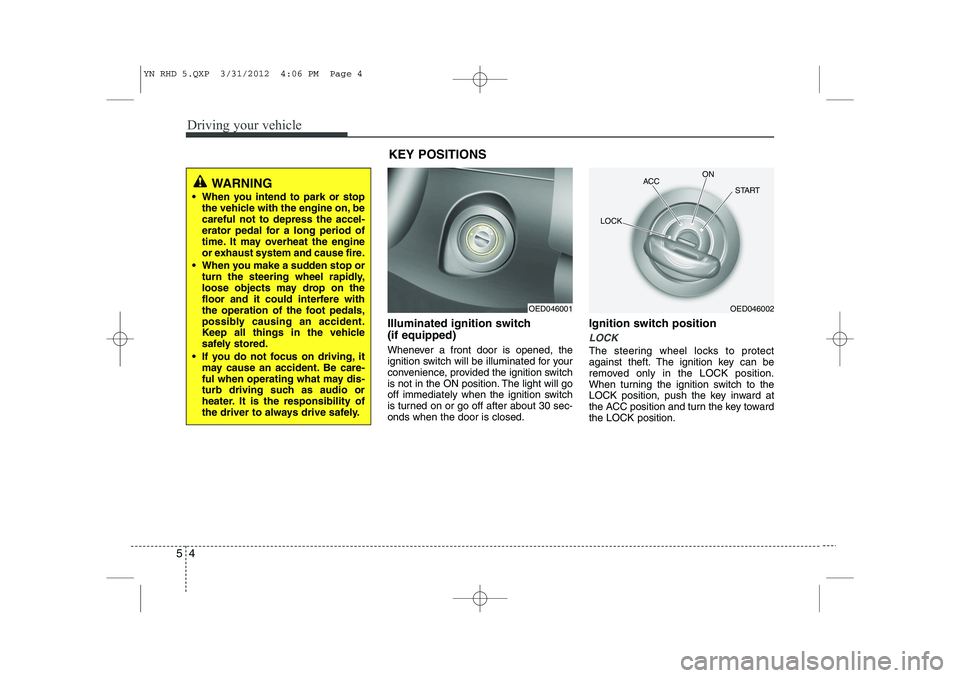
Illuminated ignition switch (if equipped)
Whenever a front door is opened, the
ignition switch will be illuminated for your
convenience, provided the ignition switch
is not in the ON position. The light will go
off immediately when the ignition switch
is turned on or go off after about 30 sec-onds when the door is closed. Ignition switch position
LOCK
The steering wheel locks to protect
against theft. The ignition key can be
removed only in the LOCK position.
When turning the ignition switch to the
LOCK position, push the key inward at
the ACC position and turn the key towardthe LOCK position.
KEY POSITIONS
OED046001OED046002
ACC
ON
START
LOCK
WARNING
When you intend to park or stop the vehicle with the engine on, be careful not to depress the accel-
erator pedal for a long period of
time. It may overheat the engine
or exhaust system and cause fire.
When you make a sudden stop or turn the steering wheel rapidly,
loose objects may drop on the
floor and it could interfere with
the operation of the foot pedals,
possibly causing an accident.
Keep all things in the vehicle
safely stored.
If you do not focus on driving, it may cause an accident. Be care-
ful when operating what may dis-
turb driving such as audio or
heater. It is the responsibility of
the driver to always drive safely.
YN RHD 5.QXP 3/31/2012 4:06 PM Page 4
Page 568 of 751

55
Driving your vehicle
ACC (Accessory)
The steering wheel is unlocked and elec-
trical accessories are operative.
✽✽NOTICE
If difficulty is experienced turning the
ignition switch to the ACC position, turnthe key whilst turning the steering wheel
right and left to release the tension.
ON
The warning lights can be checked
before the engine is started. This is the
normal running position after the engine
is started.
Do not leave the ignition switch ON if the engine is not running to prevent batterydischarge.
START
Turn the ignition switch to the START
position to start the engine. The engine
will crank until you release the key; then
it returns to the ON position. The brake
warning light can be checked in this posi-tion.
WARNING - Ignition switch
Never turn the ignition switch to LOCK or ACC whilst the vehicle is
moving. This would result in loss
of directional control and braking
function, which could cause anaccident.
The anti-theft steering column lock is not a substitute for the parking
brake. Before leaving the driver’s
seat, always make sure the shift
lever is engaged in 1 st
gear for the
manual transaxle or P (Park) for
the automatic transaxle, set the
parking brake fully and shut the
engine off. Unexpected and sud-
den vehicle movement may occurif these precautions are not taken.
(Continued)(Continued)
Never reach for the ignition switch,or any other controls through the
steering wheel whilst the vehicle is
in motion. The presence of yourhand or arm in this area could
cause a loss of vehicle control, an
accident and serious bodily injuryor death.
Do not place any movable objects around the driver’s seat as they
may move whilst driving, interferewith the driver and lead to an acci-dent.
YN RHD 5.QXP 3/31/2012 4:06 PM Page 5
Page 570 of 751
57
Driving your vehicle
Starting the diesel engine
To start the diesel engine when the engine is cold, it has to be pre-heated
before starting the engine and then have
to be warmed up before starting to drive.
1. Make sure the parking brake isapplied.
2. Manual Transaxle - Depress the
clutch pedal fully and leave the shift
lever at Neutral. Keep the clutch pedal
and brake pedal depressed whilst
turning the ignition switch to the startposition.
Automatic Transaxle - Place the
transaxle shift lever in P(park).
Depress the brake pedal fully.
You can also start the engine when the
shift lever is in the N(neutral) position.
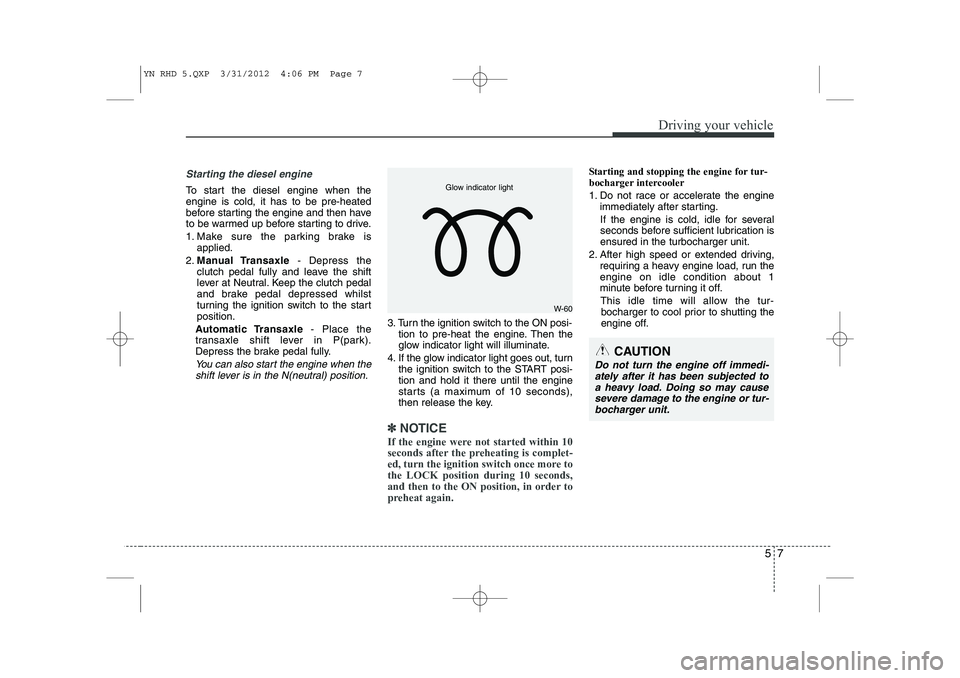
3. Turn the ignition switch to the ON posi- tion to pre-heat the engine. Then the
glow indicator light will illuminate.
4. If the glow indicator light goes out, turn the ignition switch to the START posi-tion and hold it there until the engine
starts (a maximum of 10 seconds),
then release the key.
✽✽
NOTICE
If the engine were not started within 10
seconds after the preheating is complet-
ed, turn the ignition switch once more tothe LOCK position during 10 seconds,
and then to the ON position, in order to
preheat again.
Starting and stopping the engine for tur-
bocharger intercooler
1. Do not race or accelerate the engine immediately after starting.
If the engine is cold, idle for several
seconds before sufficient lubrication isensured in the turbocharger unit.
2. After high speed or extended driving, requiring a heavy engine load, run theengine on idle condition about 1
minute before turning it off.
This idle time will allow the tur- bocharger to cool prior to shutting the
engine off.
W-60
Glow indicator light
CAUTION
Do not turn the engine off immedi-
ately after it has been subjected to
a heavy load. Doing so may cause severe damage to the engine or tur-bocharger unit.
YN RHD 5.QXP 3/31/2012 4:06 PM Page 7
Page 579 of 751
Driving your vehicle
16
5
Manual transaxle operation
The manual transaxle has 5 (6, if
equipped) forward gears.
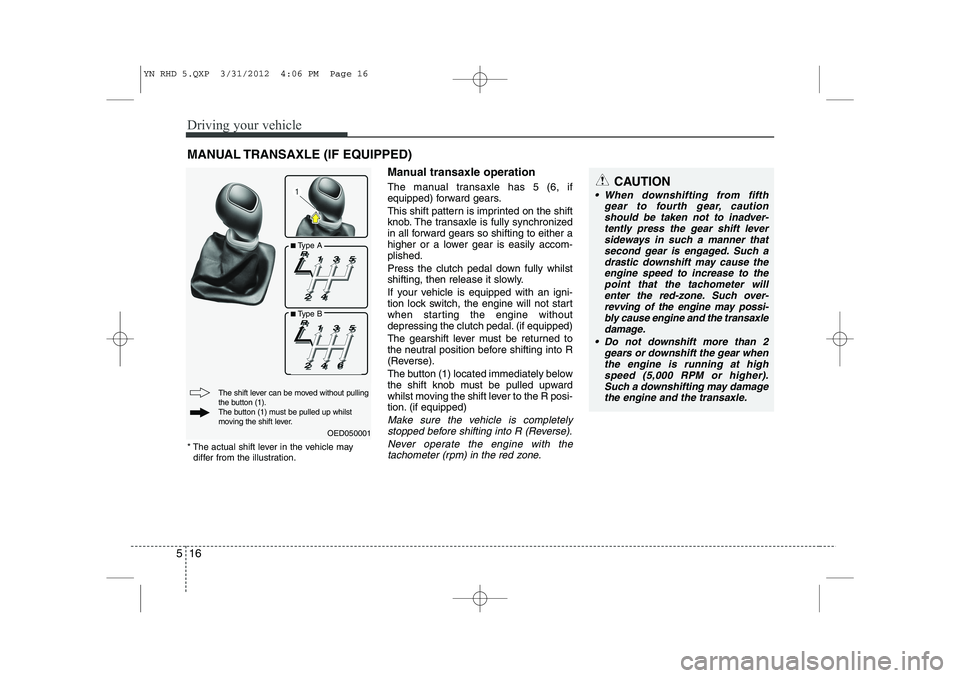
This shift pattern is imprinted on the shift
knob. The transaxle is fully synchronized
in all forward gears so shifting to either a
higher or a lower gear is easily accom-plished.
Press the clutch pedal down fully whilst
shifting, then release it slowly.
If your vehicle is equipped with an igni-
tion lock switch, the engine will not start
when starting the engine without
depressing the clutch pedal. (if equipped)
The gearshift lever must be returned to
the neutral position before shifting into R
(Reverse).
The button (1) located immediately below
the shift knob must be pulled upward
whilst moving the shift lever to the R posi-
tion. (if equipped)
Make sure the vehicle is completely
stopped before shifting into R (Reverse).
Never operate the engine with thetachometer (rpm) in the red zone.
MANUAL TRANSAXLE (IF EQUIPPED)
CAUTION
When downshifting from fifth gear to fourth gear, caution
should be taken not to inadver-tently press the gear shift leversideways in such a manner that second gear is engaged. Such a
drastic downshift may cause the engine speed to increase to thepoint that the tachometer will
enter the red-zone. Such over-revving of the engine may possi- bly cause engine and the transaxledamage.
Do not downshift more than 2 gears or downshift the gear whenthe engine is running at highspeed (5,000 RPM or higher).
Such a downshifting may damagethe engine and the transaxle.
OED050001
The shift lever can be moved without pulling
the button (1).
The button (1) must be pulled up whilst
moving the shift lever.
* The actual shift lever in the vehicle may
differ from the illustration.
■ Type A
■ Type B
YN RHD 5.QXP 3/31/2012 4:06 PM Page 16
Page 582 of 751
519
Driving your vehicle
Automatic transaxle operation
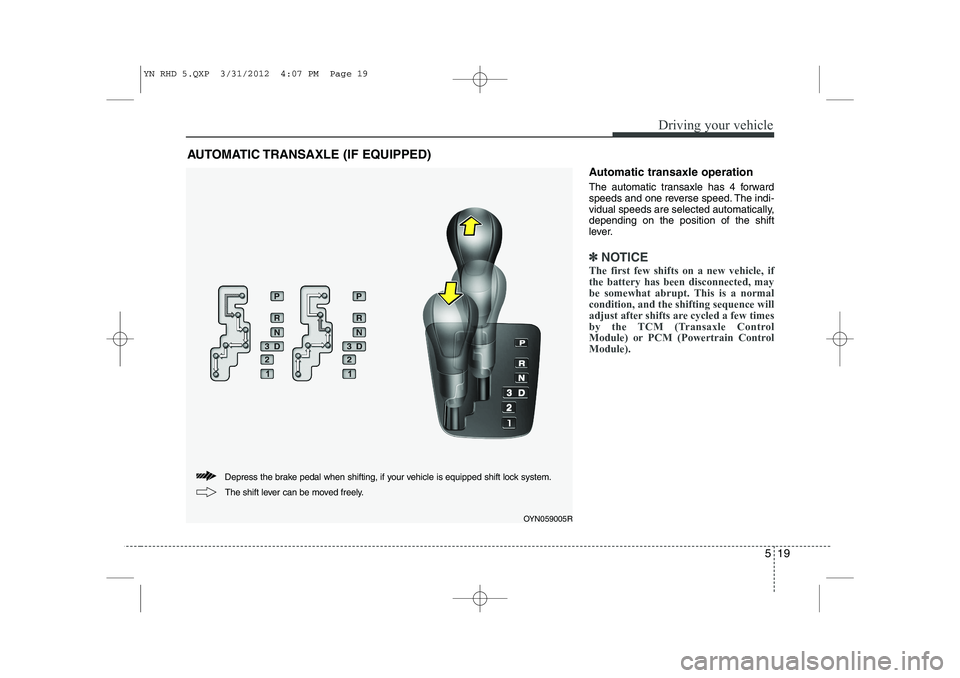
The automatic transaxle has 4 forward
speeds and one reverse speed. The indi-
vidual speeds are selected automatically,depending on the position of the shift
lever.
✽✽NOTICE
The first few shifts on a new vehicle, if the battery has been disconnected, may
be somewhat abrupt. This is a normalcondition, and the shifting sequence will
adjust after shifts are cycled a few times
by the TCM (Transaxle Control
Module) or PCM (Powertrain ControlModule).
AUTOMATIC TRANSAXLE (IF EQUIPPED)
OYN059005R
Depress the brake pedal when shifting, if your vehicle is equipped shift lock system.
The shift lever can be moved freely.
YN RHD 5.QXP 3/31/2012 4:07 PM Page 19
Page 583 of 751
Driving your vehicle
20
5
For smooth operation, depress the brake
pedal when shifting from N (Neutral) to aforward or reverse gear.Transaxle ranges
P (Park)
Always come to a complete stop before
shifting into P (Park). This position locks
the transaxle and prevents the frontwheels from rotating.
WARNING - Automatic
transaxle
Always check the surrounding areas near your vehicle for peo-
ple, especially children, beforeshifting a car into D (Drive) or R
(Reverse).
Before leaving the driver’s seat, always make sure the shift lever
is in the P (Park) position; then
set the parking brake fully and
shut the engine off. Unexpected
and sudden vehicle movementcan occur if these precautions
are not followed in the order iden-tified.
CAUTION
To avoid damage to your
transaxle, do not accelerate the
engine in R (Reverse) or any for-ward gear position with thebrakes on.
When stopped on an upgrade, do not hold the vehicle with enginepower. Use the service brake or the parking brake.
Do not shift from N (Neutral) or P (Park) into D (Drive), or R
(Reverse) when the engine isabove idle speed.
WARNING
Shifting into P (Park) whilst the vehicle is in motion will cause the
drive wheels to lock which will
cause you to lose control of the
vehicle.
Do not use the P (Park) position in place of the parking brake.
Always make sure the shift lever
is latched in the P (Park) position
and set the parking brake fully.
Never leave a child unattended in a vehicle.
CAUTION
The transaxle may be damaged if
you shift into P (Park) whilst the vehicle is in motion.
YN RHD 5.QXP 3/31/2012 4:07 PM Page 20
Page 584 of 751
521
Driving your vehicle
R (Reverse)
Use this position to drive the vehicle
backward. N (Neutral)
The wheels and transaxle are not locked.
The vehicle will roll freely even on the
slightest incline unless the parking brake
or service brakes are applied.D (Drive)
This is the normal forward driving posi-
tion. The transaxle will automatically shift
through a 4-gear sequence, providing the
best fuel economy and power.
For extra power when passing another
vehicle or climbing grades, depress the
accelerator fully, at which time the
transaxle will automatically downshift to
the next lower gear.
✽✽
NOTICE
Always ensure vehicle is stationary, at a
complete stop, before selecting D (Drive).
3 (Third Gear, if equipped)
Move the shift lever to this position for
towing a trailer during hill climbing.
This position also provides engine brak-
ing when going down hills. 2 (Second Gear)
Use 2 (Second Gear) for more power
when climbing hills and for increased
braking when going down hills. This posi-tion also helps reduce wheel spin on slip-
pery surfaces. When the shift lever is
placed in 2 (Second Gear), the transaxlewill automatically shift from first to sec-
ond gear. 1 (First Gear)
Move the shift lever to this position in
hard pulling situations and for climbing
steep grades.
CAUTION
Always come to a complete stop
before shifting into or out of R(Reverse); you may damage thetransaxle if you shift into R whilstthe vehicle is in motion, except as
explained in “Rocking the vehicle”in this section.
CAUTION
Do not exceed the recommendedmaximum speeds in 2 (SecondGear) or 1 (First Gear). Operating
the vehicle at speeds above themaximum recommended, for 2 (Second Gear) or 1 (First Gear) maycause excessive heat to develop
which could result in damage to or failure of the automatic transaxle.
YN RHD 5.QXP 3/31/2012 4:07 PM Page 21