Page 89 of 751
417
Features of your vehicle
Opening the tailgate
The tailgate is locked or unlocked whenall doors are locked or unlocked with the
key, transmitter or central door lock
switch.
Only the tailgate is unlocked if the only tailgate unlock button on the transmitter
is pressed (if equipped). Once the tail-gate is opened and then closed, the tail-
gate is locked automatically.
If unlocked, the tailgate can be opened by pressing the handle and pulling it up.
✽✽ NOTICE
Page 90 of 751

Features of your vehicle
18
4
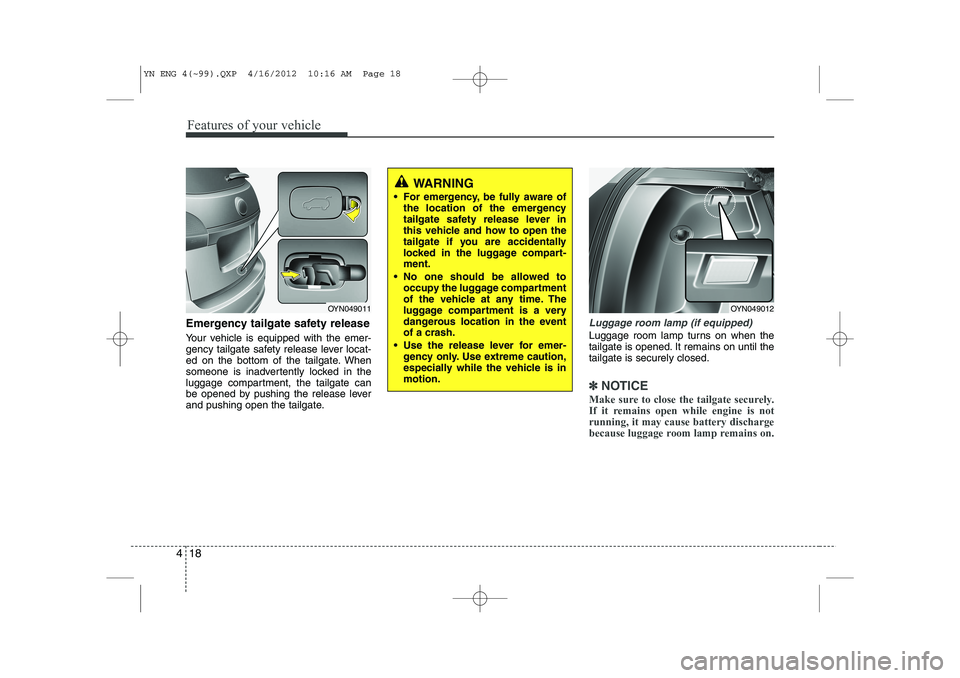
Emergency tailgate safety release
Your vehicle is equipped with the emer-
gency tailgate safety release lever locat-
ed on the bottom of the tailgate. When
someone is inadvertently locked in the
luggage compartment, the tailgate can
be opened by pushing the release lever
and pushing open the tailgate.Luggage room lamp (if equipped)
Luggage room lamp turns on when the
tailgate is opened. It remains on until thetailgate is securely closed.
✽✽
NOTICE
Make sure to close the tailgate securely.
If it remains open while engine is notrunning, it may cause battery discharge
because luggage room lamp remains on.
WARNING
For emergency, be fully aware of the location of the emergency
tailgate safety release lever in
this vehicle and how to open the
tailgate if you are accidentally
locked in the luggage compart-ment.
No one should be allowed to occupy the luggage compartment
of the vehicle at any time. The
luggage compartment is a very
dangerous location in the eventof a crash.
Use the release lever for emer- gency only. Use extreme caution,
especially while the vehicle is inmotion.
OYN049012OYN049011
YN ENG 4(~99).QXP 4/16/2012 10:16 AM Page 18
Page 124 of 751

Features of your vehicle
52
4
Door ajar warning light
(if equipped)
This warning light illuminates when a door is not closed securely with the igni-
tion switch in any position.
Tailgate open warning light
(if equipped)
This warning light illuminates when the tailgate is not closed securely with the
ignition switch in any position.
Door open position indicator
(including tailgate,
if equipped)
This indicator illuminates when a door is
not closed securely.
The indicator displays which door isopened.
Immobilizer indicator (if equipped)
This light illuminates when the immobiliz-
er key is inserted and turned to the ON
position to start the engine.
At this time, you can start the engine. The
light goes out after the engine is running.
If this light blinks when the ignition switch
is in the ON position before starting the
engine, we recommend that the system
be checked by an authorized Kia dealer.
Low fuel level warning
This warning light indicates the fuel tank
is nearly empty. When it comes on, you
should add fuel as soon as possible.
Driving with the fuel level warning light on
or with the fuel level below “0” can causethe engine to misfire and damage the
catalytic converter (if equipped).
Malfunction indicator lamp
(MIL) (check engine light) (if equipped)
This indicator is part of the Engine
Control System which monitors various
emission control system components. If
this indicator illuminates while driving, itindicates that a potential malfunction has
been detected somewhere in the emis-sion control system. This indicator will also illuminates when
the ignition switch is turned to the ON
position, and will go off in a few seconds
after the engine is started. If it illuminates
while driving, or does not illuminate when
the ignition switch is turned to the ON
position, we recommend that you contact
an authorized Kia dealer.
Generally, your vehicle will continue to be
drivable, but we recommend that the sys-
tem be checked by an authorized Kia
dealer promptly.
YN ENG 4(~99).QXP 4/16/2012 10:18 AM Page 52
Page 206 of 751

Driving your vehicle
2
5
WARNING - ENGINE EXHAUST CAN BE DANGEROUS!
Engine exhaust fumes can be extremely dangerous. If, at any time, you smell exhaust fumes inside the vehicle, open the win-
dows immediately.
• Do not inhale exhaust fumes.
Exhaust fumes contain carbon monoxide, a colorless, odorless gas that can cause unconsciousness and death by asphyxia- tion.
Be sure the exhaust system does not leak. The exhaust system should be checked whenever the vehicle is raised to change the oil or for any other purpose. If you hear
a change in the sound of the exhaust or if you drive over something that strikes the underneath side of the car, we recommend
that the system be checked by an authorized Kia dealer.
Do not run the engine in an enclosed area. Letting the engine idle in your garage, even with the garage door open, is a hazardous practice. Never run the engine in your
garage any longer than it takes to start the engine and back the vehicle out.
Avoid idling the engine for prolonged periods with people inside the vehicle. If it is necessary to idle the engine for a prolonged period with people inside the vehicle, be sure to do so only in an open a rea
with the air intake set at "Fresh" and fan operating at one of the higher speeds so fresh air is drawn into the interior.
If you must drive with the tailgate open because you are carrying objects that make this necessary:
1. Close all windows.
2. Open side vents.
3. Set the air intake control at "Fresh", the air flow control at "Floor" or "Face" and the fan at one of the higher speeds.
To assure proper operation of the ventilation system, be sure the ventilation air intakes located just in front of the windshield are
kept clear of snow, ice, leaves or other obstructions.
YN ENG 5.QXP 4/16/2012 10:01 AM Page 2
Page 290 of 751
When towing your vehicle in an emer- gency without wheel dollies :
1. Set the ignition switch in the ACC posi-tion.
2. Place the transaxle shift lever in N (Neutral).
3. Release the parking brake.
Removable towing hook (front) (if equipped)
1. Open the tailgate, and remove the tow-ing hook from the tool case.
2. Remove the hole cover pressing the lower part of the cover on the front
bumper. 3. Install the towing hook by turning it
clockwise into the hole until it is fullysecured.
4. Remove the towing hook and install the cover after use.
CAUTION
Failure to place the transaxle shift
lever in N (Neutral) may cause inter-nal damage to the transaxle.
OYN069014OYN069015
626
What to do in an emergency
YN ENG 6.QXP 4/16/2012 10:06 AM Page 26
Page 361 of 751
Maintenance
68
7
Type B
1. Remove the light assembly from the
vehicle by pushing the lens forward
and pulling the assembly out.
2. Disconnect the bulb electrical connec- tor.
3. Separate the socket and the lens parts by turning the socket counter clock-
wise until the tabs on the socket align
with the slots on the lens part.
4. Remove the bulb by pulling it straight out.
5. Insert a new bulb in the socket.
6. Reassemble the socket and the lens part.
7. Connect the bulb electrical connector.
8. Reinstall the light assembly to the body of the vehicle. Rear combination light bulb replacement (1) Stop and tail light
(2) Rear turn signal light
(3) Back-up light
(4) Tail light
(5) Rear fog light (if equipped)
1. Open the tailgate.2.Outside
Loosen the outside light assembly
retaining screws with a cross-tip screw-
driver.
OYN079051OYN079036
OYN079037
OYN079038
YN ENG 7.QXP 4/16/2012 10:10 AM Page 68
Page 362 of 751

769
Maintenance
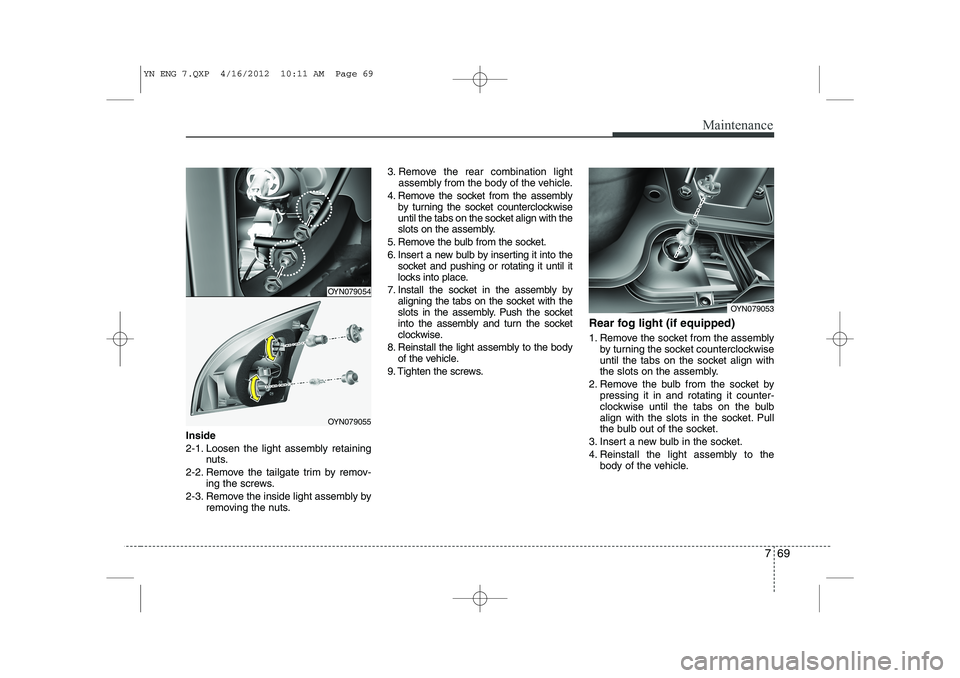
Inside
2-1. Loosen the light assembly retainingnuts.
2-2. Remove the tailgate trim by remov- ing the screws.
2-3. Remove the inside light assembly by removing the nuts. 3. Remove the rear combination light
assembly from the body of the vehicle.
4. Remove the socket from the assembly by turning the socket counterclockwise
until the tabs on the socket align with the
slots on the assembly.
5. Remove the bulb from the socket.
6. Insert a new bulb by inserting it into the socket and pushing or rotating it until it
locks into place.
7. Install the socket in the assembly by aligning the tabs on the socket with the
slots in the assembly. Push the socket
into the assembly and turn the socket
clockwise.
8. Reinstall the light assembly to the body of the vehicle.
9. Tighten the screws. Rear fog light (if equipped)
1. Remove the socket from the assembly
by turning the socket counterclockwise
until the tabs on the socket align with
the slots on the assembly.
2. Remove the bulb from the socket by pressing it in and rotating it counter-
clockwise until the tabs on the bulb
align with the slots in the socket. Pull
the bulb out of the socket.
3. Insert a new bulb in the socket.
4. Reinstall the light assembly to the body of the vehicle.
OYN079054
OYN079055
OYN079053
YN ENG 7.QXP 4/16/2012 10:11 AM Page 69
Page 363 of 751
Maintenance
70
7
High mounted stop light replacement (if equipped)
1. Open the tailgate.
2. Loosen the light assembly retaining
nuts. 3. Remove the light assembly and dis-
connect the bulb electrical connector.
4. Remove the socket from the assembly.
5. Remove the bulb from the socket by pulling it.
6. Install a new bulb in the socket.
7. Reinstall the light assembly in the reverse order of removal. License plate light bulb replace- ment
1. Open the tailgate.
2. Remove the tailgate trim by removing
the screws.
3. Remove the lens by pushing the cover.
4. Remove the bulb by pulling it straight out.
5. Install a new bulb.
6. Reinstall the lens securely.
OYN079056OYN079058OYN079057
YN ENG 7.QXP 4/16/2012 10:11 AM Page 70