2013 KIA VENGA key battery
[x] Cancel search: key batteryPage 218 of 751
Driving your vehicle
14
5
Your vehicle may be equipped with the ISG system, which reduces fuel con-
sumption by automatically shutting down
the engine, when the vehicle is at astandstill.
(For example : red light, stop sign and
traffic jam)
The engine starts automatically as soon
as the starting conditions are met.
✽
✽ NOTICE
When the engine automatically starts by
the ISG system, some warning
lights(ABS, ESP, ESP OFF, EPS orParking brake warning light) may turn
on for a few seconds. This happens because of low batteryvoltage. It does not mean the system ismalfunctioning.
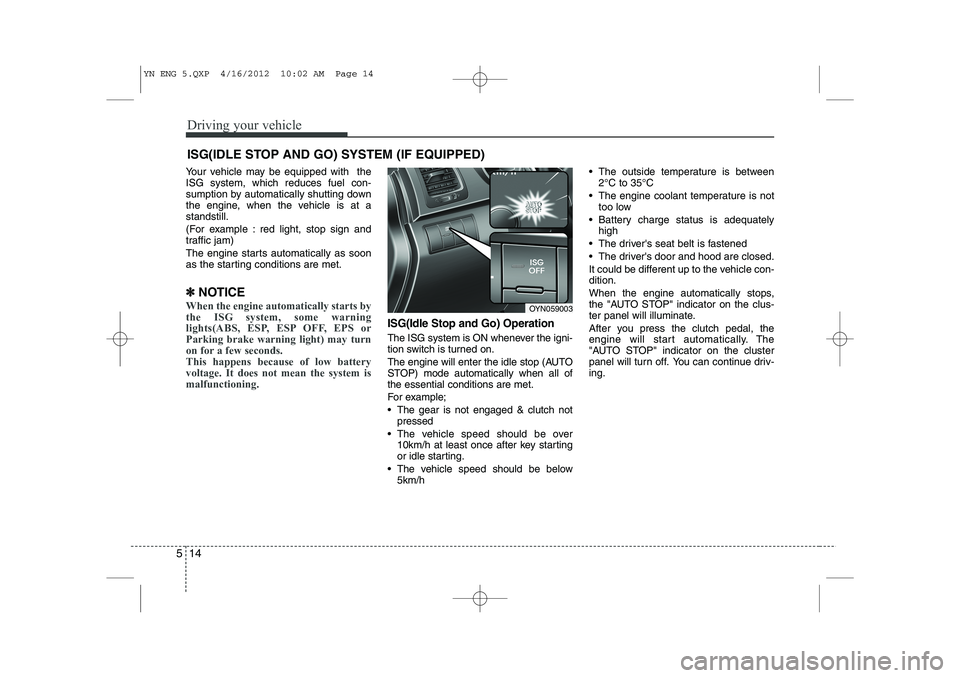
ISG(Idle Stop and Go) Operation
The ISG system is ON whenever the igni-
tion switch is turned on.
The engine will enter the idle stop (AUTO
STOP) mode automatically when all ofthe essential conditions are met.
For example;
The gear is not engaged & clutch not
pressed
The vehicle speed should be over 10km/h at least once after key starting
or idle starting.
The vehicle speed should be below 5km/h The outside temperature is between
2°C to 35°C
The engine coolant temperature is not too low
Battery charge status is adequately high
The driver's seat belt is fastened
The driver's door and hood are closed.
It could be different up to the vehicle con- dition.
When the engine automatically stops,
the "AUTO STOP" indicator on the clus-
ter panel will illuminate.
After you press the clutch pedal, the
engine will start automatically. The
"AUTO STOP" indicator on the cluster
panel will turn off. You can continue driv-ing.
ISG(IDLE STOP AND GO) SYSTEM (IF EQUIPPED)
OYN059003
YN ENG 5.QXP 4/16/2012 10:02 AM Page 14
Page 389 of 751
Index
6
I
Power outlet . . . . . . . . . . . . . . . . . . . . . . . . . . . . . . . . 4-96
Sunvisor . . . . . . . . . . . . . . . . . . . . . . . . . . . . . . . . . . . 4-95
Interior light . . . . . . . . . . . . . . . . . . . . . . . . . . . . . . . . . 4-70
Interior overview . . . . . . . . . . . . . . . . . . . . . . . . . . . . . . 2-2
ISG (Idle stop and go) system . . . . . . . . . . . . . . . . . . . 5-14
ISOFIX system . . . . . . . . . . . . . . . . . . . . . . . . . . . . . . . 3-32
Jack and tools . . . . . . . . . . . . . . . . . . . . . . . . . . . . . . . . . 6-7
Jump starting. . . . . . . . . . . . . . . . . . . . . . . . . . . . . . . . . . 6-4
Key positions . . . . . . . . . . . . . . . . . . . . . . . . . . . . . . . . . 5-4
Keys . . . . . . . . . . . . . . . . . . . . . . . . . . . . . . . . . . . . . . . . 4-2 Label Air bag warning label . . . . . . . . . . . . . . . . . . . . . . . . . 3-59
Tire sidewall labeling . . . . . . . . . . . . . . . . . . . . . . . . . 7-48
Tire specification and pressure label . . . . . . . . . . . . . . 8-8
Vehicle certification label . . . . . . . . . . . . . . . . . . . . . . . 8-7
Lap/shoulder belt . . . . . . . . . . . . . . . . . . . . . . . . . . . . . 3-16
Light bulbs . . . . . . . . . . . . . . . . . . . . . . . . . . . . . . . . . . 7-63 Lighting. . . . . . . . . . . . . . . . . . . . . . . . . . . . . . . . . . . . . 4-61
Battery saver function . . . . . . . . . . . . . . . . . . . . . . . . 4-61
Lubricants and capacities . . . . . . . . . . . . . . . . . . . . . . . . 8-4
Main fuse, see memory fuse . . . . . . . . . . . . . . . . . . . . . 7-54 Maintenance Explanation of scheduled maintenance items . . . . . . 7-20
Maintenance services . . . . . . . . . . . . . . . . . . . . . . . . . . 7-3
Maintenance under severe usage conditions . . . . . 7-12,18
Normal maintenance schedule. . . . . . . . . . . . . . . . . 7-8,14
Owner maintenance . . . . . . . . . . . . . . . . . . . . . . . . . . . 7-5
Scheduled maintenance service . . . . . . . . . . . . . . . . . . 7-7
Tire maintenance . . . . . . . . . . . . . . . . . . . . . . . . . . . . 7-47
Maintenance schedule Maintenance under severe usage conditions . . . . . 7-12,18
Normal maintenance schedule. . . . . . . . . . . . . . . . . 7-8,14
Maintenance services . . . . . . . . . . . . . . . . . . . . . . . . . . . 7-7
Manual climate control system. . . . . . . . . . . . . . . . . . . 4-72 Air conditioning . . . . . . . . . . . . . . . . . . . . . . . . . . . . . 4-77
Climate control air filter . . . . . . . . . . . . . . . . . . . . . . . 4-79
Heating and air conditioning . . . . . . . . . . . . . . . . . . . 4-73
Manual transaxle. . . . . . . . . . . . . . . . . . . . . . . . . . . . . . 5-16
Manual window . . . . . . . . . . . . . . . . . . . . . . . . . . . . . . 4-23
Memory fuse . . . . . . . . . . . . . . . . . . . . . . . . . . . . . . . . . 7-54
J
K
L
M
YN eng INDEX.QXP 2011.09.22. 16:35 Page 6
Page 449 of 751

Safety features of your vehicle
44
3
Driver's and passenger's front air
bag (if equipped)
Your vehicle is equipped with a
Supplemental Restraint (Air Bag) System
and lap/shoulder belts at both the driver
and passenger seating positions.
WARNING
If an air bag deploys, there may be a loud noise followed by a fine
dust released in the vehicle.These conditions are normal and
are not hazardous - the air bags
are packed in this fine powder.
The dust generated during air
bag deployment may cause skin
or eye irritation as well as aggra-
vate asthma for some persons.
Always wash all exposed skin
areas thoroughly with lukewarmwater and a mild soap after an
accident in which the air bags
were deployed.
The SRS can function only when the ignition switch is in the ONposition.
Before you replace a fuse or dis- connect a battery terminal, turn
the ignition switch to the LOCK
position and remove the ignition
key. Never remove or replace the
air bag related fuse(s) when the
ignition switch is in the ON posi-
tion. Failure to heed this warning
will cause the SRS air bag warn-
ing light to illuminate.
OYN039024R
OYN039025R
Driver’s front air bag
Passenger’s front air bag
WARNING
Do not install or place any acces- sories (drink holder, cassette
holder, sticker, etc.) on the front
passenger's panel above the
glove box in a vehicle with a pas-
senger's air bag. Such objects
may become dangerous projec-
tiles and cause injury if the pas-
senger's air bag inflates.
When installing a container of liq- uid air freshener inside the vehi-
cle, do not place it near the
instrument cluster nor on the
instrument panel surface.
It may become a dangerous pro-
jectile and cause injury if the pas-
senger's air bag inflates.
B240B05L
Passenger’s front air bag
YN RHD 3.QXP 3/31/2012 4:04 PM Page 44
Page 471 of 751
47
Features of your vehicle
For transmitter replacement, we recom-
mend that you contact an authorised Kia
dealer.
CAUTION
The keyless entry system trans-mitter is designed to give youyears of trouble-free use, howev-
er it can malfunction if exposed to moisture or static electricity.Ifyou are unsure how to use yourtransmitter or replace the battery,
we recommend that you contact an authorised Kia dealer.
Using the wrong battery can cause the transmitter to malfunc-
tion. Be sure to use the correct battery.
To avoid damaging the transmit- ter, don't drop it, get it wet, orexpose it to heat or sunlight.
CAUTION
An inappropriately disposed bat-tery can be harmful to the environ-
ment and human health.Dispose the battery according to your local law(s) or regulation.
YN RHD 4(~99).QXP 11/29/2012 10:59 AM Page 7
Page 474 of 751
Features of your vehicle
10
4
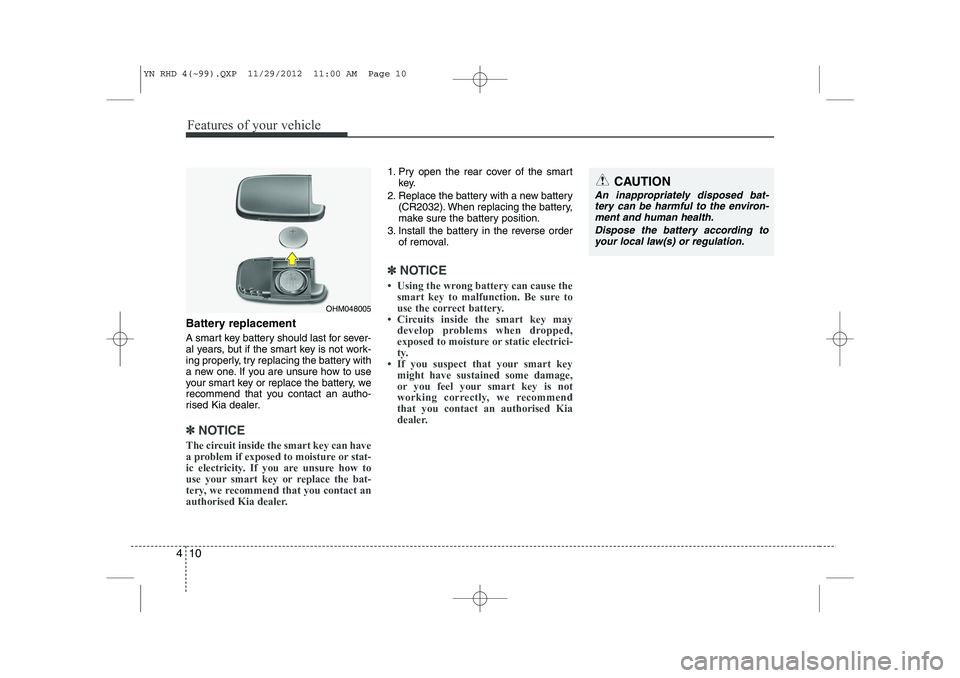
Battery replacement
A smart key battery should last for sever-
al years, but if the smart key is not work-
ing properly, try replacing the battery with
a new one. If you are unsure how to use
your smart key or replace the battery, we
recommend that you contact an autho-
rised Kia dealer.
✽✽
NOTICE
The circuit inside the smart key can have
a problem if exposed to moisture or stat-
ic electricity. If you are unsure how to
use your smart key or replace the bat-
tery, we recommend that you contact an
authorised Kia dealer.
1. Pry open the rear cover of the smart key.
2. Replace the battery with a new battery (CR2032). When replacing the battery,
make sure the battery position.
3. Install the battery in the reverse order of removal.
✽✽ NOTICE
Page 520 of 751

Features of your vehicle
56
4
KEY OUT indicator
(if equipped)
When the ENGINE START/STOP button
is in the ACC or ON position, if any door
is open, the system checks for the smart
key. If the smart key is not in the vehicle,
the indicator will blink, and if all doors areclosed, the chime (if equipped) will also
sound for about 5 seconds. The indicator
will go off whilst the vehicle is moving.
Keep the smart key in the vehicle or
insert it in the smart key holder.
Key reminder warning chime
(if equipped)
If the driver’s door is opened whilst the
ignition key is left in the ignition switch
(ACC or LOCK position), the key
reminder warning chime will sound. This
is to prevent you from locking your keys
in the vehicle. The chime sounds until the
key is removed from the ignition switch or
the driver’s door is closed.
Glow indicator (Diesel engine)
The indicator illuminates when the igni-
tion switch is in the ON position. The
engine can be started after the preheat
indicator light goes off. The illuminating
time varies with the water temperature,
air temperature and battery condition.
✽✽ NOTICE
If the engine does not start within 10
seconds after the preheating is complet-
ed, turn the ignition key once more to
the LOCK position for 10 seconds, and
then to the ON position, in order to pre-heat again.
Fuel filter warning light (Diesel engine)
This warning light illuminates for 3 sec-
onds after the ignition switch is set to the
ON position and then it will go off. If it
lights up whilst the engine is running, it
indicates that water has accumulated
inside the fuel filter. If this happens,
remove the water from the fuel filter. For
more information, refer to “Fuel filter” insection 7.
CAUTION
When the fuel filter warning light isilluminated, engine power (vehicle
speed & idle speed) may decrease. If you keep driving with the warninglight on, you can damage your vehi-cle's engine parts and injection sys-
tem of the Common Rail.
If this occurs, we recommend thatthe system be checked by an autho-rised Kia dealer.
CAUTION
If the preheat indicator continues to illuminate or blink on and off afterthe engine has warmed up or whilst
driving, we recommend that the system be checked by an autho-rised Kia dealer.
KEY
OUT
YN RHD 4(~99).QXP 11/29/2012 11:02 AM Page 56
Page 525 of 751
461
Features of your vehicle
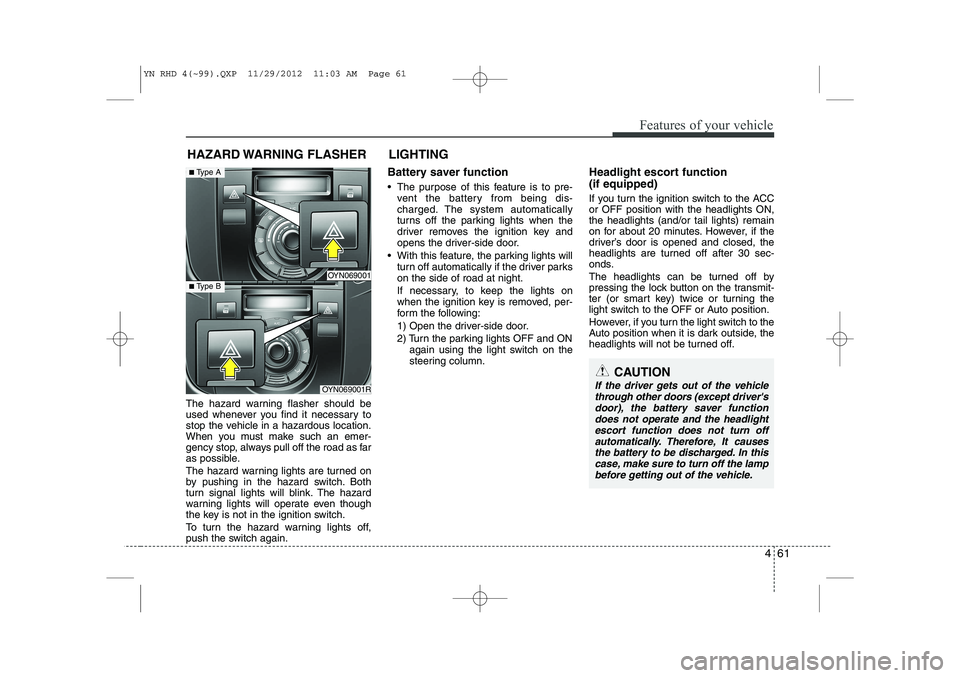
The hazard warning flasher should be
used whenever you find it necessary to
stop the vehicle in a hazardous location.
When you must make such an emer-
gency stop, always pull off the road as far
as possible.
The hazard warning lights are turned on
by pushing in the hazard switch. Both
turn signal lights will blink. The hazard
warning lights will operate even though
the key is not in the ignition switch.
To turn the hazard warning lights off,
push the switch again.Battery saver function
The purpose of this feature is to pre-
vent the battery from being dis-
charged. The system automatically
turns off the parking lights when the
driver removes the ignition key and
opens the driver-side door.
With this feature, the parking lights will turn off automatically if the driver parkson the side of road at night.
If necessary, to keep the lights on
when the ignition key is removed, per-
form the following:
1) Open the driver-side door.
2) Turn the parking lights OFF and ON again using the light switch on the
steering column. Headlight escort function (if equipped)
If you turn the ignition switch to the ACC or OFF position with the headlights ON,the headlights (and/or tail lights) remain
on for about 20 minutes. However, if the
driver’s door is opened and closed, the
headlights are turned off after 30 sec-
onds.
The headlights can be turned off by
pressing the lock button on the transmit-
ter (or smart key) twice or turning the
light switch to the OFF or Auto position.
However, if you turn the light switch to the
Auto position when it is dark outside, the
headlights will not be turned off.
CAUTION
If the driver gets out of the vehicle
through other doors (except driver'sdoor), the battery saver functiondoes not operate and the headlight
escort function does not turn offautomatically. Therefore, It causes the battery to be discharged. In thiscase, make sure to turn off the lamp
before getting out of the vehicle.
LIGHTING
HAZARD WARNING FLASHER
OYN069001
OYN069001R
■ Type A
■ Type B
YN RHD 4(~99).QXP 11/29/2012 11:03 AM Page 61
Page 534 of 751
Features of your vehicle
70
4
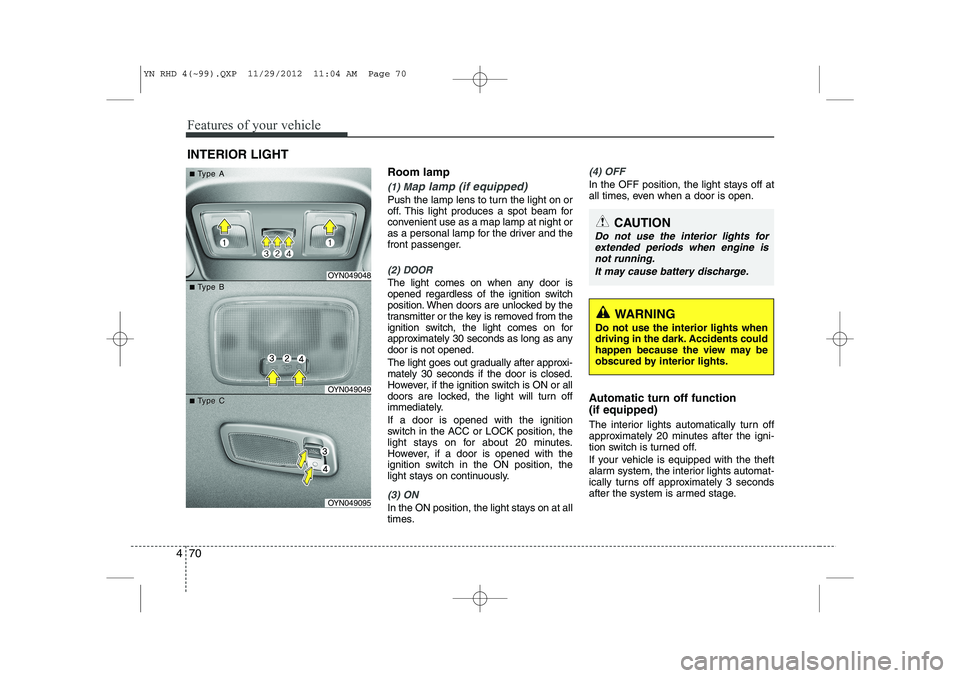
Room lamp
(1) Map lamp (if equipped)
Push the lamp lens to turn the light on or
off. This light produces a spot beam for
convenient use as a map lamp at night or
as a personal lamp for the driver and the
front passenger.
(2) DOOR
The light comes on when any door is
opened regardless of the ignition switch
position. When doors are unlocked by the
transmitter or the key is removed from the
ignition switch, the light comes on for
approximately 30 seconds as long as anydoor is not opened.
The light goes out gradually after approxi- mately 30 seconds if the door is closed.
However, if the ignition switch is ON or all
doors are locked, the light will turn off
immediately. If a door is opened with the ignition
switch in the ACC or LOCK position, the
light stays on for about 20 minutes.
However, if a door is opened with the
ignition switch in the ON position, the
light stays on continuously.
(3) ON
In the ON position, the light stays on at all
times.
(4) OFF
In the OFF position, the light stays off at
all times, even when a door is open.
Automatic turn off function (if equipped)
The interior lights automatically turn off
approximately 20 minutes after the igni-
tion switch is turned off.
If your vehicle is equipped with the theft
alarm system, the interior lights automat-
ically turns off approximately 3 seconds
after the system is armed stage.
INTERIOR LIGHT
CAUTION
Do not use the interior lights for
extended periods when engine is
not running.
It may cause battery discharge.
OYN049048
OYN049049
OYN049095
■■TType Aype A
■■TType Bype B
■■TType Cype C
WARNING
Do not use the interior lights when
driving in the dark. Accidents could
happen because the view may be
obscured by interior lights.
YN RHD 4(~99).QXP 11/29/2012 11:04 AM Page 70