2013 KIA VENGA charging
[x] Cancel search: chargingPage 334 of 751

741
Maintenance
Reset items
Items should be reset after the battery
has been discharged or the battery hasbeen disconnected.
Auto up/down window (See section 4)
Sunroof (See section 4)
Trip computer (See section 4)
Climate control system (See section 4)
Clock (See section 4)
Audio (See section 4)
WARNING
Before performing maintenance or recharging the battery, turn off all accessories and stop the
engine.
The negative battery cable must be removed first and installed
last when the battery is discon-nected.
WARNING - Recharging
battery
When recharging the battery,
observe the following precautions:
The battery must be removed from the vehicle and placed in an area with good ventilation.
Do not allow cigarettes, sparks, or flame near the battery.
Watch the battery during charg- ing, and stop or reduce the charg-
ing rate if the battery cells begin
gassing (boiling) violently or if
the temperature of the electrolyte
of any cell exceeds 49°C (120°F).
Wear eye protection when check- ing the battery during charging.
(Continued)
(Continued)
Disconnect the battery charger inthe following order.
1. Turn off the battery charger main switch.
2. Unhook the negative clamp from the negative battery terminal.
3. Unhook the positive clamp from the positive battery terminal.(Continued)
If the AGM battery is reconnected or replaced, ISG function will notoperate immediately.
If you want to use the ISG func-tion, the battery sensor needs to be calibrated for approximately 4hours with the ignition off.
YN ENG 7.QXP 4/16/2012 10:09 AM Page 41
Page 401 of 751
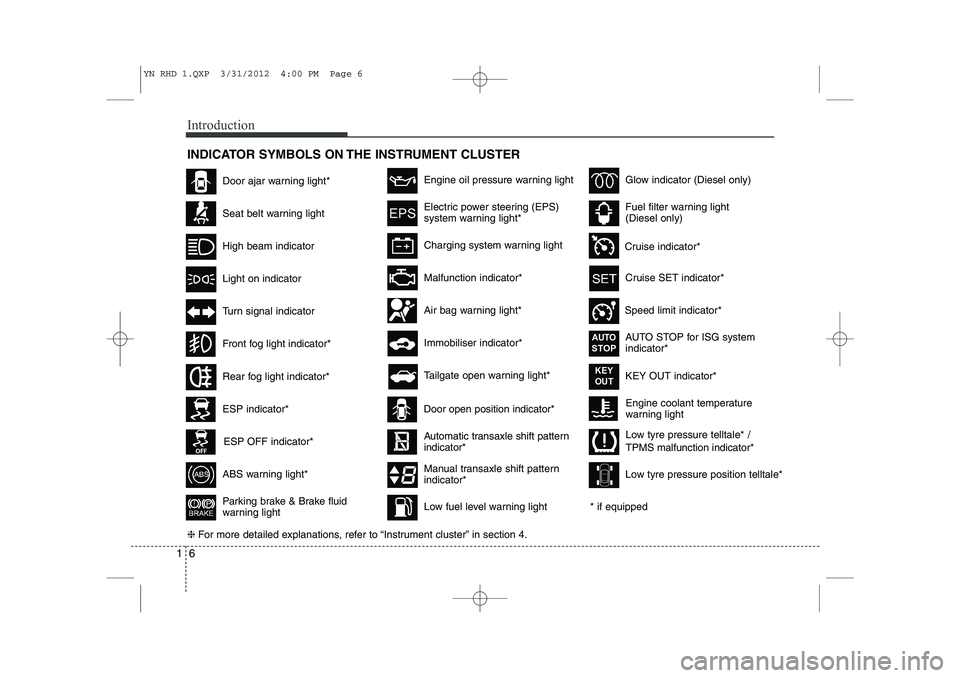
Introduction
6
1
INDICATOR SYMBOLS ON THE INSTRUMENT CLUSTER
Engine coolant temperature
warning light
Seat belt warning light
High beam indicator
Turn signal indicator
ABS warning light*
Parking brake & Brake fluid
warning light
Malfunction indicator*
Immobiliser indicator*
Glow indicator (Diesel only)
Fuel filter warning light (Diesel only)
Tailgate open warning light*
❈ For more detailed explanations, refer to “Instrument cluster” in section 4.
Charging system warning light
Door ajar warning light*
ESP indicator*
ESP OFF indicator*
Front fog light indicator*
Engine oil pressure warning light
Electric power steering (EPS)
system warning light*
Air bag warning light*
Low tyre pressure telltale* / TPMS malfunction indicator*
Rear fog light indicator*
Cruise SET indicator*
Speed limit indicator* AUTO STOP for ISG system indicator*
Cruise indicator*
AUTOSTOP
KEY OUT indicator*KEY
OUT
Light on indicator
Automatic transaxle shift pattern indicator*
Manual transaxle shift pattern indicator*
* if equipped
Door open position indicator*
Low fuel level warning light Low tyre pressure position telltale*
YN RHD 1.QXP 3/31/2012 4:00 PM Page 6
Page 515 of 751
451
Features of your vehicle
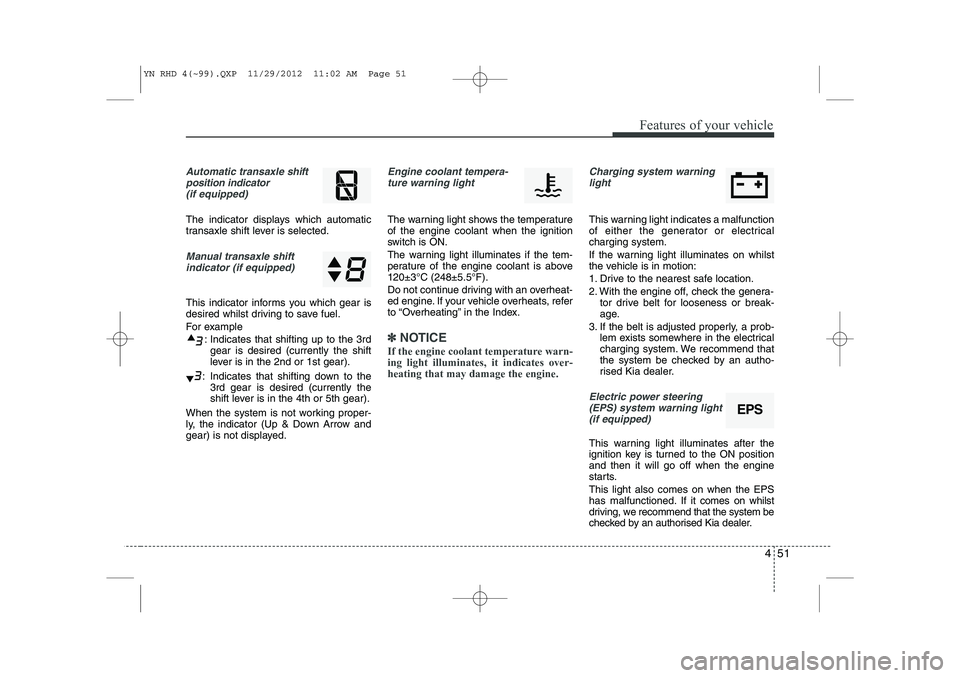
Automatic transaxle shiftposition indicator (if equipped)
The indicator displays which automatic
transaxle shift lever is selected.
Manual transaxle shiftindicator (if equipped)
This indicator informs you which gear is
desired whilst driving to save fuel.
For example
: Indicates that shifting up to the 3rdgear is desired (currently the shift
lever is in the 2nd or 1st gear).
: Indicates that shifting down to the 3rd gear is desired (currently the
shift lever is in the 4th or 5th gear).
When the system is not working proper-
ly, the indicator (Up & Down Arrow and
gear) is not displayed.
Engine coolant tempera- ture warning light
The warning light shows the temperature of the engine coolant when the ignition
switch is ON.
The warning light illuminates if the tem-
perature of the engine coolant is above120±3°C (248±5.5°F).
Do not continue driving with an overheat-
ed engine. If your vehicle overheats, refer
to “Overheating” in the Index.
✽✽ NOTICE
If the engine coolant temperature warn- ing light illuminates, it indicates over-heating that may damage the engine.
Charging system warning light
This warning light indicates a malfunction
of either the generator or electricalcharging system.
If the warning light illuminates on whilst
the vehicle is in motion:
1. Drive to the nearest safe location.
2. With the engine off, check the genera- tor drive belt for looseness or break-
age.
3. If the belt is adjusted properly, a prob- lem exists somewhere in the electrical
charging system. We recommend that
the system be checked by an autho-
rised Kia dealer.
Electric power steering
(EPS) system warning light(if equipped)
This warning light illuminates after the
ignition key is turned to the ON positionand then it will go off when the engine
starts. This light also comes on when the EPS
has malfunctioned. If it comes on whilst
driving, we recommend that the system be
checked by an authorised Kia dealer.
EPS
YN RHD 4(~99).QXP 11/29/2012 11:02 AM Page 51
Page 518 of 751
Features of your vehicle
54
4
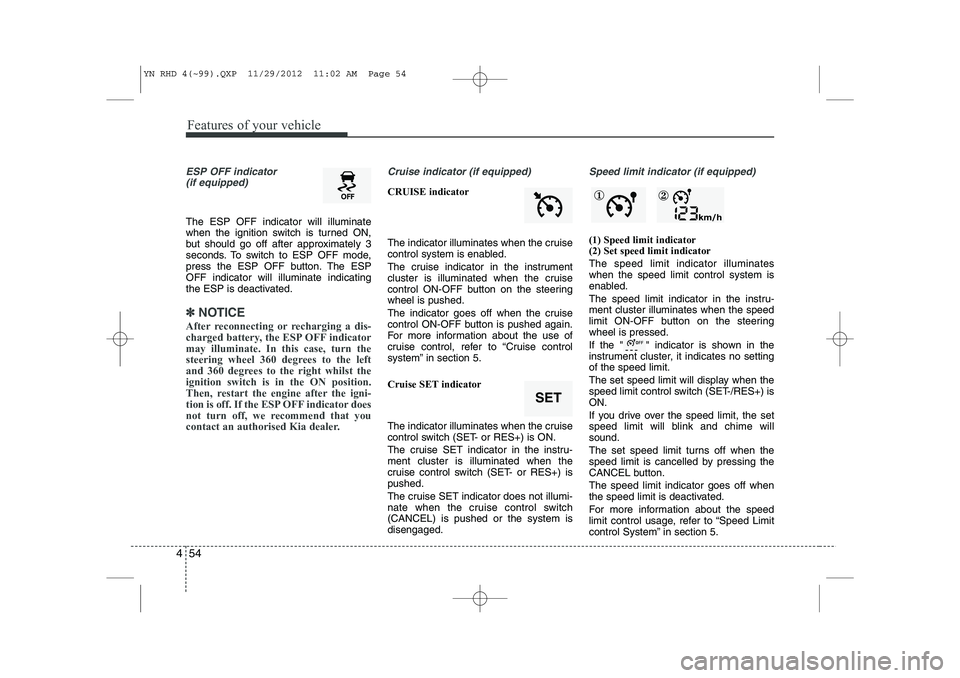
ESP OFF indicator
(if equipped)
The ESP OFF indicator will illuminate
when the ignition switch is turned ON,
but should go off after approximately 3
seconds. To switch to ESP OFF mode,
press the ESP OFF button. The ESPOFF indicator will illuminate indicating
the ESP is deactivated.
✽✽ NOTICE
After reconnecting or recharging a dis-
charged battery, the ESP OFF indicatormay illuminate. In this case, turn the
steering wheel 360 degrees to the left
and 360 degrees to the right whilst theignition switch is in the ON position.
Then, restart the engine after the igni-
tion is off. If the ESP OFF indicator does
not turn off, we recommend that you
contact an authorised Kia dealer.
Cruise indicator (if equipped)
CRUISE indicator
The indicator illuminates when the cruise
control system is enabled.
The cruise indicator in the instrument
cluster is illuminated when the cruise
control ON-OFF button on the steeringwheel is pushed.
The indicator goes off when the cruise
control ON-OFF button is pushed again.
For more information about the use of
cruise control, refer to “Cruise control
system” in section 5.
Cruise SET indicator
The indicator illuminates when the cruise
control switch (SET- or RES+) is ON.
The cruise SET indicator in the instru- ment cluster is illuminated when the
cruise control switch (SET- or RES+) ispushed.
The cruise SET indicator does not illumi-
nate when the cruise control switch(CANCEL) is pushed or the system isdisengaged.
Speed limit indicator (if equipped)
(1) Speed limit indicator (2) Set speed limit indicator The speed limit indicator illuminates when the speed limit control system is
enabled.
The speed limit indicator in the instru- ment cluster illuminates when the speed
limit ON-OFF button on the steeringwheel is pressed.
If the " " indicator is shown in the
instrument cluster, it indicates no settingof the speed limit.
The set speed limit will display when the
speed limit control switch (SET-/RES+) isON.
If you drive over the speed limit, the set
speed limit will blink and chime willsound.
The set speed limit turns off when the
speed limit is cancelled by pressing the
CANCEL button. The speed limit indicator goes off when
the speed limit is deactivated.
For more information about the speed
limit control usage, refer to “Speed Limit
control System” in section 5.
SET
① ②
YN RHD 4(~99).QXP 11/29/2012 11:02 AM Page 54
Page 594 of 751
531
Driving your vehicle
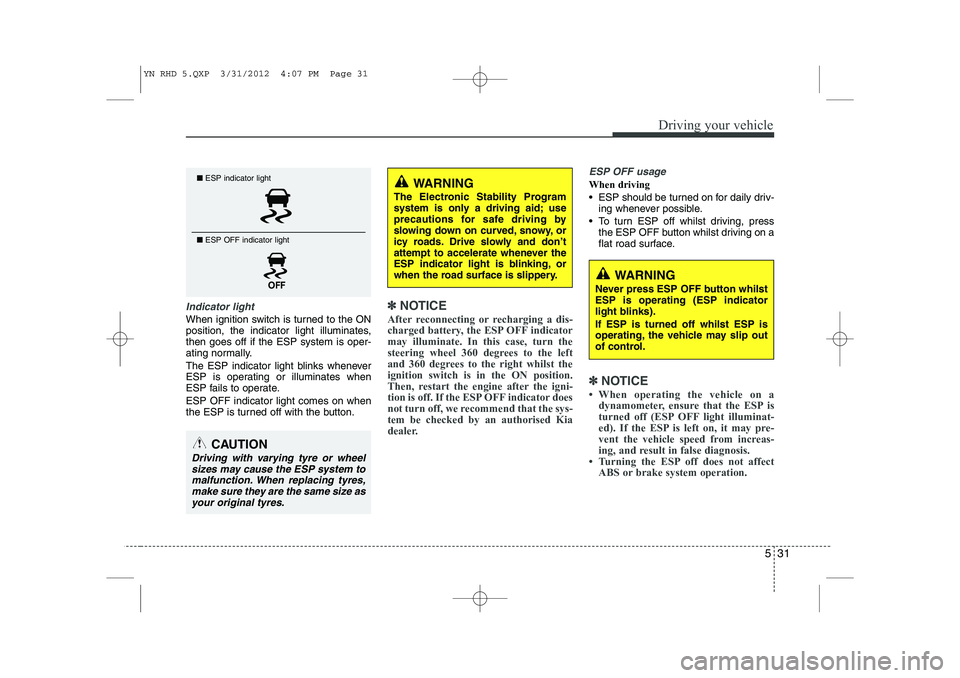
Indicator light
When ignition switch is turned to the ON
position, the indicator light illuminates,then goes off if the ESP system is oper-
ating normally.
The ESP indicator light blinks whenever
ESP is operating or illuminates when
ESP fails to operate. ESP OFF indicator light comes on when
the ESP is turned off with the button.
✽✽NOTICE
After reconnecting or recharging a dis-
charged battery, the ESP OFF indicatormay illuminate. In this case, turn the
steering wheel 360 degrees to the left
and 360 degrees to the right whilst theignition switch is in the ON position.
Then, restart the engine after the igni-
tion is off. If the ESP OFF indicator does
not turn off, we recommend that the sys-tem be checked by an authorised Kia
dealer.
ESP OFF usage
When driving
ESP should be turned on for daily driv- ing whenever possible.
To turn ESP off whilst driving, press the ESP OFF button whilst driving on a
flat road surface.
✽✽ NOTICE
Page 627 of 751
What to do in an emergency
4
6
EMERGENCY STARTING
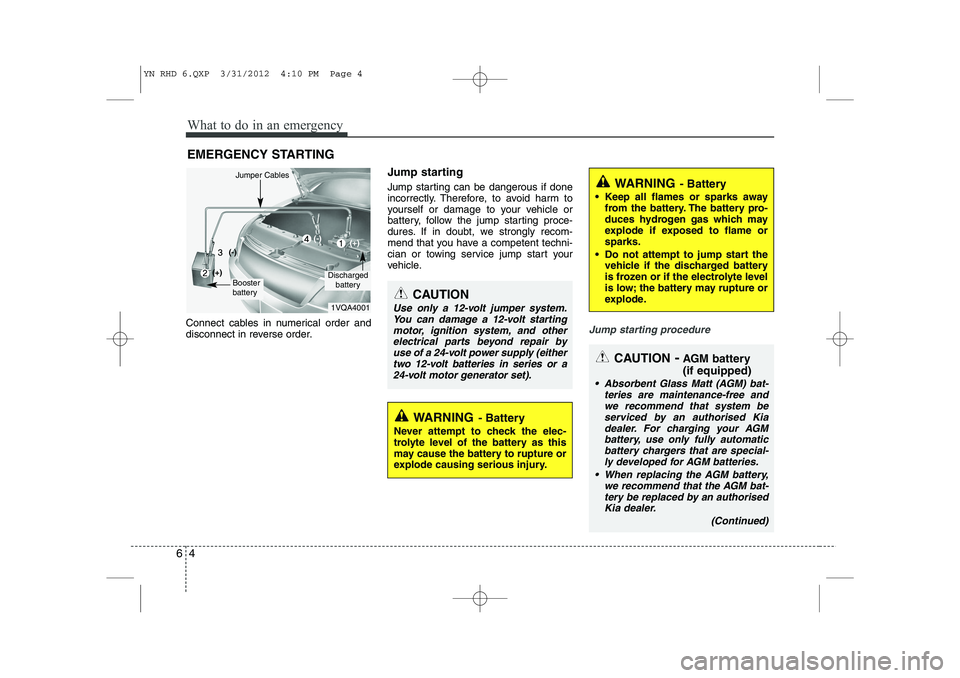
Connect cables in numerical order and
disconnect in reverse order. Jump starting
Jump starting can be dangerous if done
incorrectly. Therefore, to avoid harm to
yourself or damage to your vehicle or
battery, follow the jump starting proce-
dures. If in doubt, we strongly recom-
mend that you have a competent techni-
cian or towing service jump start your
vehicle.
Jump starting procedure
CAUTION
Use only a 12-volt jumper system.
You can damage a 12-volt starting
motor, ignition system, and otherelectrical parts beyond repair by use of a 24-volt power supply (eithertwo 12-volt batteries in series or a
24-volt motor generator set).
WARNING - Battery
• Keep all flames or sparks away from the battery. The battery pro-
duces hydrogen gas which may
explode if exposed to flame orsparks.
Do not attempt to jump start the vehicle if the discharged battery
is frozen or if the electrolyte level
is low; the battery may rupture or
explode.
WARNING - Battery
Never attempt to check the elec-
trolyte level of the battery as this
may cause the battery to rupture or
explode causing serious injury.
1VQA4001
Discharged battery
Jumper Cables
Booster
battery
(-)
(+)
(+)(-)
CAUTION -AGM battery (if equipped)
Absorbent Glass Matt (AGM) bat-
teries are maintenance-free and
we recommend that system beserviced by an authorised Kiadealer. For charging your AGM battery, use only fully automatic
battery chargers that are special-ly developed for AGM batteries.
When replacing the AGM battery, we recommend that the AGM bat-tery be replaced by an authorised
Kia dealer.
(Continued)
YN RHD 6.QXP 3/31/2012 4:10 PM Page 4
Page 628 of 751

65
What to do in an emergency
1. Make sure the booster battery is 12-volt and that its negative terminal is
grounded.
2. If the booster battery is in another vehicle, do not allow the vehicles comein contact.
3. Turn off all unnecessary electrical loads.
4. Connect the jumper cables in the exact sequence shown in the illustration.First connect one end of a jumper
cable to the positive terminal of the
discharged battery (1), then connect
the other end to the positive terminal
on the booster battery (2). 5. Proceed to connect one end of the
other jumper cable to the negative ter-
minal of the booster battery (3), then
the other end to a solid, stationary,
metallic point (for example, the engine
lifting bracket) away from the battery
(4). Do not connect it to or near any
part that moves when the engine is
cranked.
Do not allow the jumper cables to con-
tact anything except the correct battery
terminals or the correct ground. Do not
lean over the battery when making
connections.
6. Start the engine of the vehicle with the booster battery and let it run at 2,000
rpm, then start the engine of the vehi-
cle with the discharged battery.
If the cause of your battery discharging is
not apparent, we recommend that thesystem be checked by an authorised Kia
dealer.
Push-starting
Your manual transaxle-equipped vehicle
should not be push-started because itmight damage the emission control sys-tem.
Vehicles equipped with automatic
transaxle cannot be push-started.
Follow the directions in this section for
jump-starting.
WARNING
Never tow a vehicle to start it
because the sudden surge forward
when the engine starts could cause
a collision with the tow vehicle.
CAUTION - Battery cables
Do not connect the jumper cable
from the negative terminal of the booster battery to the negative ter-minal of the discharged battery. This can cause the discharged bat-
tery to overheat and crack, releas- ing battery acid.
(Continued)
If the AGM battery is reconnected or replaced, ISG function will notoperate immediately.
If you want to use the ISG func-tion, the battery sensor needs to be calibrated for approximately 4hours with the ignition off.
YN RHD 6.QXP 3/31/2012 4:10 PM Page 5
Page 691 of 751
739
Maintenance
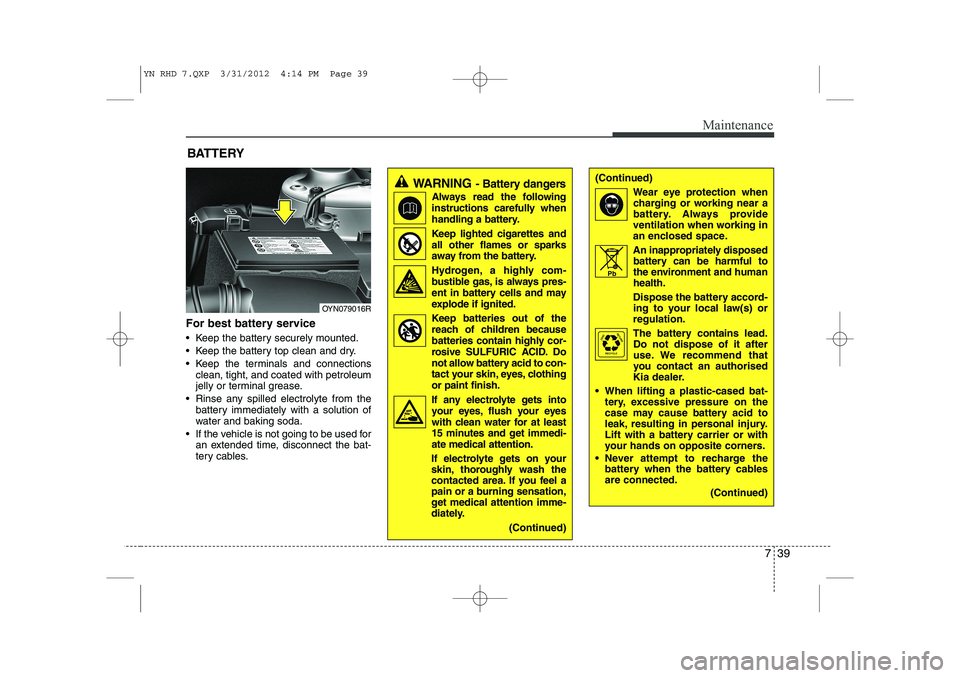
For best battery service
Keep the battery securely mounted.
Keep the battery top clean and dry.
Keep the terminals and connectionsclean, tight, and coated with petroleum
jelly or terminal grease.
Rinse any spilled electrolyte from the battery immediately with a solution of
water and baking soda.
If the vehicle is not going to be used for an extended time, disconnect the bat-
tery cables.
WARNING - Battery dangers
Always read the following
instructions carefully when
handling a battery.
Keep lighted cigarettes and all other flames or sparks
away from the battery.
Hydrogen, a highly com- bustible gas, is always pres-
ent in battery cells and may
explode if ignited.
Keep batteries out of the reach of children because
batteries contain highly cor-
rosive SULFURIC ACID. Do
not allow battery acid to con-
tact your skin, eyes, clothingor paint finish.
If any electrolyte gets into your eyes, flush your eyes
with clean water for at least
15 minutes and get immedi-ate medical attention.
If electrolyte gets on your
skin, thoroughly wash the
contacted area. If you feel a
pain or a burning sensation,
get medical attention imme-
diately.
(Continued)(Continued)Wear eye protection whencharging or working near a
battery. Always provide
ventilation when working in
an enclosed space.
An inappropriately disposed battery can be harmful to
the environment and humanhealth.
Dispose the battery accord- ing to your local law(s) or
regulation.
The battery contains lead.
Do not dispose of it after
use. We recommend that
you contact an authorised
Kia dealer.
When lifting a plastic-cased bat- tery, excessive pressure on the
case may cause battery acid to
leak, resulting in personal injury.
Lift with a battery carrier or with
your hands on opposite corners.
Never attempt to recharge the battery when the battery cables are connected.
(Continued)
BATTERY
OYN079016R Pb
YN RHD 7.QXP 3/31/2012 4:14 PM Page 39