2013 KIA VENGA change time
[x] Cancel search: change timePage 241 of 751
537
Driving your vehicle
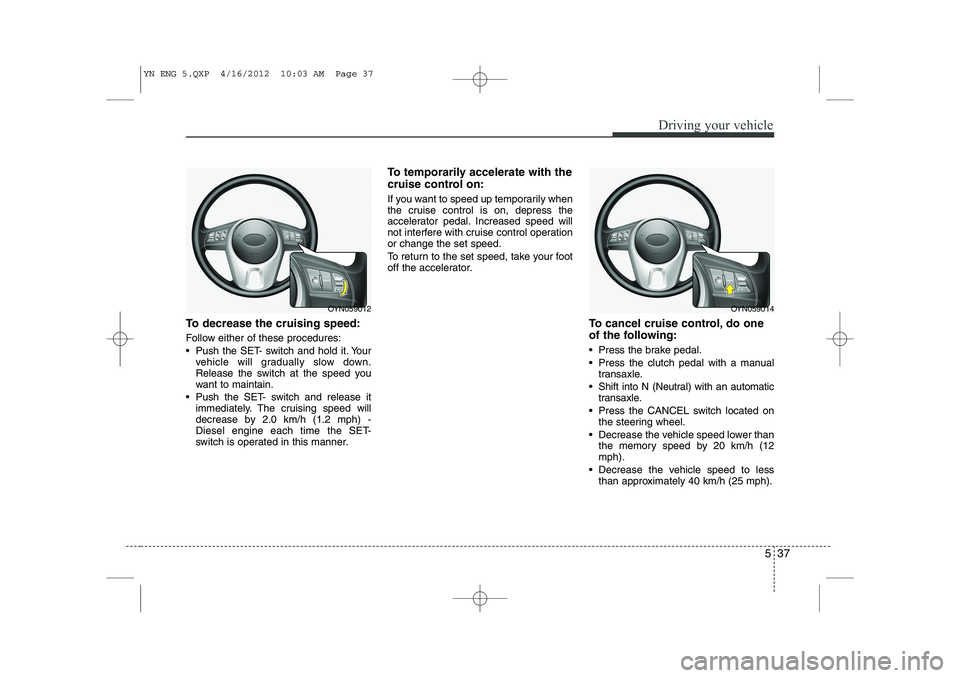
To decrease the cruising speed:
Follow either of these procedures:
Push the SET- switch and hold it. Yourvehicle will gradually slow down.
Release the switch at the speed you
want to maintain.
Push the SET- switch and release it immediately. The cruising speed will
decrease by 2.0 km/h (1.2 mph) -
Diesel engine each time the SET-
switch is operated in this manner. To temporarily accelerate with the
cruise control on:
If you want to speed up temporarily when
the cruise control is on, depress the
accelerator pedal. Increased speed will
not interfere with cruise control operationor change the set speed.
To return to the set speed, take your foot
off the accelerator.
To cancel cruise control, do one
of the following:
Press the brake pedal.
Press the clutch pedal with a manualtransaxle.
Shift into N (Neutral) with an automatic transaxle.
Press the CANCEL switch located on the steering wheel.
Decrease the vehicle speed lower than the memory speed by 20 km/h (12 mph).
Decrease the vehicle speed to less than approximately 40 km/h (25 mph).
OYN059014OYN059012
YN ENG 5.QXP 4/16/2012 10:03 AM Page 37
Page 254 of 751

Driving your vehicle
50
5
Use high quality ethylene glycol coolant
Your vehicle is delivered with high quality
ethylene glycol coolant in the cooling
system. It is the only type of coolant that
should be used because it helps prevent
corrosion in the cooling system, lubri-
cates the water pump and prevents
freezing. Be sure to replace or replenish
your coolant in accordance with themaintenance schedule in section 7.
Before winter, have your coolant tested toassure that its freezing point is sufficient
for the temperatures anticipated during
the winter.
Check battery and cables
Winter puts additional burdens on the
battery system. Visually inspect the bat-
tery and cables as described in section
7. We recommend that the level of
charge in your battery be checked by an
authorized Kia dealer. Change to "winter weight" oil if
necessary In some climates it is recommended that
a lower viscosity "winter weight" oil be
used during cold weather. See section 8
for recommendations. If you aren't sure
what weight oil you should use, we rec-
ommend that you consult an authorized
Kia dealer.
Check spark plugs and ignition system
Inspect your spark plugs as described in
section 7 and replace them if necessary.
Also check all ignition wiring and compo-
nents to be sure they are not cracked,
worn or damaged in any way.
WARNING
- Tire chains
The use of chains may adversely affect vehicle handling.
Do not exceed 30 km/h (20 mph) or the chain manufacturer’s rec-
ommended speed limit, whichev-
er is lower.
Drive carefully and avoid bumps, holes, sharp turns, and other
road hazards, which may cause
the vehicle to bounce.
Avoid sharp turns or locked- wheel braking.
CAUTION
Chains that are the wrong size or
improperly installed can damage
your vehicle's brake lines, sus-pension, body and wheels.
Stop driving and retighten the chains any time you hear themhitting the vehicle.
YN ENG 5.QXP 4/16/2012 10:04 AM Page 50
Page 259 of 751

555
Driving your vehicle
Following distance
Stay at least twice as far behind the vehi-
cle ahead as you would when driving
your vehicle without a trailer. This can
help you avoid situations that require
heavy braking and sudden turns.
Passing
You’ll need more passing distance up
ahead when you’re towing a trailer. And,
because of the increased vehicle length,
you’ll need to go much farther beyond the
passed vehicle before you can return to
your lane.
Backing up
Hold the bottom of the steering wheel
with one hand. Then, to move the trailer
to the left, just move your hand to the left.
To move the trailer to the right, move your
hand to the right. Always back up slowly
and, if possible, have someone guide
you.
Making turns
When you’re turning with a trailer, make
wider turns than normal. Do this so your
trailer won’t strike soft shoulders, curbs,
road signs, trees, or other objects. Avoid
jerky or sudden maneuvers. Signal well
in advance.
Turn signals when towing a trailer
When you tow a trailer, your vehicle has
to have a different turn signal flasher and
extra wiring. The green arrows on your
instrument panel will flash whenever you
signal a turn or lane change. Properly
connected, the trailer lights will also flash
to alert other drivers you’re about to turn,
change lanes, or stop.
When towing a trailer, the green arrows
on your instrument panel will flash for
turns even if the bulbs on the trailer are
burned out. Thus, you may think drivers
behind you are seeing your signals
when, in fact, they are not. It’s important
to check occasionally to be sure the trail-
er bulbs are still working. You must also
check the lights every time you discon-
nect and then reconnect the wires.
Do not connect a trailer lighting system
directly to your vehicle’s lighting system.
Use only an approved trailer wiring har-
ness.We recommend that you contact an
authorized Kia dealer to assist you in
installing the wiring harness.
Driving on grades
Reduce speed and shift to a lower gear
before you start down a long or steep
downgrade. If you don’t shift down, you
might have to use your brakes so much
that they would get hot and no longer
operate efficiently.
On a long uphill grade, shift down and
reduce your speed to around 70 km/h (45mph) to reduce the possibility of engine
and transaxle overheating.
If your trailer weighs more than the max-
imum trailer weight without trailer brakes
and you have an automatic transaxle,
you should drive in D (Drive) when tow-
ing a trailer.
Operating your vehicle in D (Drive) when
towing a trailer will minimize heat build up
and extend the life of your transaxle.
WARNING
Failure to use an approved trailer wiring harness could result in dam-
age to the vehicle electrical system
and/or personal injury.
YN ENG 5.QXP 4/16/2012 10:04 AM Page 55
Page 393 of 751
kia, tthe ccompany
Thank you for becoming the owner of a new Kia vehicle.
As a global car manufacturer focused on building high-quality, value for reasonable prices, Kia Motors is dedicated to providing you with a cus-tomer service experience that exceeds your expectations. At all of our Kia dealerships you will be treated with warmth, hospitality and professionalism by people who care based on our “Family-like Care”
promise.
All information contained in this Owner’s Manual is accurate at the
time of publication. However, Kia reserves the right to make changesat any time so that our policy of continual product improvement can becarried out. This manual applies to all models of this vehicle and includes descrip-
tions and explanations of optional as well as standard equipment. As aresult, you may encounter material in this manual that is not applicableto your specific Kia vehicle.
Enjoy your vehicle and Kia’s “Family-like Care” experience!
YN RHD FOREWORD.QXP 1/15/2013 1:00 PM Page 1
Page 394 of 751
i
Thank you for choosing a Kia vehicle. This manual will familiarize you with operational, maintenance and safety information about your new vehicle. It is
supplemented by a Warranty and Maintenance book that provides important information on all warranties regarding
your vehicle. Kia urges you to read these publications carefully and follow the recommendations to help assureenjoyable and safe operation of your new vehicle.
Kia offers a great variety of options, components and features for its various models. Therefore, some of the equip- ment described in this manual, along with the various illustrations, may not be applicable to your particular vehicle. The information and specifications provided in this manual were accurate at the time of printing. Kia reserves the right to discontinue or change specifications or design at any time without notice and without incurring any obliga-
tion. If you have questions, we recommend to contact your authorised Kia dealer. Kia assures you of our continuing interest in your motoring pleasure and satisfaction in your Kia vehicle.
© 2013 Kia Motors Slovakia s.r.o. All rights reserved. Reproduction by any means, electronic or mechanical, including photocopying, recording, or by any information storage and retrieval system or translation in whole or part is not permitted without written author-
ization from Kia Motors Slovakia s.r.o..
FFoo rreeww oorrdd
YN RHD FOREWORD.QXP 1/15/2013 1:00 PM Page 2
Page 410 of 751
35
Safety features of your vehicle
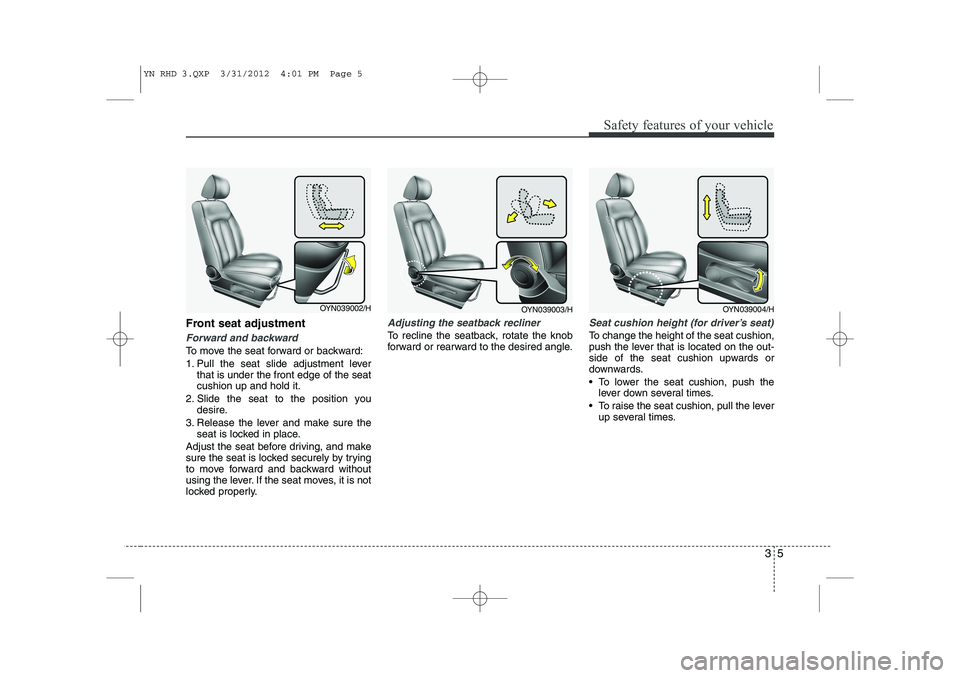
Front seat adjustment
Forward and backward
To move the seat forward or backward:
1. Pull the seat slide adjustment leverthat is under the front edge of the seat cushion up and hold it.
2. Slide the seat to the position you desire.
3. Release the lever and make sure the seat is locked in place.
Adjust the seat before driving, and make
sure the seat is locked securely by trying
to move forward and backward without
using the lever. If the seat moves, it is not
locked properly.
Adjusting the seatback recliner
To recline the seatback, rotate the knob
forward or rearward to the desired angle.
Seat cushion height (for driver’s seat)
To change the height of the seat cushion,
push the lever that is located on the out-
side of the seat cushion upwards or
downwards.
• To lower the seat cushion, push the lever down several times.
To raise the seat cushion, pull the lever up several times.
OYN039002/HOYN039004/HOYN039003/H
YN RHD 3.QXP 3/31/2012 4:01 PM Page 5
Page 413 of 751
Safety features of your vehicle
8
3
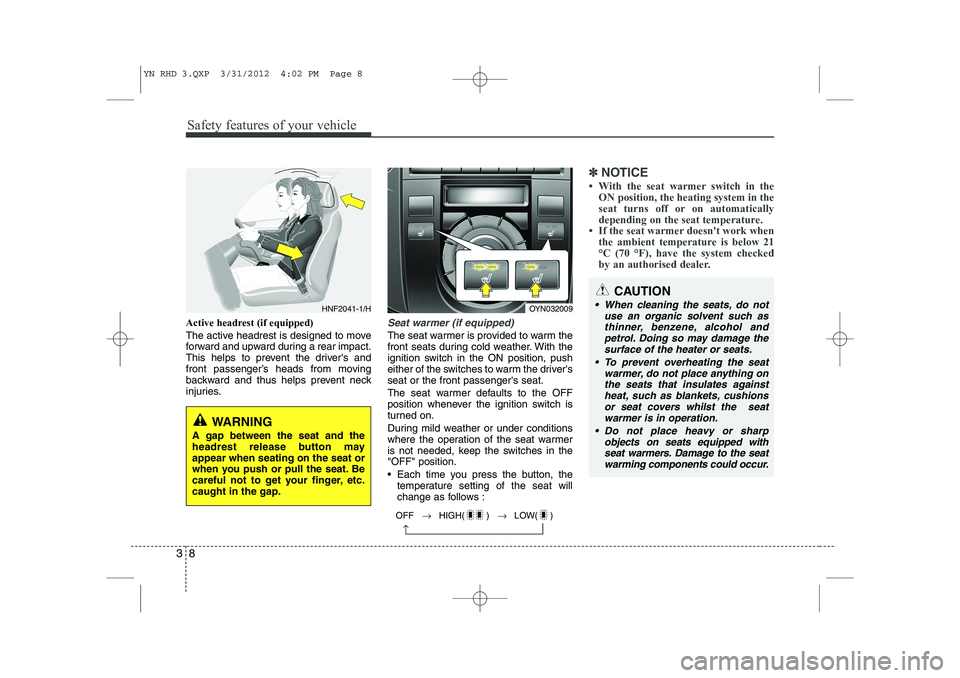
Active headrest (if equipped)
The active headrest is designed to move
forward and upward during a rear impact.
This helps to prevent the driver's and
front passenger’s heads from moving
backward and thus helps prevent neck
injuries.Seat warmer (if equipped)
The seat warmer is provided to warm the
front seats during cold weather. With the
ignition switch in the ON position, push
either of the switches to warm the driver'sseat or the front passenger's seat.
The seat warmer defaults to the OFF
position whenever the ignition switch is
turned on.
During mild weather or under conditions
where the operation of the seat warmer
is not needed, keep the switches in the"OFF" position.
Each time you press the button, the
temperature setting of the seat will
change as follows :
✽✽ NOTICE
Page 528 of 751
Features of your vehicle
64
4
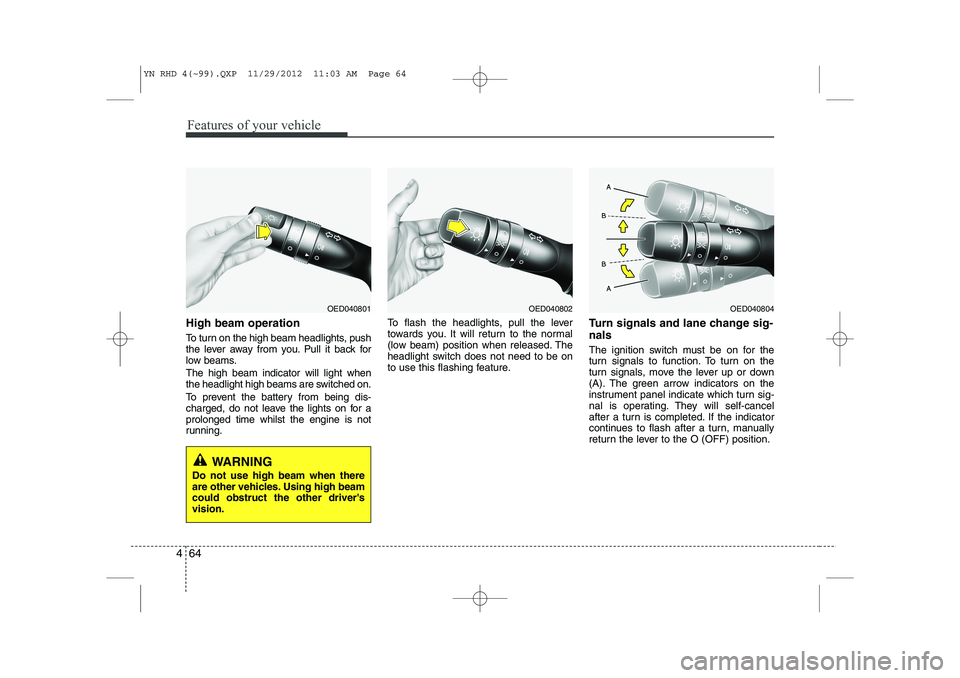
High beam operation
To turn on the high beam headlights, push
the lever away from you. Pull it back for
low beams. The high beam indicator will light when
the headlight high beams are switched on.
To prevent the battery from being dis-
charged, do not leave the lights on for aprolonged time whilst the engine is not
running. To flash the headlights, pull the lever
towards you. It will return to the normal
(low beam) position when released. The
headlight switch does not need to be on
to use this flashing feature.
Turn signals and lane change sig- nals
The ignition switch must be on for the
turn signals to function. To turn on the
turn signals, move the lever up or down
(A). The green arrow indicators on the
instrument panel indicate which turn sig-
nal is operating. They will self-cancel
after a turn is completed. If the indicator
continues to flash after a turn, manually
return the lever to the O (OFF) position.
OED040804OED040802OED040801
WARNING
Do not use high beam when there
are other vehicles. Using high beamcould obstruct the other driver'svision.
YN RHD 4(~99).QXP 11/29/2012 11:03 AM Page 64