2013 KIA Sportage steering
[x] Cancel search: steeringPage 289 of 387
Driving your vehicle
58
5
E140407AUN-EA
Parking on hills
Generally, if you have a trailer attached to
your vehicle, you should not park your
vehicle on a hill. People can be seriously
or fatally injured, and both your vehicle
and the trailer can be damaged if they
unexpectedly roll downhill.
However, if you ever have to park your
trailer on a hill, here's how to do it:
1. Pull the vehicle into the parking space.
Turn the steering wheel in the direction
of the curb (right if headed downhill,
left if headed up hill).
2. If the vehicle has a manual transaxle, place the car in neutral. If the vehicle
has an automatic transaxle, place the
car in P (Park).
3. Set the parking brake and shut off the vehicle. 4. Place chocks under the trailer wheels
on the down hill side of the wheels.
5. Start the vehicle, hold the brakes, shift to neutral, release the parking brake
and slowly release the brakes until the
trailer chocks absorb the load.
6. Reapply the brakes, reapply the park- ing brake and shift the vehicle to R
(Reverse) for manual transaxle or P
(Park) for automatic transaxle.
7. Shut off the vehicle and release the vehicle brakes but leave the parking
brake set.
CAUTION
When towing a trailer on steep grades (in excess of 6%) payclose attention to the enginecoolant temperature gauge toensure the engine does not over- heat.
If the needle of the coolant tem-perature gauge moves across thedial towards “H” (HOT), pull overand stop as soon as it is safe todo so, and allow the engine to idleuntil it cools down. You may pro-ceed once the engine has cooledsufficiently.
You must decide driving speed depending on trailer weight anduphill grade to reduce the possi-bility of engine and transaxle overheating.
WARNING- Parking on a hill
Parking your vehicle on a hill with a
trailer attached could cause seri-
ous injury or death, should the trail-
er break loose or brake stops work-
ing.
WARNING- Parking brake
It can be dangerous to get out of
your vehicle if the parking brake is
not firmly set.
If you have left the engine running,
the vehicle can move suddenly. You
or others could be seriously or
fatally injured.
Page 316 of 387
617
What to do in an emergency
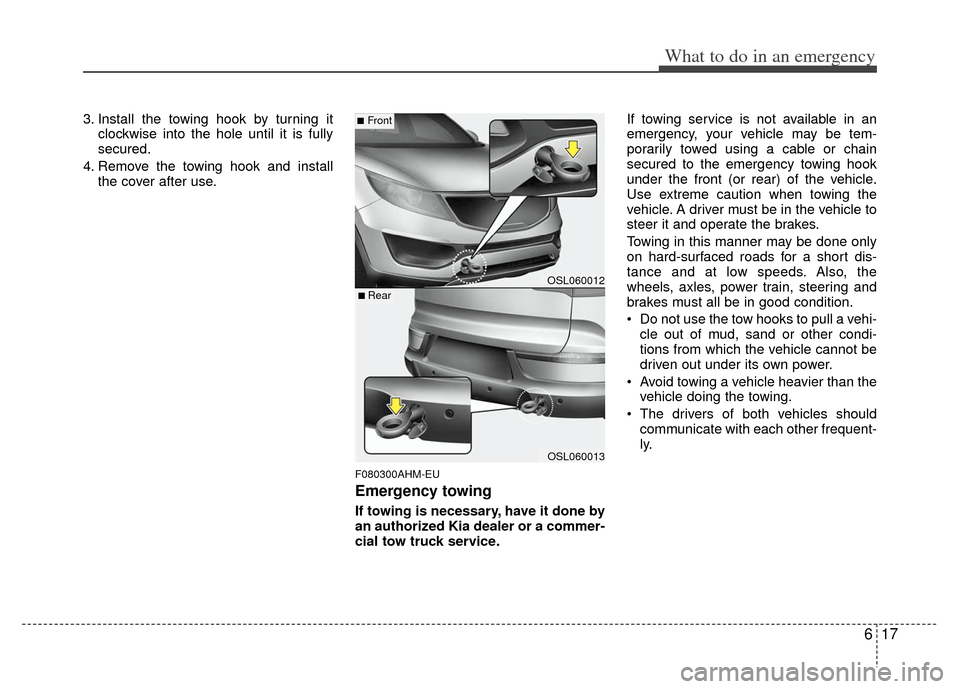
3. Install the towing hook by turning itclockwise into the hole until it is fully
secured.
4. Remove the towing hook and install the cover after use.
F080300AHM-EU
Emergency towing
If towing is necessary, have it done by
an authorized Kia dealer or a commer-
cial tow truck service. If towing service is not available in an
emergency, your vehicle may be tem-
porarily towed using a cable or chain
secured to the emergency towing hook
under the front (or rear) of the vehicle.
Use extreme caution when towing the
vehicle. A driver must be in the vehicle to
steer it and operate the brakes.
Towing in this manner may be done only
on hard-surfaced roads for a short dis-
tance and at low speeds. Also, the
wheels, axles, power train, steering and
brakes must all be in good condition.
Do not use the tow hooks to pull a vehi-
cle out of mud, sand or other condi-
tions from which the vehicle cannot be
driven out under its own power.
Avoid towing a vehicle heavier than the vehicle doing the towing.
The drivers of both vehicles should communicate with each other frequent-
ly.
OSL060012
OSL060013
■Front
■ Rear
Page 318 of 387
619
What to do in an emergency
F080301AAM-EU
Emergency towing precautions
Turn the ignition switch to ACC so thesteering wheel isn’t locked.
Place the transaxle shift lever in N (Neutral).
Release the parking bake.
Press the brake pedal with more force than usual since you will have reduced
brake performance.
More steering effort will be required because the power steering system
will be disabled.
If you are driving down a long hill, the brakes may overheat and brake per-
formance will be reduced. Stop often
and let the brakes cool off.
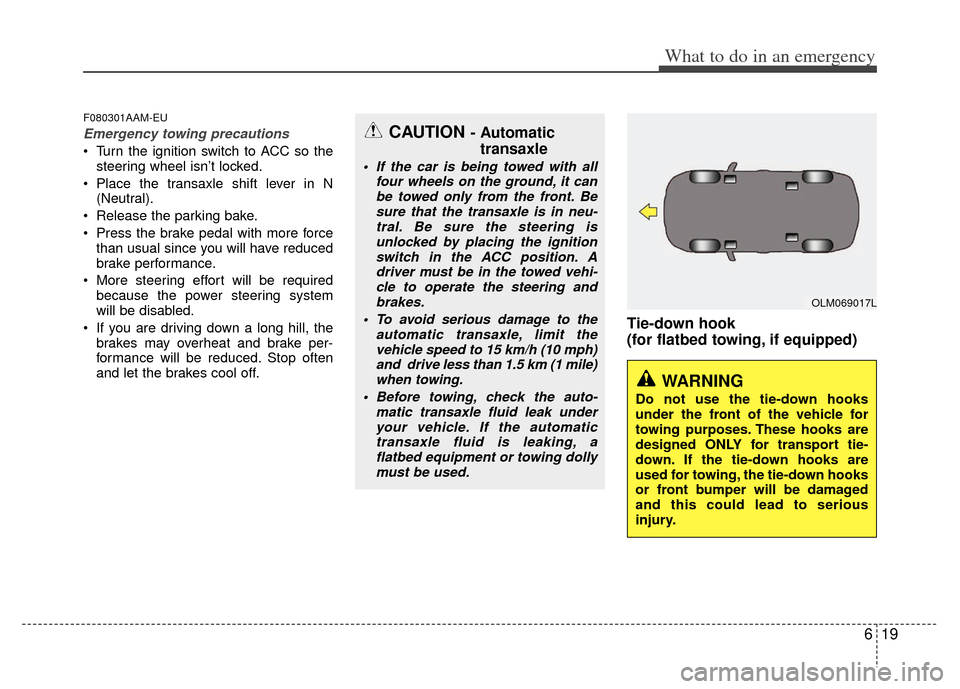
Tie-down hook
(for flatbed towing, if equipped)
CAUTION - Automatictransaxle
If the car is being towed with all
four wheels on the ground, it canbe towed only from the front. Besure that the transaxle is in neu-tral. Be sure the steering is unlocked by placing the ignitionswitch in the ACC position. Adriver must be in the towed vehi-cle to operate the steering andbrakes.
To avoid serious damage to the automatic transaxle, limit thevehicle speed to 15 km/h (10 mph)and drive less than 1.5 km (1 mile)when towing.
Before towing, check the auto- matic transaxle fluid leak underyour vehicle. If the automatic transaxle fluid is leaking, aflatbed equipment or towing dollymust be used.
WARNING
Do not use the tie-down hooks
under the front of the vehicle for
towing purposes. These hooks are
designed ONLY for transport tie-
down. If the tie-down hooks are
used for towing, the tie-down hooks
or front bumper will be damaged
and this could lead to serious
injury.
OLM069017L
Page 323 of 387
75
Maintenance
G030102AAM
While operating your vehicle:
Note any changes in the sound of theexhaust or any smell of exhaust fumes
in the vehicle.
Check for vibrations in the steering wheel. Notice any increased steering
effort or looseness in the steering
wheel, or change in its straight-ahead
position.
Notice if your vehicle constantly turns slightly or “pulls” to one side when trav-
eling on smooth, level road.
When stopping, listen and check for unusual sounds, pulling to one side,
increased brake pedal travel or “hard-
to-push” brake pedal.
If any slipping or changes in the oper- ation of your transaxle occurs, check
the transaxle fluid level.
Check the automatic transaxle P (Park) function.
Check the parking brake.
Check for fluid leaks under your vehicle (water dripping from the air condition-
ing system during or after use is nor-
mal).
G030103AHM
At least monthly:
Check the coolant level in the enginecoolant reservoir.
Check the operation of all exterior lights, including the stoplights, turn sig-
nals and hazard warning flashers.
Check the inflation pressures of all tires including the spare.
G030104AHM
At least twice a year (i.e., every Spring and Fall):
Check the radiator, heater and air con- ditioning hoses for leaks or damage.
Check the windshield washer spray and wiper operation. Clean the wiper
blades with clean cloth dampened with
washer fluid.
Check the headlight alignment.
Check the muffler, exhaust pipes, shields and clamps.
Check the lap/shoulder belts for wear and function.
Check for worn tires and loose wheel lug nuts.
G030105AHM-C1
At least once a year:
Clean the body and door drain holes.
Lubricate the door hinges and checks,and hood hinges.
Lubricate the door and hood locks and latches.
Lubricate the door rubber weather- strips.
Check the air conditioning system.
Check the power steering fluid level.
Inspect and lubricate the automatic transaxle linkage and controls.
Clean the battery and terminals.
Check the brake/clutch fluid level.
Page 327 of 387

79
Maintenance
Kilometers or time in months, whichever comes first
× 1,000 km 12 24 36 48 60 72 84 96 108 120 132 144 156 168 180 192
# Months 6 12 18 24 30 36 42 48 54 60 66 72 78 84 90 96
Front brake disc/pads, calipers I I I IIIII
Rear brake disc/pads I I I IIIII
Parking brake I I I I
Exhaust pipes, heat shield & mountings I I I IIIII
Front suspension ball jonts I I I IIIII
Steering gear box, linkage & boots/ IIIII IIIIIIII III
lower arm ball joint, upper arm ball joint
Drive shaft dust boots I I I IIIII
All latch, hinges and locks I I I IIIII
Battery condition I I I I I I IIIIIII III
MAINTENANCE
INTERVALS
MAINTENANCE
ITEM
NORMAL MAINTENANCE SCHEDULE (CONT.)
R : Replace or change I : Inspect and if necessary, adjust, correct, clean or replace.
Page 328 of 387
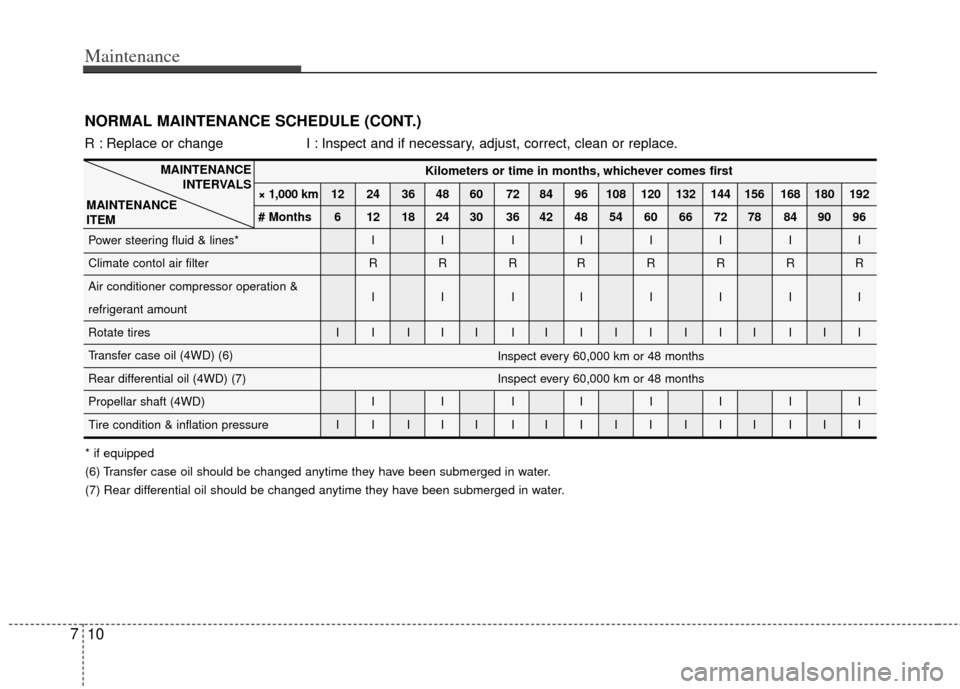
Maintenance
10
7
Kilometers or time in months, whichever comes first
× 1,000 km 12 24 36 48 60 72 84 96 108 120 132 144 156 168 180 192
# Months 6 12 18 24 30 36 42 48 54 60 66 72 78 84 90 96
Power steering fluid & lines* I I I IIIII
Climate contol air filter R R R RRRRR
Air conditioner compressor operation & IIIIIIII
refrigerant amount
Rotate tires I I I I I I IIIIIII III
Transfer case oil (4WD) (6)
Rear differential oil (4WD) (7)
Propellar shaft (4WD) I I I IIIII
Tire condition & inflation pressure I I I I I I IIIIIII III
MAINTENANCE
INTERVALS
MAINTENANCE
ITEM
Inspect every 60,000 km or 48 months
Inspect every 60,000 km or 48 months
NORMAL MAINTENANCE SCHEDULE (CONT.)
R : Replace or change I : Inspect and if necessary, adjust, correct, clean or replace.
* if equipped
(6) Transfer case oil should be changed anytime they have been submerged in water.
(7) Rear differential oil should be changed anytime they have been submerged in water.
Page 330 of 387
Maintenance
12
7
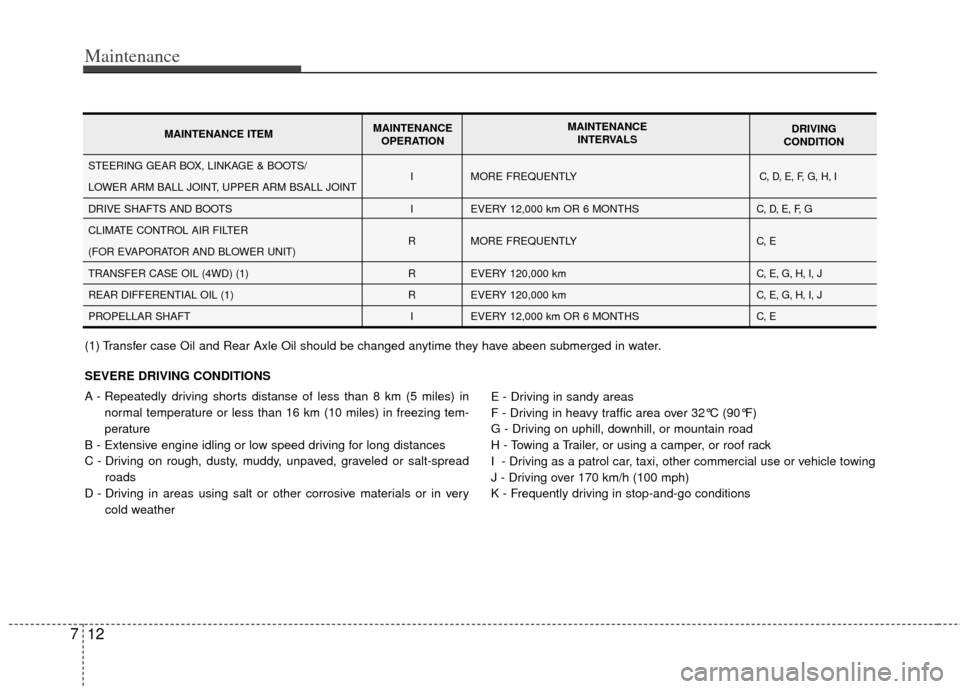
SEVERE DRIVING CONDITIONS
A - Repeatedly driving shorts distanse of less than 8 km (5 miles) in
normal temperature or less than 16 km (10 miles) in freezing tem-
perature
B - Extensive engine idling or low speed driving for long distances
C - Driving on rough, dusty, muddy, unpaved, graveled or salt-spread roads
D - Driving in areas using salt or other corrosive materials or in very cold weather E - Driving in sandy areas
F - Driving in heavy traffic area over 32°C (90°F)
G - Driving on uphill, downhill, or mountain road
H - Towing a Trailer, or using a camper, or roof rack
I - Driving as a patrol car, taxi, other commercial use or vehicle towing
J - Driving over 170 km/h (100 mph)
K - Frequently driving in stop-and-go conditions
I
I
R
R
R I MORE FREQUENTLY
EVERY 12,000 km OR 6 MONTHS
MORE FREQUENTLY
EVERY 120,000 km
EVERY 120,000 km
EVERY 12,000 km OR 6 MONTHSC, D, E, F, G, H, I
C, D, E, F, G
C, E
C, E, G, H, I, J
C, E, G, H, I, J
C, ESTEERING GEAR BOX, LINKAGE & BOOTS/
LOWER ARM BALL JOINT, UPPER ARM BSALL JOINT
DRIVE SHAFTS AND BOOTS
CLIMATE CONTROL AIR FILTER
(FOR EVAPORATOR AND BLOWER UNIT)
TRANSFER CASE OIL (4WD) (1)
REAR DIFFERENTIAL OIL (1)
PROPELLAR SHAFT
MAINTENANCE ITEM MAINTENANCE
OPERATION MAINTENANCE
INTERVALS DRIVING
CONDITION
(1) Transfer case Oil and Rear Axle Oil should be changed anytime they have abeen submerged in water.
Page 333 of 387
715
Maintenance
G051700AUN
Parking brake
Inspect the parking brake system includ-
ing the parking brake lever (or pedal) and
cables.
G051900AUN
Brake discs, pads, calipers and
rotors
Check the pads for excessive wear, discs
for run out and wear, and calipers for fluid
leakage.
G052000AUN
Exhaust pipe and muffler
Visually inspect the exhaust pipes, muf-
fler and hangers for cracks, deterioration,
or damage. Start the engine and listen
carefully for any exhaust gas leakage.
Tighten connections or replace parts as
necessary.
G052100AUN
Suspension mounting bolts
Check the suspension connections for
looseness or damage. Retighten to the
specified torque.
G052200AUN
Steering gear box, linkage &
boots/lower arm ball joint
With the vehicle stopped and engine off,
check for excessive free-play in the
steering wheel.
Check the linkage for bends or damage.
Check the dust boots and ball joints for
deterioration, cracks, or damage.
Replace any damaged parts.
G052400AUN
Drive shafts and boots
Check the drive shafts, boots and clamps
for cracks, deterioration, or damage.
Replace any damaged parts and, if nec-
essary, repack the grease.
G052500AUN
Air conditioning refrigerant
Check the air conditioning lines and con-
nections for leakage and damage.