2013 KIA Sportage clutch
[x] Cancel search: clutchPage 304 of 387
65
What to do in an emergency
F040101ASA
Jump starting procedure
1. Make sure the booster battery is 12-volt and that its negative terminal is
grounded.
2. If the booster battery is in another vehicle, do not allow the vehicles to
come in contact.
3. Turn off all unnecessary electrical loads.
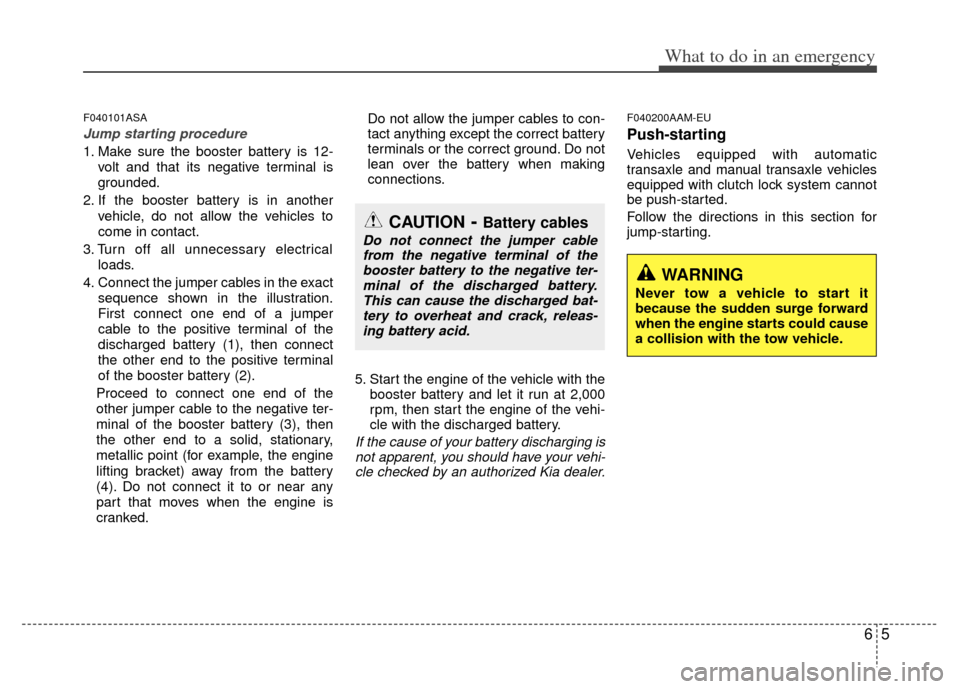
4. Connect the jumper cables in the exact sequence shown in the illustration.
First connect one end of a jumper
cable to the positive terminal of the
discharged battery (1), then connect
the other end to the positive terminal
of the booster battery (2).
Proceed to connect one end of the
other jumper cable to the negative ter-
minal of the booster battery (3), then
the other end to a solid, stationary,
metallic point (for example, the engine
lifting bracket) away from the battery
(4). Do not connect it to or near any
part that moves when the engine is
cranked. Do not allow the jumper cables to con-
tact anything except the correct battery
terminals or the correct ground. Do not
lean over the battery when making
connections.
5. Start the engine of the vehicle with the booster battery and let it run at 2,000
rpm, then start the engine of the vehi-
cle with the discharged battery.
If the cause of your battery discharging isnot apparent, you should have your vehi-cle checked by an authorized Kia dealer.
F040200AAM-EU
Push-starting
Vehicles equipped with automatic
transaxle and manual transaxle vehicles
equipped with clutch lock system cannot
be push-started.
Follow the directions in this section for
jump-starting.
CAUTION- Battery cables
Do not connect the jumper cablefrom the negative terminal of thebooster battery to the negative ter- minal of the discharged battery.This can cause the discharged bat-tery to overheat and crack, releas-ing battery acid.
WARNING
Never tow a vehicle to start it
because the sudden surge forward
when the engine starts could cause
a collision with the tow vehicle.
Page 319 of 387
7
Engine compartment / 7-2
Maintenance services / 7-3
Owner maintenance / 7-4
Maintenance schedule / 7-6
Explanation of scheduled maintenance items / 7-10
Engine oil / 7-16
Engine coolant / 7-18
Brake/clutch fluid / 7-21
Washer fluid / 7-22
Parking brake / 7-22
Air cleaner / 7-23
Climate control air filter / 7-24
Wiper blades / 7-25
Battery / 7-28
Tires and wheels / 7-31
Fuses / 7-45
Appearance care / 7-53
Emission control system / 7-59
Maintenance
Page 320 of 387
Maintenance
27
ENGINE COMPARTMENT
G010000AAM-EU
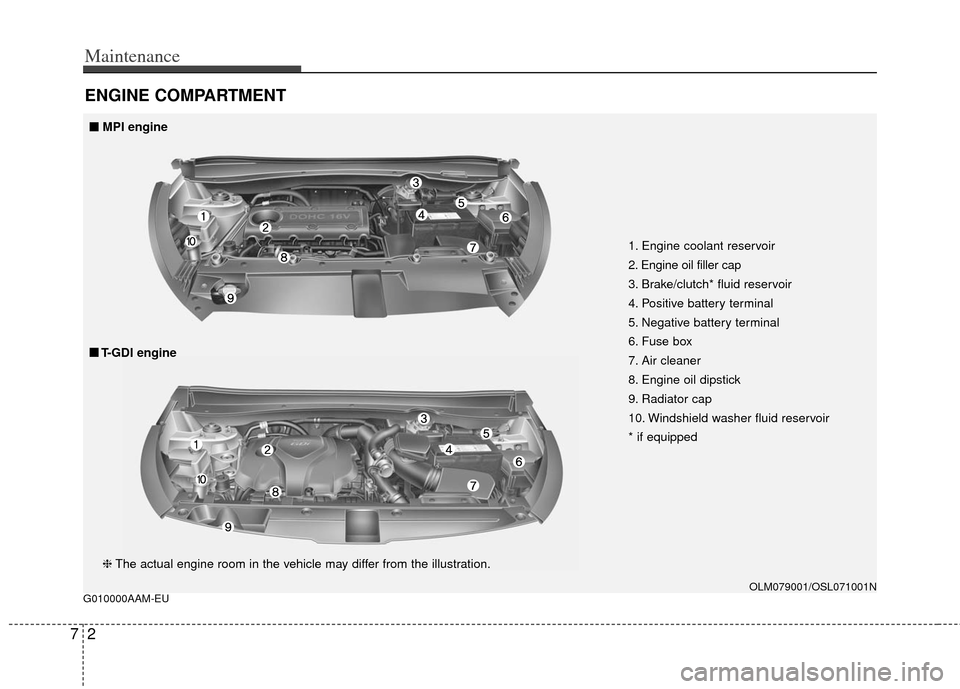
1. Engine coolant reservoir
2. Engine oil filler cap
3. Brake/clutch* fluid reservoir
4. Positive battery terminal
5. Negative battery terminal
6. Fuse box
7. Air cleaner
8. Engine oil dipstick
9. Radiator cap
10. Windshield washer fluid reservoir
* if equipped
OLM079001/OSL071001N
❈The actual engine room in the vehicle may differ from the illustration.
■
■
MPI engine
■
■ T-GDI engine
Page 323 of 387
75
Maintenance
G030102AAM
While operating your vehicle:
Note any changes in the sound of theexhaust or any smell of exhaust fumes
in the vehicle.
Check for vibrations in the steering wheel. Notice any increased steering
effort or looseness in the steering
wheel, or change in its straight-ahead
position.
Notice if your vehicle constantly turns slightly or “pulls” to one side when trav-
eling on smooth, level road.
When stopping, listen and check for unusual sounds, pulling to one side,
increased brake pedal travel or “hard-
to-push” brake pedal.
If any slipping or changes in the oper- ation of your transaxle occurs, check
the transaxle fluid level.
Check the automatic transaxle P (Park) function.
Check the parking brake.
Check for fluid leaks under your vehicle (water dripping from the air condition-
ing system during or after use is nor-
mal).
G030103AHM
At least monthly:
Check the coolant level in the enginecoolant reservoir.
Check the operation of all exterior lights, including the stoplights, turn sig-
nals and hazard warning flashers.
Check the inflation pressures of all tires including the spare.
G030104AHM
At least twice a year (i.e., every Spring and Fall):
Check the radiator, heater and air con- ditioning hoses for leaks or damage.
Check the windshield washer spray and wiper operation. Clean the wiper
blades with clean cloth dampened with
washer fluid.
Check the headlight alignment.
Check the muffler, exhaust pipes, shields and clamps.
Check the lap/shoulder belts for wear and function.
Check for worn tires and loose wheel lug nuts.
G030105AHM-C1
At least once a year:
Clean the body and door drain holes.
Lubricate the door hinges and checks,and hood hinges.
Lubricate the door and hood locks and latches.
Lubricate the door rubber weather- strips.
Check the air conditioning system.
Check the power steering fluid level.
Inspect and lubricate the automatic transaxle linkage and controls.
Clean the battery and terminals.
Check the brake/clutch fluid level.
Page 326 of 387
Maintenance
87
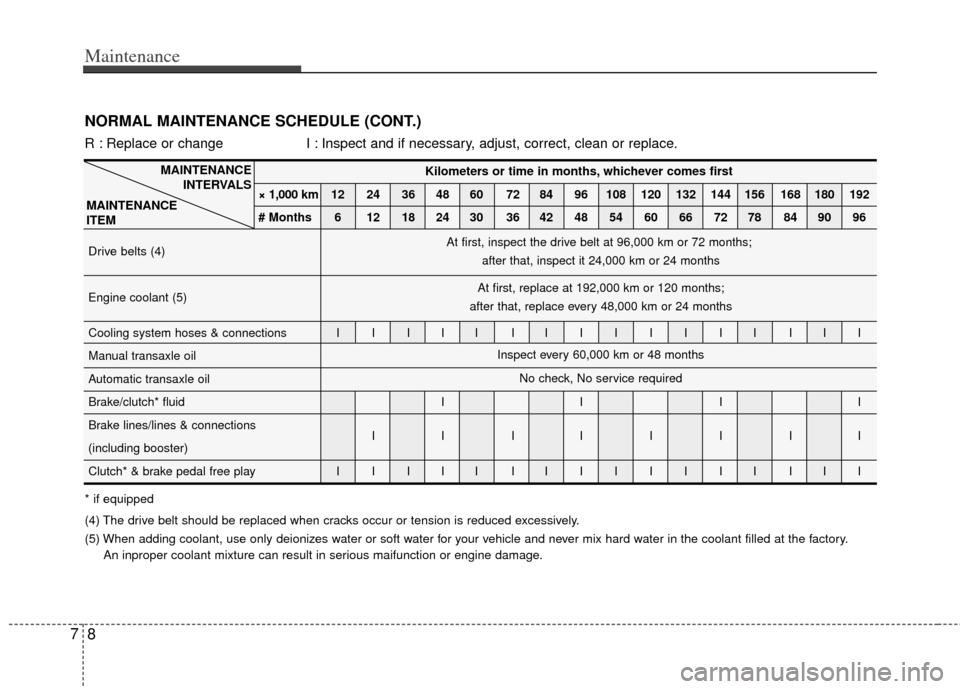
NORMAL MAINTENANCE SCHEDULE (CONT.)
MAINTENANCEINTERVALS
MAINTENANCE
ITEM
R : Replace or change I : Inspect and if necessary, adjust, correct, clean or replace.
* if equipped
(4) The drive belt should be replaced when cracks occur or tension is reduced excessively.
(5) When adding coolant, use only deionizes water or soft water for your vehicle and never mix hard water in the coolant filled at the factory.
An inproper coolant mixture can result in serious maifunction or engine damage. Kilometers or time in months, whichever comes first
× 1,000 km 12 24 36 48 60 72 84 96 108 120 132 144 156 168 180 192
# Months 6 12 18 24 30 36 42 48 54 60 66 72 78 84 90 96
Drive belts (4)
Engine coolant (5)
Cooling system hoses & connections I I I I I I IIIIIII III
Manual transaxle oil
Automatic transaxle oil
Brake/clutch* fluid I I I I
Brake lines/lines & connections IIIIIIII
(including booster)
Clutch* & brake pedal free play I I I I I I IIIIIII III
At first, inspect the drive belt at 96,000 km or 72 months;
after that, inspect it 24,000 km or 24 months
At first, replace at 192,000 km or 120 months;
after that, replace every 48,000 km or 24 months
Inspect every 60,000 km or 48 monthsNo check, No service required
Page 332 of 387
Maintenance
14
7
G050900AUN
Spark plugs
Make sure to install new spark plugs of
the correct heat range.
G051000AHM
Valve clearance (if equipped)
Inspect for excessive valve noise and/or
engine vibration and adjust if necessary.
An authorized Kia dealer should perform
the operation.
G051100AHM
Cooling system
Check the cooling system components,
such as the radiator, coolant reservoir,
hoses and connections for leakage and
damage. Replace any damaged parts.
G051200AUN
Coolant
The coolant should be changed at the
intervals specified in the maintenance
schedule.
G051400AUN
Automatic transaxle fluid
(if equipped)
Automatic transaxle fluid should not be
checked under normal usage conditions.
But in severe conditions, the fluid should
be changed at an authorized Kia dealer
in accordance to the scheduled mainte-
nance at the beginning of this section.
✽ ✽
NOTICE
Automatic transaxle fluid color is basi-
cally red.
As the vehicle is driven, the automatic
transaxle fluid will begin to look darker.
It is normal condition and you should
not judge the need to replace the fluid
based upon the changed color.
G051300AUN
Manual transaxle fluid
(if equipped)
Inspect the manual transaxle fluid
according to the maintenance schedule.
G051500AUN
Brake hoses and lines
Visually check for proper installation,
chafing, cracks, deterioration and any
leakage. Replace any deteriorated or
damaged parts immediately.
G051600AAM
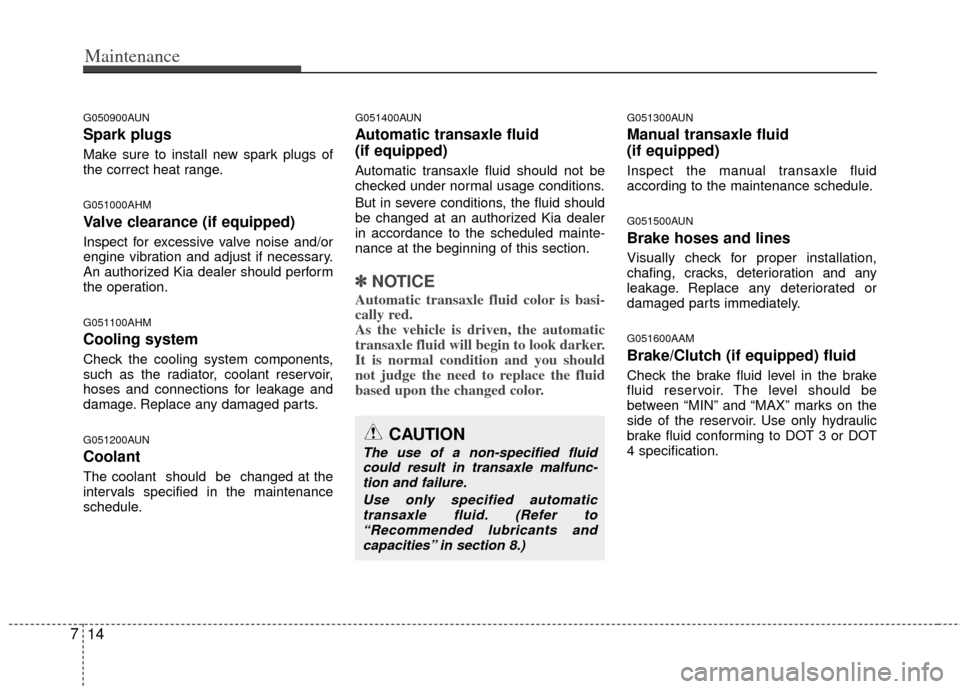
Brake/Clutch (if equipped) fluid
Check the brake fluid level in the brake
fluid reservoir. The level should be
between “MIN” and “MAX” marks on the
side of the reservoir. Use only hydraulic
brake fluid conforming to DOT 3 or DOT
4 specification.
CAUTION
The use of a non-specified fluid
could result in transaxle malfunc-tion and failure.
Use only specified automatictransaxle fluid. (Refer to“Recommended lubricants andcapacities” in section 8.)
Page 339 of 387
721
Maintenance
BRAKE/CLUTCH (IF EQUIPPED) FLUID
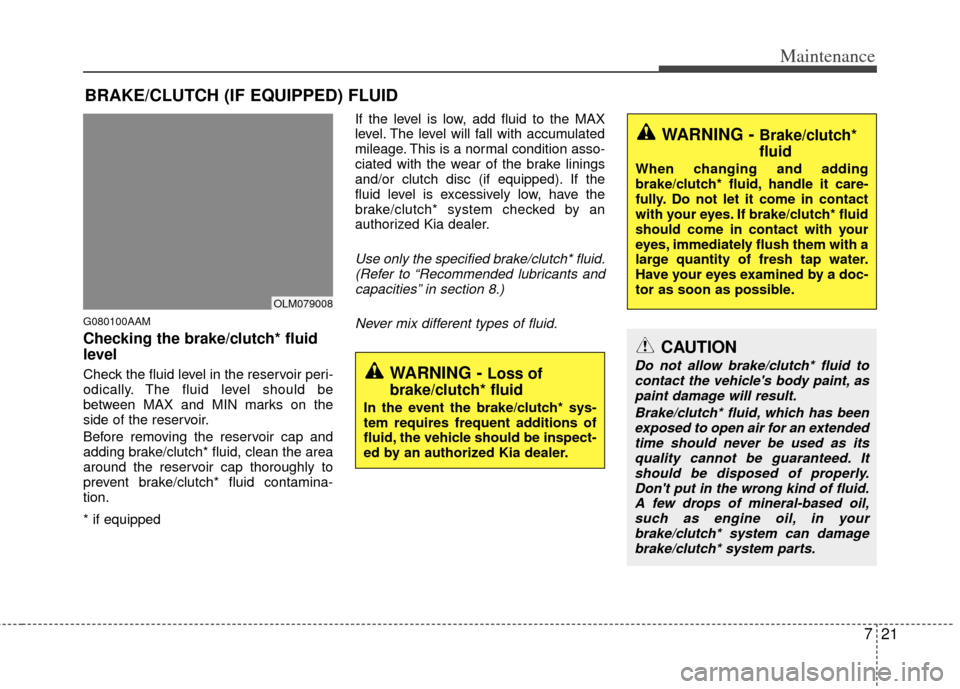
G080100AAM
Checking the brake/clutch* fluid
level
Check the fluid level in the reservoir peri-
odically. The fluid level should be
between MAX and MIN marks on the
side of the reservoir.
Before removing the reservoir cap and
adding brake/clutch* fluid, clean the area
around the reservoir cap thoroughly to
prevent brake/clutch* fluid contamina-
tion.
* if equippedIf the level is low, add fluid to the MAX
level. The level will fall with accumulated
mileage. This is a normal condition asso-
ciated with the wear of the brake linings
and/or clutch disc (if equipped). If the
fluid level is excessively low, have the
brake/clutch* system checked by an
authorized Kia dealer.
Use only the specified brake/clutch* fluid.
(Refer to “Recommended lubricants andcapacities” in section 8.)
Never mix different types of fluid.
WARNING - Loss of
brake/clutch* fluid
In the event the brake/clutch* sys-
tem requires frequent additions of
fluid, the vehicle should be inspect-
ed by an authorized Kia dealer.
OLM079008
WARNING - Brake/clutch*
fluid
When changing and adding
brake/clutch* fluid, handle it care-
fully. Do not let it come in contact
with your eyes. If brake/clutch* fluid
should come in contact with your
eyes, immediately flush them with a
large quantity of fresh tap water.
Have your eyes examined by a doc-
tor as soon as possible.
CAUTION
Do not allow brake/clutch* fluid to
contact the vehicle's body paint, aspaint damage will result.
Brake/clutch* fluid, which has beenexposed to open air for an extendedtime should never be used as its quality cannot be guaranteed. Itshould be disposed of properly. Don't put in the wrong kind of fluid.A few drops of mineral-based oil, such as engine oil, in yourbrake/clutch* system can damagebrake/clutch* system parts.