Page 37 of 485

Safety features of your vehicle
22
3
✽✽
NOTICE
If you are not able to pull out the
seat belt from the retractor, firmly
pull the belt out and release it. Then
you will be able to pull the belt out
smoothly.
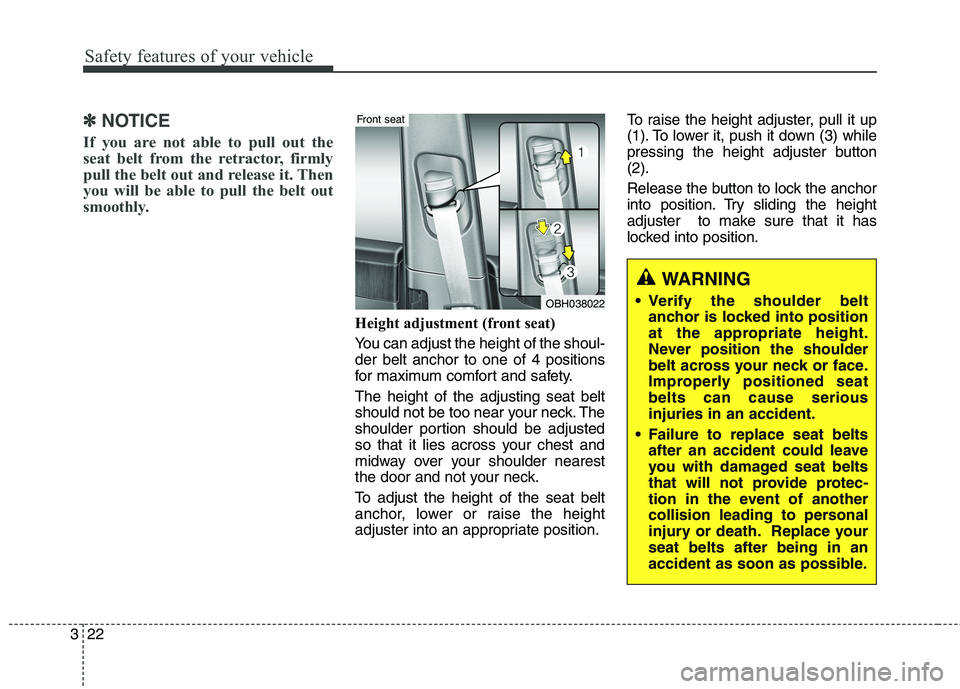
Height adjustment (front seat)
You can adjust the height of the shoul- der belt anchor to one of 4 positions
for maximum comfort and safety. The height of the adjusting seat belt
should not be too near your neck. The
shoulder portion should be adjusted
so that it lies across your chest and
midway over your shoulder nearest
the door and not your neck.
To adjust the height of the seat belt
anchor, lower or raise the height
adjuster into an appropriate position. To raise the height adjuster, pull it up
(1). To lower it, push it down (3) while
pressing the height adjuster button(2).
Release the button to lock the anchor
into position. Try sliding the height
adjuster to make sure that it has
locked into position.
WARNING
Verify the shoulder belt anchor is locked into position
at the appropriate height.
Never position the shoulder
belt across your neck or face.
Improperly positioned seatbelts can cause seriousinjuries in an accident.
Failure to replace seat belts after an accident could leave
you with damaged seat belts
that will not provide protec-
tion in the event of another
collision leading to personal
injury or death. Replace yourseat belts after being in an
accident as soon as possible.
OBH038022
Front seat
Page 44 of 485

329
Safety features of your vehicle
Seat belt precautionsInfant or small child
You should be aware of the specific
requirements in your country. Child
and/or infant seats must be properlyplaced and installed in the rear seat.
For more information about the use
of these restraints, refer to “Child
restraint system” in this section.
✽✽NOTICE
Small children are best protected
from injury in an accident when
properly restrained in the rear seat
by a child restraint system that
meets the requirements of the Safety
Standards of your country. Before
buying any child restraint system,
make sure that it has a label certify-
ing that it meets Safety Standards of
your country. The restraint must be
appropriate for your child's height
and weight. Check the label on the
child restraint for this information.
Refer to “Child restraint system” in
this section.
WARNING
All occupants of the vehicle
must wear their seat belts at all
times. Seat belts and childrestraints reduce the risk of
serious or fatal injuries for all
occupants in the event of a col-
lision or sudden stop. Without a
seat belt, occupants could be
shifted too close to a deploying
air bag, strike the interior struc-
ture or be thrown from the vehi-
cle. Properly worn seat belts
greatly reduce these hazards.
Always follow the precautions
about seat belts, air bags andoccupant seating contained in
this manual.
WARNING
Every person in your vehicle
needs to be properly restrained
at all times, including infants
and children. Never hold a child
in your arms or lap when riding
in a vehicle. The violent forcescreated during a crash will tear
the child from your arms and
throw the child against the inte-
rior. Always use a child restraint
appropriate for your child'sheight and weight.
Page 79 of 485
Adding equipment to or modi-
fying your air bag-equipped
vehicle
If you modify your vehicle by chang-
ing your vehicle's frame, bumper sys-tem, front end or side sheet metal or
ride height, this may affect the oper-
ation of your vehicle's air bag sys-tem.Air bag warning label
Air bag warning labels are attached
to alert the driver and passengers of
potential risk of air bag system.Note that these government warn-
ings focus on the risk to children, we
also want you to be aware of the
risks which adults are exposed to.
Those have been described in previ-
ous pages.
OKH032073
OKH032071L
364
Safety features of your vehicle
Page 137 of 485

Features of your vehicle
58
4
Lamp
Head Lamp Delay (Headlight Escort)
On:
The headlight escort function will
be activated.
Off:
The headlight escort function will
be deactivated.
For more details, refer to “Lighting” in
this chapter.
Welcome Light
On: The welcome light function will be
activated.
Off:
The welcome light function will be
deactivated.
For more details, refer to “Welcome
System” in this chapter. Travel Mode (Traffic Change)
(if equipped)
On:
The traffic change function will be
activated.
Off: The traffic change function will be
deactivated.
For more details, refer to “Lighting” in
this chapter.
HUD (if equipped)
Display Height Adjust the height of the HUD image
on the windshield glass (1 to 20 level).
Illumination Adjust the intensity of the HUD illu-
mination (1 to 20 level).
Speedometer Color Choose the speedometer color of the
HUD (White, Orange, Green).
Speedometer Size
Choose the font size of the HUD
(Large, Medium, Small).
Contents Settings
Activate or deactivate each contents
of the HUD (TBT, SCC, LDWS). ❈ TBT : Turn By Turn
SCC : Smart Cruise Control
LDWS : Lane Departure Warning System
Page 140 of 485
461
Features of your vehicle
LCD MenusLCD DISPLAY (TYPE B)
MenusExplanation
Vehicle Settings
On this mode, you can change settings of the doors, lamps, seats, and so on.
Auto Door Lock: Off / Speed / Shift Lever
Auto Door Unlock: Off / Power Off / Shift Lever / Driver Door Unlock
Seat Easy Access: On / Off
Steering Easy Access: On / Off
Head Lamp Delay: On / Off
Welcome Light: On / Off
One Touch Turn Lamp: Off / 3 Flashing / 5 Flashing / 7 Flashing
Travel Mode: On / Off
AVSM (if equipped): On / Off
HUD Settings
(if equipped)
On this mode, you can change settings of the HUD.
Display Height: 1 to 20 level
Illumination: 1 to 20 level
Speedometer Color: White / Orange / Green
Speedometer size: Large / Medium / Small
Contents Settings: TBT / SCC / LDWS
Page 144 of 485
465
Features of your vehicle
AVSM (if equipped)
On:The AVSM system will be activat- ed.
Off: The AVSM system will be deacti-
vated.
For more details, refer to “Advanced
Vehicle Safety Management (AVSM)
System” in chapter 5. ❈ AVSM: Advanced Vehicle Safety ManagementHUD Settings (if equipped)
Display Height Adjust the height of the HUD image
on the windshield glass (1 to 20 level).
Illumination Adjust the intensity of the HUD illu-
mination (1 to 20 level). Speedometer Color Choose the speedometer color of the
HUD (White, Orange, Green).
Speedometer Size
Choose the font size of the HUD
(Large, Medium, Small).
Contents Settings
Activate or deactivate each contents
of the HUD (TBT, SCC, LDWS). ❈
TBT : Turn By Turn
SCC : Smart Cruise Control
LDWS : Lane Departure Warning System
✽✽NOTICE
If you select the TBT as contents of
the HUD, the TBT information on
the instrument cluster will not be
displayed.
OKH042911
Page 168 of 485

489
Features of your vehicle
Electronic ControlledSuspension (ECS) Warning Light (if equipped)
This warning light illuminates:
Once you set the Engine Start/Stop Button to the ON position.
- It illuminates for approximately 3seconds and then goes off.
When there is a malfunction with the electronic controlled suspen- sion (ECS) system.
In this case, we recommend that you
have the vehicle inspected by an
authorized Kia dealer. ❈ For more details, refer to “Electronic Controlled Suspension
(ECS)” in chapter 5.
✽✽
NOTICE - Electronic Controlled Suspension (ECS)
Warning Light
When there is a malfunction with
the Electronic Stability Control
(ESC), the Electronic Controlled
Suspension (ECS) Warning Light
may come on as well as the
Electronic Stability Control (ESC)
Indicator Light.
ECSCAUTION - Electronic
Controlled Suspension
(ECS) Warning Light
If the Electronic Controlled Suspension (ECS) Warning Lightilluminates when there is no airin the suspension, the vehicle height will be very low. In thiscase, do not drive the vehicle toprotect it from the projections on the surface of the ground.
We recommend that you havethe vehicle inspected by anauthorized Kia dealer.
When towing the vehicle, youshould follow the instruction in “Electronic ControlledSuspension (ECS)” of chapter 5.
Page 175 of 485

Features of your vehicle
96
4
Description
The head up display is a transparent
display which projects a shadow of
some information of the instrument
cluster and navigation on the wind-
shield glass. The head up display image on the
windshield glass may be invisiblewhen: - Sitting posture is bad.
- Wearing a polarized sunglasses.
- There is an object on the cover ofthe head up display.
- Driving on a wet road.
- An inadequate lighting is turned on inside the vehicle.
- Any light comes from the outside.
- Wearing an inadequate glasses to your eyesight.
If the head up display image is not shown well, adjust the height or
illumination of the head up display
in the LCD display.
❈ For more details, refer to “LCD
Display” in this chapter.
When the head up display needs inspection or repair, we recom-
mend that you consult an author-
ized Kia dealer.
HEAD UP DISPLAY (HUD) (IF EQUIPPED)
OKH042164
WARNING - Head Up
Display
Do not make the front wind- shield glass have window tint or other types of metallic coat-
ing. Otherwise, the head up
display image may be invisible.
Do not place any accessories on the clash pad or attach anyobjects on the windshieldglass.
As the Blind Spot Detection (BSD) system is a supplemen-
tal device for your safe driving,
it may be dangerous to rely on
only the BSD information of the
head up display image when
changing the lane. Always pay
attention to drive safely.