2013 KIA CEED battery replacement
[x] Cancel search: battery replacementPage 88 of 1168

49
Features of your vehicle
Battery replacement
A battery should last for several years,
but if the transmitter or smart key is not
working properly, try replacing the bat-
tery with a new one. If you are unsure
how to use or replace the battery, we rec-
ommend that you contact an authorized
Kia dealer.
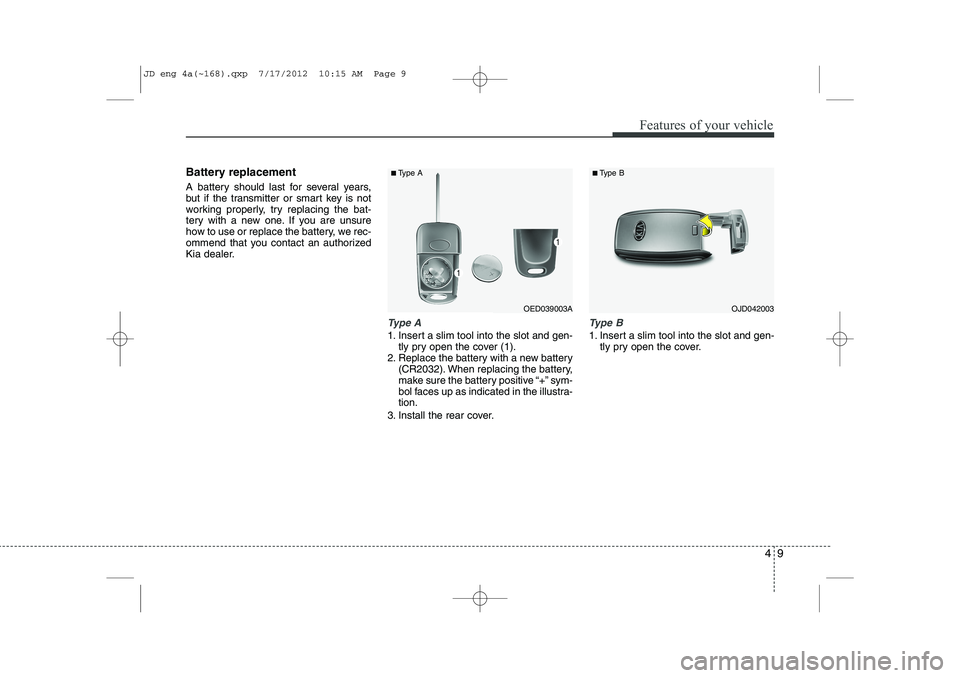
Type A
1. Insert a slim tool into the slot and gen-tly pry open the cover (1).
2. Replace the battery with a new battery (CR2032). When replacing the battery,
make sure the battery positive “+” sym-
bol faces up as indicated in the illustra-tion.
3. Install the rear cover.
Type B
1. Insert a slim tool into the slot and gen- tly pry open the cover.
OJD042003OED039003A
■
Type A ■Type B
JD eng 4a(~168).qxp 7/17/2012 10:15 AM Page 9
Page 427 of 1168

What to do in an emergency
6
6
Jump starting procedure ✽✽
NOTICE
If the battery is discharged, the engine can be started using a battery of anoth-
er vehicle and two jumper cables. Only
use jumper cables with fully insulatedclamp handles.
To prevent personal injury or damage to
both vehicles, adhere strictly to the fol-
lowing procedure.
1. Make sure the booster battery is 12- volt and that its negative terminal is
grounded.
2. If the booster battery is in another vehicle, do not allow the vehicles totouch.
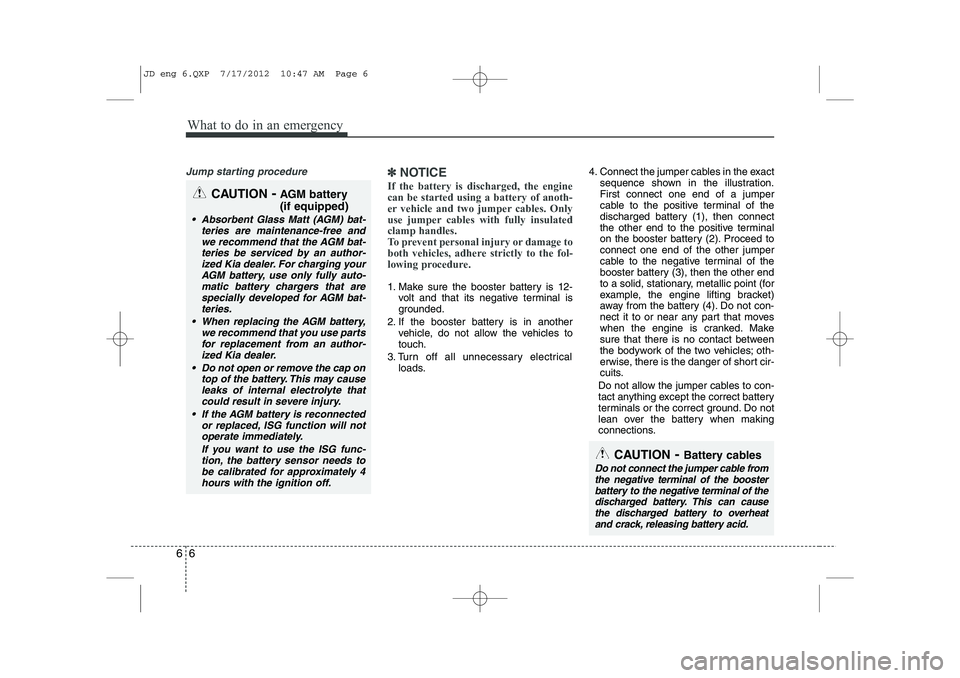
3. Turn off all unnecessary electrical loads. 4. Connect the jumper cables in the exact
sequence shown in the illustration.First connect one end of a jumper
cable to the positive terminal of the
discharged battery (1), then connect
the other end to the positive terminal
on the booster battery (2). Proceed toconnect one end of the other jumper
cable to the negative terminal of the
booster battery (3), then the other end
to a solid, stationary, metallic point (for
example, the engine lifting bracket)
away from the battery (4). Do not con-
nect it to or near any part that moves
when the engine is cranked. Make
sure that there is no contact between
the bodywork of the two vehicles; oth-
erwise, there is the danger of short cir-
cuits.
Do not allow the jumper cables to con-
tact anything except the correct battery
terminals or the correct ground. Do not
lean over the battery when making
connections.
CAUTION - Battery cables
Do not connect the jumper cable from
the negative terminal of the booster battery to the negative terminal of thedischarged battery. This can cause
the discharged battery to overheat and crack, releasing battery acid.
CAUTION -AGM battery (if equipped)
Absorbent Glass Matt (AGM) bat-
teries are maintenance-free andwe recommend that the AGM bat-
teries be serviced by an author-ized Kia dealer. For charging yourAGM battery, use only fully auto-
matic battery chargers that arespecially developed for AGM bat-teries.
When replacing the AGM battery, we recommend that you use parts
for replacement from an author- ized Kia dealer.
Do not open or remove the cap on top of the battery. This may cause
leaks of internal electrolyte that could result in severe injury.
If the AGM battery is reconnected or replaced, ISG function will notoperate immediately.
If you want to use the ISG func-tion, the battery sensor needs to be calibrated for approximately 4hours with the ignition off.
JD eng 6.QXP 7/17/2012 10:47 AM Page 6
Page 516 of 1168

763
Maintenance
FUSESA vehicle’s electrical system is protected
from electrical overload damage by
fuses.
This vehicle has 3 (or 4) fuse panels, one
located in the driver’s side panel bolster,
others in the engine compartment near
the battery.
If any of your vehicle’s lights, acces-
sories, or controls do not work, check the
appropriate circuit fuse. If a fuse has
blown, the element inside the fuse will bemelted.
If the electrical system does not work,
first check the driver’s side fuse panel.
Always replace a blown fuse with one of
the same rating.
Before replacing a blown fuse, discon-
nect the negative battery cable.
If the replacement fuse blows, this indi-
cates an electrical problem. Avoid using
the system involved and we recommend
that you consult an authorized Kia deal-
er.
Three kinds of fuses are used: blade typefor lower amperage rating, cartridge type, and multi fuse type for higher amperageratings.✽✽ NOTICE
The actual fuse/relay panel label may
differ from equipped items.
WARNING - Fuse replace-
ment
Never replace a fuse with any- thing but another fuse of the same rating.
A higher capacity fuse could cause damage and possibly a
fire.
Never install a wire or aluminum foil instead of the proper fuse -
even as a temporary repair. It may
cause extensive wiring damage
and a possible fire.
CAUTION
Do not use a screwdriver or any
other metal object to remove fusesbecause it may cause a short circuitand damage the system.
Normal
Normal
■
Blade type
■ Cartridge type
■ Multi fuse type Blown
Blown
Normal Blown
ORB072110/ODM072020
Normal
Blown
■
Battery fuse terminal
JD eng 7.QXP 7/17/2012 10:57 AM Page 63
Page 518 of 1168

765
Maintenance
Fuse switch
Always, put the fuse switch at the ON position.
If you move the switch to the OFF posi- tion, some items such as audio and digi-
tal clock must be reset and transmitter
(or smart key) may not work properly.
✽✽NOTICE
If you need to park your vehicle for pro-
longed periods more than 1 month,
move the fuse switch to the OFF position
to prevent the battery being discharged.
Engine compartment panel fuse replacement
1. Turn the ignition switch and all other switches off.
2. Remove the fuse box cover by press- ing the tap and pulling up.
OGD071019
OGD071021
Diesel onlyOJD072017
CAUTION
Always place the fuse switch in
the ON position while driving thevehicle.
Do not move the fuse switch repeatedly. The fuse switch maybe worn out.
JD eng 7.QXP 7/17/2012 10:58 AM Page 65
Page 535 of 1168

Maintenance
82
7
Front light replacement
(1) Front turn signal light
(2) Headlight (Low)(3) Static bending light (if equipped)
(4) Position light (5) Position light / Daytime running light
(DRL, LED Type) (if equipped)
(6) Headlight (High)
(7) Daytime running light (DRL, Bulb type) (if equipped)
(8) Front fog light (if equipped)
1. Turn off the engine and open the hood.
2. Disconnect the negative battery cable.
3. Disconnect the power connector front the back of the headlight assembly.
If you can reach the bulb without remov-
ing the headlight assembly, you do notneed to do step 4 to 7.
4. Loosen the retaining bolts on the frontbumper .
- Front bumper upper board : 4 EA
- Front bumper cover : 1 EA
OJD072052
OJD072026
■ Type A
■Type BOJD072053
OJD072054
Diesel only
JD eng 7.QXP 7/17/2012 10:59 AM Page 82
Page 573 of 1168

Index
2
I
Active ECO system . . . . . . . . . . . . . . . . . . . . . . . . . . . 5-32
AFLS (Adaptive Front Lighting System) . . . . . . . . 4-117
Air bag warning label . . . . . . . . . . . . . . . . . . . . . . . . . 3-63
Air bag warning light . . . . . . . . . . . . . . . . . . . . . . . . . 3-43
Air bags . . . . . . . . . . . . . . . . . . . . . . . . . . . . . . . . . . . . 3-40
Air bag warning label . . . . . . . . . . . . . . . . . . . . . . . 3-54
Air bag warning light . . . . . . . . . . . . . . . . . . . . . . . . 3-43
Curtain air bag . . . . . . . . . . . . . . . . . . . . . . . . . . . . . 3-54
Driver's and passenger's front air bag . . . . . . . . . . 3-48
Passenger’s front air bag ON indicator . . . . . . . . . 3-44
Passenger’s front air bag ON/OFF switch . . . . . . . 3-50
Side impact air bag. . . . . . . . . . . . . . . . . . . . . . . . . . 3-53
SRS components and functions . . . . . . . . . . . . . . . . 3-45
Air cleaner . . . . . . . . . . . . . . . . . . . . . . . . . . . . . . . . . . 7-43
Air conditioner compressor label . . . . . . . . . . . . . . . 8-11
Air conditioning system . . . . . . . . . . . . . . . . . . . . . . . . 8-3
Alarm system. . . . . . . . . . . . . . . . . . . . . . . . . . . . . . . . 4-14
Aming . . . . . . . . . . . . . . . . . . . . . . . . . . . . . . . . . . . . . . 7-87
Anti-lock brake system (ABS) . . . . . . . . . . . . . . . . . . 5-41
Appearance care Interior care . . . . . . . . . . . . . . . . . . . . . . . . . . . . . . 7-103
Armrest (Rear seat) . . . . . . . . . . . . . . . . . . . . . . . . . . 3-14
Ashtray. . . . . . . . . . . . . . . . . . . . . . . . . . . . . . . . . . . . 4-154
Audio remote control . . . . . . . . . . . . . . . . . . . . . . . . 4-164 Audio system . . . . . . . . . . . . . . . . . . . . . . . . . . . . . . . 4-169
Audio remote control . . . . . . . . . . . . . . . . . . . . . . . 4-170
Roof antenna . . . . . . . . . . . . . . . . . . . . . . . . . . . . . . 4-169
Auto defogging system . . . . . . . . . . . . . . . . . . . . . . . 4-149
Auto light/AFLS position . . . . . . . . . . . . . . . . . . . . . 4-112
Automatic climate control system . . . . . . . . . . . . . . 4-136 Air conditioning . . . . . . . . . . . . . . . . . . . . . . . . . . . 4-145
Automatic heating and air conditioning . . . . . . . 4-137
Climate control air filter . . . . . . . . . . . . . . . . . . . . 4-146
Manual heating and air conditioning . . . . . . . . . . 4-139
Automatic transaxle / DCT . . . . . . . . . . . . . . . . . . . . 5-23 DS mode. . . . . . . . . . . . . . . . . . . . . . . . . . . . . . . . . . . 5-27
Paddle shifter . . . . . . . . . . . . . . . . . . . . . . . . . . . . . . 5-28
Shift lock system . . . . . . . . . . . . . . . . . . . . . . . . . . . . 5-29
Sports mode. . . . . . . . . . . . . . . . . . . . . . . . . . . . . . . . 5-27
Automatic transaxle shift position indicator (Normal vision) . . . . . . . . . . . . . . . . . . . . . . . . . . . . . 4-49
Automatic transaxle shift position indicator (Super vision) . . . . . . . . . . . . . . . . . . . . . . . . . . . . . . 4-62
Aux, USB and iPod . . . . . . . . . . . . . . . . . . . . . . . . . . 4-158
Barrier net . . . . . . . . . . . . . . . . . . . . . . . . . . . . . . . . . 4-161
Battery . . . . . . . . . . . . . . . . . . . . . . . . . . . . . . . . . . . . . 7-50
Battery replacement (Remote keyless entry) . . . . . . . 4-9
Battery saver function . . . . . . . . . . . . . . . . . . . . . . . 4-110
A
B
JD eng Index.qxp 7/21/2012 11:45 AM Page 2
Page 581 of 1168

Index
10
I
Pre-tensioner seat belt . . . . . . . . . . . . . . . . . . . . . . . . 3-23
Push starting . . . . . . . . . . . . . . . . . . . . . . . . . . . . . . . . . 6-7
Rear combination light bulb replacement . . . . . . . . 7-93
Rear parking assist system. . . . . . . . . . . . . . . . . . . . . 4-90
Rear seat . . . . . . . . . . . . . . . . . . . . . . . . . . . . . . . . . . . 3-13
Rear view camera . . . . . . . . . . . . . . . . . . . . . . . . . . . 4-109
Rear window wiper . . . . . . . . . . . . . . . . . . . . . . . . . . 4-121
Recommended cold tire inflation pressures . . . . . . . 7-53
Recommended lubricants and capacities . . . . . . . . . . 8-6
Recommended SAE viscosity number . . . . . . . . . . . 8-8
Recommends Engine oil . . . . . . . . . . . . . . . . . . . . . . . 8-7
Refrigerant label . . . . . . . . . . . . . . . . . . . . . . . . . . . . . 8-11Remote keyless entry Battery replacement . . . . . . . . . . . . . . . . . . . . . . . . . . 4-9
Remote keyless entry . . . . . . . . . . . . . . . . . . . . . . . . . . 4-6
Replacement light bulb . . . . . . . . . . . . . . . . . . . . . . . 7-82
Road warning . . . . . . . . . . . . . . . . . . . . . . . . . . . . . . . . 6-2
Rocking the vehicle . . . . . . . . . . . . . . . . . . . . . . . . . . . 5-64
Roof antenna . . . . . . . . . . . . . . . . . . . . . . . . . . . . . . . 4-169
Room lamp . . . . . . . . . . . . . . . . . . . . . . . . . . . . . . . . 4-123
Roof rack . . . . . . . . . . . . . . . . . . . . . . . . . . . . . . . . . . 4-167 Scheduled maintenance service . . . . . . . . . . . . . . . . . . 7-9
Maintenance under severe usage conditions (except Europe, for Russia) . . . . . . . . . . . . . . . . . . 7-30
Maintenance under severe usage conditions (for Europe, except Russia) . . . . . . . . . . . . . . . . . . 7-19
Normal maintenance schedule (except Europe, for Russia) . . . . . . . . . . . . . . . . . . 7-21
Normal maintenance schedule (for Europe, except Russia) . . . . . . . . . . . . . . . . . . 7-10
Seat belt warning . . . . . . . . . . . . . . . . . . . . . . . . . . . . 3-19
Seat belts . . . . . . . . . . . . . . . . . . . . . . . . . . . . . . . . . . . 3-18 Hight adjustment . . . . . . . . . . . . . . . . . . . . . . . . . . . 3-21
Lap/shoulder belt . . . . . . . . . . . . . . . . . . . . . . . . . . . 3-21
Pre-tensioner seat belt . . . . . . . . . . . . . . . . . . . . . . . 3-23
Seat belt warning . . . . . . . . . . . . . . . . . . . . . . . . . . . 3-19
Seat warmer(front) . . . . . . . . . . . . . . . . . . . . . . . . . . . 3-12
Seatback pocket . . . . . . . . . . . . . . . . . . . . . . . . . . . . . 3-13
Seats . . . . . . . . . . . . . . . . . . . . . . . . . . . . . . . . . . . . . . . . 3-2
Armrest . . . . . . . . . . . . . . . . . . . . . . . . . . . . . . . . . . . 3-14
Driver position memory system . . . . . . . . . . . . . . . . 3-8
Folding the rear seat. . . . . . . . . . . . . . . . . . . . . . . . . 3-15
Front seat adjustment . . . . . . . . . . . . . . . . . . . . . . . . 3-4
Headrest(front) . . . . . . . . . . . . . . . . . . . . . . . . . . . . . 3-10
Headrest(rear) . . . . . . . . . . . . . . . . . . . . . . . . . . . . . . 3-13
Lumbar support (Automatic Seat) . . . . . . . . . . . . . . 3-7
R
S
JD eng Index.qxp 7/21/2012 11:45 AM Page 10
Page 672 of 1168

49
Features of your vehicle
Battery replacement
A battery should last for several years,
but if the transmitter or smart key is not
working properly, try replacing the bat-
tery with a new one. If you are unsure
how to use or replace the battery, we rec-
ommend that you contact an authorised
Kia dealer.
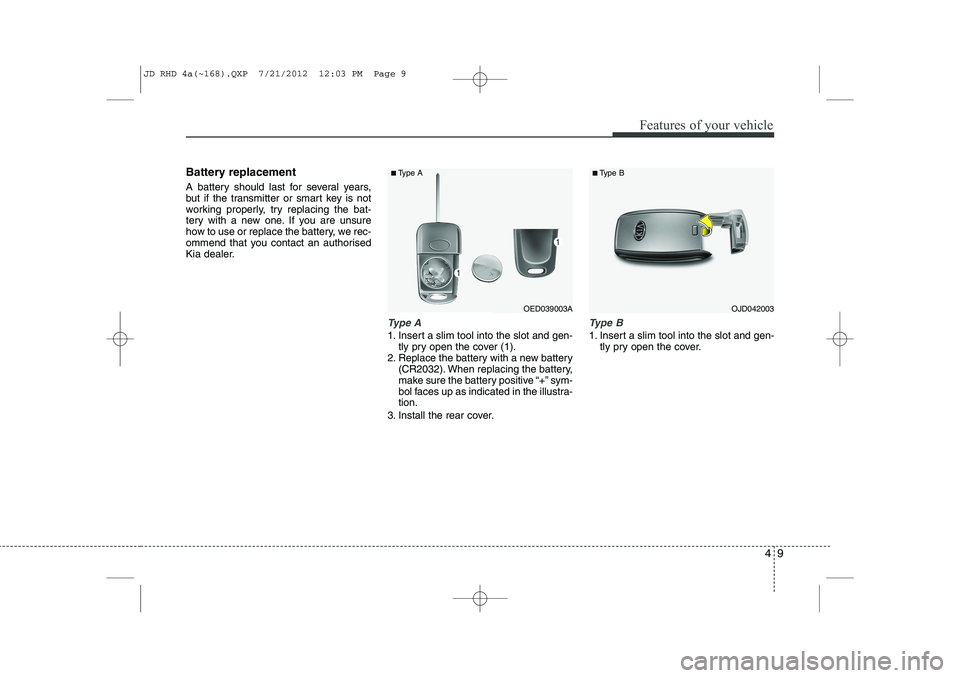
Type A
1. Insert a slim tool into the slot and gen-tly pry open the cover (1).
2. Replace the battery with a new battery (CR2032). When replacing the battery,
make sure the battery positive “+” sym-
bol faces up as indicated in the illustra-tion.
3. Install the rear cover.
Type B
1. Insert a slim tool into the slot and gen- tly pry open the cover.
OJD042003OED039003A
■
Type A ■Type B
JD RHD 4a(~168).QXP 7/21/2012 12:03 PM Page 9