Page 337 of 1168

Features of your vehicle
258
4
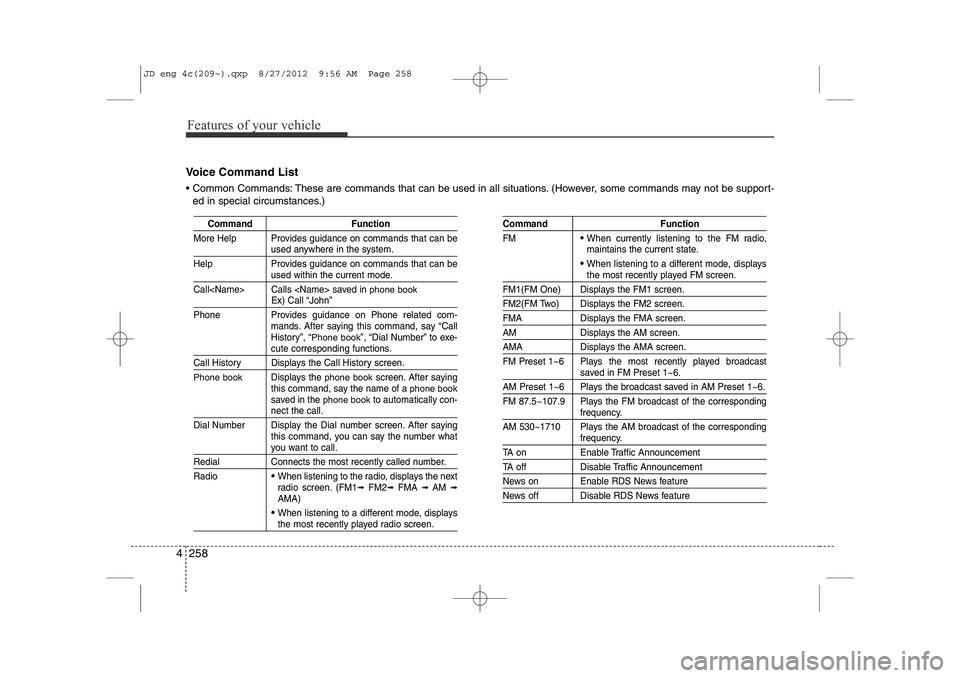
Command Function
More Help Provides guidance on commands that can be
used anywhere in the system.
Help Provides guidance on commands that can be
used within the current mode.
Call Calls saved in
phone bookEx) Call “John”
Phone Provides guidance on Phone related com- mands. After saying this command, say “Call
History”, “
Phone book”, “Dial Number” to exe-cute corresponding functions.
Call History Displays the Call History screen.
Phone bookDisplays the phone bookscreen. After saying
this command, say the name of a phone booksaved in the phone bookto automatically con-nect the call.
Dial Number Display the Dial number screen. After saying this command, you can say the number what
you want to call.
Redial Connects the most recently called number. Radio
When listening to the radio, displays the next
radio screen. (FM1 ➟FM2 ➟FMA ➟ AM ➟
AMA)
When listening to a different mode, displaysthe most recently played radio screen.
Command Function FM
When currently listening to the FM radio,
maintains the current state.
When listening to a different mode, displaysthe most recently played FM screen.
FM1(FM One) Displays the FM1 screen.
FM2(FM Two) Displays the FM2 screen.
FMA Displays the FMA screen.
AM Displays the AM screen.
AMA Displays the AMA screen.
FM Preset 1~6 Plays the most recently played broadcast
saved in FM Preset 1~6.
AM Preset 1~6 Plays the broadcast saved in AM Preset 1~6.
FM 87.5~107.9 Plays the FM broadcast of the corresponding
frequency.
AM 530~1710 Plays the AM broadcast of the corresponding
frequency.
TA on Enable Traffic Announcement
TA off Disable Traffic Announcement
News on Enable RDS News feature
News off Disable RDS News feature
Voice Command List
Common Commands: These are commands that can be used in all situations. (However, some commands may not be support- ed in special circumstances.)
JD eng 4c(209~).qxp 8/27/2012 9:56 AM Page 258
Page 339 of 1168

Features of your vehicle
260
4
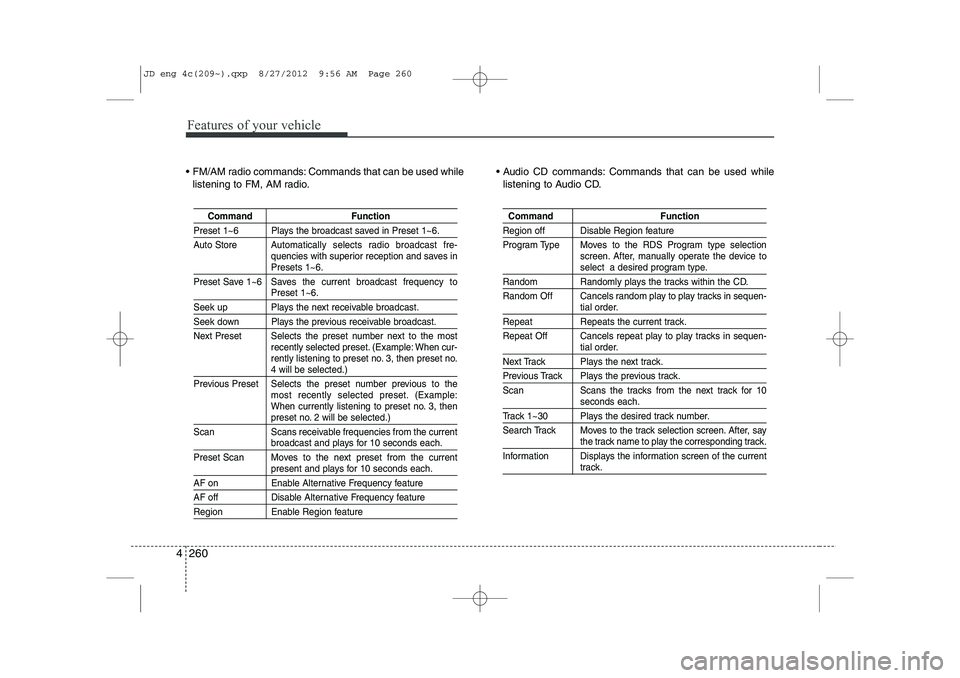
FM/AM radio commands: Commands that can be used while
listening to FM, AM radio. Audio CD commands: Commands that can be used while
listening to Audio CD.
Command Function
Preset 1~6 Plays the broadcast saved in Preset 1~6.
Auto Store A utomatically selects radio broadcast fre-
quencies with superior reception and saves in
Presets 1~6.
Preset Save 1~6 Saves the current broadcast frequency to
Preset 1~6.
Seek up Plays the next receivable broadcast.
Seek down Plays the previous receivable broadcast.
Next Preset Selects the preset number next to the most recently selected preset. (Example: When cur-
rently listening to preset no. 3, then preset no.
4 will be selected.)
Previous Preset Selects the preset number previous to the most recently selected preset. (Example:
When currently listening to preset no. 3, then
preset no. 2 will be selected.)
Scan Scans receivable frequencies from the current
broadcast and plays for 10 seconds each.
Preset Scan Moves to the next preset from the current
present and plays for 10 seconds each.
AF on Enable Alternative Frequency feature
AF off Disable Alternative Frequency feature
Region Enable Region feature
Command Function
Region off Disable Region feature
Program Type Moves to the RDS Program type selection screen. After, manually operate the device to
select a desired program type.
Random Randomly plays the tracks within the CD.
Random Off Cancels random play to play tracks in sequen-
tial order.
Repeat Repeats the current track.
Repeat Off Cancels repeat play to play tracks in sequen-
tial order.
Next Track Plays the next track.
Previous Track Plays the previous track.
Scan Scans the tracks from the next track for 10
seconds each.
Track 1~30 Plays the desired track number.
Search Track Moves to the track selection screen. After, say
the track name to play the corresponding track.
Information Displays the information screen of the current
track.
JD eng 4c(209~).qxp 8/27/2012 9:56 AM Page 260
Page 395 of 1168

Driving your vehicle
54
5
To cancel cruise control, do one
of the following:
Depress the brake pedal.
Depress the clutch pedal if equipped
with a manual transaxle.
Shift into N (Neutral) if equipped with an automatic transaxle.
Press the O (Cancel) button located on the steering wheel.
Decrease the vehicle speed lower than the memory speed by 20 km/h (12 mph).
Decrease the vehicle speed to less than approximately 30 km/h (20 mph).
Each of these actions will cancel cruise
control operation (the cruise setindicator
light will go off), but it will not turn the system off. If you wish to resume cruise
control operation, move up the lever (toRES+) located on your steering wheel. You will return to your previously presetspeed.
To resume cruising speed at
more than approximately 30 km/h(20 mph):
If any method other than the button
was used to cancel cruising speed and
the system is still activated, the mostrecent set speed will automatically
resume when the +RES switch ispushed.
It will not resume, however, if the vehicle
speed has dropped below approximately30 km/h (20 mph).
OJD052020OJD052019
JD eng 5.qxp 7/17/2012 10:43 AM Page 54
Page 397 of 1168
Driving your vehicle
56
5
You can set the speed limit when you do
not want to drive over a specific speed.
If you drive over the preset speed limit,
the warning system operates (set speed
limit will blink and chime will sound) until
the vehicle speed returns within thespeed limit.
✽✽
NOTICE
While speed limit control is in opera-
tion, the cruise control system cannot beactivated.
Speed limit control switch
O: Cancels set speed limit.
: Turns speed limit control system onor off.
RES+: Resumes or increases speed limit control speed.
SET-: Sets or decreases speed limit con- trol speed. To set speed limit :
1. Move the lever up ( ) on the steer-
ing wheel, to turn the system on.
SPEED LIMIT CONTROL SYSTEM (IF EQUIPPED)
OJD052021OJD052016
JD eng 5.qxp 7/17/2012 10:43 AM Page 56
Page 399 of 1168
Driving your vehicle
58
5
To drive over the preset speed limit you
must depress hard on the accelerator
pedal (more than approximately 80%)
until the kick down mechanism works
with a clicking noise. Then the set speed
limit will blink and chime will sound until
you return the vehicle speed within thespeed limit.
✽✽
NOTICE
Page 505 of 1168
Maintenance
52
7
Reset items
Items should be reset after the battery
has been discharged or the battery hasbeen disconnected.
Auto up/down window (See section 4)
Sunroof (See section 4)
Trip computer (See section 4)
Climate control system
(See section 4)
Audio (See section 4)(Continued)
Wear eye protection when check- ing the battery during charging.
Disconnect the battery charger in the following order.
1. Turn off the battery charger
main switch.
2. Unhook the negative clamp from the negative battery ter- minal.
3. Unhook the positive clamp from the positive battery termi-nal.
Before performing maintenance or recharging the battery, turn offall accessories and stop the
engine.
The negative battery cable must be removed first and installed
last when the battery is discon-nected.
JD eng 7.QXP 7/17/2012 10:57 AM Page 52
Page 510 of 1168

757
Maintenance
Wheel alignment and tire balance
The wheels on your vehicle were aligned and balanced carefully at the
factory to give you the longest tire life
and best overall performance.
In most cases, you will not need to
have your wheels aligned again.
However, if you notice unusual tire
wear or your vehicle pulling one way
or the other, the alignment may needto be reset.
If you notice your vehicle vibrating
when driving on a smooth road, your
wheels may need to be rebalanced.Tire replacement
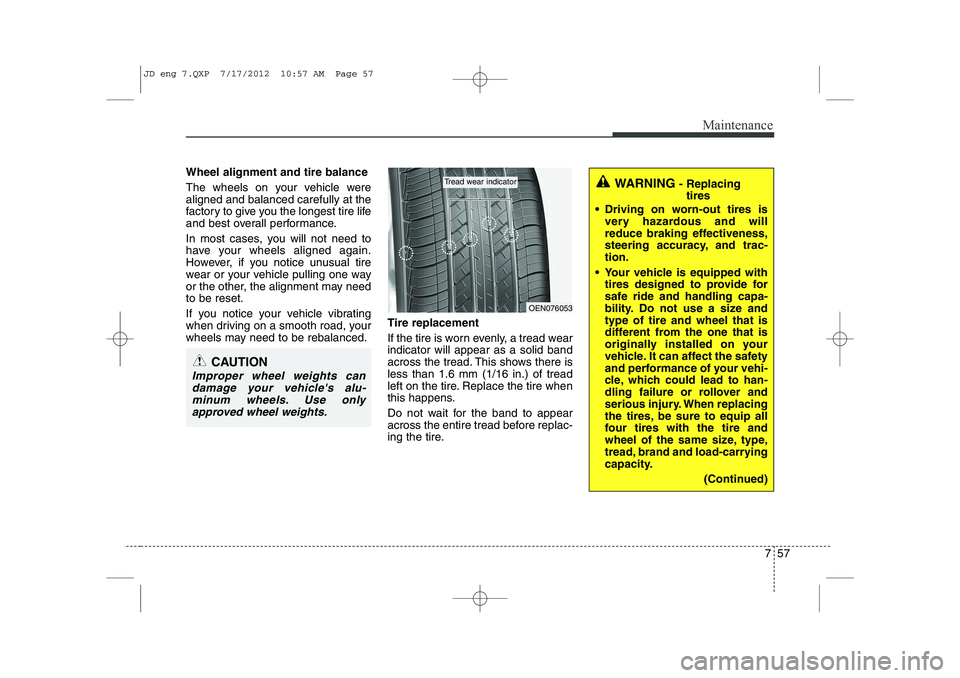
If the tire is worn evenly, a tread wear indicator will appear as a solid band
across the tread. This shows there isless than 1.6 mm (1/16 in.) of tread
left on the tire. Replace the tire when
this happens.
Do not wait for the band to appear
across the entire tread before replac-
ing the tire.
CAUTION
Improper wheel weights can
damage your vehicle's alu-minum wheels. Use only approved wheel weights.
WARNING - Replacing
tires
Driving on worn-out tires is very hazardous and will
reduce braking effectiveness,
steering accuracy, and trac-tion.
Your vehicle is equipped with tires designed to provide for
safe ride and handling capa-
bility. Do not use a size andtype of tire and wheel that is
different from the one that is
originally installed on your
vehicle. It can affect the safety
and performance of your vehi-
cle, which could lead to han-
dling failure or rollover and
serious injury. When replacing
the tires, be sure to equip all
four tires with the tire and
wheel of the same size, type,
tread, brand and load-carrying
capacity.
(Continued)
OEN076053
Tread wear indicator
JD eng 7.QXP 7/17/2012 10:57 AM Page 57
Page 518 of 1168
765
Maintenance
Fuse switch
Always, put the fuse switch at the ON position.
If you move the switch to the OFF posi- tion, some items such as audio and digi-
tal clock must be reset and transmitter
(or smart key) may not work properly.
✽✽NOTICE
If you need to park your vehicle for pro-
longed periods more than 1 month,
move the fuse switch to the OFF position
to prevent the battery being discharged.
Engine compartment panel fuse replacement
1. Turn the ignition switch and all other switches off.
2. Remove the fuse box cover by press- ing the tap and pulling up.
OGD071019
OGD071021
Diesel onlyOJD072017
CAUTION
Always place the fuse switch in
the ON position while driving thevehicle.
Do not move the fuse switch repeatedly. The fuse switch maybe worn out.
JD eng 7.QXP 7/17/2012 10:58 AM Page 65