2013 KIA CEED tow
[x] Cancel search: towPage 1007 of 1168
What to do in an emergency
2
6
ROAD WARNING
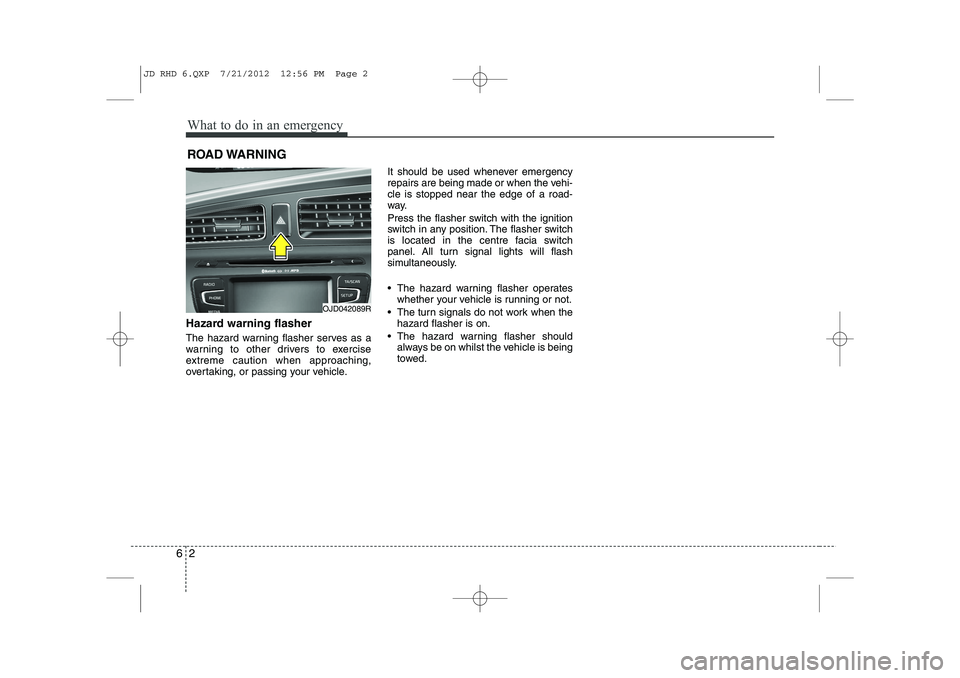
Hazard warning flasher
The hazard warning flasher serves as a
warning to other drivers to exercise
extreme caution when approaching,
overtaking, or passing your vehicle. It should be used whenever emergency
repairs are being made or when the vehi-cle is stopped near the edge of a road-
way.
Press the flasher switch with the ignition
switch in any position. The flasher switch
is located in the centre facia switch
panel. All turn signal lights will flash
simultaneously.
• The hazard warning flasher operates
whether your vehicle is running or not.
The turn signals do not work when the hazard flasher is on.
The hazard warning flasher should always be on whilst the vehicle is being
towed.
OJD042089R
JD RHD 6.QXP 7/21/2012 12:56 PM Page 2
Page 1010 of 1168
65
What to do in an emergency
EMERGENCY STARTING
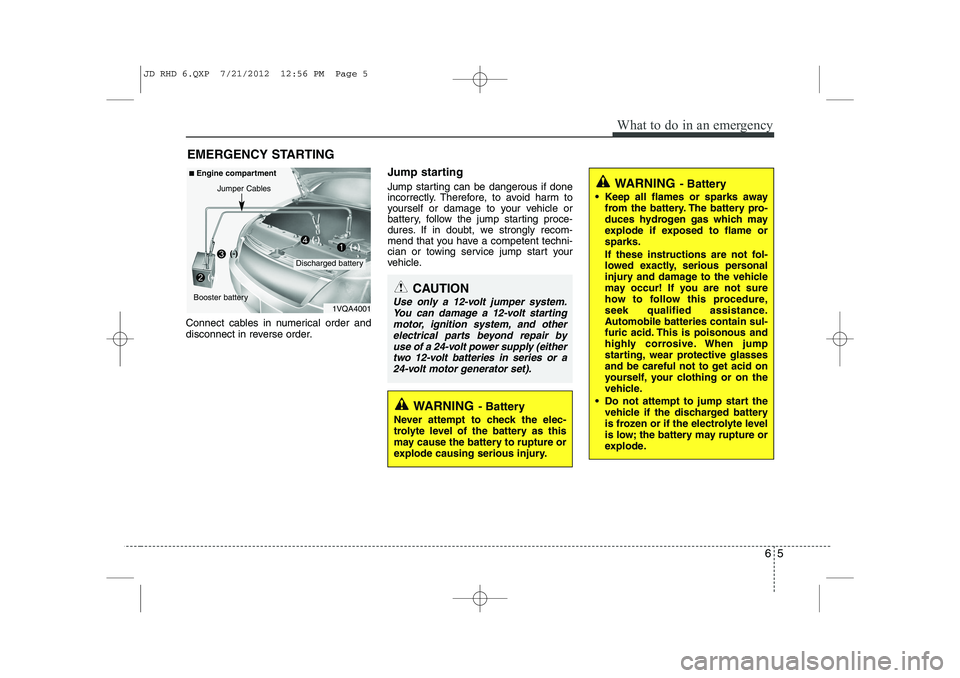
Connect cables in numerical order and
disconnect in reverse order. Jump starting
Jump starting can be dangerous if done
incorrectly. Therefore, to avoid harm to
yourself or damage to your vehicle or
battery, follow the jump starting proce-
dures. If in doubt, we strongly recom-
mend that you have a competent techni-
cian or towing service jump start your
vehicle.
CAUTION
Use only a 12-volt jumper system.
You can damage a 12-volt startingmotor, ignition system, and other electrical parts beyond repair by
use of a 24-volt power supply (either two 12-volt batteries in series or a24-volt motor generator set).
WARNING - Battery
• Keep all flames or sparks away from the battery. The battery pro-
duces hydrogen gas which may
explode if exposed to flame orsparks.
If these instructions are not fol-
lowed exactly, serious personal
injury and damage to the vehicle
may occur! If you are not sure
how to follow this procedure,
seek qualified assistance.
Automobile batteries contain sul-
furic acid. This is poisonous and
highly corrosive. When jump
starting, wear protective glasses
and be careful not to get acid on
yourself, your clothing or on the
vehicle.
Do not attempt to jump start the vehicle if the discharged battery
is frozen or if the electrolyte level
is low; the battery may rupture or
explode.
WARNING - Battery
Never attempt to check the elec-
trolyte level of the battery as this
may cause the battery to rupture or
explode causing serious injury.
1VQA4001
Discharged battery
Jumper Cables
■
Engine compartment
Booster battery(-)
(+)
(+)(-)
JD RHD 6.QXP 7/21/2012 12:56 PM Page 5
Page 1012 of 1168
67
What to do in an emergency
5. Start the engine of the vehicle with thebooster battery and let it run at 2,000
rpm, then start the engine of the vehi-
cle with the discharged battery. If the
first starting attempt is not successful,
wait a few minutes before making
another attempt in order to allow the
discharged battery to recharge.
If the cause of your battery discharging is
not apparent, we recommend that the system be checked by an authorised Kia
dealer.
Push-starting
Your manual transaxle-equipped vehicle
should not be push-started because itmight damage the emission control sys-
tem. Vehicles equipped with automatic
transaxle cannot be push-started. Follow
the directions in this section for jump-
starting.
WARNING
Never tow a vehicle to start it
because the sudden surge forward
when the engine starts could cause
a collision with the tow vehicle.
JD RHD 6.QXP 7/21/2012 12:56 PM Page 7
Page 1014 of 1168
69
What to do in an emergency
IF YOU HAVE A FLAT TYRE (WITH SPARE TYRE, IF EQUIPPED)
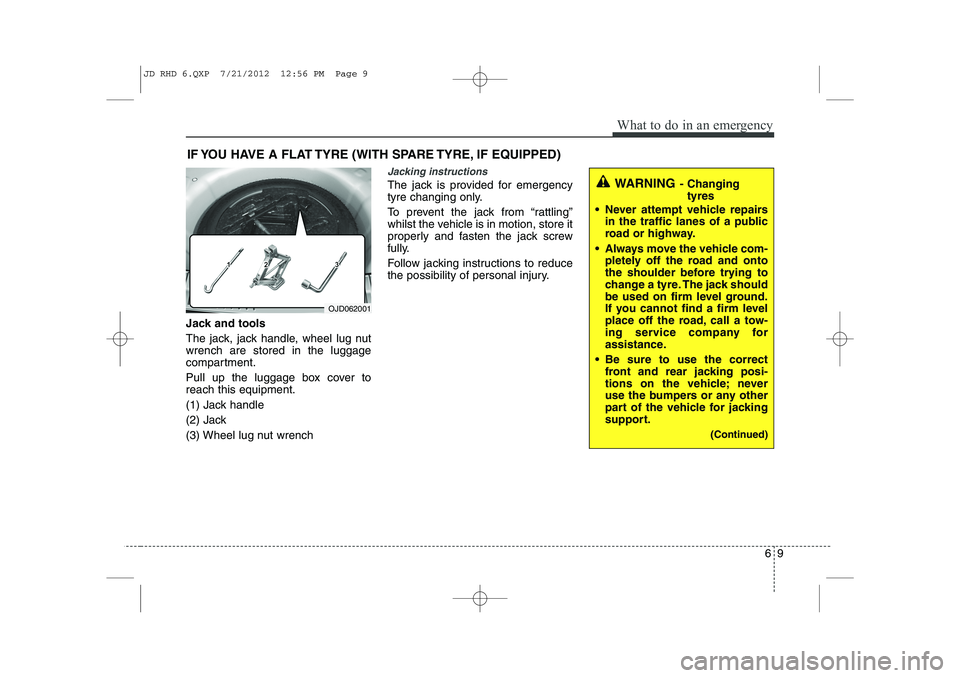
Jack and tools
The jack, jack handle, wheel lug nut wrench are stored in the luggage
compartment.
Pull up the luggage box cover to reach this equipment.
(1) Jack handle
(2) Jack
(3) Wheel lug nut wrench
Jacking instructions
The jack is provided for emergency
tyre changing only.
To prevent the jack from “rattling”
whilst the vehicle is in motion, store it
properly and fasten the jack screw
fully.
Follow jacking instructions to reduce
the possibility of personal injury.
OJD062001
WARNING - Changing
tyres
Never attempt vehicle repairs in the traffic lanes of a public
road or highway.
Always move the vehicle com- pletely off the road and onto
the shoulder before trying to
change a tyre. The jack should
be used on firm level ground.
If you cannot find a firm level
place off the road, call a tow-
ing service company for
assistance.
Be sure to use the correct front and rear jacking posi-
tions on the vehicle; never
use the bumpers or any other
part of the vehicle for jacking
support.
(Continued)
JD RHD 6.QXP 7/21/2012 12:56 PM Page 9
Page 1021 of 1168
What to do in an emergency
16
6
Do not take this vehicle through an
automatic car wash whilst the com- pact spare tyre is installed.
Do not use tyre chains on the com- pact spare tyre. Because of the
smaller size, a tyre chain will not fit
properly. This could damage the
vehicle and result in loss of thechain.
The compact spare tyre should not be installed on the front axle if the
vehicle must be driven in snow or
on ice.
Do not use the compact spare tyre on any other vehicle because thistyre has been designed especially
for your vehicle.
The compact spare tyre’s tread life is shorter than a regular tyre.
Inspect your compact spare tyre
regularly and replace worn com-
pact spare tyres with the same sizeand design, mounted on the samewheel. The compact spare tyre should not
be used on any other wheels, nor
should standard tyres, snow tyres,
wheel covers or trim rings be used
with the compact spare wheel. Ifsuch use is attempted, damage tothese items or other car compo-
nents may occur.
Do not use more than one compact spare tyre at a time.
Do not tow a trailer whilst the com- pact spare tyre is installed.
JD RHD 6.QXP 7/21/2012 12:56 PM Page 16
Page 1025 of 1168
What to do in an emergency
20
6
9) Switch off the compressor. 10) Detach the hoses from the sealant bottle connector and
from the tyre valve.
Return the Tyre Mobility Kit to its
storage location in the vehicle. Distributing the sealant
Immediately drive approximately 3
km (2 miles) to evenly distribute the
sealant in the tyre.
Producing the tyre inflation pres- sure
1) After driving approximately 3 km
(2 miles), stop at a suitable loca- tion.
2) Connect connection hose 9 of the compressor directly to the tyre
valve.
3) Connect between compressor and the vehicle power outlet using
the cable and connectors.
4) Adjust the tyre inflation pressure to 220 kPa (32 psi). With the igni-
tion switched on, proceed as fol-
lows.
- To increase the inflation pres- sure: Switch on the compressor,
position I. To check the current
inflation pressure setting, briefly
switch off the compressor.
WARNING
Carbon monoxide poisoning
and suffocation is possible if the
engine is left running in a poorly
ventilated or unventilated loca-
tion (such as inside a building).
WARNING
Do not let the compressor run for
more than 10 minutes, otherwise
the device will overheat and may
be damaged.
CAUTION
Do not exceed a speed of 80 km/h (50 mph). If possible, donot fall below a speed of 20 km/h (12 mph).
Whilst driving, if you experienceany unusual vibration, ride dis-turbance or noise, reduce yourspeed and drive with caution until you can safely pull off ofthe side of the road.
Call for road side service or tow-ing.
JD RHD 6.QXP 7/21/2012 12:57 PM Page 20
Page 1026 of 1168
621
What to do in an emergency
- To reduce the inflation pres-sure: Press the button 8 on the
compressor. Notes on the safe use of the Tyre Mobility Kit
Park your car at the side of the
road so that you can work with the
Tyre Mobility Kit away from moving
traffic. Place your warning triangle
in a prominent place to make pass-
ing vehicles aware of your location.
To be sure your vehicle won't move, even when you're on fairly
level ground, always set your park-
ing brake.
Only use the Tyre Mobility Kit for sealing/inflation passenger car
tyres. Do not use on motorcycles,
bicycles or any other type of tyres.
Do not remove any foreign objects- such as nails or screws -that have
penetrated the tyre.
Before using the Tyre Mobility Kit, read the precautionary advice
printed on the sealant bottle!
Provided the car is outdoors, leave the engine running. Otherwise
operating the compressor may
eventually drain the car battery. Never leave the Tyre Mobility Kit
unattended whilst it is being used.
Do not leave the compressor run- ning for more than 10 min. at a time
or it may overheat.
Do not use the Tyre Mobility Kit if the ambient temperature is below -30°C (-22°F).
Do not use the sealing compound after its expiration date which can
be found on the label of the bottle.
Keep away from children.
WARNING
The tyre inflation pressure must
be at least 220 kPa (32 psi). If it
is not, do not continue driving.
Call for road side service or
towing.
CAUTION
If the inflation pressure is not maintained, drive the vehicle asecond time, refer to Distributing the sealant. Thenrepeat steps 1 to 4.
Use of the Tyre Mobility Kit maybe ineffectual for tyre damagelarger than approximately 4 mm (0.16 in). We recommend thatyou contact an authorised Kiadealer if the tyre cannot be made roadworthy with the TyreMobility Kit.
WARNING
Have your tyre repaired as soon
as possible. The tyre may loose
air pressure at any time after
inflating with the TMK.
CAUTION
The Tyre Mobility Kit is a tempo- rary fix to the tyre and we rec-ommend that the tyre beinspected by an authorised Kia dealer as soon as possible.
JD RHD 6.QXP 7/21/2012 12:57 PM Page 21
Page 1031 of 1168
What to do in an emergency
26
6
Changing a tyre with TPMS
If you have a flat tyre, the low Tyre
Pressure and Position telltales will
come on. We recommend that the
system be checked by an authorised
Kia dealer. Each wheel is equipped with a tyre pressure sensor mounted inside the
tyre behind the valve stem. You must
use TPMS specific wheels. It is rec-
ommended that you have your tyres
serviced by an authorised Kia dealer. If you drive the vehicle for about 10
minutes at speeds above 25 km/h
after replaceing the low pressure tyre
with the spare tyre, one of the follow-ing will happen:
The TPMS malfunction indicator
may blink for approximately 1
minute and then remain continuous-
ly illuminated because the TPMSsensor is not mounted on the spare
wheel. (changed tyre equipped with
a sensor not in the vehicle)
The TPMS malfunction indicator will remain continuously illuminated
whilst driving because the TPMSsensor is not mounted on the spare
wheel. (changed tyre equipped with
a sensor in the vehicle)CAUTION
The TPMS malfunction indica-
tor may blink for approximate-ly 1 minute and then remaincontinuously illuminated if thevehicle is moving around elec- tric power supply cables orradios transmitter such as atpolice stations, government and public offices, broadcast-ing stations, military installa-tions, airports, or transmitting towers, etc. This can interferewith normal operation of theTyre Pressure Monitoring System (TPMS).
The TPMS malfunction indica- tor may blink for approximate-ly 1 minute and then remaincontinuously illuminated if snow chains are used or someseparate electronic devicessuch as notebook computer, mobile charger, remote starteror navigation etc., are used inthe vehicle. This can interfere with normal operation of theTyre Pressure MonitoringSystem (TPMS).
CAUTION
We recommend that you use thesealant approved by Kia.
The sealant on the tyre pressuresensor and wheel shall be elem-inated when you replace the tyre with a new one.
JD RHD 6.QXP 7/21/2012 12:57 PM Page 26