Page 930 of 1168
55
Driving your vehicle
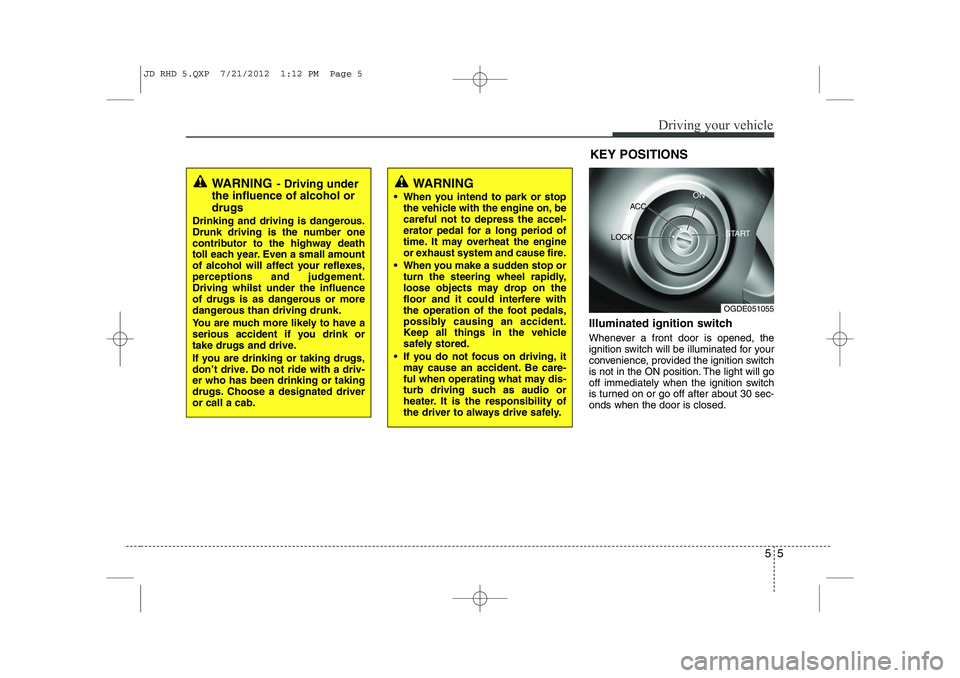
Illuminated ignition switch
Whenever a front door is opened, the
ignition switch will be illuminated for your
convenience, provided the ignition switch
is not in the ON position. The light will go
off immediately when the ignition switch
is turned on or go off after about 30 sec-onds when the door is closed.KEY POSITIONS
WARNING
- Driving under
the influence of alcohol or drugs
Drinking and driving is dangerous.
Drunk driving is the number one
contributor to the highway death
toll each year. Even a small amount
of alcohol will affect your reflexes,
perceptions and judgement.Driving whilst under the influence
of drugs is as dangerous or more
dangerous than driving drunk.
You are much more likely to have a
serious accident if you drink or
take drugs and drive.
If you are drinking or taking drugs,
don’t drive. Do not ride with a driv-er who has been drinking or taking
drugs. Choose a designated driveror call a cab.WARNING
When you intend to park or stop the vehicle with the engine on, be careful not to depress the accel-
erator pedal for a long period of
time. It may overheat the engine
or exhaust system and cause fire.
When you make a sudden stop or turn the steering wheel rapidly,
loose objects may drop on the
floor and it could interfere with
the operation of the foot pedals,
possibly causing an accident.
Keep all things in the vehicle
safely stored.
If you do not focus on driving, it may cause an accident. Be care-
ful when operating what may dis-
turb driving such as audio or
heater. It is the responsibility of
the driver to always drive safely.
OGDE051055
ACC
ON
START
LOCK
JD RHD 5.QXP 7/21/2012 1:12 PM Page 5
Page 934 of 1168
59
Driving your vehicle
ENGINE START/STOP BUTTON (IF EQUIPPED)
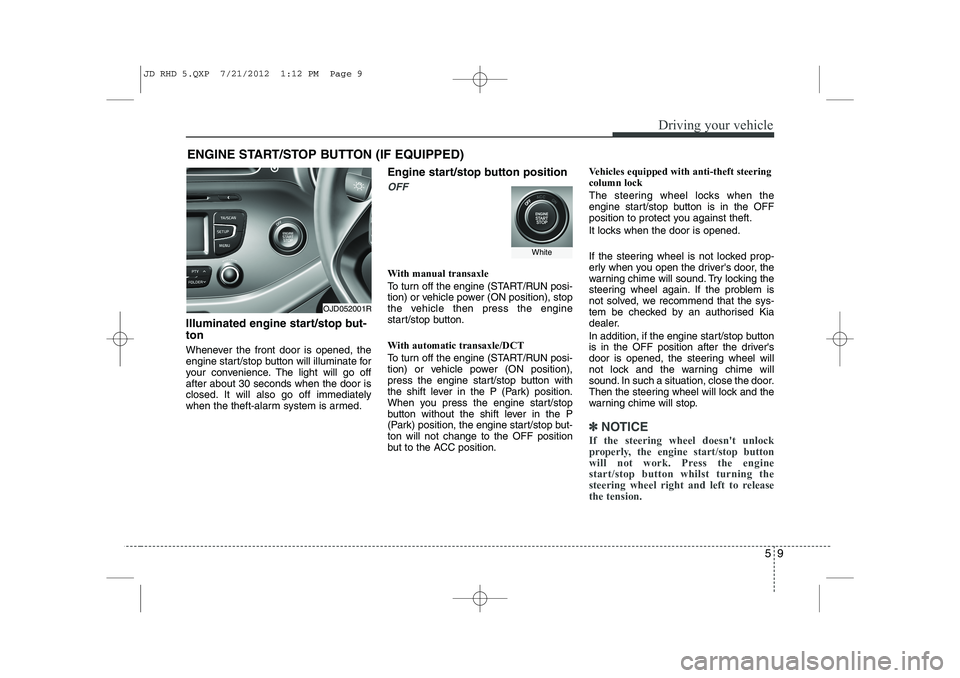
Illuminated engine start/stop but- ton
Whenever the front door is opened, the
engine start/stop button will illuminate for
your convenience. The light will go offafter about 30 seconds when the door is
closed. It will also go off immediately
when the theft-alarm system is armed. Engine start/stop button position
OFF
With manual transaxle
To turn off the engine (START/RUN posi-
tion) or vehicle power (ON position), stop
the vehicle then press the engine
start/stop button.
With automatic transaxle/DCT
To turn off the engine (START/RUN posi-
tion) or vehicle power (ON position),
press the engine start/stop button with
the shift lever in the P (Park) position.
When you press the engine start/stop
button without the shift lever in the P
(Park) position, the engine start/stop but-ton will not change to the OFF position
but to the ACC position.Vehicles equipped with anti-theft steeringcolumn lock
The steering wheel locks when the
engine start/stop button is in the OFF
position to protect you against theft.
It locks when the door is opened.
If the steering wheel is not locked prop-
erly when you open the driver's door, the
warning chime will sound. Try locking the
steering wheel again. If the problem is
not solved, we recommend that the sys-
tem be checked by an authorised Kia
dealer.
In addition, if the engine start/stop button
is in the OFF position after the driver's
door is opened, the steering wheel will
not lock and the warning chime will
sound. In such a situation, close the door.
Then the steering wheel will lock and the
warning chime will stop.
✽✽
NOTICE
If the steering wheel doesn't unlock
properly, the engine start/stop button
will not work. Press the enginestart/stop button whilst turning the
steering wheel right and left to releasethe tension.
OJD052001R
White
JD RHD 5.QXP 7/21/2012 1:12 PM Page 9
Page 1034 of 1168
629
What to do in an emergency
When towing your vehicle in an emer- gency without wheel dollies :
1. Set the ignition switch in the ACC posi-tion.
2. Place the transaxle shift lever in N (Neutral).
3. Release the parking brake.
Removable towing hook (if equipped)
1. Open the tailgate/boot, and removethe towing hook from the tool case.
2. Remove the hole cover pressing the lower part of the cover on the front
bumper.
3. Install the towing hook by turning it clockwise into the hole until it is fullysecured.
4. Remove the towing hook and install the cover after use.
Emergency towing
CAUTION
Failure to place the transaxle shiftlever in N (Neutral) may cause inter-
nal damage to the transaxle.
OJD062008
■ Rear (5door)
OJD062012
■Rear (wagon)
■ Front
OJD062009
OJD062010
JD RHD 6.QXP 7/21/2012 12:57 PM Page 29
Page 1045 of 1168
Maintenance
8
7
At least monthly:
Check coolant level in the engine
coolant reservoir.
Check the operation of all exterior lights, including the stoplights, turn sig-
nals and hazard warning flashers.
Check the inflation pressures of all tyres including the spare.
At least twice a year
(i.e., every Spring and Fall) :
Check radiator, heater and air condi- tioning hoses for leaks or damage.
Check windscreen washer spray and wiper operation. Clean wiper blades
with clean cloth dampened with wash-er fluid.
Check headlight alignment.
Check muffler, exhaust pipes, shields and clamps.
Check the lap/shoulder belts for wear and function.
Check for worn tyres and loose wheel lug nuts.
At least once a year :
Clean body and door drain holes.
Lubricate door hinges and checks, andbonnet hinges.
Lubricate door and bonnet locks and latches.
Lubricate door rubber weatherstrips.
Check the air conditioning system.
Inspect and lubricate automatic transaxle linkage and controls.
Clean battery and terminals.
Check the brake (and clutch) fluid level.
JD RHD 7.QXP 7/21/2012 12:46 PM Page 8
Page 1105 of 1168
Maintenance
68
7
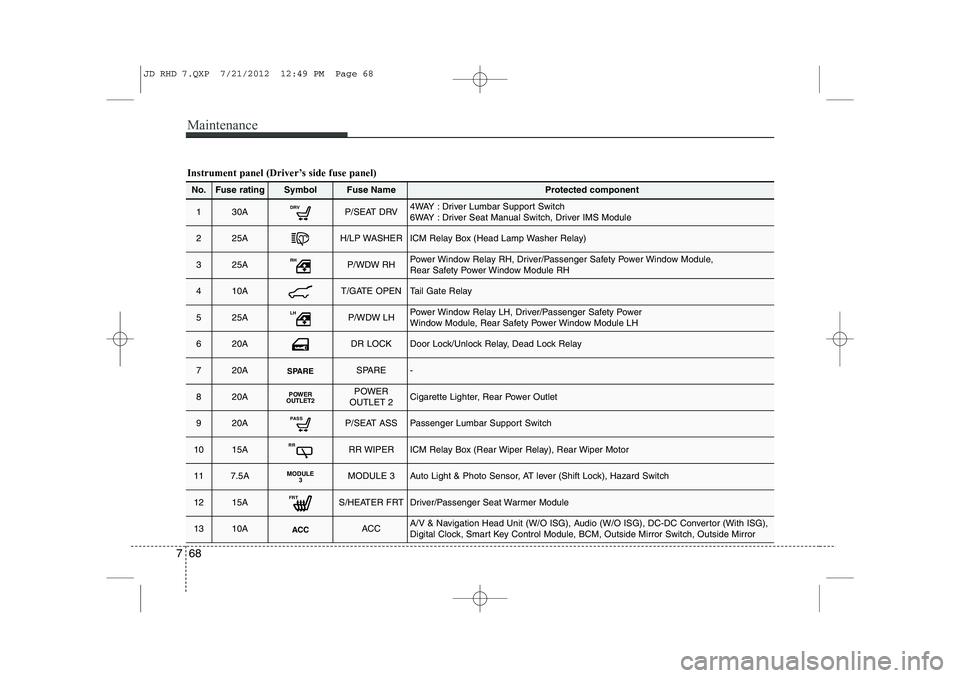
Instrument panel (Driver’s side fuse panel)
No.Fuse ratingSymbolFuse NameProtected component
130ADRVP/SEAT DRV4WAY : Driver Lumbar Support Switch
6WAY : Driver Seat Manual Switch, Driver IMS Module
225AH/LP WASHERICM Relay Box (Head Lamp Washer Relay)
325ARHP/WDW RHPower Window Relay RH, Driver/Passenger Safety Power Window Module,
Rear Safety Power Window Module RH
410AT/GATE OPENTail Gate Relay
525ALHP/WDW LHPower Window Relay LH, Driver/Passenger Safety Power
Window Module, Rear Safety Power Window Module LH
620ADR LOCKDoor Lock/Unlock Relay, Dead Lock Relay
720ASPARESPARE-
820APOWER
OUTLET2POWER
OUTLET 2Cigarette Lighter, Rear Power Outlet
920APASSP/SEAT ASSPassenger Lumbar Support Switch
1015ARRRR WIPERICM Relay Box (Rear Wiper Relay), Rear Wiper Motor
117.5AMODULE 3MODULE 3Auto Light & Photo Sensor, AT lever (Shift Lock), Hazard Switch
1215AFRTS/HEATER FRTDriver/Passenger Seat Warmer Module
1310AACCACCA/V & Navigation Head Unit (W/O ISG), Audio (W/O ISG), DC-DC Convertor (With ISG),
Digital Clock, Smart Key Control Module, BCM, Outside Mirror Switch, Outside Mirror
JD RHD 7.QXP 7/21/2012 12:49 PM Page 68
Page 1107 of 1168
Maintenance
70
7
No.Fuse ratingSymbolFuse NameProtected component
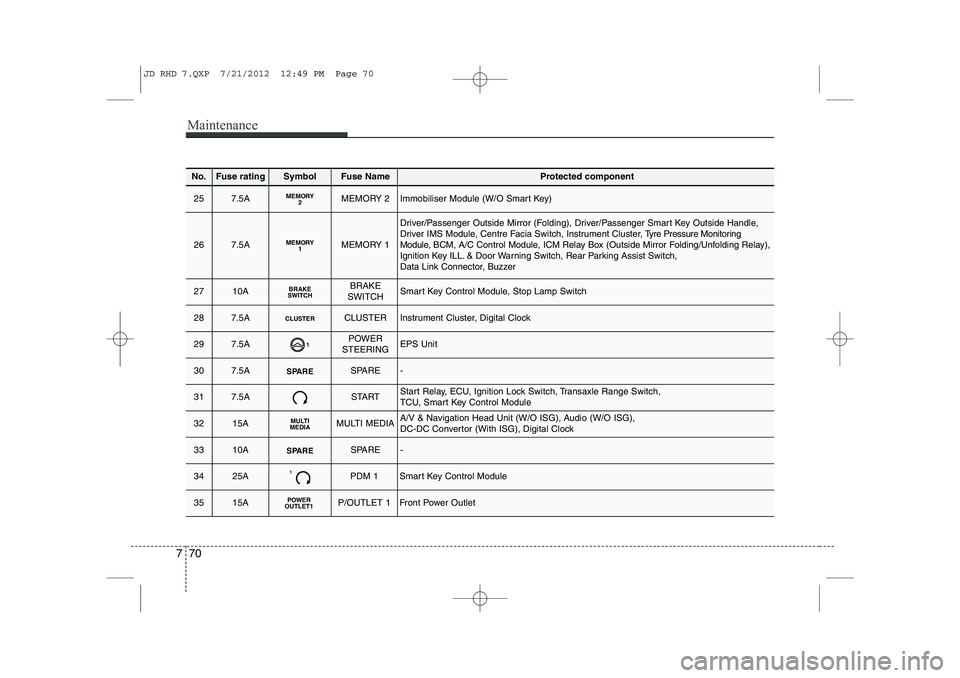
257.5AMEMORY2MEMORY 2Immobiliser Module (W/O Smart Key)
267.5AMEMORY1MEMORY 1
Driver/Passenger Outside Mirror (Folding), Driver/Passenger Smart Key Outside Handle, Driver IMS Module, Centre Facia Switch, Instrument Cluster, T yre Pressure Monitoring
Module, BCM, A/C Control Module, ICM Relay Box (Outside Mirror Folding/Unfolding Relay),
Ignition Key ILL. & Door Warning Switch, Rear Parking Assist Switch,
Data Link Connector, Buzzer
2710ABRAKE
SWITCHBRAKE
SWITCHSmart Key Control Module, Stop Lamp Switch
287.5ACLUSTERCLUSTERInstrument Cluster, Digital Clock
297.5A1POWER
STEERINGEPS Unit
307.5ASPARESPARE-
317.5ASTARTStart Relay, ECU, Ignition Lock Switch, Transaxle Range Switch,
TCU, Smart Key Control Module
3215AMULTI
MEDIAMULTI MEDIAA/V & Navigation Head Unit (W/O ISG), Audio (W/O ISG),
DC-DC Convertor (With ISG), Digital Clock
3310ASPARESPARE-
3425A1PDM 1Smart Key Control Module
3515APOWER
OUTLET1P/OUTLET 1Front Power Outlet
JD RHD 7.QXP 7/21/2012 12:49 PM Page 70
Page 1131 of 1168
Maintenance
94
7
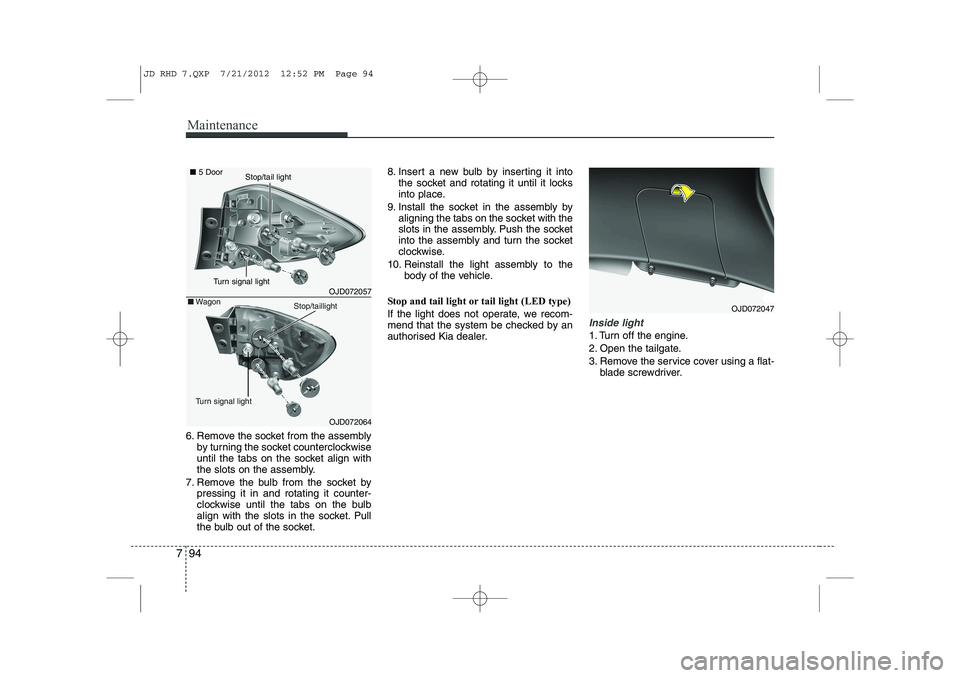
6. Remove the socket from the assembly
by turning the socket counterclockwise
until the tabs on the socket align with
the slots on the assembly.
7. Remove the bulb from the socket by pressing it in and rotating it counter-
clockwise until the tabs on the bulb
align with the slots in the socket. Pull
the bulb out of the socket. 8. Insert a new bulb by inserting it into
the socket and rotating it until it locks
into place.
9. Install the socket in the assembly by aligning the tabs on the socket with the
slots in the assembly. Push the socket
into the assembly and turn the socket
clockwise.
10. Reinstall the light assembly to the body of the vehicle.
Stop and tail light or tail light (LED type)
If the light does not operate, we recom-
mend that the system be checked by an
authorised Kia dealer.
Inside light
1. Turn off the engine.
2. Open the tailgate.
3. Remove the service cover using a flat- blade screwdriver.
OJD072047
OJD072057
OJD072064
■5 Door
■Wagon
Turn signal light
Stop/taillight
Turn signal light
Stop/tail light
JD RHD 7.QXP 7/21/2012 12:52 PM Page 94
Page 1132 of 1168
795
Maintenance
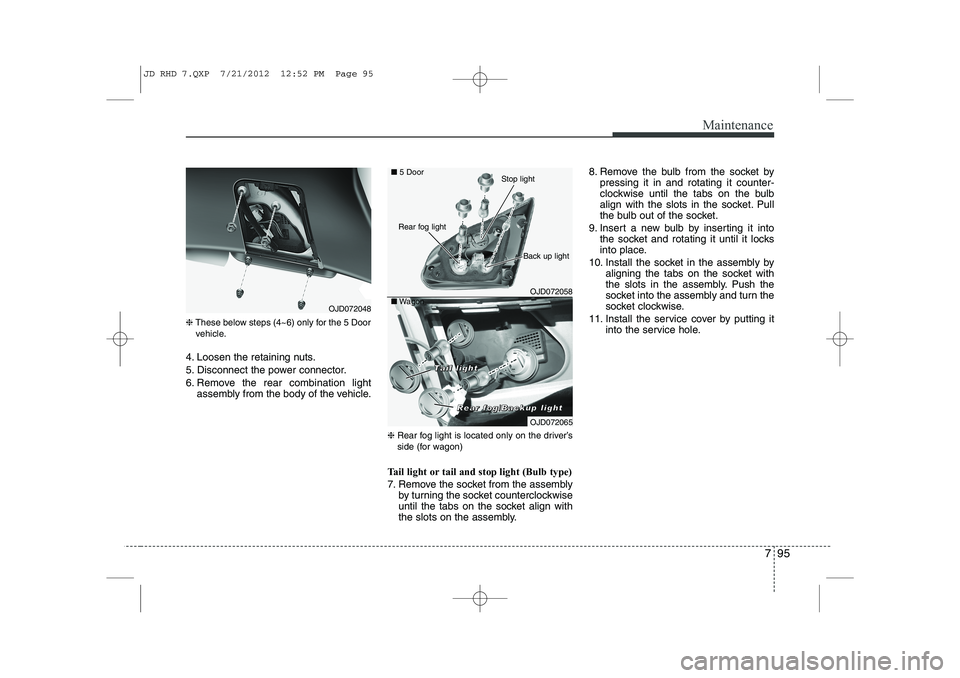
❈These below steps (4~6) only for the 5 Door
vehicle.
4. Loosen the retaining nuts.
5. Disconnect the power connector.
6. Remove the rear combination light assembly from the body of the vehicle.
❈Rear fog light is located only on the driver’s
side (for wagon)
Tail light or tail and stop light (Bulb type)
7. Remove the socket from the assembly by turning the socket counterclockwise
until the tabs on the socket align with
the slots on the assembly. 8. Remove the bulb from the socket by
pressing it in and rotating it counter-
clockwise until the tabs on the bulb
align with the slots in the socket. Pull
the bulb out of the socket.
9. Insert a new bulb by inserting it into the socket and rotating it until it locks
into place.
10. Install the socket in the assembly by aligning the tabs on the socket with
the slots in the assembly. Push the
socket into the assembly and turn the
socket clockwise.
11. Install the service cover by putting it into the service hole.
OJD072048
OJD072058
■5 Door
■ Wagon
Rear fog light
Back up light
Stop light
OJD072065
RRRReeeeaaaarrrr ffffoooogggg////BBBBaaaacccckkkkuuuupppp lllliiiigggghhhhtttt
TTTTaaaaiiiillll lllliiiigggghhhhtttt
JD RHD 7.QXP 7/21/2012 12:52 PM Page 95