2013 JEEP WRANGLER stop
[x] Cancel search: stopPage 2 of 132

WARNING!
Driving after drinking can lead to a collision. Your perceptions are
less sharp, your reflexes are slower, and your judgment is impaired
when you have been drinking. Never drink and then drive.
Important:
This User Guide is intended to familiarize you with the important features
of your vehicle. The DVD enclosed contains your Owner’s Manual,
Navigation/Uconnect
® Manuals, Warranty Booklets, Tire Warranty
and Roadside Assistance (new vehicles purchased in the U.S.) or
Roadside Assistance (new vehicles purchased in Canada) in electronic
format. We hope you find it useful. Replacement DVD kits may be
purchased by visiting www.techauthority.com. Jeep
® is a registered
trademark of Chrysler Group LLC. Copyright 2013 Chrysler Group LLC.
If you are the first registered retail owner of
your vehicle, you may obtain a complimentary
printed copy of the Owner’s Manual, Navigation/
Uconnect
® Manuals or Warranty Booklet by calling
1-877-426-5337 (U.S.) or 1-800-387-1143 (Canada)
or by contacting your dealer.
The driver’s primary responsibility
is the safe operation of the
vehicle. Driving while distracted
can result in loss of vehicle
control, resulting in a collision and
personal injury. Chrysler Group
LLC strongly recommends that
the driver use extreme caution
when using any device or feature
that may take their attention off
the road. Use of any electrical
devices such as cell phones,
computers, portable radios,
vehicle navigation or other
devices by the driver while the vehicle is moving is dangerous
and could lead to a serious
collision. Texting while driving is
also dangerous and should never
be done while the vehicle is
moving. If you find yourself
unable to devote your full
attention to vehicle operation,
pull off the road to a safe location
and stop your vehicle. Some
States or Provinces prohibit the
use of cellular telephones or
texting while driving. It is always
the driver’s responsibility to
comply with all local laws.
Driving and Alcohol:
Drunken driving is one of the most frequent causes of collisions. Your
driving ability can be seriously impaired with blood alcohol levels far below
the legal minimum. If you are drinking, don’t drive. Ride with a designated
non-drinking driver, call a cab, a friend, or use public transportation.
This guide has been prepared to help you get quickly
acquainted with your new Jeep and to provide a convenient
reference source for common questions. However, it is not a
substitute for your Owner’s Manual.
For complete operational instructions, maintenance
procedures and important safety messages, please consult
your Owner’s Manual, Navigation/Uconnect
® Manuals and
other Warning Labels in your vehicle.
Not all features shown in this guide may apply to your vehicle.
For additional information on accessories to help personalize
your vehicle, visit www.mopar.com or your local Jeep dealer.
1355929_13d_Wrangler_UG_020513.indd 22/5/13 10:01 AM
Page 13 of 132

WARNING!
• Do not start or run an engine in a closed garage or confined area. Exhaust gascontains Carbon Monoxide (CO) which is odorless and colorless. Carbon
Monoxide is poisonous and can cause you or others to be severely injured or
killed when inhaled.
• Keep Key Fob transmitters away from children. Operation of the Remote Start
System, windows, door locks or other controls could cause you and others to be
severely injured or killed.
THEFT ALARM
To Arm:
•Press the Key Fob LOCK button or the power door lock switch while the door is open.
To Disarm:
•Press the Key Fob UNLOCK button or turn the ignition to the ON/RUN position.
SEAT BELT
• Be sure everyone in your vehicle is in a seat and using a seat belt properly.
• Position the lap belt across your thighs, below your abdomen. To remove slack in
the lap portion, pull up a bit on the shoulder belt. To loosen the lap belt if it is too
tight, tilt the latch plate and pull on the lap belt. A snug belt reduces the risk of
sliding under the belt in a collision.
• Position the shoulder belt on your chest so that it is comfortable and not resting on your neck. The retractor will withdraw any slack in the belt.
• A shoulder belt placed behind you will not protect you from injury during a collision. You are more likely to hit your head in a collision if you do not wear your
shoulder belt. The lap and shoulder belt are meant to be used together.
•
A belt that is too loose will not protect you properly. In a sudden stop you could move
too far forward, increasing the possibility of injury. Wear your seat belt snugly.
• A frayed or torn belt could rip apart in a collision and leave you with no protection. Inspect the belt system periodically, checking for cuts, frays, or loose parts.
Damaged parts must be replaced immediately. Do not disassemble or modify the
system. Seat belt assemblies must be replaced after a collision if they have been
damaged (bent retractor, torn webbing, etc.).
• The seat belts for both front seating positions are equipped with pretensioning devices that are designed to remove slack from the seat belt in the event of a
collision.
• A deployed pretensioner or a deployed air bag must be replaced immediately.
GETTING STARTED
11
Page 43 of 132
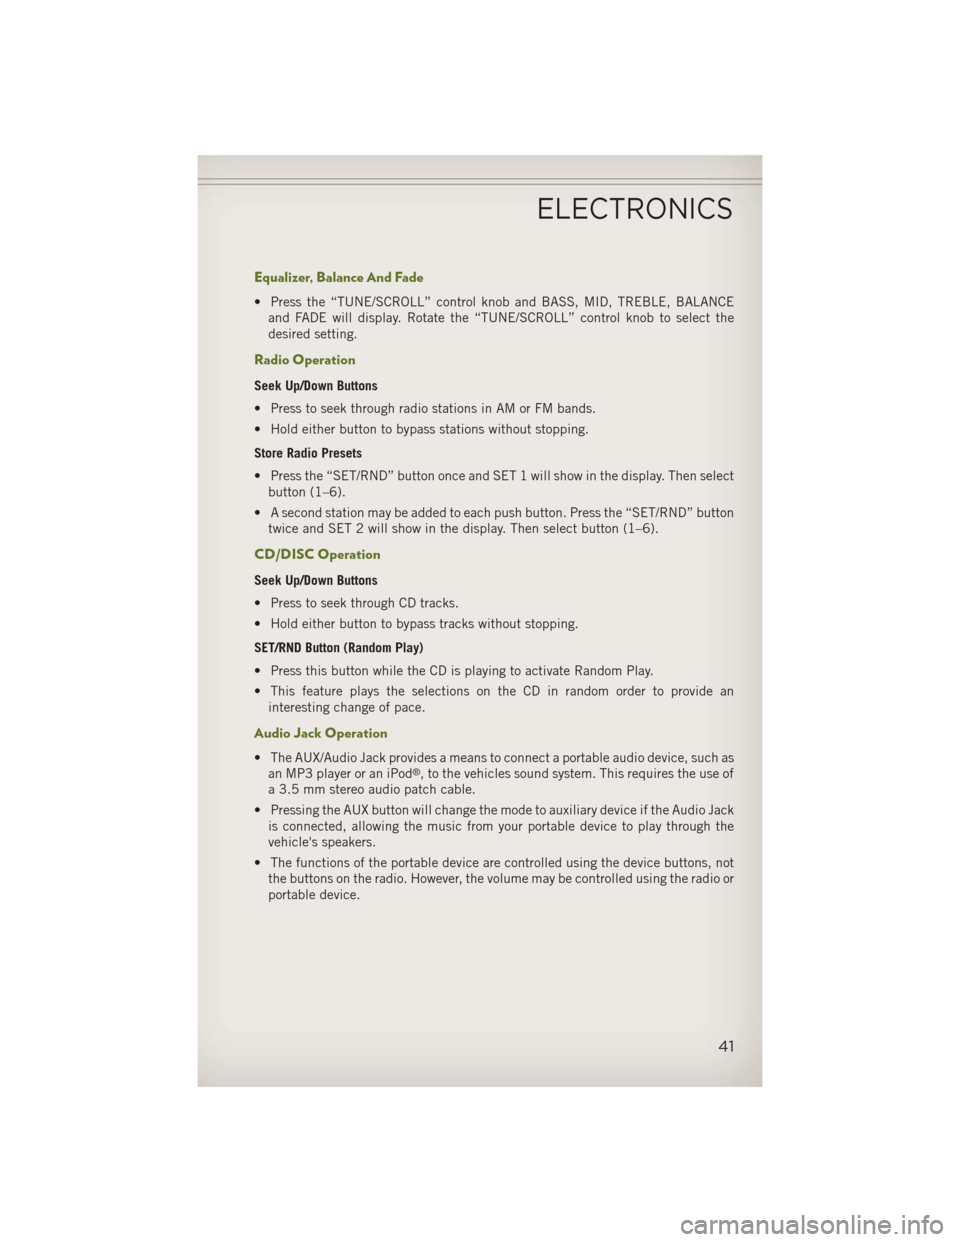
Equalizer, Balance And Fade
• Press the “TUNE/SCROLL” control knob and BASS, MID, TREBLE, BALANCEand FADE will display. Rotate the “TUNE/SCROLL” control knob to select the
desired setting.
Radio Operation
Seek Up/Down Buttons
• Press to seek through radio stations in AM or FM bands.
• Hold either button to bypass stations without stopping.
Store Radio Presets
• Press the “SET/RND” button once and SET 1 will show in the display. Then selectbutton (1–6).
• A second station may be added to each push button. Press the “SET/RND” button twice and SET 2 will show in the display. Then select button (1–6).
CD/DISC Operation
Seek Up/Down Buttons
• Press to seek through CD tracks.
• Hold either button to bypass tracks without stopping.
SET/RND Button (Random Play)
• Press this button while the CD is playing to activate Random Play.
• This feature plays the selections on the CD in random order to provide aninteresting change of pace.
Audio Jack Operation
• The AUX/Audio Jack provides a means to connect a portable audio device, such asan MP3 player or an iPod®, to the vehicles sound system. This requires the use of
a 3.5 mm stereo audio patch cable.
• Pressing the AUX button will change the mode to auxiliary device if the Audio Jack is connected, allowing the music from your portable device to play through the
vehicle's speakers.
• The functions of the portable device are controlled using the device buttons, not the buttons on the radio. However, the volume may be controlled using the radio or
portable device.
ELECTRONICS
41
Page 45 of 132
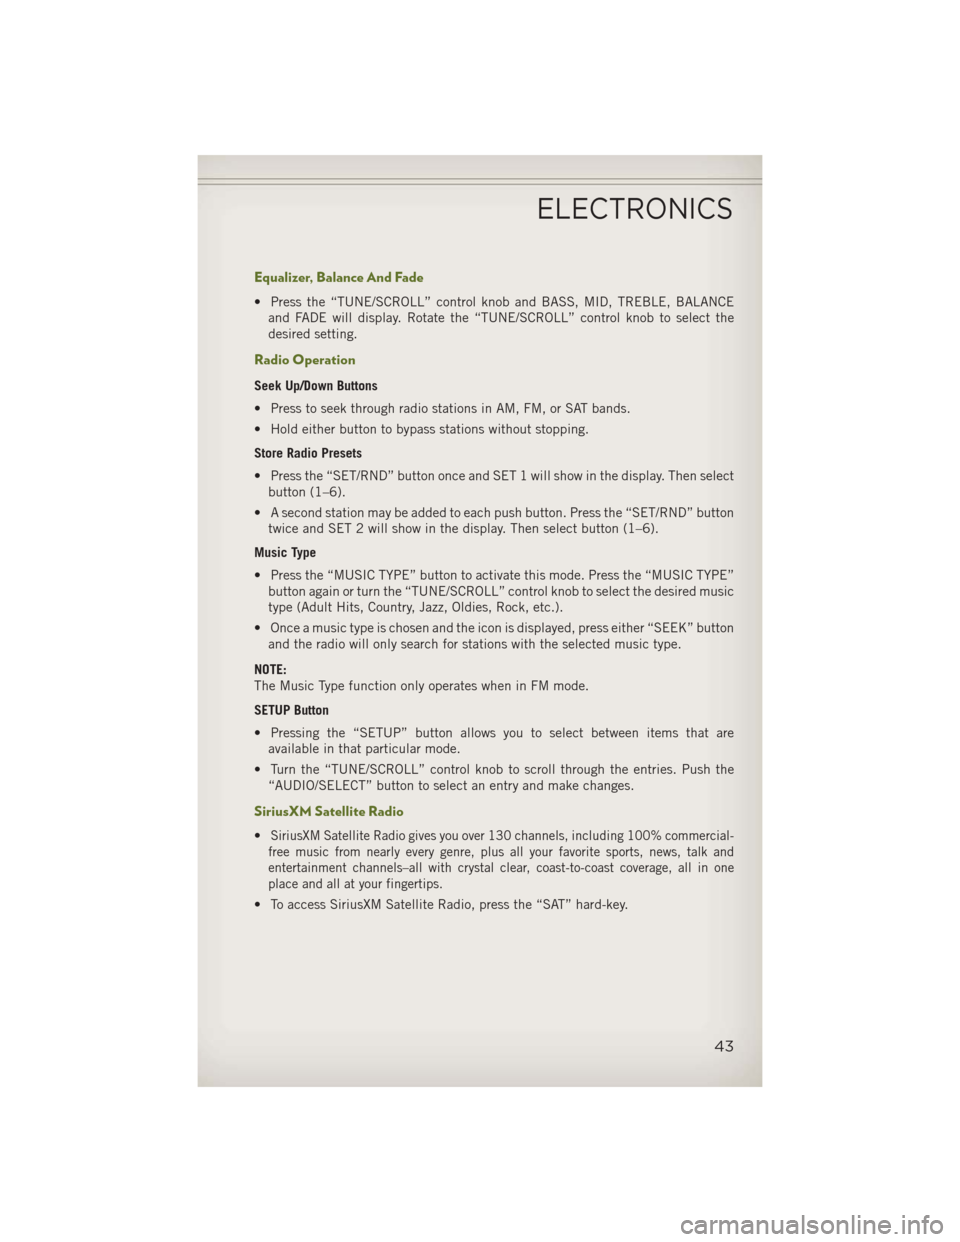
Equalizer, Balance And Fade
• Press the “TUNE/SCROLL” control knob and BASS, MID, TREBLE, BALANCEand FADE will display. Rotate the “TUNE/SCROLL” control knob to select the
desired setting.
Radio Operation
Seek Up/Down Buttons
• Press to seek through radio stations in AM, FM, or SAT bands.
• Hold either button to bypass stations without stopping.
Store Radio Presets
• Press the “SET/RND” button once and SET 1 will show in the display. Then selectbutton (1–6).
• A second station may be added to each push button. Press the “SET/RND” button twice and SET 2 will show in the display. Then select button (1–6).
Music Type
• Press the “MUSIC TYPE” button to activate this mode. Press the “MUSIC TYPE” button again or turn the “TUNE/SCROLL” control knob to select the desired music
type (Adult Hits, Country, Jazz, Oldies, Rock, etc.).
• Once a music type is chosen and the icon is displayed, press either “SEEK” button and the radio will only search for stations with the selected music type.
NOTE:
The Music Type function only operates when in FM mode.
SETUP Button
• Pressing the “SETUP” button allows you to select between items that are available in that particular mode.
• Turn the “TUNE/SCROLL” control knob to scroll through the entries. Push the “AUDIO/SELECT” button to select an entry and make changes.
SiriusXM Satellite Radio
•SiriusXM Satellite Radio gives you over 130 channels, including 100% commercial-
free music from nearly every genre, plus all your favorite sports, news, talk and
entertainment channels–all with crystal clear, coast-to-coast coverage, all in one
place and all at your fingertips.
• To access SiriusXM Satellite Radio, press the “SAT” hard-key.
ELECTRONICS
43
Page 46 of 132
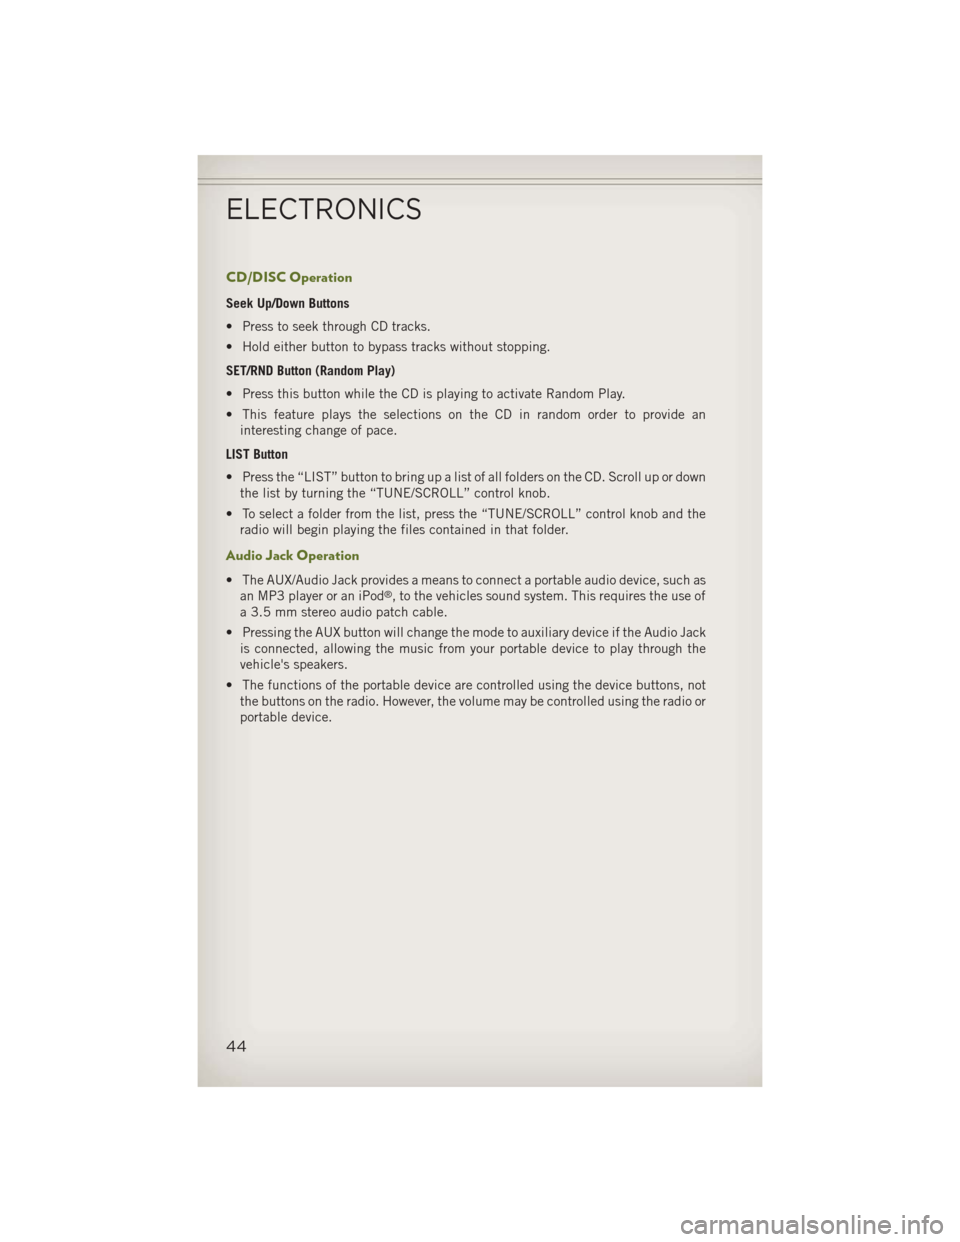
CD/DISC Operation
Seek Up/Down Buttons
• Press to seek through CD tracks.
• Hold either button to bypass tracks without stopping.
SET/RND Button (Random Play)
• Press this button while the CD is playing to activate Random Play.
• This feature plays the selections on the CD in random order to provide aninteresting change of pace.
LIST Button
• Press the “LIST” button to bring up a list of all folders on the CD. Scroll up or down the list by turning the “TUNE/SCROLL” control knob.
• To select a folder from the list, press the “TUNE/SCROLL” control knob and the radio will begin playing the files contained in that folder.
Audio Jack Operation
• The AUX/Audio Jack provides a means to connect a portable audio device, such asan MP3 player or an iPod®, to the vehicles sound system. This requires the use of
a 3.5 mm stereo audio patch cable.
• Pressing the AUX button will change the mode to auxiliary device if the Audio Jack is connected, allowing the music from your portable device to play through the
vehicle's speakers.
• The functions of the portable device are controlled using the device buttons, not the buttons on the radio. However, the volume may be controlled using the radio or
portable device.
ELECTRONICS
44
Page 48 of 132
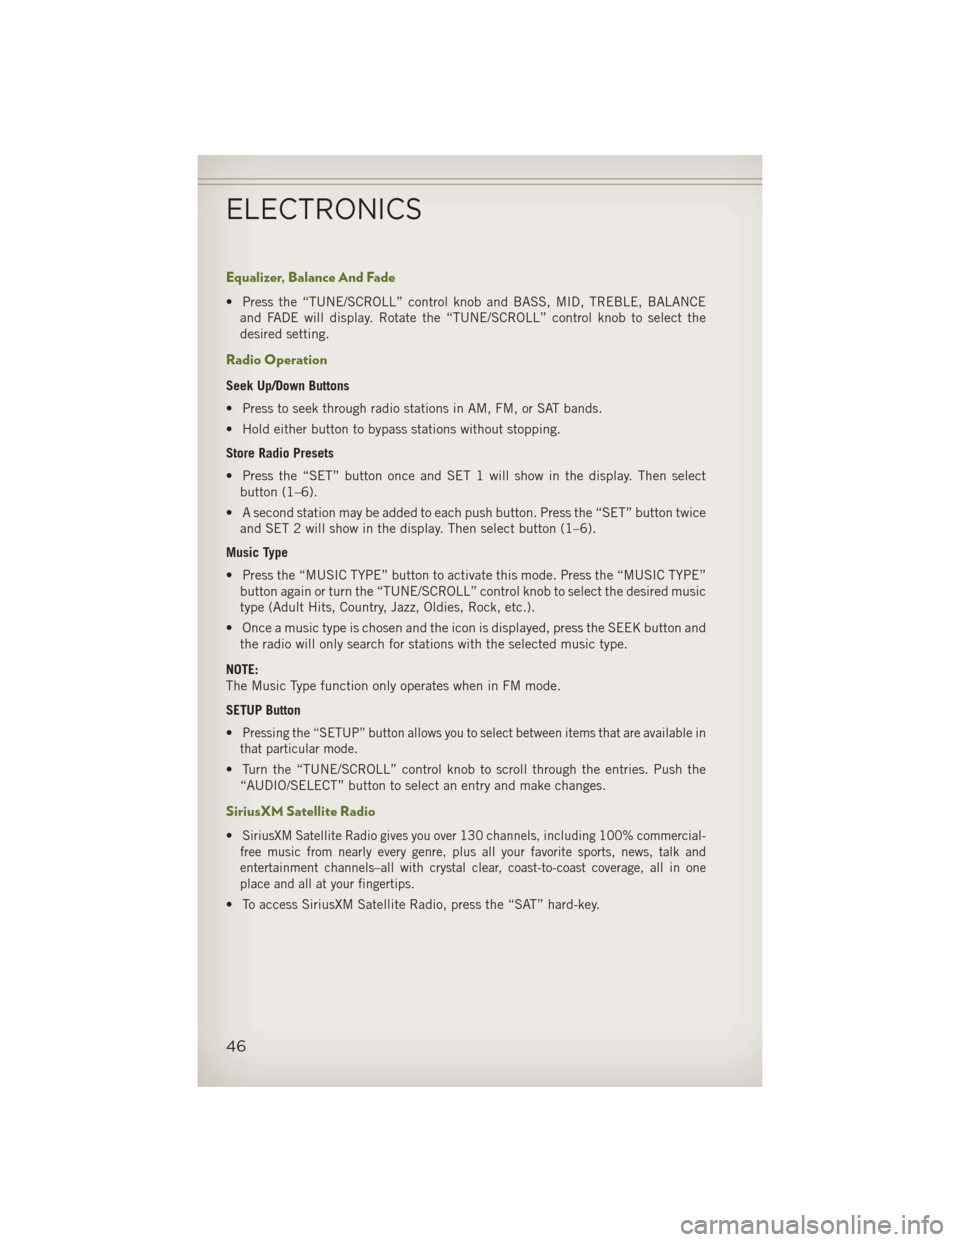
Equalizer, Balance And Fade
• Press the “TUNE/SCROLL” control knob and BASS, MID, TREBLE, BALANCEand FADE will display. Rotate the “TUNE/SCROLL” control knob to select the
desired setting.
Radio Operation
Seek Up/Down Buttons
• Press to seek through radio stations in AM, FM, or SAT bands.
• Hold either button to bypass stations without stopping.
Store Radio Presets
• Press the “SET” button once and SET 1 will show in the display. Then selectbutton (1–6).
• A second station may be added to each push button. Press the “SET” button twice and SET 2 will show in the display. Then select button (1–6).
Music Type
• Press the “MUSIC TYPE” button to activate this mode. Press the “MUSIC TYPE” button again or turn the “TUNE/SCROLL” control knob to select the desired music
type (Adult Hits, Country, Jazz, Oldies, Rock, etc.).
• Once a music type is chosen and the icon is displayed, press the SEEK button and the radio will only search for stations with the selected music type.
NOTE:
The Music Type function only operates when in FM mode.
SETUP Button
•
Pressing the “SETUP” button allows you to select between items that are available in
that particular mode.
• Turn the “TUNE/SCROLL” control knob to scroll through the entries. Push the “AUDIO/SELECT” button to select an entry and make changes.
SiriusXM Satellite Radio
•SiriusXM Satellite Radio gives you over 130 channels, including 100% commercial-
free music from nearly every genre, plus all your favorite sports, news, talk and
entertainment channels–all with crystal clear, coast-to-coast coverage, all in one
place and all at your fingertips.
• To access SiriusXM Satellite Radio, press the “SAT” hard-key.
ELECTRONICS
46
Page 49 of 132

CD/DISC Operation
Seek Up/Down Buttons
• Press to seek through CD tracks.
• Hold either button to bypass tracks without stopping.
LIST Button
• Press the “LIST” button to bring up a list of all folders on the CD. Scroll up or downthe list by turning the “TUNE/SCROLL” control knob.
• To select a folder from the list, press the “TUNE/SCROLL” control knob and the radio will begin playing the files contained in that folder.
How To Load Multiple CDs/DVDs
• Press the “LOAD” button and then press the button with the corresponding number (1–6) where the CD is being loaded. The radio will display “PLEASE
WAIT” and prompt when to “INSERT DISC”.
• After the radio displays “INSERT DISC”, insert the CD into the player. The radio display will show “LOADING DISC” when the disc is loading and “READING
DISC” when the radio is reading the disc.
• Press the eject button and then the corresponding number (1–6) to eject the desired disc.
Audio Jack Operation
• The AUX/Audio Jack provides a means to connect a portable audio device, such asan MP3 player or an iPod®, to the vehicles sound system. This requires the use of
a 3.5 mm stereo audio patch cable.
• Pressing the AUX button will change the mode to auxiliary device if the Audio Jack is connected, allowing the music from your portable device to play through the
vehicle's speakers.
• The functions of the portable device are controlled using the device buttons, not the buttons on the radio. However, the volume may be controlled using the radio or
portable device.
ELECTRONICS
47
Page 52 of 132

Radio Operation
• To access Radio Mode, touch the “RADIO” hard-key on the left side of thefaceplate, then touch the “AM,” “FM” or “SAT” soft-key at the top of the screen
to select the band.
Seek Up/Seek Down
• Press the “Seek Up” or “Seek Down” soft-keys to seek through radio stations in AM, FM, or SAT bands. Hold either Seek to bypass stations without stopping.
Store Radio Presets
• Select the radio band by touching either the “AM,” “FM,” or “SAT” soft-key.
• Find the station to store by either pressing the “Seek Up” or “Seek Down” soft-keys, touching the “SCAN” soft-key, or by using the “DIRECT TUNE” soft-key.
• Once the station is found, touch and hold one of the “PRESET” soft-keys in the list to the right, until you hear a confirmation beep.
NOTE:
If the Presets are not visible on the right side of the screen, press the “Presets”
soft-key.
ELECTRONICS
50