2013 HYUNDAI VELOSTER display
[x] Cancel search: displayPage 124 of 372
Features of your vehicle
48 4
Trip computer
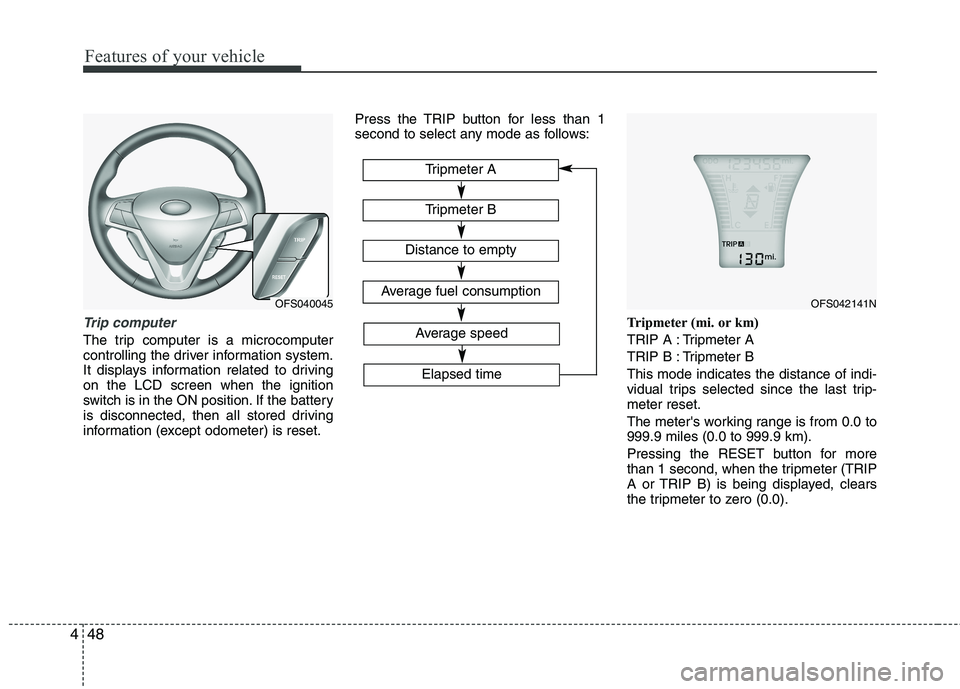
The trip computer is a microcomputer
controlling the driver information system.
It displays information related to driving
on the LCD screen when the ignition
switch is in the ON position. If the battery
is disconnected, then all stored driving
information (except odometer) is reset.Press the TRIP button for less than 1
second to select any mode as follows:
Tripmeter (mi. or km)
TRIP A : Tripmeter A
TRIP B : Tripmeter B
This mode indicates the distance of indi-
vidual trips selected since the last trip-
meter reset.
The meter's working range is from 0.0 to
999.9 miles (0.0 to 999.9 km).
Pressing the RESET button for more
than 1 second, when the tripmeter (TRIP
A or TRIP B) is being displayed, clears
the tripmeter to zero (0.0).
OFS040045
Tripmeter B
Tripmeter A
Distance to empty
Average fuel consumption
Elapsed time
Average speed
OFS042141N
Page 125 of 372
449
Features of your vehicle
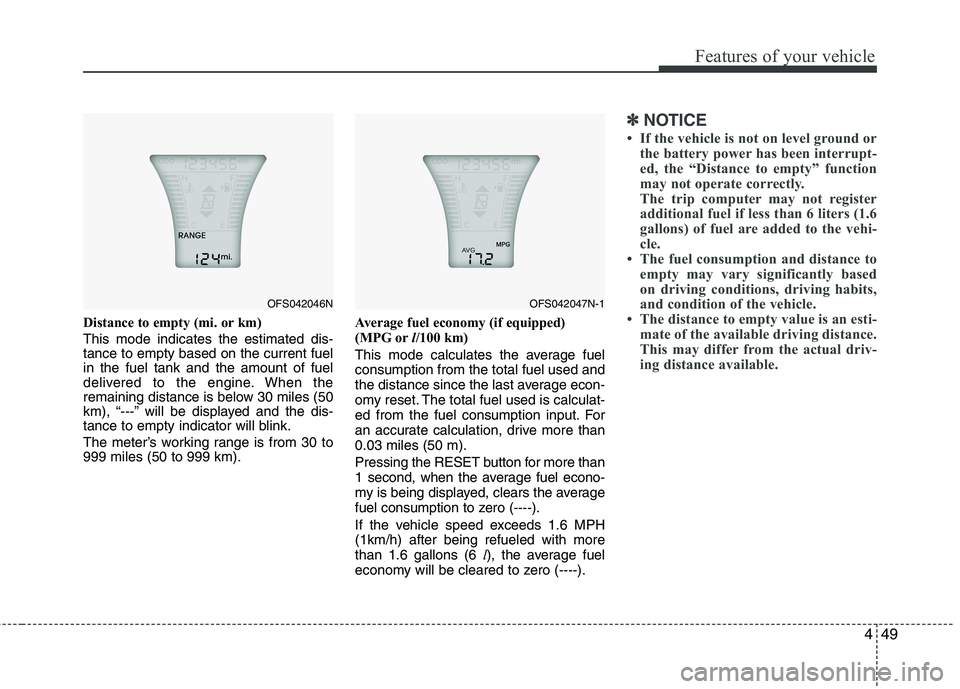
Distance to empty (mi. or km)
This mode indicates the estimated dis-
tance to empty based on the current fuel
in the fuel tank and the amount of fuel
delivered to the engine. When the
remaining distance is below 30 miles (50
km), “---” will be displayed and the dis-
tance to empty indicator will blink.
The meter’s working range is from 30 to
999 miles (50 to 999 km).Average fuel economy (if equipped)
(MPG orl/100 km)
This mode calculates the average fuel
consumption from the total fuel used and
the distance since the last average econ-
omy reset. The total fuel used is calculat-
ed from the fuel consumption input. For
an accurate calculation, drive more than
0.03 miles (50 m).
Pressing the RESET button for more than
1 second, when the average fuel econo-
my is being displayed, clears the average
fuel consumption to zero (----).
If the vehicle speed exceeds 1.6 MPH
(1km/h) after being refueled with more
than 1.6 gallons (6 l), the average fuel
economy will be cleared to zero (----).
✽
✽
NOTICE
• If the vehicle is not on level ground or
the battery power has been interrupt-
ed, the “Distance to empty” function
may not operate correctly.
The trip computer may not register
additional fuel if less than 6 liters (1.6
gallons) of fuel are added to the vehi-
cle.
• The fuel consumption and distance to
empty may vary significantly based
on driving conditions, driving habits,
and condition of the vehicle.
• The distance to empty value is an esti-
mate of the available driving distance.
This may differ from the actual driv-
ing distance available.
OFS042046NOFS042047N-1
Page 126 of 372

Features of your vehicle
50 4
Average speed (MPH or km/h)
This mode calculates the average speed
of the vehicle since the last average
speed reset.
Even if the vehicle is not in motion, the
average speed keeps changing while the
engine is running.
Pressing the RESET button for more
than 1 second, when the average speed
is being displayed, clears the average
speed to zero (---).Elapsed time
This mode indicates the total time trav-
eled since the last driving time reset.
Even if the vehicle is not in motion, the
driving time keeps increasing while the
engine is running.
The meter’s working range is from
00:00~99:59.
Pressing the RESET button for more
than 1 second, when the driving time is
being displayed, clears the driving time to
zero (00:00).
Warnings and indicators
All warning lights are checked by turning
the ignition switch ON (do not start the
engine). Any light that does not illuminate
should be checked by an authorized
HYUNDAI dealer.
After starting the engine, check to make
sure that all warning lights are off. If any
are still on, this indicates a situation that
needs attention. When releasing the
parking brake, the brake system warning
light should go off. The fuel warning light
will stay on if the fuel level is low.
OFS042048N-1OFS042142N
Page 132 of 372
Features of your vehicle
56 4
EcoShift dual clutch transmission
shift indicator/Automatic transaxle
shift position indicator (if equipped)
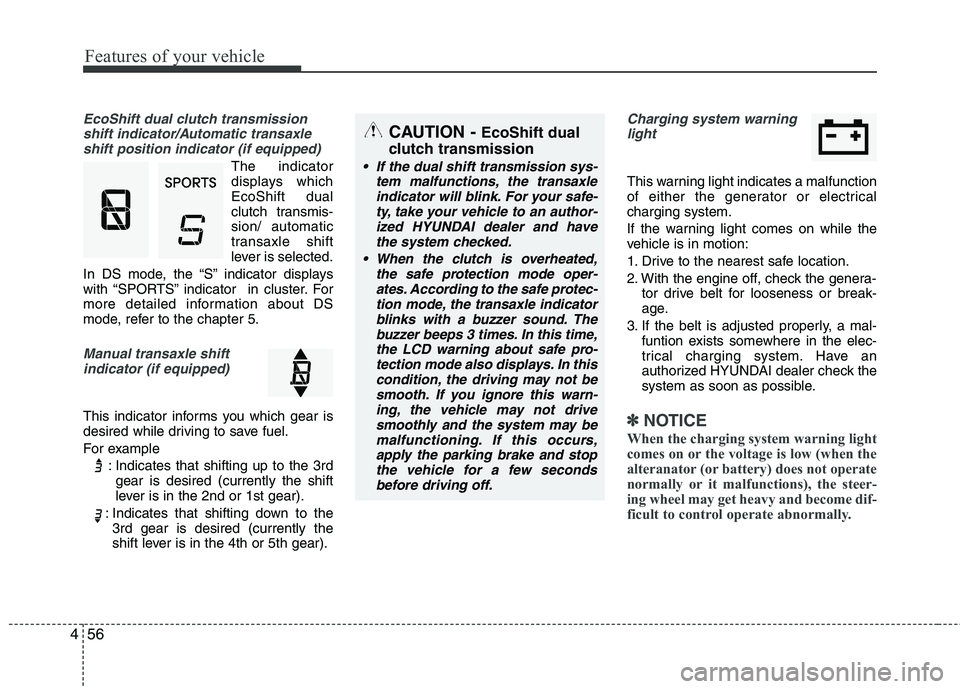
The indicator
displays which
EcoShift dual
clutch transmis-
sion/ automatic
transaxle shift
lever is selected.
In DS mode, the “S” indicator displays
with “SPORTS” indicator in cluster. For
more detailed information about DS
mode, refer to the chapter 5.
Manual transaxle shift
indicator (if equipped)
This indicator informs you which gear is
desired while driving to save fuel.
For example
: Indicates that shifting up to the 3rd
gear is desired (currently the shift
lever is in the 2nd or 1st gear).
: Indicates that shifting down to the
3rd gear is desired (currently the
shift lever is in the 4th or 5th gear).
Charging system warning
light
This warning light indicates a malfunction
of either the generator or electrical
charging system.
If the warning light comes on while the
vehicle is in motion:
1. Drive to the nearest safe location.
2. With the engine off, check the genera-
tor drive belt for looseness or break-
age.
3. If the belt is adjusted properly, a mal-
funtion exists somewhere in the elec-
trical charging system. Have an
authorized HYUNDAI dealer check the
system as soon as possible.
✽ ✽
NOTICE
When the charging system warning light
comes on or the voltage is low (when the
alteranator (or battery) does not operate
normally or it malfunctions), the steer-
ing wheel may get heavy and become dif-
ficult to control operate abnormally.
CAUTION - EcoShift dual
clutch transmission
If the dual shift transmission sys-
tem malfunctions, the transaxle
indicator will blink. For your safe-
ty, take your vehicle to an author-
ized HYUNDAI dealer and have
the system checked.
When the clutch is overheated,
the safe protection mode oper-
ates. According to the safe protec-
tion mode, the transaxle indicator
blinks with a buzzer sound. The
buzzer beeps 3 times. In this time,
the LCD warning about safe pro-
tection mode also displays. In this
condition, the driving may not be
smooth. If you ignore this warn-
ing, the vehicle may not drive
smoothly and the system may be
malfunctioning. If this occurs,
apply the parking brake and stop
the vehicle for a few seconds
before driving off.
Page 199 of 372
Driving your vehicle
18 5
Transaxle ranges
P (Park)
Always come to a complete stop before
shifting into P (Park). This position locks
the transaxle and prevents the front
wheels from rotating.
WARNING
Shifting into P (Park) while the
vehicle is in motion will cause the
drive wheels to lock which will
cause you to lose control of the
vehicle.
Do not use the P (Park) position
in place of the parking brake.
Always make sure the shift lever
is latched in the P (Park) position
and set the parking brake fully.
Never leave a child unattended in
a vehicle.
CAUTION
To avoid damage to your transaxle,
do not accelerate the engine in R
(Reverse) or any forward gear posi-
tion with the brakes on.
When stopped on an upgrade, do
not hold the vehicle with engine
power. Use the service brake or
the parking brake.
Do not shift from N (Neutral) or P
(Park) into D (Drive), or R
(Reverse) when the engine is
above idle speed.
(Continued)
If the LCD warning is active, the
foot brake must be applied.
If a transaxle system problem
occurs, the transaxle indicator
will blink. If this occurs, take your
vehicle to an authorized
HYUNDAI dealer and have the
system checked.
When the clutch is overheated,
the safe protection mode oper-
ates. According to the safe pro-
tection mode, the transaxle indi-
cator blinks with a buzzer sound.
The buzzer beeps 3 times. In this
time, the LCD warning about safe
protection mode also displays.
If this occurs, the transaxle may
not shift smoothly due to clutch
overheating. To prevent damage
to the transaxle clutches, shift
into Park and wait for several sec-
onds before driving again.
Do not hold the vehicle on a hill in
Drive or Reverse by applying the
accelerator pedal because the
clutch may be overheated.
Instead, use the foot brake or
parking brake.
(Continued)(Continued)
When the transaxle shifts auto-
maticaly or manually, the gear
shifts may be noticeable; howev-
er, this is characteristic of the
double-clutch transaxle and does
not indicate a transaxle concern.
If the vehicle is held by applying
accelerator pedal on a hill, the
transmission and clutch will be
damaged. To hold at the hill, use
the parking brake or foot brake.
Page 258 of 372
What to do in an emergency
22 6
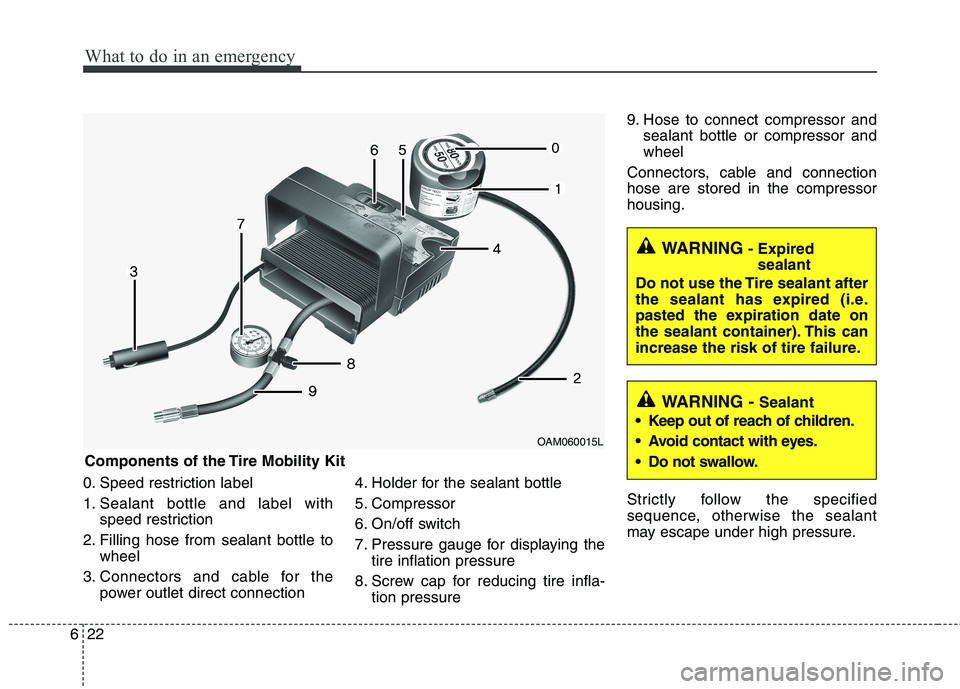
0. Speed restriction label
1. Sealant bottle and label with
speed restriction
2. Filling hose from sealant bottle to
wheel
3. Connectors and cable for the
power outlet direct connection4. Holder for the sealant bottle
5. Compressor
6. On/off switch
7. Pressure gauge for displaying the
tire inflation pressure
8. Screw cap for reducing tire infla-
tion pressure9. Hose to connect compressor and
sealant bottle or compressor and
wheel
Connectors, cable and connection
hose are stored in the compressor
housing.
Strictly follow the specified
sequence, otherwise the sealant
may escape under high pressure.
WARNING- Expired
sealant
Do not use the Tire sealant after
the sealant has expired (i.e.
pasted the expiration date on
the sealant container). This can
increase the risk of tire failure.
WARNING - Sealant
Keep out of reach of children.
Avoid contact with eyes.
Do not swallow.
Components of the Tire Mobility Kit
OAM060015L
Page 321 of 372
Maintenance
56 7
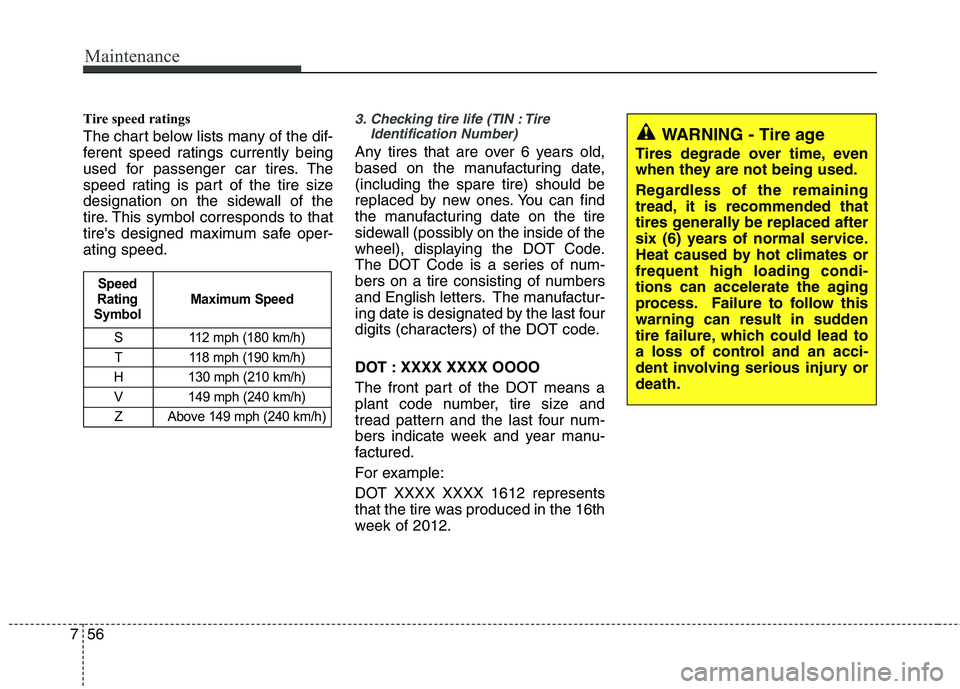
Tire speed ratings
The chart below lists many of the dif-
ferent speed ratings currently being
used for passenger car tires. The
speed rating is part of the tire size
designation on the sidewall of the
tire. This symbol corresponds to that
tire's designed maximum safe oper-
ating speed.
3. Checking tire life (TIN : Tire
Identification Number)
Any tires that are over 6 years old,
based on the manufacturing date,
(including the spare tire) should be
replaced by new ones. You can find
the manufacturing date on the tire
sidewall (possibly on the inside of the
wheel), displaying the DOT Code.
The DOT Code is a series of num-
bers on a tire consisting of numbers
and English letters. The manufactur-
ing date is designated by the last four
digits (characters) of the DOT code.
DOT : XXXX XXXX OOOO
The front part of the DOT means a
plant code number, tire size and
tread pattern and the last four num-
bers indicate week and year manu-
factured.
For example:
DOT XXXX XXXX 1612 represents
that the tire was produced in the 16th
week of 2012.
S 112 mph (180 km/h)
T 118 mph (190 km/h)
H 130 mph (210 km/h)
V 149 mph (240 km/h)
Z Above 149 mph (240 km/h)
Maximum Speed Speed
Rating
Symbol
WARNING - Tire age
Tires degrade over time, even
when they are not being used.
Regardless of the remaining
tread, it is recommended that
tires generally be replaced after
six (6) years of normal service.
Heat caused by hot climates or
frequent high loading condi-
tions can accelerate the aging
process. Failure to follow this
warning can result in sudden
tire failure, which could lead to
a loss of control and an acci-
dent involving serious injury or
death.
Page 367 of 372
I3
Index
Heating and air conditioning ......................................4-80
Clock (Digital) ..............................................................4-97
Clothes hanger ..............................................................4-98
Combined instrument, see instrument cluster ..............4-44
Compact spare tire replacement ....................................7-54
Coolant ..........................................................................7-33
Cooling fluid, see engine coolant ................................7-33
Crankcase emission control system ..............................7-85
Cruise control system ....................................................5-34
Cup holder ....................................................................4-93
Curtain air bag ..............................................................3-49
Dashboard illumination,
see instrument panel illumination ..............................4-45
Dashboard, see instrument cluster ................................4-44
Defogging (Windshield)................................................4-88
Defogging logic (Windshield) ......................................4-89
Defroster (Rear window) ..............................................4-78
Defrosting (Windshield)................................................4-88
Digital clock ..................................................................4-97
Dimensions ......................................................................8-2
Display illumination,
see instrument panel illumination ..............................4-45
Displays, see instrument cluster....................................4-44
Door locks ....................................................................4-18
Central door lock switch ............................................4-20Child-protector rear door lock....................................4-21
Drinks holders, see cup holders ....................................4-93
Driver's air bag ..............................................................3-44
Driving at night ............................................................5-42
Driving in flooded areas................................................5-43
Driving in the rain ........................................................5-43
Economical operation....................................................5-39
EcoShift dual clutch transmission ................................5-16
Electronic stability control (ESC) ................................5-29
Emergency starting..........................................................6-4
Jump starting ................................................................6-4
Push starting ................................................................6-5
Emergency towing ........................................................6-26
Emergency while driving ................................................6-2
Emission control system ..............................................7-85
Crankcase emission control system ..........................7-85
Evaporative emission control System ........................7-85
Exhaust emission control system ..............................7-86
Engine compartment ................................................2-4, 7-2
Engine coolant ..............................................................7-33
Engine number ................................................................8-9
Engine oil ......................................................................7-31
Engine overheats ............................................................6-6
Engine start/stop button ..................................................5-8
Engine temperature gauge ............................................4-46
D
E