2013 HYUNDAI TUCSON fluid
[x] Cancel search: fluidPage 13 of 397
17
Introduction
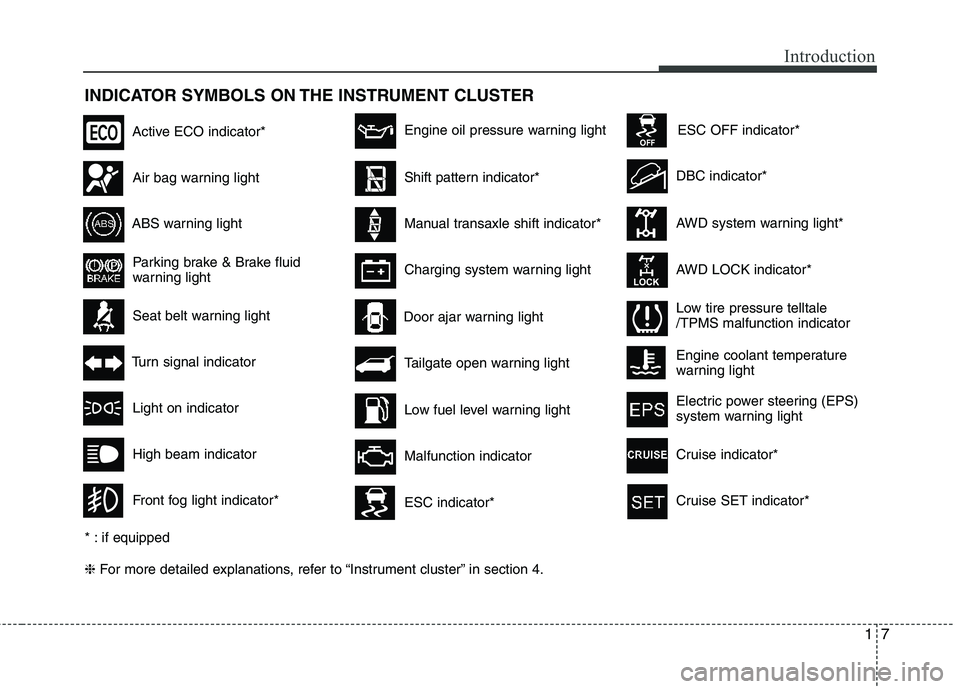
INDICATOR SYMBOLS ON THE INSTRUMENT CLUSTER ❈For more detailed explanations, refer to “Instrument cluster” in section 4.
Seat belt warning light
Tailgate open warning light
High beam indicator
Light on indicator
Turn signal indicator
Front fog light indicator*
ABS warning light
Parking brake & Brake fluid
warning light
Engine oil pressure warning light
AWD system warning light*
AWD LOCK indicator*
Malfunction indicator
Air bag warning light
Low fuel level warning light DBC indicator*
Charging system warning light
Door ajar warning light
* : if equipped
ESC indicator*
ESC OFF indicator*
Low tire pressure telltale /TPMS malfunction indicator
Active ECO indicator*
Shift pattern indicator*
Manual transaxle shift indicator*
Engine coolant temperature
warning light
Electric power steering (EPS)
system warning light
Cruise indicator*
Cruise SET indicator*
Page 17 of 397
Your vehicle at a glance
4
2
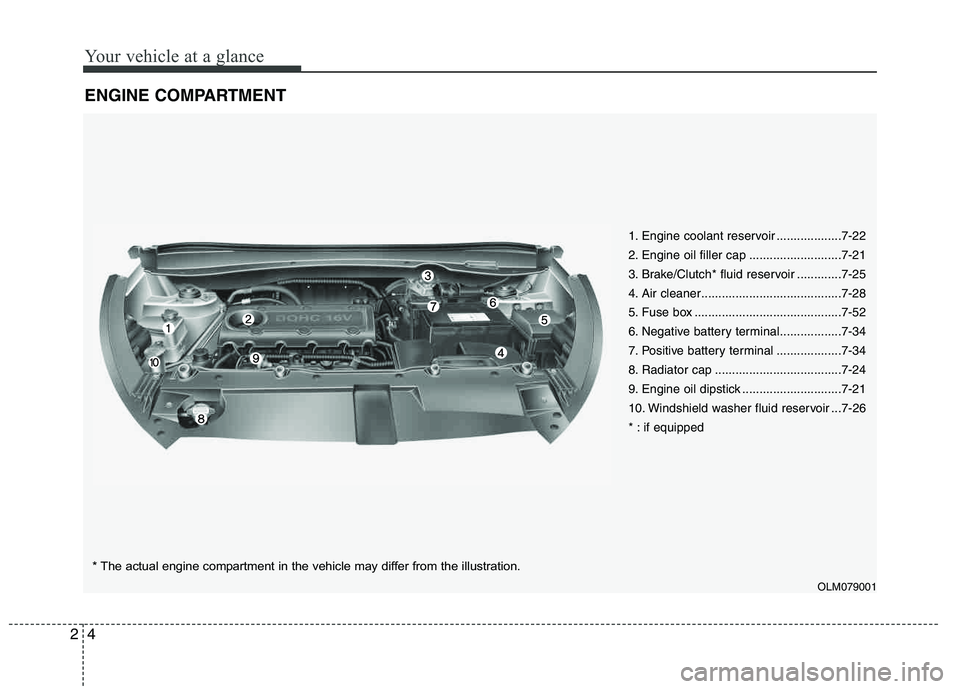
ENGINE COMPARTMENT
1. Engine coolant reservoir ...................7-22
2. Engine oil filler cap ...........................7-21
3. Brake/Clutch* fluid reservoir .............7-25
4. Air cleaner.........................................7-28
5. Fuse box ...........................................7-52
6. Negative battery terminal..................7-34
7. Positive battery terminal ...................7-34
8. Radiator cap .....................................7-24
9. Engine oil dipstick .............................7-21
10. Windshield washer fluid reservoir ...7-26
* : if equipped
OLM079001
* The actual engine compartment in the vehicle may differ from the illustration.
Page 107 of 397

427
Features of your vehicle
Opening the fuel filler door
The fuel filler door must be opened from
inside the vehicle by pulling up the fuel
filler door opener lever.
✽✽NOTICE
If the fuel filler door does not open
because ice has formed around it, tap
lightly or push on the door to break the
ice and release the door. Do not pry on
the door. If necessary, spray around the
door with an approved de-icer fluid (do
not use radiator anti-freeze) or move the
vehicle to a warm place and allow the ice
to melt.
1. Stop the engine.
2. To open the fuel filler door, pull the fuel filler door opener up.
3. Pull the fuel filler door (1) out to fully open.
4. To remove the cap, turn the fuel filler cap (2) counterclockwise.
5. Refuel as needed.
Closing the fuel filler door
1. To install the cap, turn it clockwise until it “clicks” one time. This indicates that the cap is securely tightened.
2. Close the fuel filler door and push it lightly making sure that it is securely closed.
FUEL FILLER DOOR
OSA047022OLM042028N
WARNING - Refueling
If pressurized fuel sprays out, it
can cover your clothes or skin
and thus subject you to the risk
of fire and burns. Always remove
the fuel cap carefully and slowly.
If the cap is venting fuel or if you
hear a hissing sound, wait until
the condition stops before com-
pletely removing the cap.
Do not "top off" after the nozzle automatically shuts off whenrefueling.
Tighten the cap until it clicks one time, otherwise the Check Engine light will illuminate.
Always check that the fuel cap is installed securely to prevent fuel
spillage in the event of an acci- dent.
Page 127 of 397

447
Features of your vehicle
Electronic brake
force distribution
(EBD) system
warning light
If two warning lights shown illuminate at
the same time while driving, your vehicle
may have a malfunction with ABS andEBD system.
In this case, your ABS and regular brake
system may not work normally. Have the
vehicle checked by an authorized
HYUNDAI dealer as soon as possible.✽✽NOTICE
If the ABS warning light or EBD warn-
ing light is on and stays on, the
speedometer or odometer/tripmeter
may not work. Also, the EPS warning
light may illuminate and the steering
effort may increase or decrease. In this
case, have your vehicle checked by an
authorized HYUNDAI dealer as soon as
possible.Parking brake & brake fluid warning light
Parking brake warning
This light is illuminated when the parking
brake is applied with the ignition switch in
the START or ON position. The warning
light should go off when the parking
brake is released while engine is run-ning.
The parking brake warning chime will
sound to remind you that the parking
brake is applied when you are driving
above 6 mph (10 km/h). Always release
the parking brake before you drive.
Low brake fluid level warning
If the warning light remains on, it may
indicate that the brake fluid level in the
reservoir is low.
If the warning light remains on:
1. Drive carefully to the nearest safe location and stop your vehicle.
2. With the engine stopped, check the brake fluid level immediately and add
fluid as required. Then check all brake
components for fluid leaks.
WARNING
If both ABS and Brake warning
lights are on and stay on, your vehi-
cle’s brake system will not work
normally. So you may experience
an unexpected and dangerous situ-
ation during sudden braking. In this
case, avoid high speed driving and
abrupt braking. Have your vehicle
checked by an authorized HYUNDAI
dealer as soon as possible.
Page 128 of 397
Features of your vehicle
48
4
3. Do not drive the vehicle if leaks are
found, the warning light remains on or
the brakes do not operate properly.
Have the vehicle towed to any author-
ized HYUNDAI dealer for a brake sys-
tem inspection and necessary repairs.
Your vehicle is equipped with a dual-diag-
onal braking system. This means you still
have braking on two wheels even if one of
the brake circuits is damaged or malfunc-
tions. With only one of the circuits work-
ing, more than normal pedal travel and
greater pedal pressure are required to
stop the car. Also, the car will not stop in
as short a distance with only a portion of
the brake system working. If the brakes
fail while you are driving, shift to a lower
gear for additional engine braking and
stop the car as soon as it is safe to do so.
To check bulb operation, check whether
the parking brake and brake fluid warning
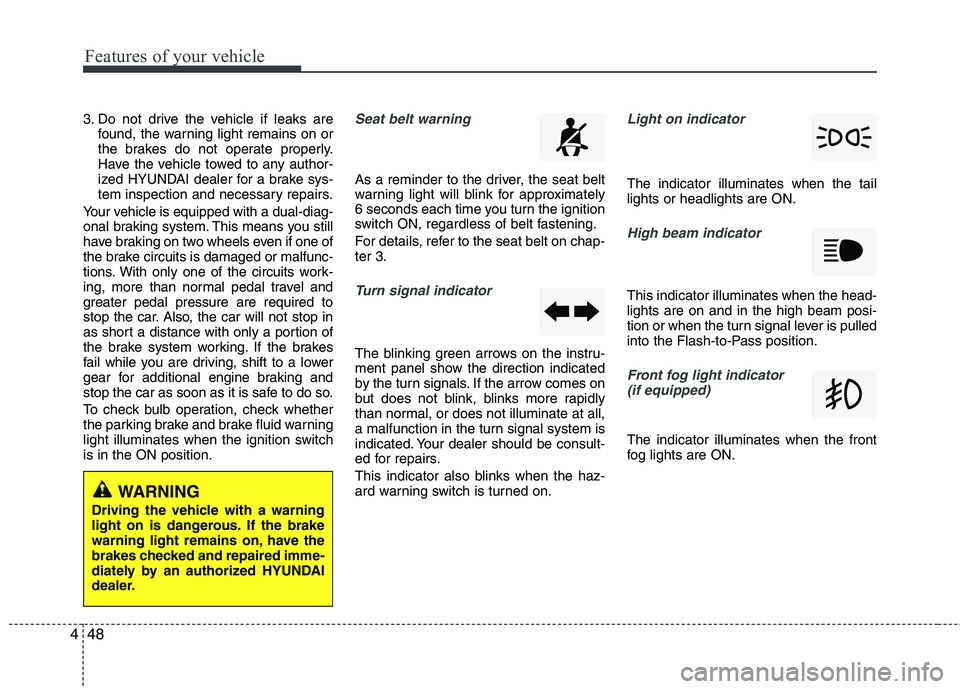
light illuminates when the ignition switch is in the ON position.Seat belt warning
As a reminder to the driver, the seat belt
warning light will blink for approximately
6 seconds each time you turn the ignition
switch ON, regardless of belt fastening.
For details, refer to the seat belt on chap- ter 3.
Turn signal indicator
The blinking green arrows on the instru-
ment panel show the direction indicated
by the turn signals. If the arrow comes on
but does not blink, blinks more rapidly
than normal, or does not illuminate at all,
a malfunction in the turn signal system is
indicated. Your dealer should be consult-
ed for repairs.
This indicator also blinks when the haz-
ard warning switch is turned on.
Light on indicator
The indicator illuminates when the tail lights or headlights are ON.
High beam indicator
This indicator illuminates when the head- lights are on and in the high beam posi-
tion or when the turn signal lever is pulled
into the Flash-to-Pass position.
Front fog light indicator (if equipped)
The indicator illuminates when the front
fog lights are ON.
WARNING
Driving the vehicle with a warning
light on is dangerous. If the brake
warning light remains on, have the
brakes checked and repaired imme-
diately by an authorized HYUNDAI
dealer.
Page 141 of 397
461
Features of your vehicle
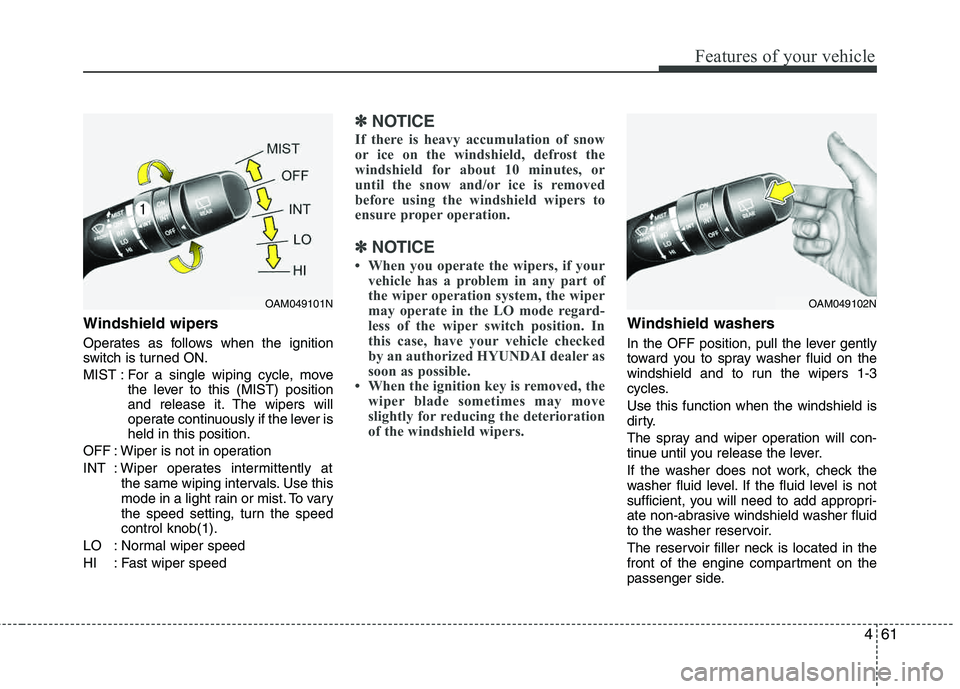
Windshield wipers
Operates as follows when the ignition
switch is turned ON.
MIST : For a single wiping cycle, movethe lever to this (MIST) position
and release it. The wipers will
operate continuously if the lever isheld in this position.
OFF : Wiper is not in operation
INT : Wiper operates intermittently at the same wiping intervals. Use this
mode in a light rain or mist. To vary
the speed setting, turn the speed control knob(1).
LO : Normal wiper speed
HI : Fast wiper speed
✽✽ NOTICE
If there is heavy accumulation of snow
or ice on the windshield, defrost the
windshield for about 10 minutes, or
until the snow and/or ice is removed
before using the windshield wipers to
ensure proper operation.
✽
✽ NOTICE
When you operate the wipers, if your vehicle has a problem in any part of
the wiper operation system, the wiper
may operate in the LO mode regard-
less of the wiper switch position. In
this case, have your vehicle checked
by an authorized HYUNDAI dealer as
soon as possible.
When the ignition key is removed, the wiper blade sometimes may move
slightly for reducing the deterioration
of the windshield wipers.
Windshield washers
In the OFF position, pull the lever gently
toward you to spray washer fluid on the
windshield and to run the wipers 1-3
cycles. Use this function when the windshield is
dirty.
The spray and wiper operation will con-
tinue until you release the lever.
If the washer does not work, check the
washer fluid level. If the fluid level is not
sufficient, you will need to add appropri-
ate non-abrasive windshield washer fluid
to the washer reservoir.
The reservoir filler neck is located in the
front of the engine compartment on the
passenger side.
OAM049101NOAM049102N
Page 142 of 397
Features of your vehicle
62
4
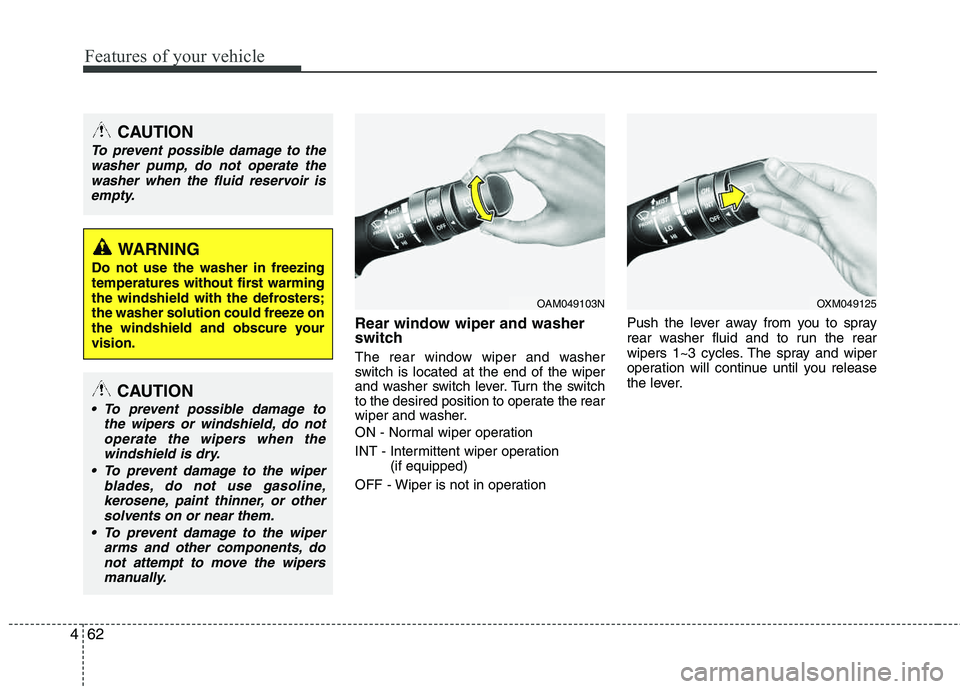
Rear window wiper and washer
switch
The rear window wiper and washer
switch is located at the end of the wiper
and washer switch lever. Turn the switch
to the desired position to operate the rear
wiper and washer.
ON - Normal wiper operation
INT - Intermittent wiper operation
(if equipped)
OFF - Wiper is not in operation Push the lever away from you to spray
rear washer fluid and to run the rear
wipers 1~3 cycles. The spray and wiper
operation will continue until you release
the lever.
CAUTION
To prevent possible damage to the
washer pump, do not operate the washer when the fluid reservoir is
empty.
WARNING
Do not use the washer in freezing
temperatures without first warming
the windshield with the defrosters;
the washer solution could freeze on
the windshield and obscure your vision.
CAUTION
To prevent possible damage to the wipers or windshield, do not
operate the wipers when thewindshield is dry.
To prevent damage to the wiper blades, do not use gasoline,kerosene, paint thinner, or other
solvents on or near them.
To prevent damage to the wiper arms and other components, donot attempt to move the wipers
manually.
OAM049103NOXM049125
Page 211 of 397
53
Driving your vehicle
Before entering vehicle
• Be sure that all windows, outside mir-ror(s), and outside lights are clean.
Check the condition of the tires.
Check under the vehicle for any sign of leaks.
Be sure there are no obstacles behind you if you intend to back up.
Necessary inspections
Fluid levels, such as engine oil, engine
coolant, brake fluid, and washer fluid
should be checked on a regular basis,
with the exact interval depending on the
fluid. Further details are provided in sec-
tion 7, “Maintenance”.
BEFORE DRIVING
WARNING
Driving while distracted can result
in a loss of vehicle control, that
may lead to an accident, severe
personal injury, and death. The dri-
ver’s primary responsibility is in
the safe and legal operation of a
vehicle, and use of any handheld
devices, other equipment, or vehi-
cle systems which take the driver’s
eyes, attention and focus away
from the safe operation of a vehicle
or which are not permissible by law
should never be used during oper-
ation of the vehicle.
CALIFORNIA PROPOSI-
TION 65 WARNING
Engine exhaust and a wide variety of automobile components and
parts, including components foundin the interior furnishings in a vehi-
cle, contain or emit chemicals
known to the State of California to
cause cancer and birth defects and
reproductive harm. In addition, cer-
tain fluids contained in vehicles
and certain products of component
wear contain or emit chemicals
known to the State of California to
cause cancer and birth defects or
other reproductive harm.