2013 HYUNDAI TUCSON tow
[x] Cancel search: towPage 272 of 397
Driving your vehicle
64
5
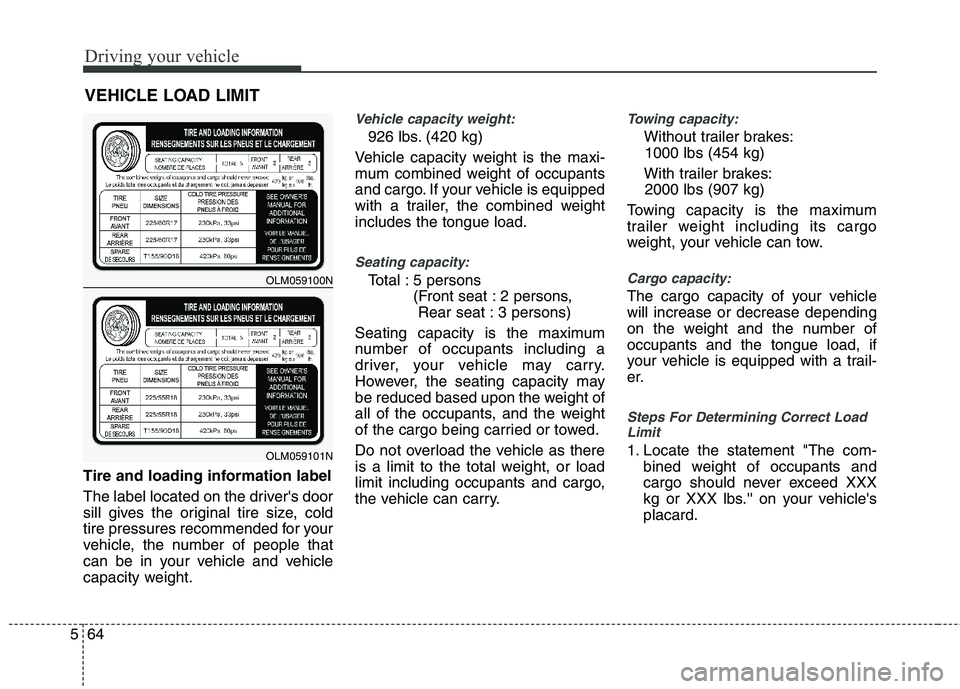
Tire and loading information label
The label located on the driver's door
sill gives the original tire size, cold
tire pressures recommended for your
vehicle, the number of people that
can be in your vehicle and vehicle
capacity weight.
Vehicle capacity weight:
926 lbs. (420 kg)
Vehicle capacity weight is the maxi-
mum combined weight of occupants
and cargo. If your vehicle is equipped
with a trailer, the combined weightincludes the tongue load.
Seating capacity:
Total : 5 persons (Front seat : 2 persons, Rear seat : 3 persons)
Seating capacity is the maximum
number of occupants including a
driver, your vehicle may carry.
However, the seating capacity may
be reduced based upon the weight of
all of the occupants, and the weight
of the cargo being carried or towed.
Do not overload the vehicle as there
is a limit to the total weight, or load
limit including occupants and cargo,
the vehicle can carry.
Towing capacity:
Without trailer brakes: 1000 lbs (454 kg)
With trailer brakes: 2000 lbs (907 kg)
Towing capacity is the maximum
trailer weight including its cargo
weight, your vehicle can tow.
Cargo capacity:
The cargo capacity of your vehicle will increase or decrease depending
on the weight and the number ofoccupants and the tongue load, if
your vehicle is equipped with a trail-
er.
Steps For Determining Correct Load Limit
1. Locate the statement "The com-
bined weight of occupants and
cargo should never exceed XXX
kg or XXX lbs.'' on your vehicle'splacard.
VEHICLE LOAD LIMIT
OLM059100N
OLM059101N
Page 273 of 397
565
Driving your vehicle
2. Determine the combined weight ofthe driver and passengers that will
be riding in your vehicle.
3. Subtract the combined weight of the driver and passengers from
XXX kg or XXX lbs.
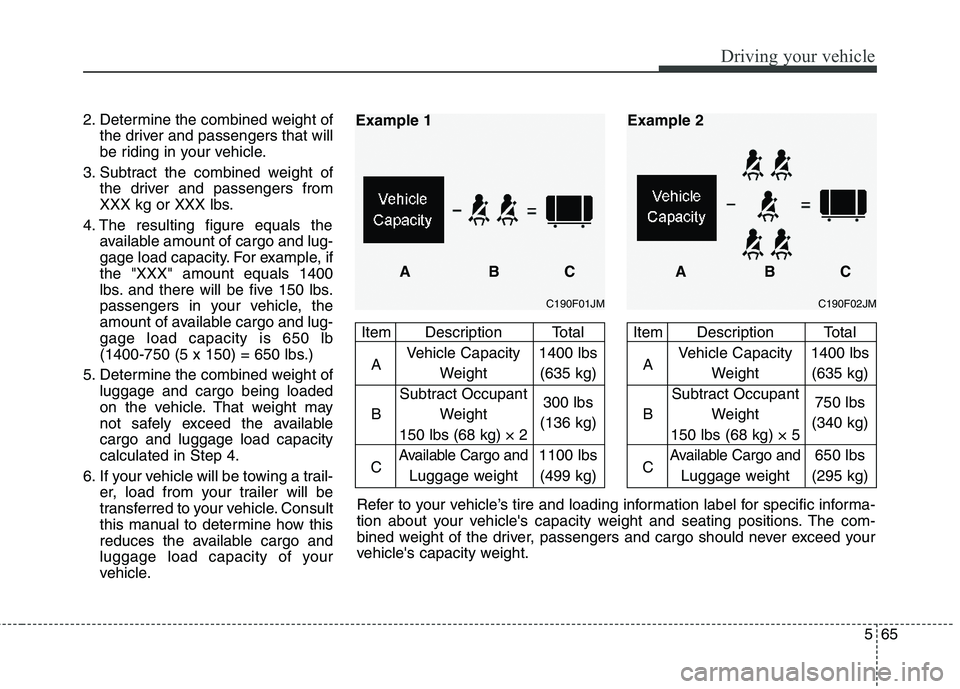
4. The resulting figure equals the available amount of cargo and lug-
gage load capacity. For example, ifthe "XXX" amount equals 1400
lbs. and there will be five 150 lbs.
passengers in your vehicle, the
amount of available cargo and lug-gage load capacity is 650 lb
(1400-750 (5 x 150) = 650 lbs.)
5. Determine the combined weight of luggage and cargo being loaded
on the vehicle. That weight may
not safely exceed the availablecargo and luggage load capacitycalculated in Step 4.
6. If your vehicle will be towing a trail- er, load from your trailer will be
transferred to your vehicle. Consult
this manual to determine how this
reduces the available cargo and
luggage load capacity of your
vehicle. Refer to your vehicle’s tire and loading information label for specific informa-
tion about your vehicle's capacity weight and seating positions. The com-
bined weight of the driver, passengers and cargo should never exceed your
vehicle's capacity weight.
C190F01JM
Item Description Total
A Vehicle Capacity 1400 lbs
Weight (635 kg)
Subtract Occupant
B Weight 300 lbs
150 lbs (68 kg) × 2 (136 kg)
C
Available Cargo and1100 lbs
Luggage weight (499 kg)
Example 1
ABC
C190F02JM
Item Description TotalA Vehicle Capacity 1400 lbs
Weight (635 kg)
Subtract Occupant
B Weight 750 lbs
150 lbs (68 kg) × 5 (340 kg)
C
Available Cargo and650 lbs
Luggage weight (295 kg)
ABC
Example 2
Page 277 of 397
6
Road warning / 6-2
In case of an emergency while driving / 6-2
If the engine will not start / 6-3
Emergency starting / 6-4
If the engine overheats / 6-6
Tire pressure monitoring system (TPMS) / 6-7
If you have a flat tire / 6-12
Towing / 6-20
What to do in an emergency
Page 278 of 397
What to do in an emergency
2
6
ROAD WARNING
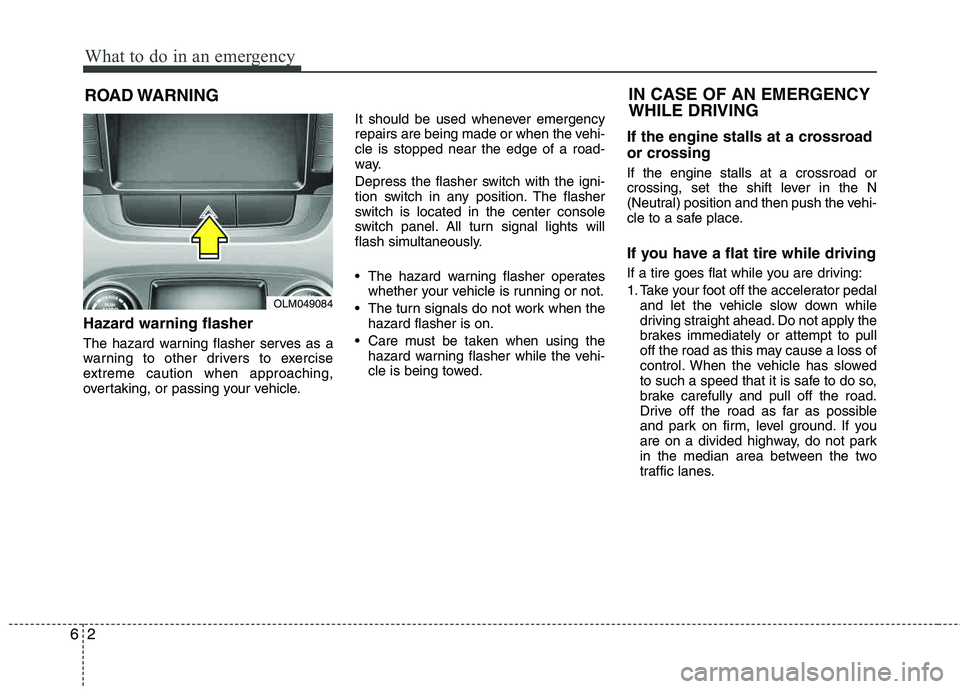
Hazard warning flasher
The hazard warning flasher serves as a
warning to other drivers to exercise
extreme caution when approaching,
overtaking, or passing your vehicle. It should be used whenever emergency
repairs are being made or when the vehi-cle is stopped near the edge of a road-
way.
Depress the flasher switch with the igni-
tion switch in any position. The flasher
switch is located in the center console
switch panel. All turn signal lights will
flash simultaneously.
• The hazard warning flasher operates
whether your vehicle is running or not.
The turn signals do not work when the hazard flasher is on.
Care must be taken when using the hazard warning flasher while the vehi-
cle is being towed.
If the engine stalls at a crossroad
or crossing
If the engine stalls at a crossroad or
crossing, set the shift lever in the N
(Neutral) position and then push the vehi-
cle to a safe place.
If you have a flat tire while driving
If a tire goes flat while you are driving:
1. Take your foot off the accelerator pedaland let the vehicle slow down while
driving straight ahead. Do not apply the
brakes immediately or attempt to pull
off the road as this may cause a loss of
control. When the vehicle has slowed
to such a speed that it is safe to do so,
brake carefully and pull off the road.
Drive off the road as far as possible
and park on firm, level ground. If you
are on a divided highway, do not park
in the median area between the two
traffic lanes.
IN CASE OF AN EMERGENCY WHILE DRIVING
OLM049084
Page 280 of 397
What to do in an emergency
4
6
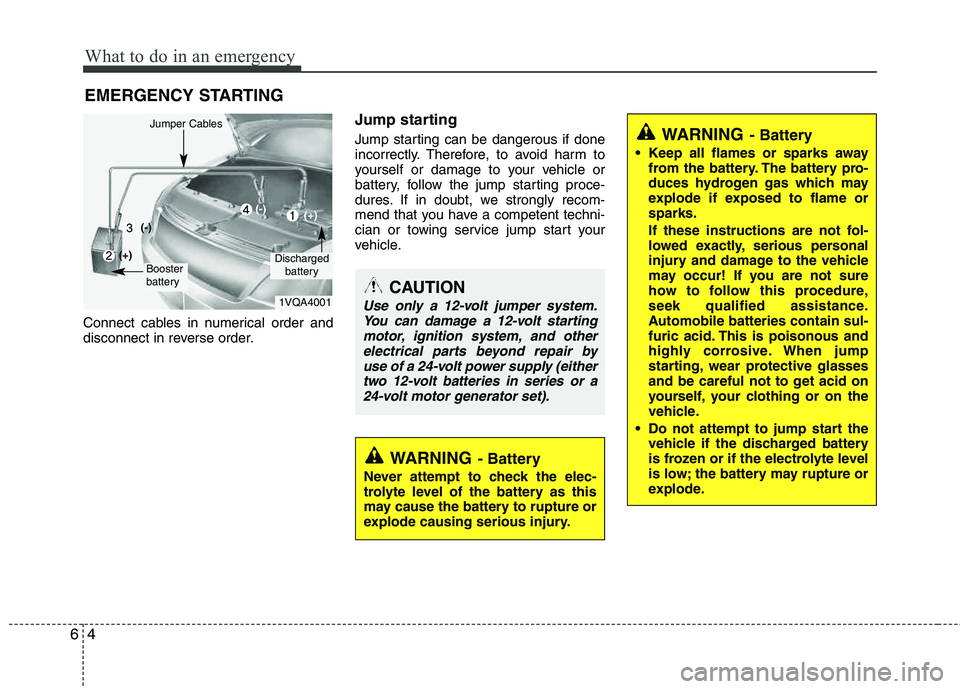
EMERGENCY STARTING
Connect cables in numerical order and
disconnect in reverse order.
Jump starting
Jump starting can be dangerous if done
incorrectly. Therefore, to avoid harm to
yourself or damage to your vehicle or
battery, follow the jump starting proce-
dures. If in doubt, we strongly recom-
mend that you have a competent techni-
cian or towing service jump start your
vehicle.
CAUTION
Use only a 12-volt jumper system. You can damage a 12-volt startingmotor, ignition system, and other
electrical parts beyond repair byuse of a 24-volt power supply (eithertwo 12-volt batteries in series or a
24-volt motor generator set).
WARNING- Battery
• Keep all flames or sparks away from the battery. The battery pro-
duces hydrogen gas which may
explode if exposed to flame or sparks.
If these instructions are not fol-
lowed exactly, serious personal
injury and damage to the vehicle
may occur! If you are not sure
how to follow this procedure,
seek qualified assistance.
Automobile batteries contain sul-
furic acid. This is poisonous and
highly corrosive. When jump
starting, wear protective glasses
and be careful not to get acid on
yourself, your clothing or on the
vehicle.
Do not attempt to jump start the vehicle if the discharged battery
is frozen or if the electrolyte level
is low; the battery may rupture or
explode.
WARNING- Battery
Never attempt to check the elec-
trolyte level of the battery as this
may cause the battery to rupture or
explode causing serious injury.
1VQA4001
Dischargedbattery
Jumper Cables
Booster
battery
(-)
(+)
(+)(-)
Page 281 of 397
65
What to do in an emergency
Jump starting procedure
1. Make sure the booster battery is 12-volt and that its negative terminal is
grounded.
2. If the booster battery is in another vehicle, do not allow the vehicles to touch.
3. Turn off all unnecessary electrical loads.
4. Connect the jumper cables in the exact sequence shown in the illustration.First connect one end of a jumper
cable to the positive terminal of the
discharged battery (1), then connect
the other end to the positive terminal
on the booster battery (2).
Proceed to connect one end of the
other jumper cable to the negative ter-
minal of the booster battery (3), then
the other end to a solid, stationary,
metallic point (for example, the engine
lifting bracket) away from the battery
(4). Do not connect it to or near any
part that moves when the engine is
cranked. Do not allow the jumper cables to con-
tact anything except the correct battery
terminals or the correct ground. Do not
lean over the battery when making
connections.
5. Start the engine of the vehicle with the booster battery and let it run at 2,000
rpm, then start the engine of the vehi-
cle with the discharged battery.
If the cause of your battery discharging is
not apparent, you should have your vehi-cle checked by an authorized HYUNDAIdealer.
Push-starting
Your manual transaxle-equipped vehicle
should not be push-started because it might damage the emission control sys- tem.
Vehicles equipped with automatic
transaxle cannot be push-started.
Follow the directions in this section for
jump-starting.
CAUTION - Battery cables
Do not connect the jumper cable
from the negative terminal of thebooster battery to the negative ter-
minal of the discharged battery.This can cause the discharged bat- tery to overheat and crack, releas-ing battery acid.
WARNING
Never tow a vehicle to start it
because the sudden surge forward
when the engine starts could cause
a collision with the tow vehicle.
Page 286 of 397
What to do in an emergency
10
6
Changing a tire with TPMS
If you have a flat tire, the Low Tire
Pressure warning indicator will turn
on. Have the flat tire repaired by an
authorized HYUNDAI dealer as soon
as possible or replace the flat tire
with the compact spare tire. Each wheel is equipped with a tire pressure sensor mounted inside the
tire behind the valve stem. You must
use TPMS specific wheels. It is rec-
ommended that you always have
your tires serviced by an authorized
HYUNDAI dealer.
Even if you replace the low pressure
tire with the compact spare tire, the
Low Tire Pressure warning indicator
will remain on until the low pressure tire is repaired and placed on the
vehicle. After you replace the low pressure
tire with the compact spare tire, the
TPMS malfunction indicator may be
illuminated after a few minutesbecause the compact spare tire does
not have a sensor.
Once the low pressure tire is re- inflated to the recommended pres-
sure and installed on the vehicle, theTPMS malfunction indicator and the
low tire pressure telltale will extin-
guish within a few minutes.
If the indicators do not extinguish
after a few minutes, please visit an
authorized HYUNDAI dealer.
You may not be able identify a low
tire by simply looking at it. Alwaysuse a good quality tire pressuregauge to measure the tire's inflation
pressure. Please note that a tire that
is hot (from being driven) will have ahigher pressure measurement than atire that is cold (from sitting station-
ary for at least 3 hours and driven
less than 1 mile (1.6 km) during that
3 hour period).CAUTION
The TPMS malfunction indica-
tor may be illuminated if thevehicle is moving around elec- tric power supply cables orradios transmitter such as atpolice stations, governmentand public offices, broadcast-ing stations, military installa-tions, airports, or transmittingtowers, etc. This can interferewith normal operation of theTire Pressure MonitoringSystem (TPMS).
The TPMS malfunction indica- tor may be illuminated if snowchains are used or some sep-arate electronic devices suchas notebook computer, mobilecharger, remote starter or nav-igation etc., are used in thevehicle. This can interfere withnormal operation of the TirePressure Monitoring System(TPMS).
CAUTION
NEVER use a puncture-repair- ing agent to repair and/or inflatea low pressure tire. The tiresealant can damage the tirepressure sensor. If used, youwill have to replace the tire pres-sure sensor.
Page 288 of 397
What to do in an emergency
12
6
IF YOU HAVE A FLAT TIRE
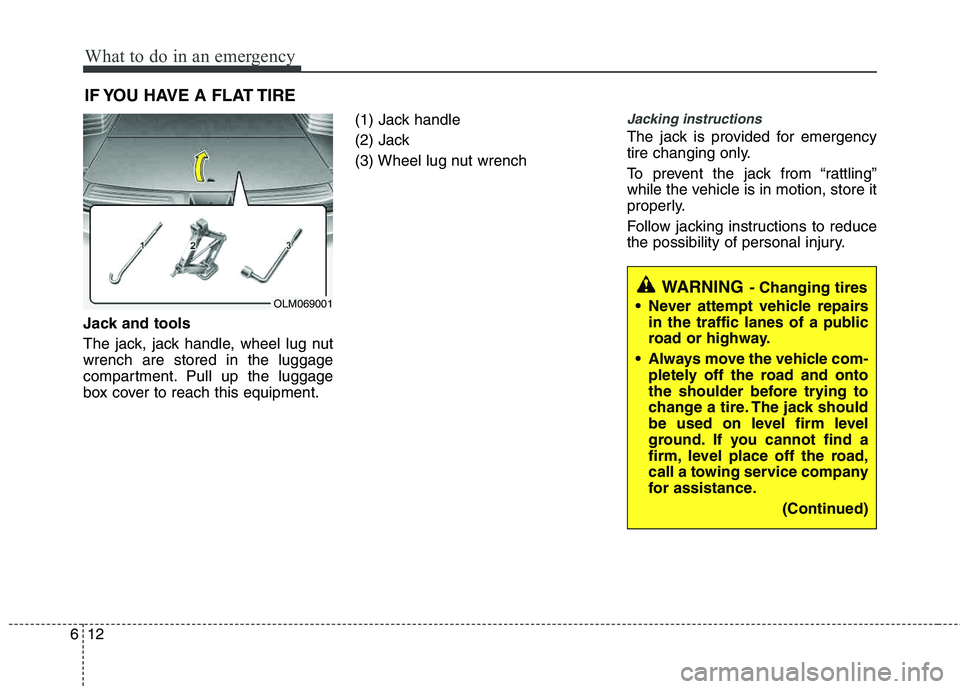
Jack and tools
The jack, jack handle, wheel lug nut wrench are stored in the luggage
compartment. Pull up the luggage
box cover to reach this equipment. (1) Jack handle
(2) Jack
(3) Wheel lug nut wrench
Jacking instructions
The jack is provided for emergency
tire changing only.
To prevent the jack from “rattling”
while the vehicle is in motion, store it
properly.
Follow jacking instructions to reduce
the possibility of personal injury.
WARNING- Changing tires
Never attempt vehicle repairs in the traffic lanes of a public
road or highway.
Always move the vehicle com- pletely off the road and onto
the shoulder before trying to
change a tire. The jack should
be used on level firm level
ground. If you cannot find a
firm, level place off the road,
call a towing service company
for assistance.
(Continued)OLM069001