Page 162 of 397
 air position or recirculated air position.
To change the air intake control position,
push the control but")
Features of your vehicle
82
4
Air intake control
This is used to select the outside (fresh) air position or recirculated air position.
To change the air intake control position,
push the control button. Recirculated air position
With the recirculated airposition selected, air from
the passenger compart-
ment will be drawn through the heating system and heated or cooled according
to the function selected.
Outside (fresh) air position With the outside (fresh) airposition selected, air enters
the vehicle from outsideand is heated or cooled according to the function
selected.
✽✽ NOTICE
Prolonged operation of the heater in the
recirculated air position (without air
conditioning selected) may cause fog-
ging of the windshield and side windows
and the air within the passenger com-
partment may become stale.
In addition, prolonged use of the air con-
ditioning with the recirculated air posi-
tion selected will result in excessively dry
air in the passenger compartment.
OLM049128L
WARNING
Continued use of the climate con-
trol system operation in the recir-
culated air position may allow humidity to increase inside the
vehicle which may fog the glass
and obscure visibility.
Do not sleep in a vehicle with the air conditioning or heating system
on. It may cause serious harm or
death due to a drop in the oxygen
level and/or body temperature.
Continued use of the climate con-
trol system operation in the recir- culated air position can cause
drowsiness or sleepiness, and loss
of vehicle control. Set the air intake
control to the outside (fresh) air
position as much as possible while driving.
Page 163 of 397
483
Features of your vehicle
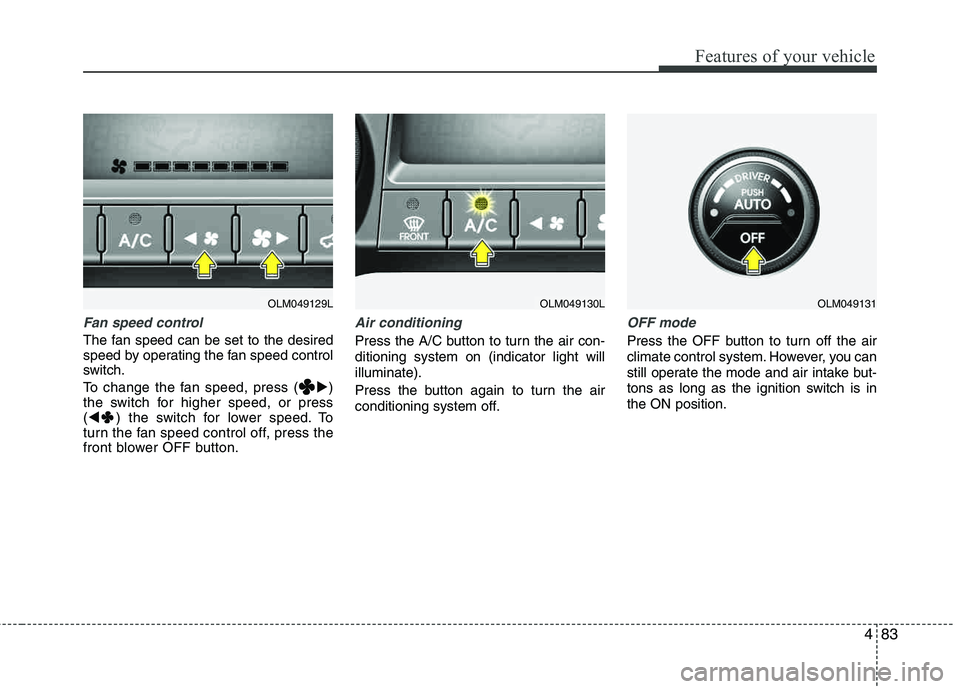
Fan speed control
The fan speed can be set to the desired
speed by operating the fan speed control
switch.
To change the fan speed, press (�)
the switch for higher speed, or press ( ⊳ ) the switch for lower speed. To
turn the fan speed control off, press the
front blower OFF button.
Air conditioning
Press the A/C button to turn the air con- ditioning system on (indicator light willilluminate).
Press the button again to turn the air
conditioning system off.
OFF mode
Press the OFF button to turn off the air
climate control system. However, you can
still operate the mode and air intake but-
tons as long as the ignition switch is in the ON position.
OLM049131OLM049129LOLM049130L
Page 164 of 397

Features of your vehicle
84
4
For maximum defrosting, set the tem-
perature control to the extreme
right/hot position and the fan speedcontrol to the highest speed.
If warm air to the floor is desired while defrosting or defogging, set the modeto the floor-defrost position.
Before driving, clear all snow and ice from the windshield, rear window, out-
side rear view mirrors, and all side win-
dows.
Clear all snow and ice from the hood and air inlet in the cowl grill to improveheater and defroster efficiency and to
reduce the probability of fogging up the inside of the windshield.
Manual climate control system
To defog inside windshield
1. Set the fan speed to the desired posi-
tion.
2. Select desired temperature.
3. Press the defrost button (
).
4. The outside (fresh) air will be selected automatically. If the position is selected, air conditioning will also be
selected automatically.
If the air conditioning and/or outside(fresh) air position are not selected auto-
matically, press the corresponding button
manually.
WINDSHIELD DEFROSTING AND DEFOGGING
WARNING - Windshield
heating
Do not use the or position during cooling operation in
extremely humid weather. The dif-
ference between the temperature of the outside air and the windshield could cause the outer surface of
the windshield to fog up, causing
loss of visibility. In this case, set
the mode selection to the posi-
tion and fan speed control to the
lower speed.
OLM049132
Page 165 of 397
.
4. The")
485
Features of your vehicle
To defrost outside windshield
1. Set the fan speed to the highest posi-tion.
2. Set the temperature to the extreme hot position.
3. Press the defrost button (
).
4. The outside (fresh) air and air condi- tioning will be selected automatically.
Automatic climate control system
To defog inside windshield
1. Set the fan speed to the desired posi- tion.
2. Select desired temperature.
3. Press the defroster button ( ).
4. The air conditioning will turn on according to the detected ambient tem-
perature and outside (fresh) air posi-
tion will be selected automatically.
If the air conditioning and outside (fresh)air position are not selected automatical-
ly, adjust the corresponding button man-
ually. If the position is selected,
lower fan speed is adjusted to a higher
fan speed.
To defrost outside windshield
1. Set the fan speed to the highest posi- tion.
2. Set the temperature to the extreme hot (HI) position.
3. Press the defroster button ( ).
4. The air conditioning will turn on according to the detected ambient
temperature and outside (fresh) air
position will be selected automatically.
OLM049134OLM049135OLM049133
Page 166 of 397

Features of your vehicle
86
4
Defogging logic
To reduce the possibility of fogging up
the inside of the windshield, the air intake or air conditioning are controlled auto-
matically according to certain conditions
such as or position. To cancel or
return to the defogging logic, perform the
following steps:
Manual climate control system
1. Turn the ignition switch to the ON posi-
tion.
2. Select the defrost position pressing the defrost button ( ).
3. Press the air intake control button at least 5 times within 3 seconds.
The indicator light in the air intake control
button will blink 3 times with 0.5 second
of interval. It indicates that the defogging
logic is canceled or returned to the pro-
grammed status.
If the battery has been discharged or dis- connected, the system resets to the pre-
programmed defogging logic.
Automatic climate control system
1. Turn the ignition switch to the ON posi- tion.
2. Select the defroster position pressing the defroster button ( ).
3. While pressing the air conditioning button (A/C), press the air intake con-
trol button at least 5 times within 3 sec-
onds.
The A/C display blinks 3 times with 0.5
second of interval. It indicates that the
defogging logic is canceled or returned to
the programmed status.
If the battery has been discharged or dis- connected, the system resets to the pre-
programmed defogging logic.
OLM049137NOLM049136N
Page 239 of 397

531
Driving your vehicle
In the event of brake failure
If service brakes fail to operate while the
vehicle is in motion, you can make an
emergency stop with the parking brake.
The stopping distance, however, will be
much greater than normal.
Disc brakes wear indicator
Your vehicle has disc brakes.
When your brake pads are worn and new
pads are required, you will hear a high-
pitched warning sound from your front
brakes or rear brakes. You may hear this
sound come and go or it may occur
whenever you depress the brake pedal.
Please remember that some driving con-
ditions or climates may cause a brake
squeal when you first apply (or lightly
apply) the brakes. This is normal and does
not indicate a problem with your brakes.
Parking brake
Applying the parking brake
■■Foot type
To engage the parking brake, first apply
the foot brake and then depress the park-
ing brake pedal down as far as possible.
WARNING- Brake wear
This brake wear warning sound
means your vehicle needs service.
If you ignore this audible warning,
you will eventually lose braking
performance, which could lead to a serious accident.
CAUTION
To avoid costly brake repairs, do not continue to drive with wornbrake pads.
Always replace the front or rear brake pads as pairs.
OLM059014
WARNING- Parking brake
Applying the parking brake while
the vehicle is moving at normal
speeds can cause a sudden loss of
control of the vehicle. If you mustuse the parking brake to stop the
vehicle, use great caution in apply-
ing the brake.
Page 301 of 397
7
Engine compartment / 7-2
Maintenance services / 7-3
Owner maintenance / 7-4
Scheduled maintenance service / 7-6
Explanation of scheduled maintenance items / 7-18
Engine oil / 7-21
Engine coolant / 7-22
Brake/clutch fluid / 7-25
Washer fluid / 7-26
Parking brake / 7-27
Air cleaner / 7-28
Climate control air filter / 7-29
Wiper blades / 7-31
Battery / 7-34
Tires and wheels / 7-37
Fuses / 7-50
Light bulbs / 7-59
Appearance care / 7-66
Emission control system / 7-72
California perchlorate notice / 7-75
Maintenance
Page 307 of 397

77
Maintenance
NORMAL MAINTENANCE SCHEDULE
The following maintenance services must be performed to ensure good emission control and performance. Keep receipts for all
vehicle emission services to protect your warranty. Where both mileage and time are shown, the frequency of service is deter-
mined by whichever occurs first.
15,000 miles (24,000 km) or 12 months
❑Inspect air cleaner filter
❑Inspect vacuum hose
❑Inspect air conditioning refrigerant
❑Inspect brake hoses and lines
❑Inspect drive shafts and boots
❑Inspect exhaust pipe and muffler
❑Inspect front brake disc/pads, calipers
❑Inspect propeller shaft (AWD)
❑Inspect rear brake disc/pads
❑Inspect steering gear box, linkage & boots/lower arm ball joint,
upper arm ball joint
❑ Inspect suspension mounting bolts
(Continued)
22,500 miles (36,000 km) or 18 months
❑Inspect air cleaner filter
❑Inspect vacuum hose
❑Replace engine oil and filter (22,500 miles (36,000 km) or 36 months)
❑Add fuel additive * 1
(22,500 miles (36,000 km) or 36 months)
7,500 miles (12,000 km) or 6 months
❑ Inspect air cleaner filter
❑Inspect vacuum hose
❑Replace engine oil and filter (7,500 miles (12,000 km) or 12 months)
❑Add fuel additive * 1
(7,500 miles (12,000 km) or 12 months)
❈ Inspect : Inspect and if necessary, adjust, correct, clean or replace.
* 1
: If TOP TIER Detergent Gasoline is not available, one bottle of additive is rec-
ommended. Additives are available from your authorized HYUNDAI dealer
along with information on how to use them. Do not mix other additives.
(Continued)
❑ Replace climate control air filter (for evaporator and blower unit)
❑Replace engine oil and filter (15,000 miles (24,000 km) or 24 months)
❑ Add fuel additive * 1
(15,000 miles (24,000 km) or 24 months)