2013 HYUNDAI TUCSON ECO mode
[x] Cancel search: ECO modePage 132 of 397

Features of your vehicle
52
4
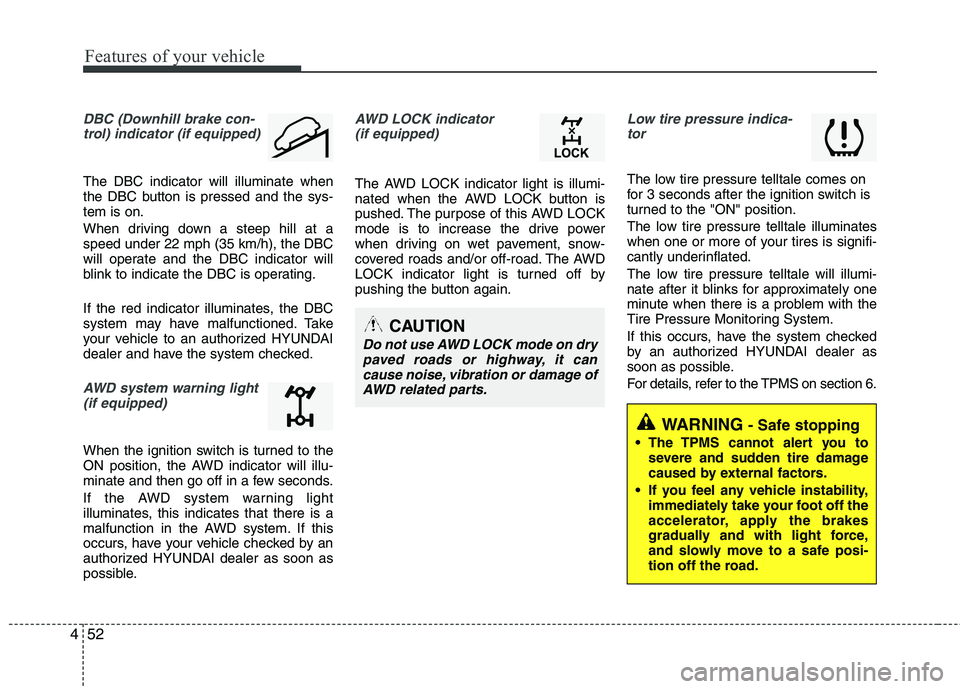
DBC (Downhill brake con-
trol) indicator (if equipped)
The DBC indicator will illuminate when
the DBC button is pressed and the sys-tem is on.
When driving down a steep hill at a speed under 22 mph (35 km/h), the DBC
will operate and the DBC indicator will
blink to indicate the DBC is operating.
If the red indicator illuminates, the DBC
system may have malfunctioned. Take
your vehicle to an authorized HYUNDAI
dealer and have the system checked.
AWD system warning light
(if equipped)
When the ignition switch is turned to the
ON position, the AWD indicator will illu-
minate and then go off in a few seconds.
If the AWD system warning light
illuminates, this indicates that there is a
malfunction in the AWD system. If this
occurs, have your vehicle checked by an
authorized HYUNDAI dealer as soon as
possible.
AWD LOCK indicator (if equipped)
The AWD LOCK indicator light is illumi-
nated when the AWD LOCK button is
pushed. The purpose of this AWD LOCK
mode is to increase the drive power
when driving on wet pavement, snow-
covered roads and/or off-road. The AWD
LOCK indicator light is turned off by
pushing the button again.
Low tire pressure indica-tor
The low tire pressure telltale comes on
for 3 seconds after the ignition switch is
turned to the "ON" position.
The low tire pressure telltale illuminates
when one or more of your tires is signifi-
cantly underinflated.
The low tire pressure telltale will illumi-
nate after it blinks for approximately one
minute when there is a problem with the
Tire Pressure Monitoring System.
If this occurs, have the system checked
by an authorized HYUNDAI dealer as
soon as possible.
For details, refer to the TPMS on section 6.
CAUTION
Do not use AWD LOCK mode on dry
paved roads or highway, it can cause noise, vibration or damage ofAWD related parts.
WARNING- Safe stopping
The TPMS cannot alert you to severe and sudden tire damage
caused by external factors.
If you feel any vehicle instability, immediately take your foot off the
accelerator, apply the brakes
gradually and with light force,
and slowly move to a safe posi-
tion off the road.
Page 155 of 397

475
Features of your vehicle
Air conditioning system operation tips
If the vehicle has been parked in directsunlight during hot weather, open the
windows for a short time to let the hot
air inside the vehicle escape.
To help reduce moisture inside of the windows on rainy or humid days,
decrease the humidity inside the vehi-
cle by operating the air conditioning system.
During air conditioning system opera- tion, you may occasionally notice aslight change in engine speed as the
air conditioning compressor cycles.
This is a normal system operation
characteristic.
Use the air conditioning system every month only for a few minutes to ensure
maximum system performance. When using the air conditioning sys-
tem, you may notice clear water drip-
ping (or even puddling) on the ground
under the passenger side of the vehi-
cle. This is a normal system operation
characteristic.
Operating the air conditioning system in the recirculated air position provides
maximum cooling, however, continual
operation in this mode may cause the
air inside the vehicle to become stale.
During cooling operation, you may occasionally notice a misty air flow
because of rapid cooling and humid air
intake. This is a normal system opera-
tion characteristics.
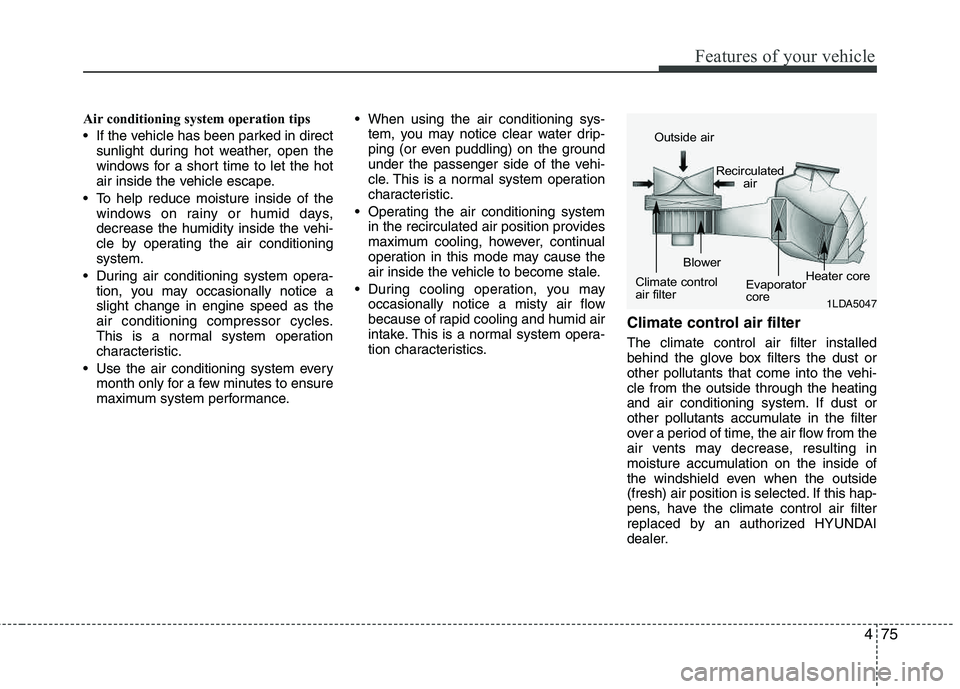
Climate control air filter
The climate control air filter installed
behind the glove box filters the dust or
other pollutants that come into the vehi-cle from the outside through the heating
and air conditioning system. If dust or
other pollutants accumulate in the filter
over a period of time, the air flow from the
air vents may decrease, resulting in
moisture accumulation on the inside of
the windshield even when the outside
(fresh) air position is selected. If this hap-
pens, have the climate control air filter
replaced by an authorized HYUNDAI
dealer.
1LDA5047
Outside air
Recirculatedair
Climate control
air filter Blower
Evaporator
coreHeater core
Page 159 of 397

479
Features of your vehicle
Manual heating and air conditioing
The heating and cooling system can be
controlled manually by pushing buttons
or turning knob(s) other than the AUTO
button. In this case, the system workssequentially according to the order of
buttons or knob(s) selected.
✽✽NOTICE
When pressing any button (or turning
any knob) except the AUTO button
while using automatic operation, the
functions not selected will continue to be
controlled automatically.
1. Start the engine.
2. Set the mode to the desired position. For improving the effectiveness of heating and cooling;- Heating: - Cooling:
3. Set the temperature control to the desired position.
4. Set the air intake control to the outside (fresh) air position.
5. Set the fan speed control to the desired speed.
6. If air conditioning is desired, turn the air conditioning system on.
Press the AUTO button in order to convert to full automatic control of the system.
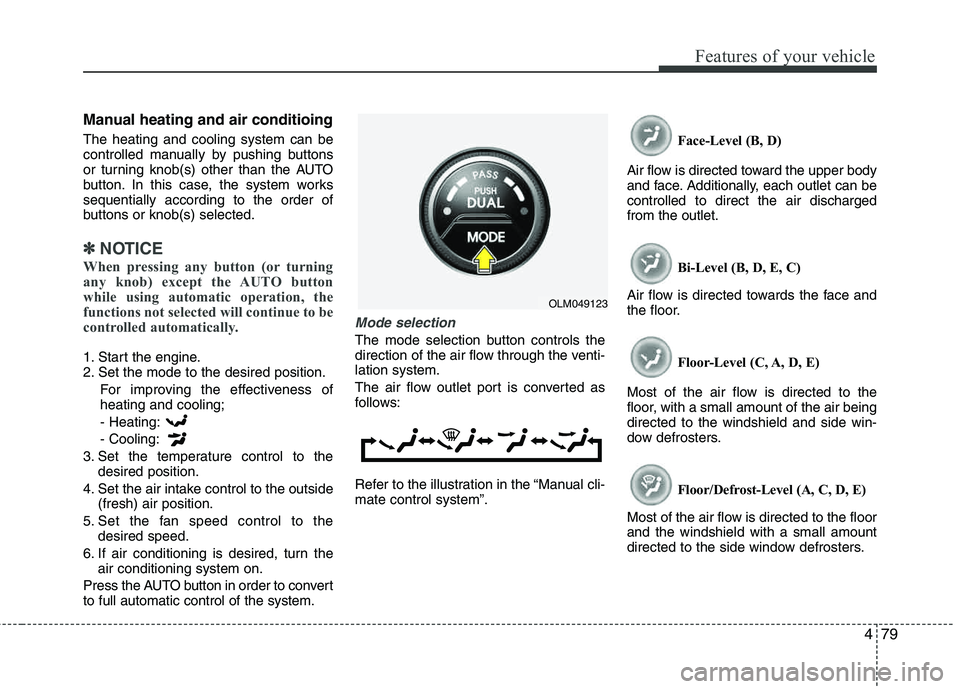
Mode selection
The mode selection button controls the
direction of the air flow through the venti-lation system.
The air flow outlet port is converted as
follows:
Refer to the illustration in the “Manual cli- mate control system”. Face-Level (B, D)
Air flow is directed toward the upper body
and face. Additionally, each outlet can becontrolled to direct the air dischargedfrom the outlet.
Bi-Level (B, D, E, C)
Air flow is directed towards the face and
the floor.
Floor-Level (C, A, D, E)
Most of the air flow is directed to the
floor, with a small amount of the air being directed to the windshield and side win-
dow defrosters.
Floor/Defrost-Level (A, C, D, E)
Most of the air flow is directed to the floorand the windshield with a small amount
directed to the side window defrosters.
OLM049123
Page 161 of 397

481
Features of your vehicle
Adjusting the driver and passenger side
temperature individually
1. Press the DUAL button to operate thedriver and passenger side temperature
individually. Also, if the passenger side
temperature control switch is operat-ed, it will automatically change to the
DUAL mode as well.
2. Operate the left temperature control to adjust the driver side temperature.
Operate the right temperature control
to adjust the passenger side tempera-
ture.
When the driver side temperature is set
to the highest (HI) or lowest (Lo) temper-
ature setting, the DUAL mode is deacti-
vated for maximum heating or cooling. Adjusting the driver and passenger side
temperature equally
1. Press the DUAL button again to deac-
tivate DUAL mode. The passenger
side temperature will be set to the
same temperature as the driver side.
2. Operate the driver side temperature control switch. The driver and passen-
ger side temperature will be adjusted
equally.
Temperature conversion
You can switch the temperature mode
between Fahrenheit to Centigrade as fol-
lows:
While pressing the OFF button, press the
AUTO button for 3 seconds or more.
The display will change from Fahrenheit
to Centigrade, or from Centigrade to
Fahrenheit.
If the battery has been discharged or dis-
connected, the temperature mode dis-
play will reset to Fahrenheit.Outside thermometer
The current outside temperature is dis-
played in 1°F (1°C) increments. The tem-
perature range is between -40°F ~ 140°F(-40°C ~ 60°C).
The outside temperature on the display may not change immediately.
OLM049126OLM049127N
Page 178 of 397

Features of your vehicle
98
4
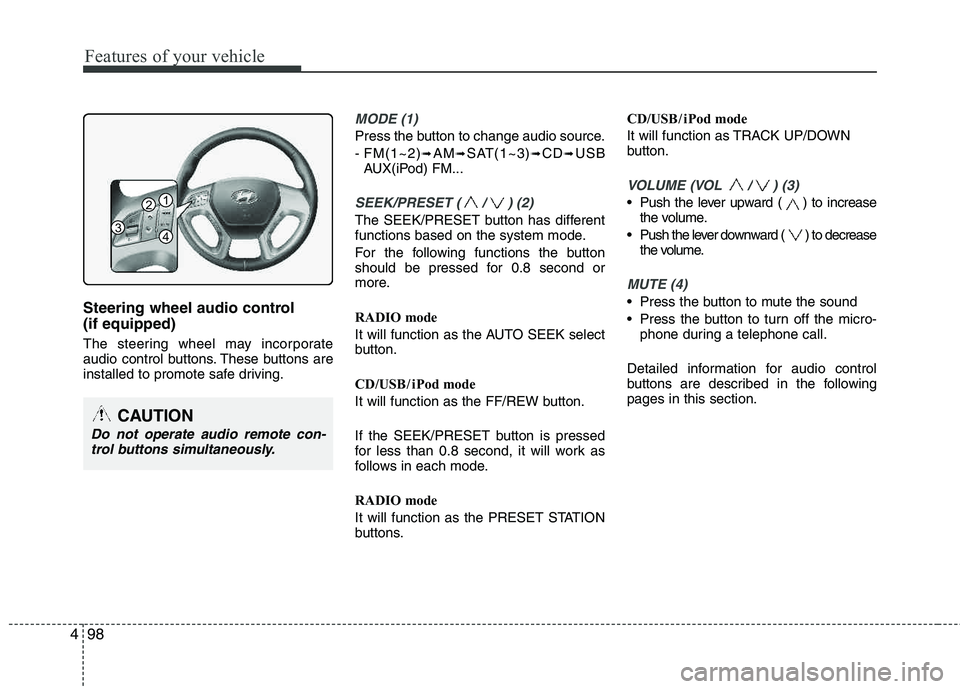
Steering wheel audio control (if equipped)
The steering wheel may incorporate
audio control buttons. These buttons are
installed to promote safe driving.
MODE (1)
Press the button to change audio source.
- FM(1~2)
➟AM➟SAT(1~3)➟CD➟USB
AUX(iPod) FM...
SEEK/PRESET ( / ) (2)
The SEEK/PRESET button has different
functions based on the system mode.
For the following functions the button
should be pressed for 0.8 second or
more.
RADIO mode
It will function as the AUTO SEEK select
button.
CD/USB / i Pod mode
It will function as the FF/REW button.
If the SEEK/PRESET button is pressed
for less than 0.8 second, it will work as
follows in each mode.
RADIO mode
It will function as the PRESET STATION
buttons. CD/USB / i Pod mode
It will function as TRACK UP/DOWN
button.
VOLUME (VOL / ) (3)
• Push the lever upward ( ) to increase
the volume.
Push the lever downward ( ) to decrease the volume.
MUTE (4)
Press the button to mute the sound
Press the button to turn off the micro-phone during a telephone call.
Detailed information for audio control
buttons are described in the followingpages in this section.
CAUTION
Do not operate audio remote con- trol buttons simultaneously.
1
3
2
4
Page 184 of 397
![HYUNDAI TUCSON 2013 Owners Manual Features of your vehicle
104
4
Using RADIO, SETUP, VOLUME
and AUDIO CONTROL
1. AM Selection Button
Pressing the [AM] button selects the AM
band. AM Mode is displayed on the LCD.
2. FM Selection Bu HYUNDAI TUCSON 2013 Owners Manual Features of your vehicle
104
4
Using RADIO, SETUP, VOLUME
and AUDIO CONTROL
1. AM Selection Button
Pressing the [AM] button selects the AM
band. AM Mode is displayed on the LCD.
2. FM Selection Bu](/manual-img/35/56204/w960_56204-183.png)
Features of your vehicle
104
4
Using RADIO, SETUP, VOLUME
and AUDIO CONTROL
1. AM Selection Button
Pressing the [AM] button selects the AM
band. AM Mode is displayed on the LCD.
2. FM Selection Button Turns to FM mode and toggles FM1 and
FM2 when the button is pressed each
time.
3. Automatic Station Seek Button
When the [SEEK ] is pressed, it will
automatically tune to the next lower station.
When the [SEEK ] is pressed, it will automatically tune to the next higher station.
4. Power ON/OFF Button & Volume Control Knob
Turns the audio system on/off whenthe ignition switch is on ACC or ON.
If the knob is turned clockwise/counter- clockwise, the volume will increase
/decrease.
5. Preset Selection Button
Press [1]~[6] buttons less than 0.8 sec-onds to play the station saved in each
button.
Press [1]~[6] b utton more than 0.8 sec-
onds or longer to save the current sta-
tion to the respective button with a
beep.
6. SCAN Button
When the button is pressed, it auto- matically scans the radio stations
upwards.
The SCAN feature steps through each station, starting from the initial station,
for ten seconds.
Press the [SCAN] button again to stop the scan feature and to listen to the currently selected channel.
7. DISP Button
Turn the LCD Display & Backlight on/off
when [DISP] button press.
8. SETUP Button
Press this Button to enter SETUP mode,
If no action is taken for 8 seconds, it will
return to previous mode.
In “SETUP” mode, rotate the TUNE knob
to move the cursor between items, and
push the TUNE knob to select.
Select whether long file names are
scrolled continuously (“ON”) or just once(“OFF”).
Select this item to turn the SDVC(Speed
Dependent Volume Control) feature ON
or OFF. If it is turned ON, volume level is adjusted automatically according to the
vehicle speed.
This function creates virtual sound
effects and allows adjustments to the
BASS level. HIGH
➟MID ➟LOW ➟OFF
Select default display of XM mode.
“Category/Channel name” or “Artist/Song
Title” can be selected.
Page 187 of 397

4107
Features of your vehicle
Using CD Player
1. CD Loading Slot
Insert a CD label side up and gently push
in while ignition switch is on ACC or ON.
The audio automatically switches to CD
mode and begins to play the CD. If the
audio was turned off, audio power will
automatically turned on as the CD is
inserted.
- This audio only recognizes 12cm-size, CD-DA(Audio CD) or ISO data-CD (MP3 CD).
- If UDF data-CD or non-CD(e.g. DVD) is inserted, "Reading Error" message will
be displayed and the disc will be ejected.
2. CD Eject Button
Press [ ] button to eject the CD. This
button works regardless of ignition
switch status.
3. CD Selection Button
If there is a CD in the CD DECK it switch-
es to CD mode. If there is no CD, then the message "No
CD" will become displayed on the LCD
for 3 seconds and returns to the previous
mode.
4. Track Selection Button
Press
[TRACK ] button for less than
0.8 seconds to play from the beginning of current song.
Press [TRACK ] button for less than
0.8 seconds and press again within 1
seconds to play the previous song.
Press [TRACK ] button for 0.8 sec-
onds or longer to initiate reverse direc- tion high speed sound search of cur-rent song.
Press [TRACK ] button for less than
0.8 seconds to play the next song.
Press [TRACK ] button for 0.8 sec-
onds or longer to initiate forward direc-tion high speed sound search of cur-rent song.
5. RANDOM Play Button
Press this button for less than 0.8 sec- onds to play songs randomly in current
folder.
Press this button for 0.8 seconds or longer to play songs randomly in entire
CD. To cancel RANDOM Play, press this
button again.
6. REPEAT Button
Press this button for less than 0.8 sec-onds to repeat current song.
Press this button for 0.8 seconds or longer to repeat all songs in current
folder.
To cancel REPEAT, press this button again.
7. CD Indicator
When car ignition switch is ACC or ON and if the CD is loaded, this indicator is
lit. If the CD is ejected, the light is turned
off.
8. SCAN Play Button
Play each song in the CD for 10 seconds.
To cancel SCAN Play, press this button again.
9. INFO Button
Displaces the information of the current song.
- Audio CD : Disc Title/Artist, Track Title/Artist, Total Tracks.
CAUTION
Do not insert a CD if CD indicator is
lit.
Page 189 of 397

4109
Features of your vehicle
CAUTION IN USING USB DEVICE
To use an external USB device,make sure the device is not con-nected when starting up the vehi-
cle. Connect the device afterstarting up.
If you start the engine when the USB device is connected, it may
damage the USB device. (USBflashdrives are very sensitive toelectric shock.)
If the engine is started up or turned off while the external USBdevice is connected, the externalUSB device may not work.
It may not play inauthentic MP3 or WMA files.
1) It can only play MP3 files with the compression rate between8Kbps~320Kbps.
2) It can only play WMA music files with the compression rate
between 8Kbps~320Kbps.
Take precautions for static elec- tricity when connecting or dis-connecting the external USB
device.
(Continued)
(Continued) An encrypted MP3 PLAYER is not recognizable.
Depending on the condition of the external USB device, the con-nected external USB device can be unrecognizable.
When the formatted byte/sector setting of External USB device isnot either 512BYTE or 2048BYTE,then the device will not be recog-nized.
Use only a USB device formatted to FAT 12/16/32.
USB devices without USB I/F authentication may not be recog-nizable.
Make sure the USB connection terminal does not come in con-
tact with the human body or otherobjects.
If you repeatedly connect or dis- connect the USB device in a shortperiod of time, it may break the device.
You may hear a strange noise when connecting or disconnect-ing a USB device.
(Continued)(Continued)
If you disconnect the external USB device during playback in USBmode, the external USB device can
be damaged or may malfunction.Therefore, disconnect the externalUSB device when the audio isturned off or in another mode. (e.g,
Radio, XM or CD)
Depending on the type and capacity of the external USBdevice or the type of the files
stored in the device, there is a dif-ference in the time taken forrecognition of the device.
Do not use the USB device for purposes other than playingmusic files.
Use of USB accessories such as rechargers or heaters using USBI/F may lower performance orcause trouble.
If you use devices such as a USB hub purchased separately, thevehicle’s audio system may notrecognize the USB device. In that
case, connect the USB devicedirectly to the multimedia termi-nal of the vehicle.
(Continued)