2013 Hyundai Sonata DOOR LOCKS
[x] Cancel search: DOOR LOCKSPage 100 of 410

419
Features of your vehicle
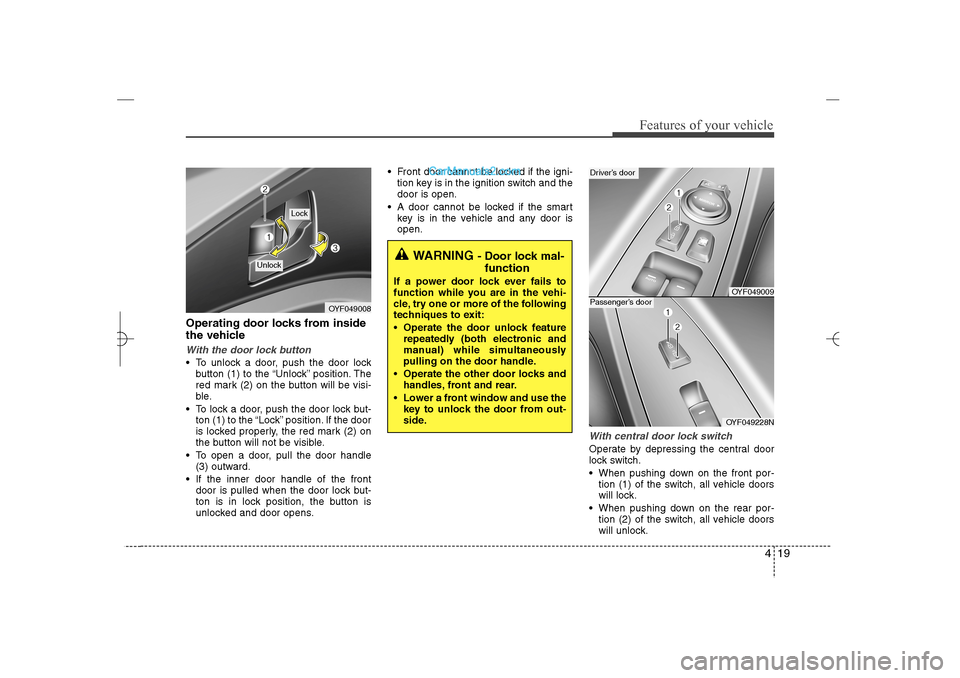
Operating door locks from inside
the vehicleWith the door lock button To unlock a door, push the door lock
button (1) to the “Unlock” position. The
red mark (2) on the button will be visi-
ble.
To lock a door, push the door lock but-
ton (1) to the “Lock” position. If the door
is locked properly, the red mark (2) on
the button will not be visible.
To open a door, pull the door handle
(3) outward.
If the inner door handle of the front
door is pulled when the door lock but-
ton is in lock position, the button is
unlocked and door opens. Front door cannot be locked if the igni-
tion key is in the ignition switch and the
door is open.
A door cannot be locked if the smart
key is in the vehicle and any door is
open.
With central door lock switchOperate by depressing the central door
lock switch.
When pushing down on the front por-
tion (1) of the switch, all vehicle doors
will lock.
When pushing down on the rear por-
tion (2) of the switch, all vehicle doors
will unlock.
OYF049008
Lock
Unlock
WARNING
- Door lock mal-
function
If a power door lock ever fails to
function while you are in the vehi-
cle, try one or more of the following
techniques to exit:
Operate the door unlock feature
repeatedly (both electronic and
manual) while simultaneously
pulling on the door handle.
Operate the other door locks and
handles, front and rear.
Lower a front window and use the
key to unlock the door from out-
side.
OYF049009
Driver’s door
OYF049228N
Passenger’s door
YF HMA 4a-111.qxp 1/16/2012 6:28 PM Page 19
Page 102 of 410

421
Features of your vehicle
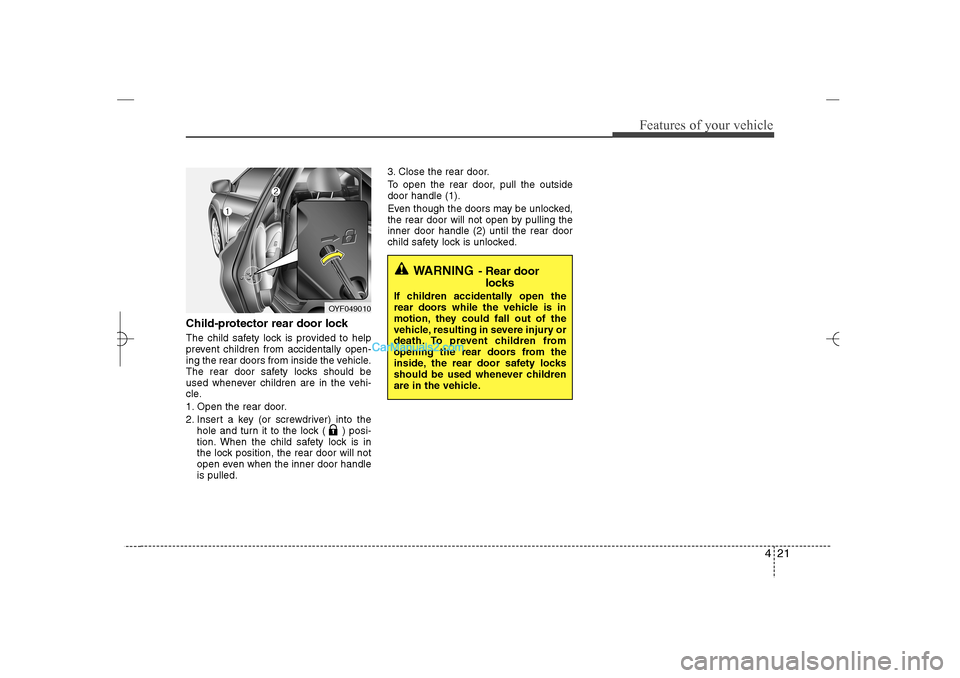
Child-protector rear door lockThe child safety lock is provided to help
prevent children from accidentally open-
ing the rear doors from inside the vehicle.
The rear door safety locks should be
used whenever children are in the vehi-
cle.
1. Open the rear door.
2. Insert a key (or screwdriver) into the
hole and turn it to the lock ( ) posi-
tion. When the child safety lock is in
the lock position, the rear door will not
open even when the inner door handle
is pulled.3. Close the rear door.
To open the rear door, pull the outside
door handle (1).
Even though the doors may be unlocked,
the rear door will not open by pulling the
inner door handle (2) until the rear door
child safety lock is unlocked.
OYF049010
WARNING
- Rear door
locks
If children accidentally open the
rear doors while the vehicle is in
motion, they could fall out of the
vehicle, resulting in severe injury or
death. To prevent children from
opening the rear doors from the
inside, the rear door safety locks
should be used whenever children
are in the vehicle.
YF HMA 4a-111.qxp 1/16/2012 6:28 PM Page 21
Page 103 of 410

Features of your vehicle22 4Opening the trunk To open the trunk, press the trunk
unlock button for more than 1 second
on the transmitter (or smart key), press
the button on the trunk handle with the
smart key in your possession, or insert
the master key (or mechanical key of
the smart key) into the lock and turn it
clockwise. To open the trunk from inside the vehi-
cle, press the trunk lid release button.
Once the trunk is opened and then
closed, the trunk is locked automatically.✽ ✽
NOTICEIn cold and wet climates, door locks and
door mechanisms may not work proper-
ly due to freezing conditions.
Closing the trunkTo close the trunk, lower the trunk lid,
then press down on it until it locks. To be
sure the trunk lid is securely fastened,
always check by trying to pull it up again.
TRUNK
OYF049012
CAUTION
Make certain that you close the
trunk before driving your vehicle.
Possible damage may occur to the
trunk lift cylinders and attached
hardware if the trunk is not closed
prior to driving.
WARNING
The trunk swing upward. Make sure
no objects or people are near the
rear of the vehicle when opening
the trunk.
WARNING
The trunk lid should be always kept
completely closed while the vehicle
is in motion. If it is left open or ajar,
poisonous exhaust gases may
enter the vehicle and serious ill-
ness or death may result.
OYF049011NOYF049231N
■Type A■Type B
YF HMA 4a-111.qxp 1/16/2012 6:28 PM Page 22
Page 125 of 410

Features of your vehicle44 4To adjust the Zone setting:
1. Determine the desired Zone Number
based upon your current location on
the Zone Map.
2. Press and hold the button for 6 sec-
onds, the current Zone Number will
appear on the display.
3. Pressing and holding the button
again will cause the numbers to incre-
ment (Note: they will repeat …13, 14,
15, 1, 2, …). Releasing the button
when the desired Zone Number
appears on the display will set the new
Zone.
4. Within about 5 seconds the compass
will start displaying a compass head-
ing again.
There are some conditions that can
cause changes to the vehicle magnets,
such as installing a ski rack or a CB
antenna. Body repair work on the vehicle
can also cause changes to the vehicle's
magnetic field. In these situations, the
compass will need to be re-calibrated to
quickly correct for these changes. To re-
calibrate the compass:1. Press and hold the button for more
than 9 seconds. When the compass
memory is cleared a "C" will appear in
the display.
2. To calibrate the compass, drive the
vehicle in 2 complete circles at less
than 5 mph (8 km/h).
Integrated HomeLink
®Wireless Control
System
The HomeLink
®Wireless Control System
provides a convenient way to replace up
to three hand-held radio-frequency (RF)
transmitters with a single built-in device.
This innovative feature will learn the
radio frequency codes of most current
transmitters to operate devices such as
gate operators, garage door openers,
entry door locks, security systems, even
home lighting. Both standard and rolling
code-equipped transmitters can be pro-
grammed by following the outlined proce-
dures. Additional HomeLink
®information
can be found at: www.homelink.com or
by calling 1-800-355-3515.Retain the original transmitter of the RF
device you are programming for use in
other vehicles as well as for future
HomeLink
®programming. It is also sug-
gested that upon the sale of the vehicle,
the programmed HomeLink
®buttons be
erased for security purposes.
WARNING
Before programming HomeLink
®to
a garage door opener or gate oper-
ator, make sure that people and
objects are out of the way of the
device to prevent potential harm or
damage. Do not use HomeLink®
with any garage door opener that
lacks the safety stop and reverse
features required by U.S. federal
safety standards (this includes any
garage door opener model manu-
factured before April 1, 1982). A
garage door that cannot detect an
object - signaling the door to stop
and reverse - does not meet current
U.S. federal safety standards. Using
a garage door opener without these
features increases the risk of seri-
ous injury or death.
YF HMA 4a-111.qxp 1/16/2012 6:30 PM Page 44
Page 321 of 410

Maintenance6 7While operating your vehicle: Note any changes in the sound of the
exhaust or any smell of exhaust fumes
in the vehicle.
Check for vibrations in the steering
wheel. Notice any increased steering
effort or looseness in the steering
wheel, or change in its straight-ahead
position.
Notice if your vehicle constantly turns
slightly or “pulls” to one side when trav-
eling on smooth, level road.
When stopping, listen and check for
unusual sounds, pulling to one side,
increased brake pedal travel or “hard-
to-push” brake pedal.
If any slipping or changes in the oper-
ation of your transaxle occurs, check
the transaxle fluid level.
Check automatic transaxle P (Park)
function.
Check parking brake.
Check for fluid leaks under your vehicle
(water dripping from the air condition-
ing system during or after use is nor-
mal).
At least monthly: Check coolant level in the engine
coolant reservoir.
Check the operation of all exterior
lights, including the stoplights, turn sig-
nals and hazard warning flashers.
Check the inflation pressures of all
tires including the spare.At least twice a year
(i.e., every Spring and Fall): Check radiator, heater and air condi-
tioning hoses for leaks or damage.
Check windshield washer spray and
wiper operation. Clean wiper blades
with clean cloth dampened with wash-
er fluid.
Check headlight alignment.
Check muffler, exhaust pipes, shields
and clamps.
Check the lap/shoulder belts for wear
and function.
Check for worn tires and loose wheel
lug nuts.
At least once a year: Clean body and door drain holes.
Lubricate door hinges and checks, and
hood hinges.
Lubricate door and hood locks and
latches.
Lubricate door rubber weatherstrips.
Check the air conditioning system.
Inspect and lubricate automatic
transaxle linkage and controls.
Clean battery and terminals.
Check the brake fluid level.
YF HMA 7.qxp 1/16/2012 6:18 PM Page 6
Page 404 of 410

Index4I
Displays, see instrument cluster ····································4-50
Display illumination, see instrument panel
illumination ·······························································4-51
Door locks······································································4-18
Central door lock switch ···········································4-19
Child-protector rear door lock ··································4-21
Drink holders, see cup holders ····································4-107
Driver's 3-point system with emergency locking
retractor ·····································································3-19
Driver's air bag·······························································3-49
Driving at night······························································5-39
Driving in flooded areas ················································5-40
Driving in the rain ·························································5-40
Economical operation ····················································5-36
EDR, see Vehicle data collection and event data
recorders ······································································1-6
Electronic stability control (ESC) ·································5-26
Electric chromic mirror (ECM) with HomeLink system
and compass ······························································4-41
Electric power steering ··················································4-39
Emergency starting ··························································6-4
Jump starting ·······························································6-4
Push starting ································································6-5
Emergency while driving·················································6-2Emission control system ················································7-73
Crankcase emission control system ··························7-73
Evaporative emission control System ·······················7-73
Exhaust emission control system ······························7-74
Engine compartment ················································2-4, 7-2
Engine coolant ·······························································7-24
Engine number ·································································8-7
Engine oil ·······································································7-22
Engine overheats······························································6-6
Engine start/stop button ···················································5-7
Engine temperature gauge ·············································4-52
Engine will not start·························································6-3
Evaporative emission control System ···························7-73
Exhaust emission control system···································7-74
Explanation of scheduled maintenance items ···············7-19
Exterior care···································································7-67
Flat tire ···········································································6-12
Changing tires ···························································6-13
Compact spare tire ····················································6-18
Jack and tools ····························································6-12
Removing and storing the spare tire ·························6-13
Floor mat anchor(s)······················································4-110
Fluid
Washer fluid ······························································7-27
Brakes/clutch fluid ····················································7-26E
F
YF HMA INDEX.QXP 5/16/2011 5:52 PM Page 4