2013 Hyundai Sonata Hybrid oil
[x] Cancel search: oilPage 364 of 425

Maintenance
50 7
FUSES
A vehicle’s electrical system is protected
from electrical overload damage by fuses.
This vehicle has 2 fuse panels, one locat-
ed in the driver’s side panel bolster, the
other in the engine compartment.
If any of your vehicle’s lights, accessories,
or controls do not work, check the appro-
priate circuit fuse. If a fuse has blown, the
element inside the fuse will be melted.
If the electrical system does not work,
first check the driver’s side fuse panel.Before replacing a blown fuse, discon-
nect the negative battery cable.
Always replace a blown fuse with one of
the same rating.
If the replacement fuse blows, this indi-
cates an electrical problem. Avoid using
the system involved and immediately
consult an authorized HYUNDAI dealer.
Three kinds of fuses are used: blade type
for lower amperage rating, cartridge type,
and multi fuse for higher amperage ratings.
✽ ✽
NOTICE
The actual fuse/relay panel label may
differ from equipped items.
WARNING - Fuse
replacement
Never replace a fuse with anything
but another fuse of the same rat-
ing.
A higher capacity fuse could
cause damage and possibly a fire.
Never install a wire or aluminum
foil instead of the proper fuse -
even as a temporary repair. It may
cause extensive wiring damage
and a possible fire.
CAUTION
Do not use a screwdriver or any
other metal object to remove fuses
because it may cause a short circuit
and damage the system.
CAUTION
When replacing a blown fuse or
relay with a new one, make sure
the new fuse or relay fits tightly
into the clips. The incomplete fas-
tening fuse or relay may cause the
vehicle wiring and electric sys-
tems damage and a possible fire.
Do not remove fuses, relays and
terminals fastened with bolts or
nuts. The fuses, relays and termi-
nals may be fastened incomplete-
ly, and it may cause a possible
fire. If fuses, relays and terminals
fastened with bolts or nuts are
blown, consult with an authorized
HYUNDAI dealer.
Do not input any other objects
except fuses or relays into
fuse/relay terminals such as a driv-
er or wiring. It may cause contact
failure and system malfunction.
OBK079042 Normal Normal Blade type
Cartridge type
Multi fuseBlown
Blown
Normal Blown
Page 367 of 425

753
Maintenance
Multi fuse
If the multi fuse is blown, it must be
removed as follows:
1. Turn off the engine.
2. Disconnect the negative battery cable.
3. Remove the fuse panel on the right
side in the engine compartment.
4. Remove the nuts shown in the picture
above.
5. Replace the fuse with a new one of the
same rating.
6. Reinstall in the reverse order of
removal.
✽ ✽
NOTICE
If the multi fuse is blown, consult an
authorized HYUNDAI dealer.
Oil pump cooling fuse/
Cooling fan fuse
If the oil pump cooling fuse or cooling fan
fuse is blown, it must be removed as fol-
lows:
1. Turn off the engine.
2. Disconnect the negative battery cable.
3. Remove the fuse panel on the right
side in the engine compartment.
4. Replace the fuse with a new one of the
same rating.
5. Reinstall in the reverse order of
removal.
Sub-relay fuse
If the sub-relay fuse is blown, it must be
removed as follows:
1. Turn off the engine.
2. Disconnect the negative battery cable.
3. Replace the fuse with a new one of the
same rating.
4. Reinstall in the reverse order of
removal.
OYFH071088NOYFH071089NOYFH071072N
Page 370 of 425

Maintenance
56 7
Description Fuse rating Protected component
WIPER 25A E/R Fuse & Relay Box (Wiper Relay), Front Wiper Motor, Multifunction Switch
MODULE 5 7.5A PDM, Electro Chromic Mirror, Panorama Sunroof
DR LOCK 20AI/P Junction Box (Door Lock Relay, Door Unlock Relay),
E/R Fuse & Relay Box (T/Turn Unlock Relay)
POWER OUTLET 2 15A Front Power Outlet LH
MODULE 1 7.5AInstrument Cluster, A/C Control Module, BCM, Sport Mode Switch IND., Clock, Audio,
Driver/Passenger Seat Warmer Module
IG 1 20A E/R Fuse & Relay Box (Fuse - ESC 3 10A, ECU 4 10A, OIL PUMP 2 10A, TCU 2 10A)
HCU 20A Hybrid Control Unit
A/BAG 15A Telltale Lamp, SRS Control Module, Passenger Weight Classification Sensor
START 1 7.5AW/O Smart Key - Burglar Alarm Relay
With Smart Key - PDM
MDPS 10A ESC Off Switch, Tire Pressure Monitoring Module, EPS Control Module
PDM 3 7.5A Smart Key Module, PDM
WATER PUMP HEV 10A Hybrid Water Pump
A/BAG IND. 7.5A Instrument Cluster
POWER
CONNECTORAUDIO 15A Audio, A/V & Navigation Head Unit
ROOM LP 10ATrunk Room Lamp, Driver Door Lamp, Ignition Key ILL. & Door Warning Switch,
Instrument Cluster, Passenger Door Lamp, A/C Control Module, Glove Box Lamp, BCM,
Front Monitor, Clock, RF Receiver, Data Link Connector, Tire Pressure Monitoring Module,
Auto Light & Photo Sensor, Electro Chromic Mirror, Room Lamp Relay
Page 371 of 425

757
Maintenance
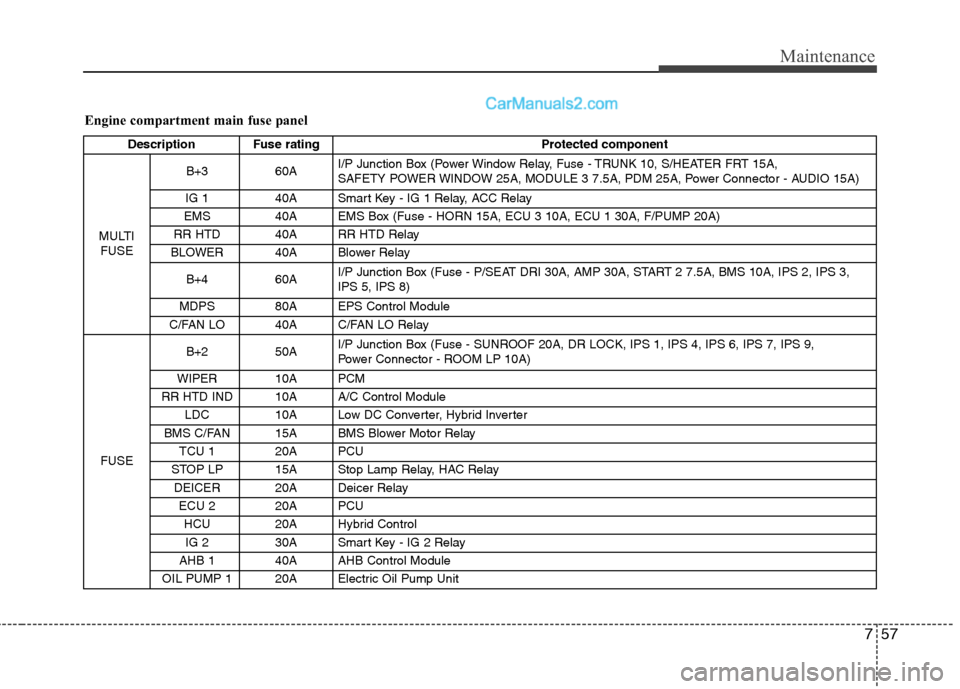
Engine compartment main fuse panel
Description Fuse rating Protected component
MULTI
FUSEB+3 60AI/P Junction Box (Power Window Relay, Fuse - TRUNK 10, S/HEATER FRT 15A,
SAFETY POWER WINDOW 25A, MODULE 3 7.5A, PDM 25A, Power Connector - AUDIO 15A)
IG 1 40A Smart Key - IG 1 Relay, ACC Relay
EMS 40A EMS Box (Fuse - HORN 15A, ECU 3 10A, ECU 1 30A, F/PUMP 20A)
RR HTD 40A RR HTD Relay
BLOWER 40A Blower Relay
B+4 60AI/P Junction Box (Fuse - P/SEAT DRI 30A, AMP 30A, START 2 7.5A, BMS 10A, IPS 2, IPS 3,
IPS 5, IPS 8)
MDPS 80A EPS Control Module
C/FAN LO 40A C/FAN LO Relay
FUSEB+2 50AI/P Junction Box (Fuse - SUNROOF 20A, DR LOCK, IPS 1, IPS 4, IPS 6, IPS 7, IPS 9,
Power Connector - ROOM LP 10A)
WIPER 10A PCM
RR HTD IND 10A A/C Control Module
LDC 10A Low DC Converter, Hybrid Inverter
BMS C/FAN 15A BMS Blower Motor Relay
TCU 1 20A PCU
STOP LP 15A Stop Lamp Relay, HAC Relay
DEICER 20A Deicer Relay
ECU 2 20A PCU
HCU 20A Hybrid Control
IG 2 30A Smart Key - IG 2 Relay
AHB 1 40A AHB Control Module
OIL PUMP 1 20A Electric Oil Pump Unit
Page 372 of 425

Maintenance
58 7
Description Fuse rating Protected component
FUSEESC 1 40A EBS Control Module
ESC 2 30A EBS Control Module
AHB 2 30A AHB Control Module
ECU 4 10A PCM
TCU 2 15A Transaxle Range Switch
ESC 3 10AHAC Relay, Stop Lamp Switch, Multipurpose Check Connector, EBS Control Module,
AHB Control Module
OIL PUMP 2 10A Hybrid Fuse & Relay Box (OPCU Relay), Active Air Flap, Electric Oil Pump Unit
B/UP LP 10A A/V & Navigation Head Unit, Rear Combination Lamp (IN) LH/RH, BCM, Electro Chromic Mirror
Page 375 of 425

761
Maintenance
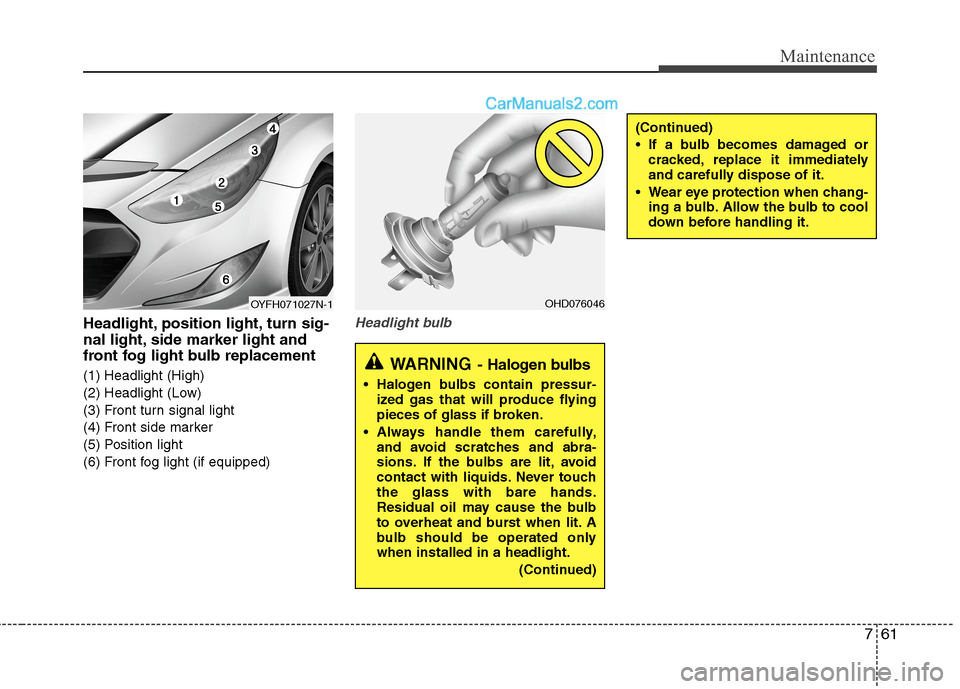
Headlight, position light, turn sig-
nal light, side marker light and
front fog light bulb replacement
(1) Headlight (High)
(2) Headlight (Low)
(3) Front turn signal light
(4) Front side marker
(5) Position light
(6) Front fog light (if equipped)
Headlight bulb
(Continued)
If a bulb becomes damaged or
cracked, replace it immediately
and carefully dispose of it.
Wear eye protection when chang-
ing a bulb. Allow the bulb to cool
down before handling it.
OHD076046
WARNING- Halogen bulbs
Halogen bulbs contain pressur-
ized gas that will produce flying
pieces of glass if broken.
Always handle them carefully,
and avoid scratches and abra-
sions. If the bulbs are lit, avoid
contact with liquids. Never touch
the glass with bare hands.
Residual oil may cause the bulb
to overheat and burst when lit. A
bulb should be operated only
when installed in a headlight.
(Continued)
OYFH071027N-1
Page 384 of 425

Maintenance
70 7
Waxing
Wax the vehicle when water will no
longer bead on the paint.
Always wash and dry the vehicle before
waxing. Use a good quality liquid or
paste wax, and follow the manufacturer’s
instructions. Wax all metal trim to protect
it and to maintain its luster.
Removing oil, tar, and similar materials
with a spot remover will usually strip the
wax from the finish. Be sure to re-wax
these areas even if the rest of the vehicle
does not yet need waxing.Finish damage repair
Deep scratches or stone chips in the
painted surface must be repaired
promptly. Exposed metal will quickly rust
and may develop into a major repair
expense.
✽ ✽
NOTICE
If your vehicle is damaged and requires
any metal repair or replacement, be sure
the body shop applies anti-corrosion
materials to the parts repaired or
replaced.
Bright-metal maintenance
To remove road tar and insects, use a
tar remover, not a scraper or other
sharp object.
To protect the surfaces of bright-metal
parts from corrosion, apply a coating of
wax or chrome preservative and rub to
a high luster.
During winter weather or in coastal
areas, cover the bright metal parts with
a heavier coating of wax or preserva-
tive. If necessary, coat the parts with
non-corrosive petroleum jelly or other
protective compound.
Underbody maintenance
Corrosive materials used for ice and
snow removal and dust control may col-
lect on the underbody. If these materials
are not removed, accelerated rusting can
occur on underbody parts such as the
fuel lines, frame, floor pan and exhaust
system, even though they have been
treated with rust protection.
Thoroughly flush the vehicle underbody
and wheel openings with lukewarm or
cold water once a month, after off-road
driving and at the end of each winter. Pay
special attention to these areas because
it is difficult to see all the mud and dirt. It
will do more harm than good to wet down
the road grime without removing it. The
lower edges of doors, rocker panels, and
frame members have drain holes that
should not be allowed to clog with dirt;
trapped water in these areas can cause
rusting.
CAUTION
Wiping dust or dirt off the body
with a dry cloth will scratch the
finish.
Do not use steel wool, abrasive
cleaners, or strong detergents
containing highly alkaline or
caustic agents on chrome-plated
or anodized aluminum parts. This
may result in damage to the pro-
tective coating and cause discol-
oration or paint deterioration.
Page 387 of 425

773
Maintenance
give particular attention to the compo-
nents under the fenders and other
areas that are hidden from view. Do a
thorough job; just dampening the accu-
mulated mud rather than washing it
away will accelerate corrosion rather
than prevent it. Water under high pres-
sure and steam are particularly effec-
tive in removing accumulated mud and
corrosive materials.
rocker panels and frame members, be
sure that drain holes are kept open so
that moisture can escape and not be
trapped inside to accelerate corrosion.
Keep your garage dry
Don't park your car in a damp, poorly
ventilated garage. This creates a favor-
able environment for corrosion. This is
particularly true if you wash your car in
the garage or drive it into the garage
when it is still wet or covered with snow,
ice or mud. Even a heated garage can
contribute to corrosion unless it is well
ventilated so moisture is dispersed.Keep paint and trim in good condition
Scratches or chips in the finish should be
covered with "touch-up" paint as soon as
possible to reduce the possibility of cor-
rosion. If bare metal is showing through,
the attention of a qualified body and paint
shop is recommended.
Bird droppings : Bird droppings are high-
ly corrosive and may damage painted
surfaces in just a few hours. Always
remove bird droppings as soon as possi-
ble.
Don't neglect the interior
Moisture can collect under the floor mats
and carpeting to cause corrosion. Check
under the mats periodically to be sure
the carpeting is dry. Use particular care if
you carry fertilizers, cleaning materials or
chemicals in the car.
These should be carried only in proper
containers and any spills or leaks should
be cleaned up, flushed with clean water
and thoroughly dried.Interior care
Interior general precautions
Prevent chemicals such as perfume, cos-
metil oil, sun cream, hand cleaner, and
air freshener from contacting the interior
parts because they may cause damage
or discoloration. If they do contact the
interior parts, wipe them off immediately.
See the instructions that follow for the
proper way to clean vinyl.
CAUTION
Never allow water or other liquids
to come in contact with electri-
cal/electronic components inside
the vehicle as this may damage
them.
When cleaning leather products
(steering wheel, seats etc.), use
neutral detergents or low alcohol
content solutions. If you use high
alcohol content solutions or
acid/alkaline detergents, the color
of the leather may fade or the sur-
face may get stripped off.