Page 234 of 425
Features of your vehicle
154 4
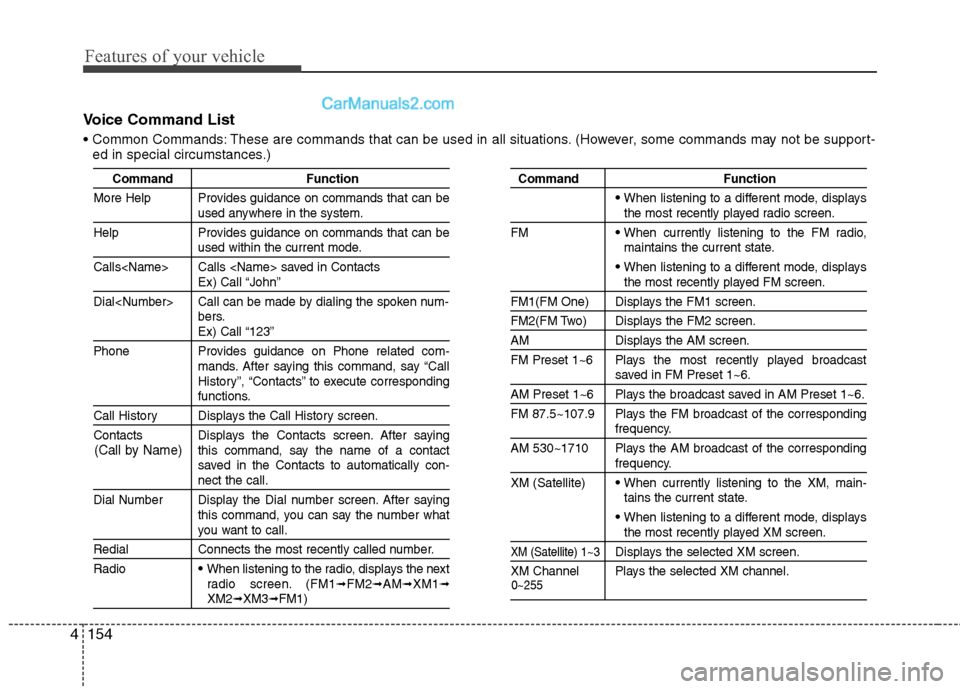
Voice Command List
These are commands that can be used in all situations. (However, some commands may not be support-
ed in special circumstances.)
Command Function
More Help Provides guidance on commands that can be
used anywhere in the system.
Help Provides guidance on commands that can be
used within the current mode.
Calls Calls saved in Contacts
Ex) Call “John”
Dial Call can be made by dialing the spoken num-
bers.
Ex) Call “123”
Phone Provides guidance on Phone related com-
mands. After saying this command, say “Call
History”, “Contacts” to execute corresponding
functions.
Call History Displays the Call History screen.
Contacts Displays the Contacts screen. After saying
this command, say the name of a contact
saved in the Contacts to automatically con-
nect the call.
Dial Number Display the Dial number screen. After saying
this command, you can say the number what
you want to call.
Redial Connects the most recently called number.
Radio
When listening to the radio, displays the next
radio screen. (FM1➟FM2➟AM➟XM1➟XM2➟XM3➟FM1)
Command Function
When listening to a different mode, displaysthe most recently played radio screen.
FM
When currently listening to the FM radio,
maintains the current state.
When listening to a different mode, displaysthe most recently played FM screen.
FM1(FM One) Displays the FM1 screen.
FM2(FM Two) Displays the FM2 screen.
AM Displays the AM screen.
FM Preset 1~6 Plays the most recently played broadcast
saved in FM Preset 1~6.
AM Preset 1~6 Plays the broadcast saved in AM Preset 1~6.
FM 87.5~107.9 Plays the FM broadcast of the corresponding
frequency.
AM 530~1710 Plays the AM broadcast of the corresponding
frequency.
XM (Satellite)
When currently listening to the XM, main-
tains the current state.
When listening to a different mode, displaysthe most recently played XM screen.
XM (Satellite) 1~3Displays the selected XM screen.
XM Channel Plays the selected XM channel.
(Call by Name)
0~255
Page 236 of 425
Features of your vehicle
156 4
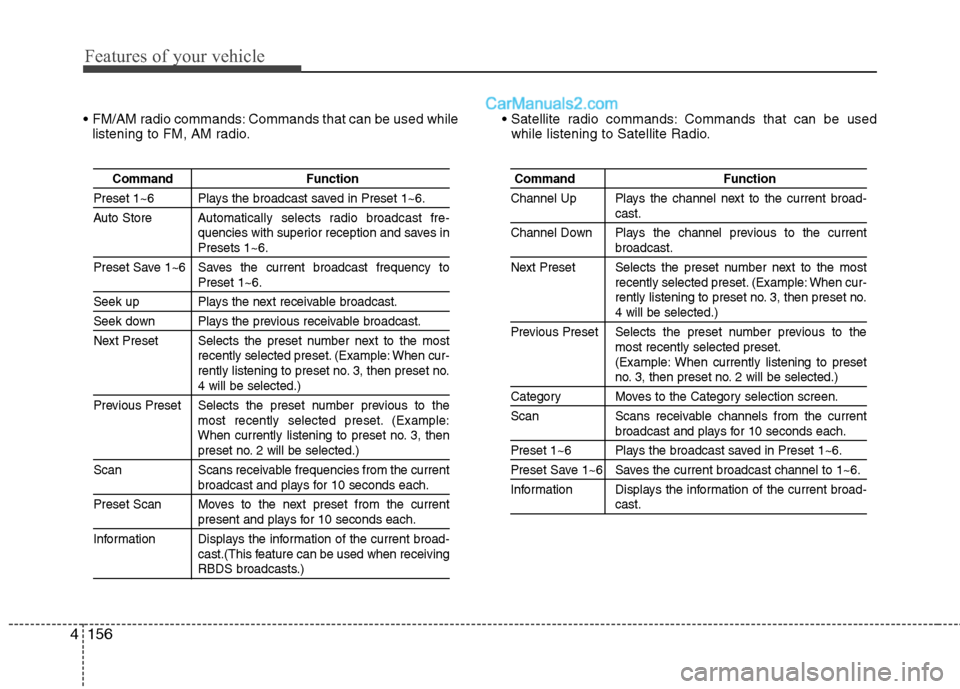
FM/AM radio commands: Commands that can be used while
listening to FM, AM radio. Commands that can be used
while listening to Satellite Radio.
Command Function
Preset 1~6 Plays the broadcast saved in Preset 1~6.
Auto Store Automatically selects radio broadcast fre-
quencies with superior reception and saves in
Presets 1~6.
Preset Save 1~6 Saves the current broadcast frequency to
Preset 1~6.
Seek up Plays the next receivable broadcast.
Seek down Plays the previous receivable broadcast.
Next Preset Selects the preset number next to the most
recently selected preset. (Example: When cur-
rently listening to preset no. 3, then preset no.
4 will be selected.)
Previous Preset Selects the preset number previous to the
most recently selected preset. (Example:
When currently listening to preset no. 3, then
preset no. 2 will be selected.)
Scan Scans receivable frequencies from the current
broadcast and plays for 10 seconds each.
Preset Scan Moves to the next preset from the current
present and plays for 10 seconds each.
Information Displays the information of the current broad-
cast.(This feature can be used when receiving
RBDS broadcasts.)
Command Function
Channel Up Plays the channel next to the current broad-
cast.
Channel Down Plays the channel previous to the current
broadcast.
Next Preset Selects the preset number next to the most
recently selected preset. (Example: When cur-
rently listening to preset no. 3, then preset no.
4 will be selected.)
Previous Preset Selects the preset number previous to the
most recently selected preset.
(Example: When currently listening to preset
no. 3, then preset no. 2 will be selected.)
Category Moves to the Category selection screen.
Scan Scans receivable channels from the current
broadcast and plays for 10 seconds each.
Preset 1~6 Plays the broadcast saved in Preset 1~6.
Preset Save 1~6 Saves the current broadcast channel to 1~6.
Information Displays the information of the current broad-
cast.
Page 269 of 425
527
Driving your vehicle
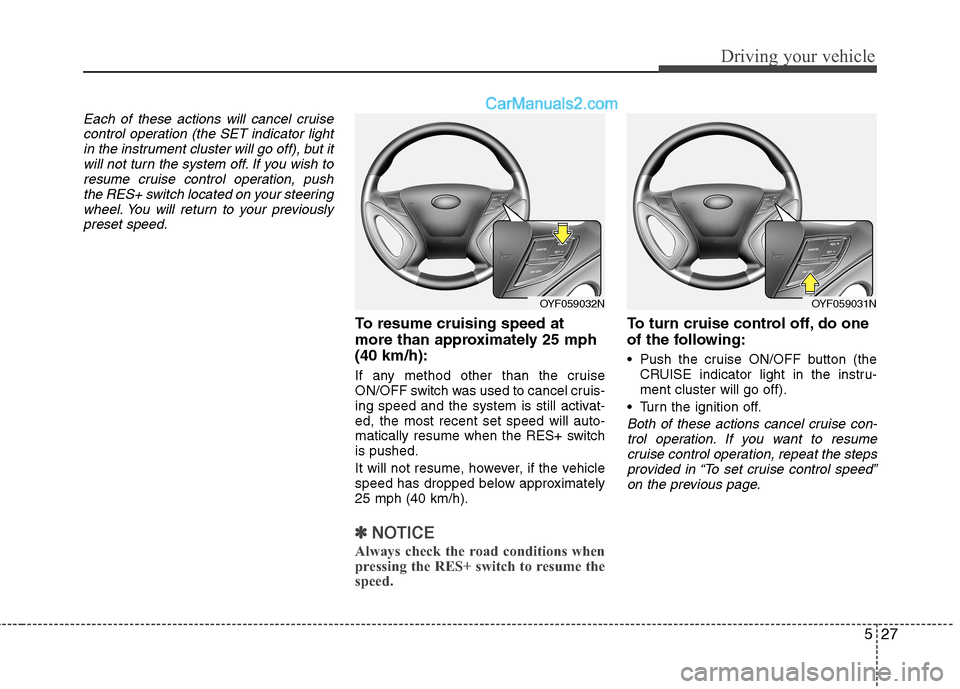
Each of these actions will cancel cruise
control operation (the SET indicator light
in the instrument cluster will go off), but it
will not turn the system off. If you wish to
resume cruise control operation, push
the RES+ switch located on your steering
wheel. You will return to your previously
preset speed.
To resume cruising speed at
more than approximately 25 mph
(40 km/h):
If any method other than the cruise
ON/OFF switch was used to cancel cruis-
ing speed and the system is still activat-
ed, the most recent set speed will auto-
matically resume when the RES+ switch
is pushed.
It will not resume, however, if the vehicle
speed has dropped below approximately
25 mph (40 km/h).
✽ ✽
NOTICE
Always check the road conditions when
pressing the RES+ switch to resume the
speed.
To turn cruise control off, do one
of the following:
Push the cruise ON/OFF button (the
CRUISE indicator light in the instru-
ment cluster will go off).
Turn the ignition off.
Both of these actions cancel cruise con-
trol operation. If you want to resume
cruise control operation, repeat the steps
provided in “To set cruise control speed”
on the previous page.
OYF059032NOYF059031N
Page 350 of 425
Maintenance
36 7
Reset items
Items should be reset after the 12V bat-
tery has been discharged or the 12V bat-
tery has been disconnected.
Auto up/down window (See section 4)
Sunroof (See section 4)
Trip computer (See section 4)
Climate control system
(See section 4)
Clock (See section 4)
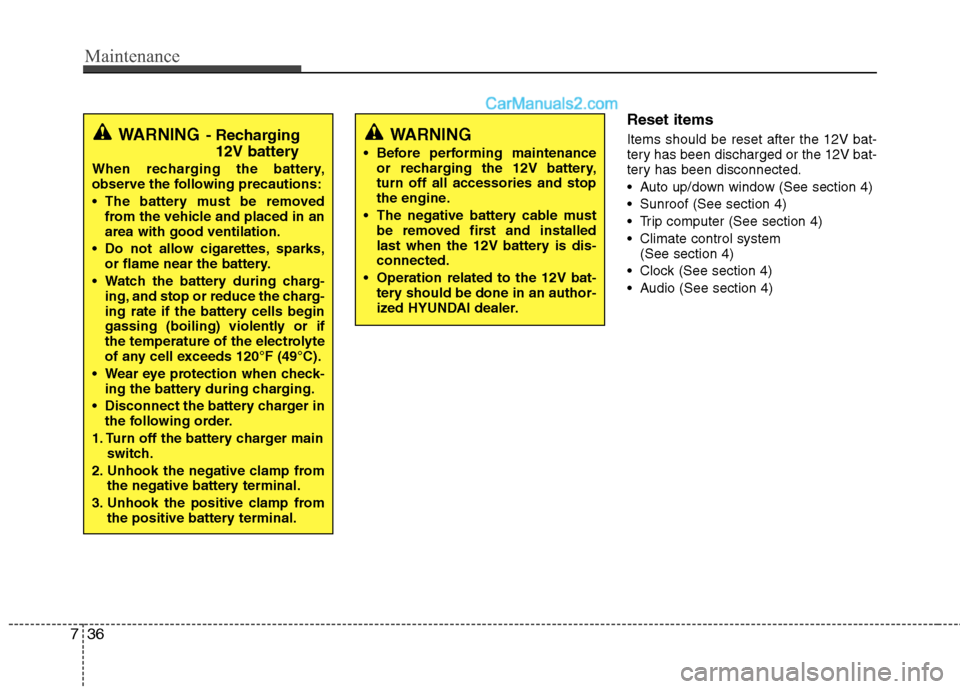
Audio (See section 4)WARNING
Before performing maintenance
or recharging the 12V battery,
turn off all accessories and stop
the engine.
The negative battery cable must
be removed first and installed
last when the 12V battery is dis-
connected.
Operation related to the 12V bat-
tery should be done in an author-
ized HYUNDAI dealer.
WARNING- Recharging
12V battery
When recharging the battery,
observe the following precautions:
The battery must be removed
from the vehicle and placed in an
area with good ventilation.
Do not allow cigarettes, sparks,
or flame near the battery.
Watch the battery during charg-
ing, and stop or reduce the charg-
ing rate if the battery cells begin
gassing (boiling) violently or if
the temperature of the electrolyte
of any cell exceeds 120°F (49°C).
Wear eye protection when check-
ing the battery during charging.
Disconnect the battery charger in
the following order.
1. Turn off the battery charger main
switch.
2. Unhook the negative clamp from
the negative battery terminal.
3. Unhook the positive clamp from
the positive battery terminal.
Page 354 of 425
Maintenance
40 7
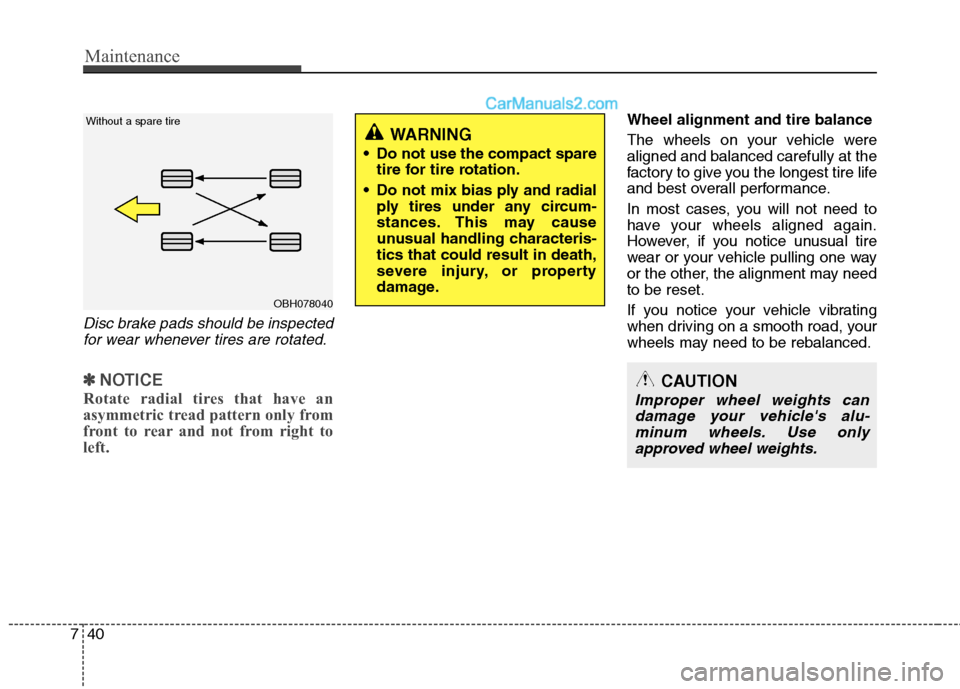
Disc brake pads should be inspected
for wear whenever tires are rotated.
✽ ✽
NOTICE
Rotate radial tires that have an
asymmetric tread pattern only from
front to rear and not from right to
left.
Wheel alignment and tire balance
The wheels on your vehicle were
aligned and balanced carefully at the
factory to give you the longest tire life
and best overall performance.
In most cases, you will not need to
have your wheels aligned again.
However, if you notice unusual tire
wear or your vehicle pulling one way
or the other, the alignment may need
to be reset.
If you notice your vehicle vibrating
when driving on a smooth road, your
wheels may need to be rebalanced.
OBH078040 Without a spare tire
WARNING
Do not use the compact spare
tire for tire rotation.
Do not mix bias ply and radial
ply tires under any circum-
stances. This may cause
unusual handling characteris-
tics that could result in death,
severe injury, or property
damage.
CAUTION
Improper wheel weights can
damage your vehicle's alu-
minum wheels. Use only
approved wheel weights.
Page 366 of 425
Maintenance
52 7
✽
✽
NOTICE
• If the memory fuse is pulled up from
the fuse panel, the warning chime,
audio, clock and interior lamps, etc.,
will not operate. Some items must be
reset after replacement. Refer to
“Battery” in this section.
• Even though the memory fuse is
pulled up, the battery can still be dis-
charged by operation of the head-
lights or other electrical devices.
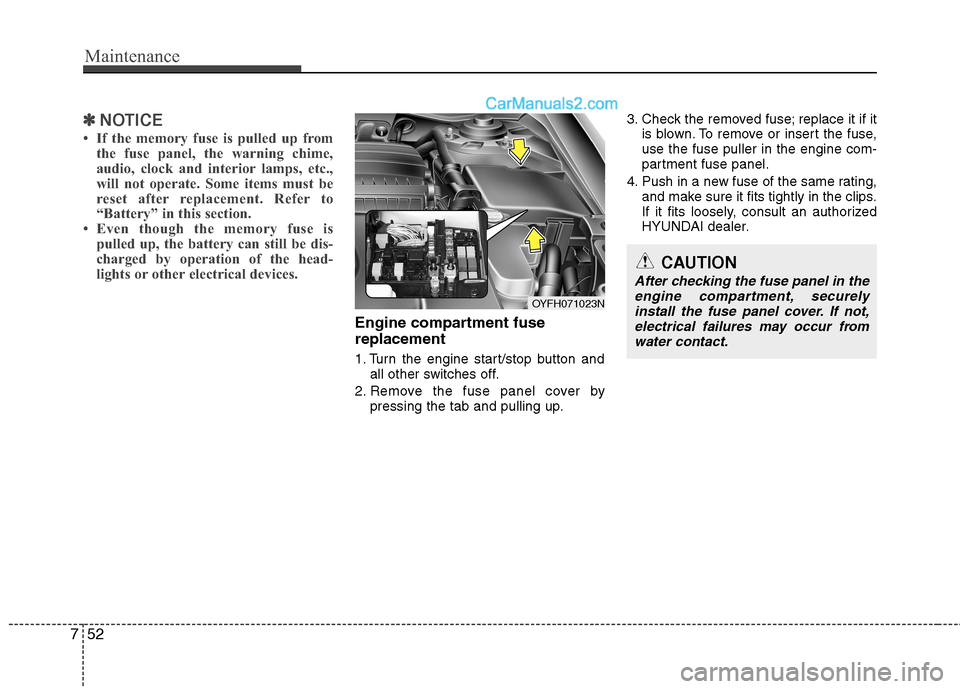
Engine compartment fuse
replacement
1. Turn the engine start/stop button and
all other switches off.
2. Remove the fuse panel cover by
pressing the tab and pulling up.3. Check the removed fuse; replace it if it
is blown. To remove or insert the fuse,
use the fuse puller in the engine com-
partment fuse panel.
4. Push in a new fuse of the same rating,
and make sure it fits tightly in the clips.
If it fits loosely, consult an authorized
HYUNDAI dealer.
OYFH071023N
CAUTION
After checking the fuse panel in the
engine compartment, securely
install the fuse panel cover. If not,
electrical failures may occur from
water contact.
Page:
< prev 1-8 9-16 17-24