2013 Hyundai Sonata Hybrid warning light
[x] Cancel search: warning lightPage 349 of 425
735
Maintenance
12V Battery recharging
Your vehicle has a maintenance-free,
calcium-based battery.
If the 12V battery becomes discharged
in a short time (because, for example,
the headlights or interior lights were
left on while the vehicle was not in
use), jump start it from another vehi-
cle’s 12V battery or recharge it by slow
charging (trickle) for 10 hours.
If the 12V battery gradually discharges
because of high electric load while the
vehicle is being used, recharge it at 20-
30A for two hours.CALIFORNIA PROPOSI-
TION 65 WARNING
Battery posts, terminals, and relat-
ed accessories contain lead and
lead compounds, chemicals known
to the State of California to cause
cancer, birth defects and reproduc-
tive harm. Batteries also contain
other chemicals known to the State
of California to cause cancer. Wash
hands after handling.
CAUTION
When you don’t use the vehicle
for a long time in the low temper-
ature, remove the 12V battery and
store it indoors.
Always charge the 12V battery
fully to prevent 12V battery case
damage in low temperatures.
If you connect unauthorized elec-
tronic devices to the 12V battery,
the 12V battery may be dis-
charged. Never use unauthorized
devices.
(Continued)
When lifting a plastic-cased bat-
tery, excessive pressure on the
case may cause battery acid to
leak, resulting in personal injury.
Lift with a battery carrier or with
your hands on opposite corners.
Never attempt to recharge the
battery when the battery cables
are connected.
The electrical ignition system
works with high voltage. Never
touch these components with the
engine running or the engine
start/stop button positioned on.
Failure to follow the above warn-
ings can result in serious bodily
injury or death.
Page 356 of 425

Maintenance
42 7
Compact spare tire replacement
(if equipped)
A compact spare tire has a shorter
tread life than a regular size tire.
Replace it when you can see the
tread wear indicator bars on the tire.
The replacement compact spare tire
should be the same size and design
tire as the one provided with your
new vehicle and should be mounted
on the same compact spare tire
wheel. The compact spare tire is not
designed to be mounted on a regular
size wheel, and the compact spare
tire wheel is not designed for mount-
ing a regular size tire.Wheel replacement
When replacing the metal wheels for
any reason, make sure the new
wheels are equivalent to the original
factory units in diameter, rim width
and offset.Tire traction
Tire traction can be reduced if you
drive on worn tires, tires that are
improperly inflated or on slippery
road surfaces. Tires should be
replaced when tread wear indicators
appear. To reduce the possibility of
losing control, slow down whenever
there is rain, snow or ice on the road.
Tire maintenance
In addition to proper inflation, correct
wheel alignment helps to decrease
tire wear. If you find a tire is worn
unevenly, have your dealer check the
wheel alignment.
When you have new tires installed,
make sure they are balanced. This
will increase vehicle ride comfort and
tire life. Additionally, a tire should
always be rebalanced if it is removed
from the wheel.
WARNING
A wheel that is not the correct
size may adversely affect wheel
and bearing life, braking and
stopping abilities, handling char-
acteristics, ground clearance,
body-to-tire clearance, snow
chain clearance, speedometer
and odometer calibration, head-
light aim and bumper height.
Page 364 of 425

Maintenance
50 7
FUSES
A vehicle’s electrical system is protected
from electrical overload damage by fuses.
This vehicle has 2 fuse panels, one locat-
ed in the driver’s side panel bolster, the
other in the engine compartment.
If any of your vehicle’s lights, accessories,
or controls do not work, check the appro-
priate circuit fuse. If a fuse has blown, the
element inside the fuse will be melted.
If the electrical system does not work,
first check the driver’s side fuse panel.Before replacing a blown fuse, discon-
nect the negative battery cable.
Always replace a blown fuse with one of
the same rating.
If the replacement fuse blows, this indi-
cates an electrical problem. Avoid using
the system involved and immediately
consult an authorized HYUNDAI dealer.
Three kinds of fuses are used: blade type
for lower amperage rating, cartridge type,
and multi fuse for higher amperage ratings.
✽ ✽
NOTICE
The actual fuse/relay panel label may
differ from equipped items.
WARNING - Fuse
replacement
Never replace a fuse with anything
but another fuse of the same rat-
ing.
A higher capacity fuse could
cause damage and possibly a fire.
Never install a wire or aluminum
foil instead of the proper fuse -
even as a temporary repair. It may
cause extensive wiring damage
and a possible fire.
CAUTION
Do not use a screwdriver or any
other metal object to remove fuses
because it may cause a short circuit
and damage the system.
CAUTION
When replacing a blown fuse or
relay with a new one, make sure
the new fuse or relay fits tightly
into the clips. The incomplete fas-
tening fuse or relay may cause the
vehicle wiring and electric sys-
tems damage and a possible fire.
Do not remove fuses, relays and
terminals fastened with bolts or
nuts. The fuses, relays and termi-
nals may be fastened incomplete-
ly, and it may cause a possible
fire. If fuses, relays and terminals
fastened with bolts or nuts are
blown, consult with an authorized
HYUNDAI dealer.
Do not input any other objects
except fuses or relays into
fuse/relay terminals such as a driv-
er or wiring. It may cause contact
failure and system malfunction.
OBK079042 Normal Normal Blade type
Cartridge type
Multi fuseBlown
Blown
Normal Blown
Page 366 of 425
Maintenance
52 7
✽
✽
NOTICE
• If the memory fuse is pulled up from
the fuse panel, the warning chime,
audio, clock and interior lamps, etc.,
will not operate. Some items must be
reset after replacement. Refer to
“Battery” in this section.
• Even though the memory fuse is
pulled up, the battery can still be dis-
charged by operation of the head-
lights or other electrical devices.
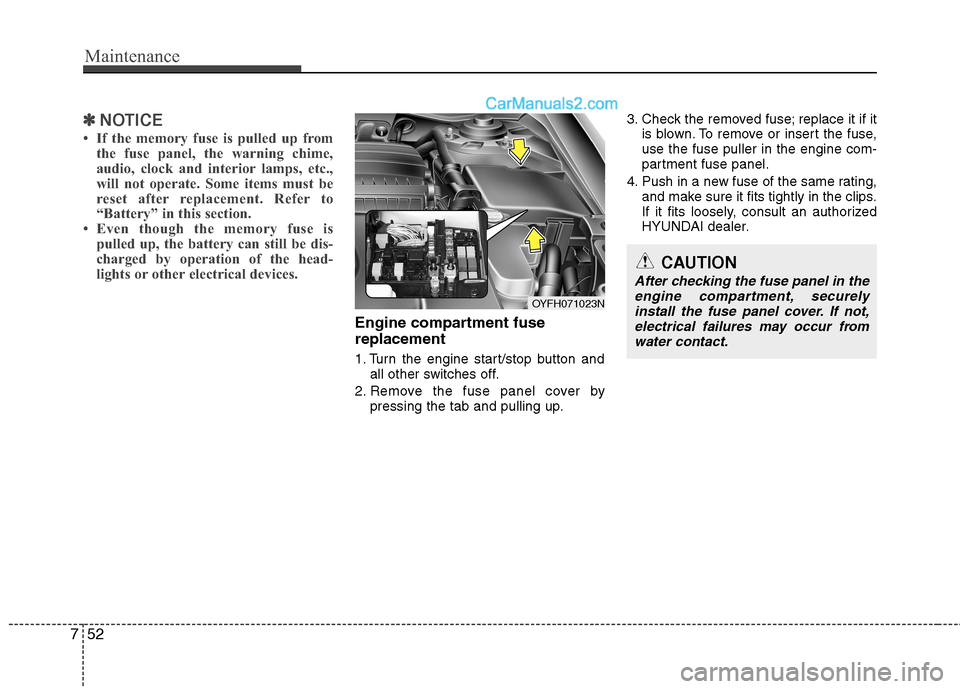
Engine compartment fuse
replacement
1. Turn the engine start/stop button and
all other switches off.
2. Remove the fuse panel cover by
pressing the tab and pulling up.3. Check the removed fuse; replace it if it
is blown. To remove or insert the fuse,
use the fuse puller in the engine com-
partment fuse panel.
4. Push in a new fuse of the same rating,
and make sure it fits tightly in the clips.
If it fits loosely, consult an authorized
HYUNDAI dealer.
OYFH071023N
CAUTION
After checking the fuse panel in the
engine compartment, securely
install the fuse panel cover. If not,
electrical failures may occur from
water contact.
Page 370 of 425

Maintenance
56 7
Description Fuse rating Protected component
WIPER 25A E/R Fuse & Relay Box (Wiper Relay), Front Wiper Motor, Multifunction Switch
MODULE 5 7.5A PDM, Electro Chromic Mirror, Panorama Sunroof
DR LOCK 20AI/P Junction Box (Door Lock Relay, Door Unlock Relay),
E/R Fuse & Relay Box (T/Turn Unlock Relay)
POWER OUTLET 2 15A Front Power Outlet LH
MODULE 1 7.5AInstrument Cluster, A/C Control Module, BCM, Sport Mode Switch IND., Clock, Audio,
Driver/Passenger Seat Warmer Module
IG 1 20A E/R Fuse & Relay Box (Fuse - ESC 3 10A, ECU 4 10A, OIL PUMP 2 10A, TCU 2 10A)
HCU 20A Hybrid Control Unit
A/BAG 15A Telltale Lamp, SRS Control Module, Passenger Weight Classification Sensor
START 1 7.5AW/O Smart Key - Burglar Alarm Relay
With Smart Key - PDM
MDPS 10A ESC Off Switch, Tire Pressure Monitoring Module, EPS Control Module
PDM 3 7.5A Smart Key Module, PDM
WATER PUMP HEV 10A Hybrid Water Pump
A/BAG IND. 7.5A Instrument Cluster
POWER
CONNECTORAUDIO 15A Audio, A/V & Navigation Head Unit
ROOM LP 10ATrunk Room Lamp, Driver Door Lamp, Ignition Key ILL. & Door Warning Switch,
Instrument Cluster, Passenger Door Lamp, A/C Control Module, Glove Box Lamp, BCM,
Front Monitor, Clock, RF Receiver, Data Link Connector, Tire Pressure Monitoring Module,
Auto Light & Photo Sensor, Electro Chromic Mirror, Room Lamp Relay
Page 374 of 425
Maintenance
60 7
LIGHT BULBS
Use only bulbs of the specified wattage.
✽
✽
NOTICE
After heavy, driving rain or washing,
headlight and taillight lenses could
appear frosty. This condition is caused by
the temperature difference between the
lamp inside and outside. This is similar
to the condensation on your windows
inside your vehicle during the rain and
doesn’t indicate a problem with your
vehicle. If the water leaks into the lamp
bulb circuitry, have the vehicle checked
by an authorized HYUNDAI dealer.
WARNING - Working on
the lights
Prior to working on the light, firmly
apply the parking brake, ensure
that the engine start/stop button is
in the OFF position and turn off the
lights to avoid sudden movement
of the vehicle and burning your fin-
gers or receiving an electric shock.
CAUTION
Be sure to replace the burned-out
bulb with one of the same wattage
rating. Otherwise, it may cause
damage to the fuse or electric
wiring system.CAUTION
If you don’t have necessary tools,
the correct bulbs and the expertise,
consult an authorized HYUNDAI
dealer. In many cases, it is difficult
to replace vehicle light bulbs
because other parts of the vehicle
must be removed before you can
get to the bulb. This is especially
true if you have to remove the head-
light assembly to
get to the bulb(s).
Removing/installingthe headlight
assembly can result in damage to
the vehicle.
WARNING
When you replace the front head-
lamp bulb be careful of the HPCU
system, the high voltage cable
(orange color), and high voltage
components for the hybrid system.
It is very dangerous because the
HPCU has high voltage. Do not
touch those high voltage systems
or it could result in the electric
shock or burns or even death.
CAUTION
If your vehicle is equipped with
High Intensity Discharge (HID)
headlights, these headlights con-
tain mercury. So if you need to have
your vehicle disposed, you should
remove the HID Headlights before
disposal. The removed HID head-
lights should be recycled, re-used
or disposed as hazardous waste.
Page 375 of 425
761
Maintenance
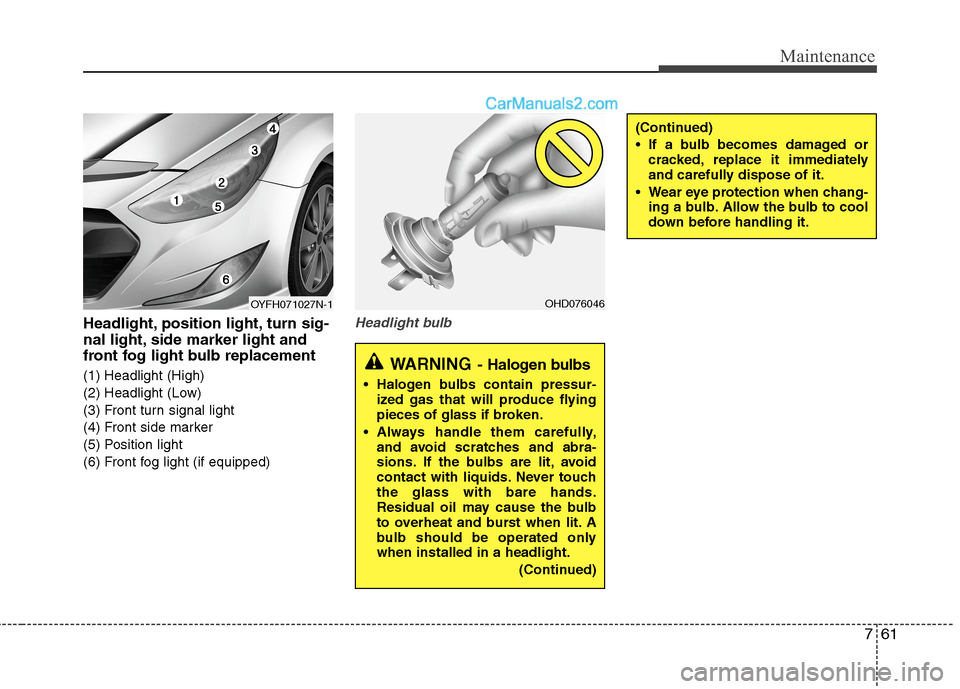
Headlight, position light, turn sig-
nal light, side marker light and
front fog light bulb replacement
(1) Headlight (High)
(2) Headlight (Low)
(3) Front turn signal light
(4) Front side marker
(5) Position light
(6) Front fog light (if equipped)
Headlight bulb
(Continued)
If a bulb becomes damaged or
cracked, replace it immediately
and carefully dispose of it.
Wear eye protection when chang-
ing a bulb. Allow the bulb to cool
down before handling it.
OHD076046
WARNING- Halogen bulbs
Halogen bulbs contain pressur-
ized gas that will produce flying
pieces of glass if broken.
Always handle them carefully,
and avoid scratches and abra-
sions. If the bulbs are lit, avoid
contact with liquids. Never touch
the glass with bare hands.
Residual oil may cause the bulb
to overheat and burst when lit. A
bulb should be operated only
when installed in a headlight.
(Continued)
OYFH071027N-1
Page 380 of 425
Maintenance
66 7
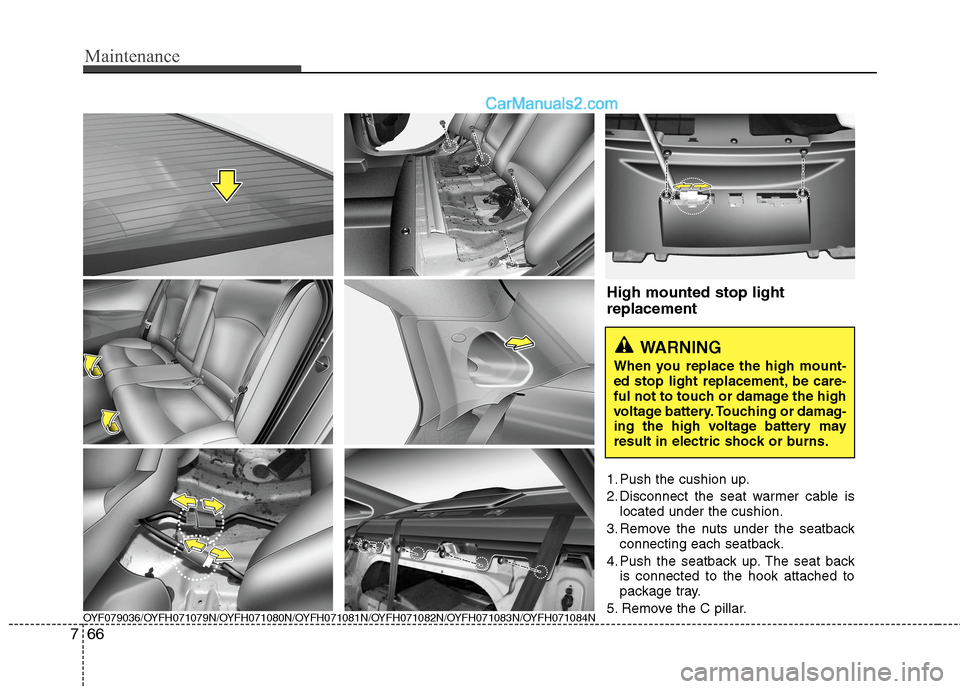
OYF079036/OYFH071079N/OYFH071080N/OYFH071081N/OYFH071082N/OYFH071083N/OYFH071084N
High mounted stop light
replacement
1. Push the cushion up.
2. Disconnect the seat warmer cable is
located under the cushion.
3. Remove the nuts under the seatback
connecting each seatback.
4. Push the seatback up. The seat back
is connected to the hook attached to
package tray.
5. Remove the C pillar.
WARNING
When you replace the high mount-
ed stop light replacement, be care-
ful not to touch or damage the high
voltage battery. Touching or damag-
ing the high voltage battery may
result in electric shock or burns.