Page 184 of 534

Downloaded from www.Manualslib.com manuals search engine 497
Features of your vehicle
Smart cornering light
While driving the corner, for your sight
and safety, the smart cornering light
turns on automatically. The system will
operate automatically as follows:
When vehicle speed is under 10km/hand steering wheel angle approximate-
ly 80 degrees.
When vehicle speed is over 10km/h and steering wheel angle approximate-
ly 35 degrees.
When the vehicle is at a standstill.
When moving rearwards with one of the above conditions satisfied the lights
will light up the opposite direction.
The smart corning light will operate only when the light switch is in the
AUTO position. (vehicles equipped with
AFLS)
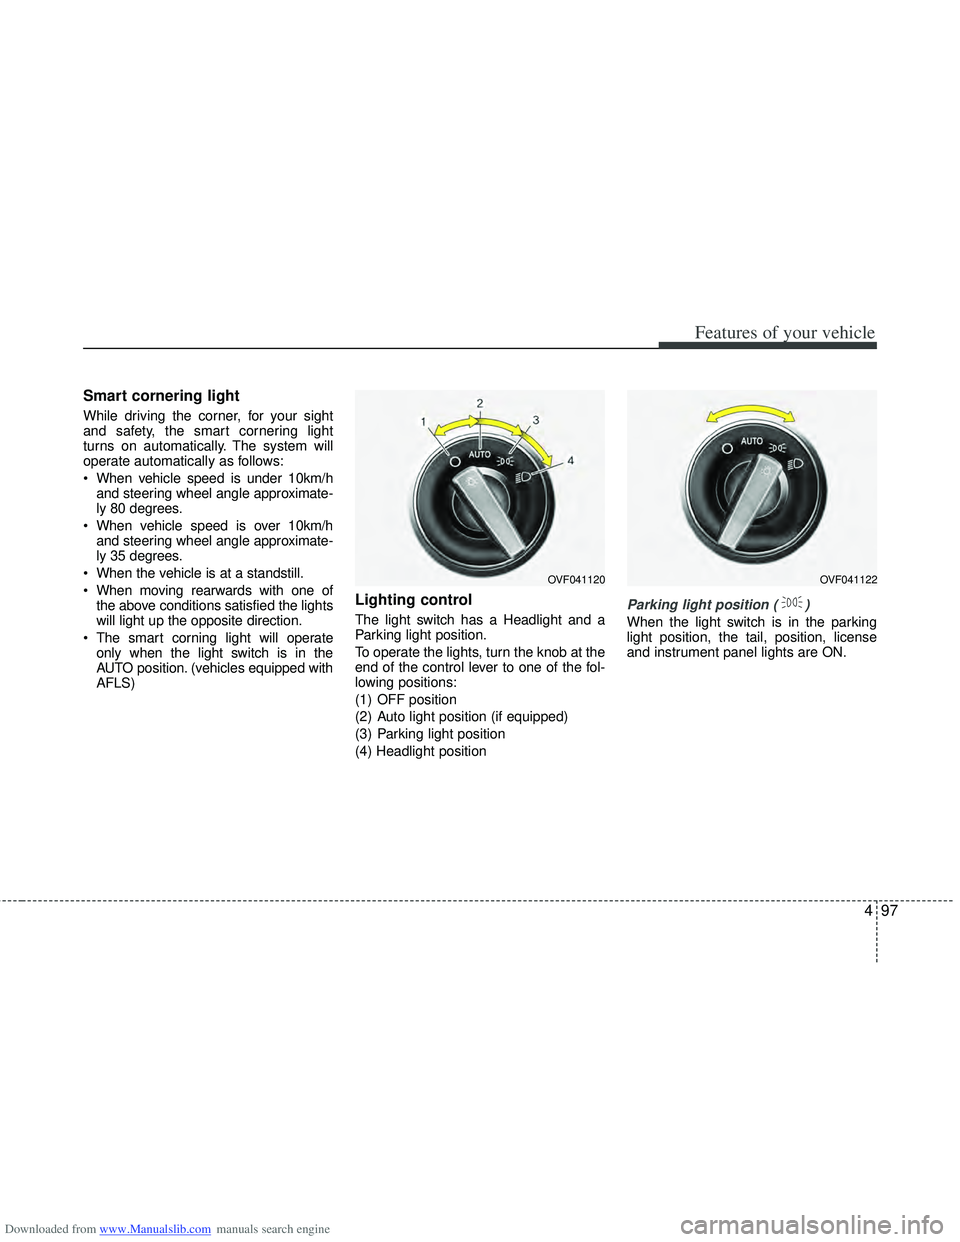
Lighting control
The light switch has a Headlight and a
Parking light position.
To operate the lights, turn the knob at the
end of the control lever to one of the fol-
lowing positions:
(1) OFF position
(2) Auto light position (if equipped)
(3) Parking light position
(4) Headlight positionParking light position ( )
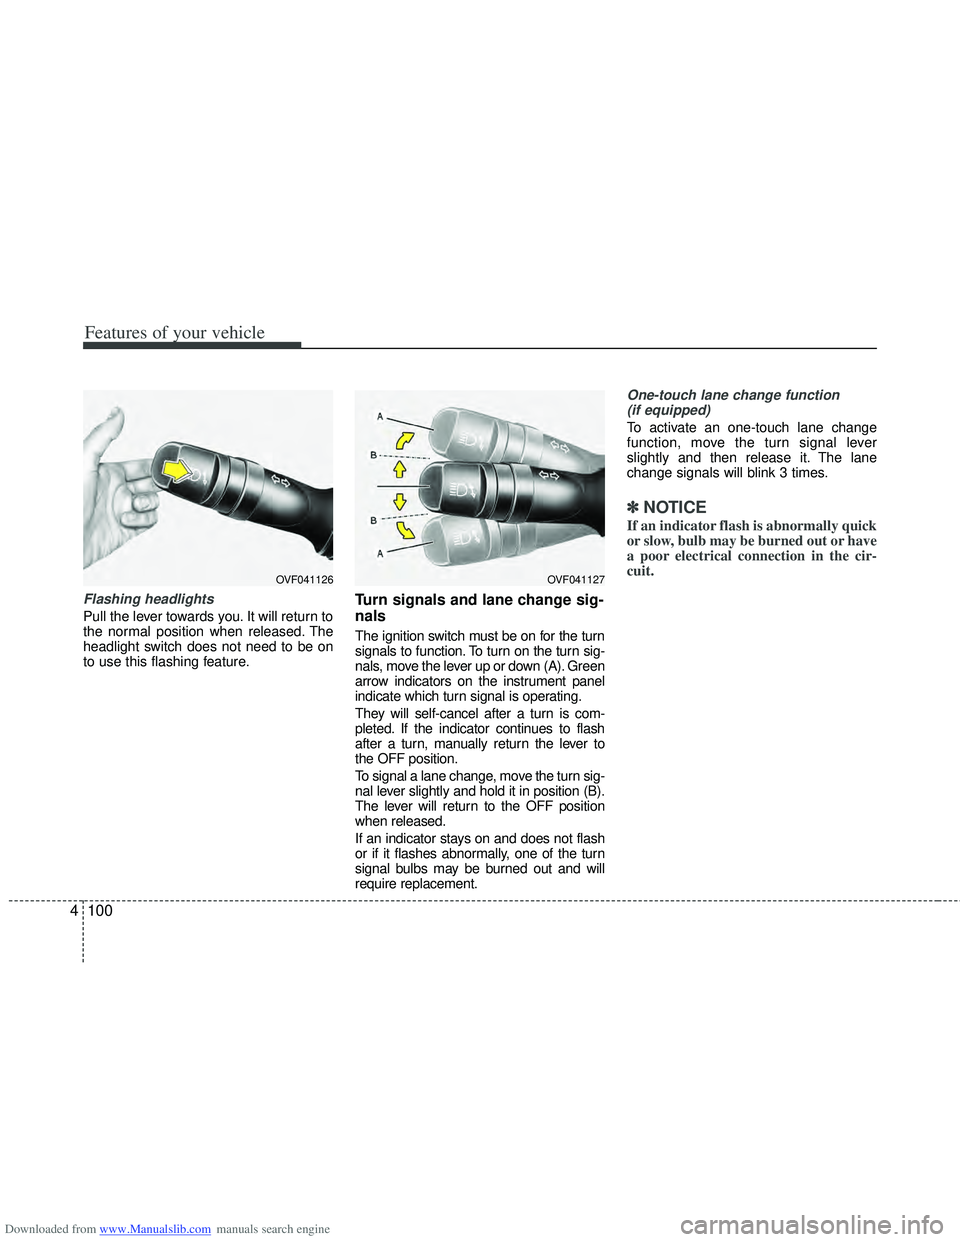
When the light switch is in the parking
light position, the tail, position, license
and instrument panel lights are ON.
OVF041120OVF041122
Page 185 of 534

Downloaded from www.Manualslib.com manuals search engine Features of your vehicle
98
4
Headlight position ( )
When the light switch is in the headlight
position the head, tail, position, license
and instrument panel lights are ON.
✽ ✽
NOTICE
The ignition switch must be in the ON
position to turn on the headlights.
Auto light/AFLS position
(if equipped)
When the light switch is in the AUTO light
position, the taillights and headlights will
be turned ON or OFF automatically
depending on the amount of light outside
the vehicle.
If your vehicle is equipped with the adap-
tive front lighting system (AFLS), it will
also operate when the headlamp is ON.
OVF041123
CAUTION
Never place anything over the sensor (1) located on the instru-ment panel, this will ensure better auto-light system control.
Don’t clean the sensor using a window cleaner, the cleaner mayleave a light film which could interfere with sensor operation.
If your vehicle has window tint or other types of coating on thefront windshield, the Auto light system may not work properly.
OVF041121
Page 187 of 534

Downloaded from www.Manualslib.com manuals search engine Features of your vehicle
100
4
Flashing headlights
Pull the lever towards you. It will return to
the normal position when released. The
headlight switch does not need to be on
to use this flashing feature.
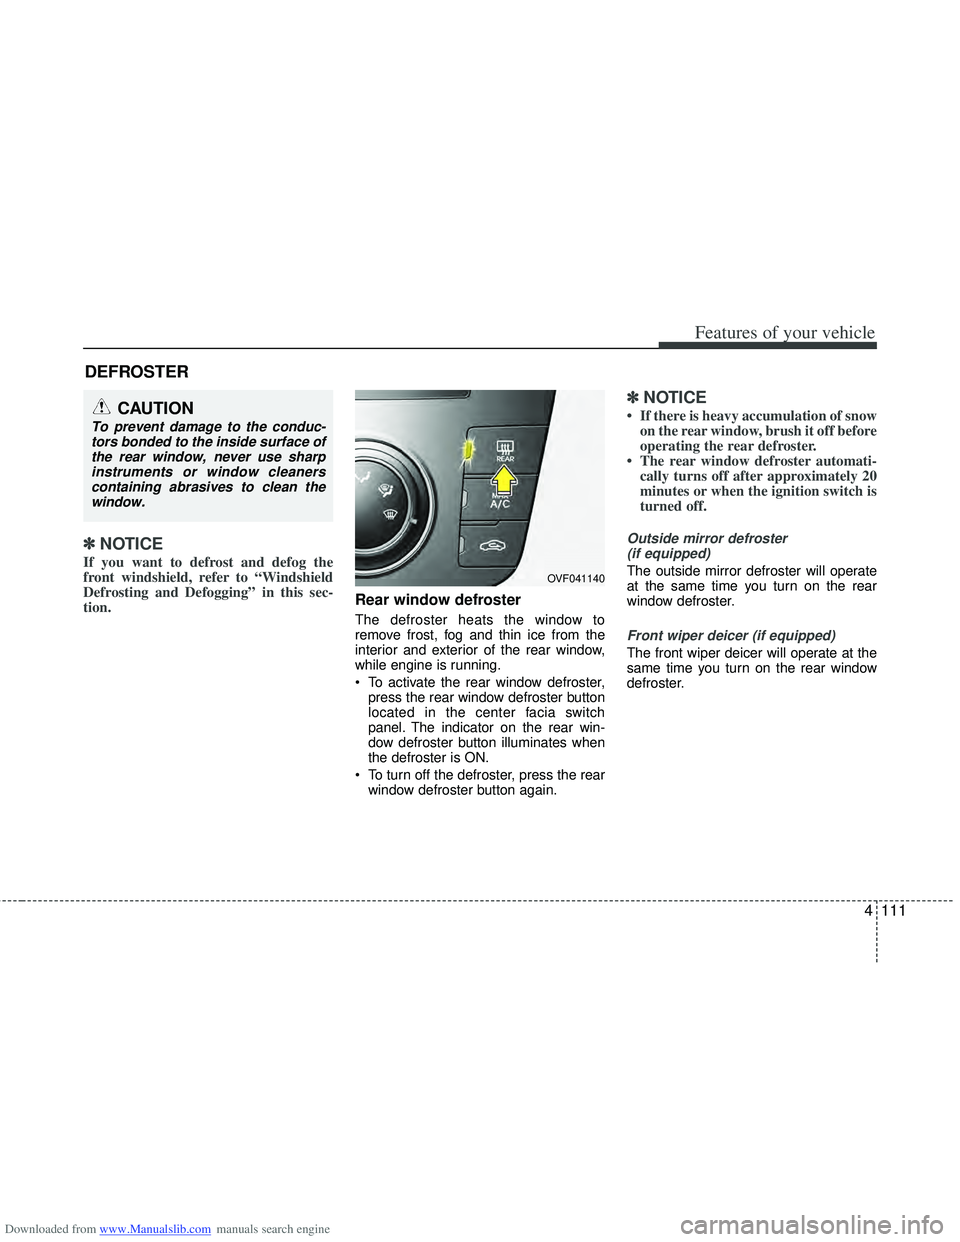
Turn signals and lane change sig-
nals
The ignition switch must be on for the turn
signals to function. To turn on the turn sig-
nals, move the lever up or down (A). Green
arrow indicators on the instrument panel
indicate which turn signal is operating.
They will self-cancel after a turn is com-
pleted. If the indicator continues to flash
after a turn, manually return the lever to
the OFF position.
To signal a lane change, move the turn sig-
nal lever slightly and hold it in position (B).
The lever will return to the OFF position
when released.
If an indicator stays on and does not flash
or if it flashes abnormally, one of the turn
signal bulbs may be burned out and will
require replacement.
One-touch lane change function
(if equipped)
To activate an one-touch lane change
function, move the turn signal lever
slightly and then release it. The lane
change signals will blink 3 times.
✽ ✽ NOTICE
If an indicator flash is abnormally quick
or slow, bulb may be burned out or have
a poor electrical connection in the cir-
cuit.
OVF041127OVF041126
Page 198 of 534

Downloaded from www.Manualslib.com manuals search engine 4111
Features of your vehicle
✽
✽NOTICE
If you want to defrost and defog the
front windshield, refer to “Windshield
Defrosting and Defogging” in this sec-
tion.
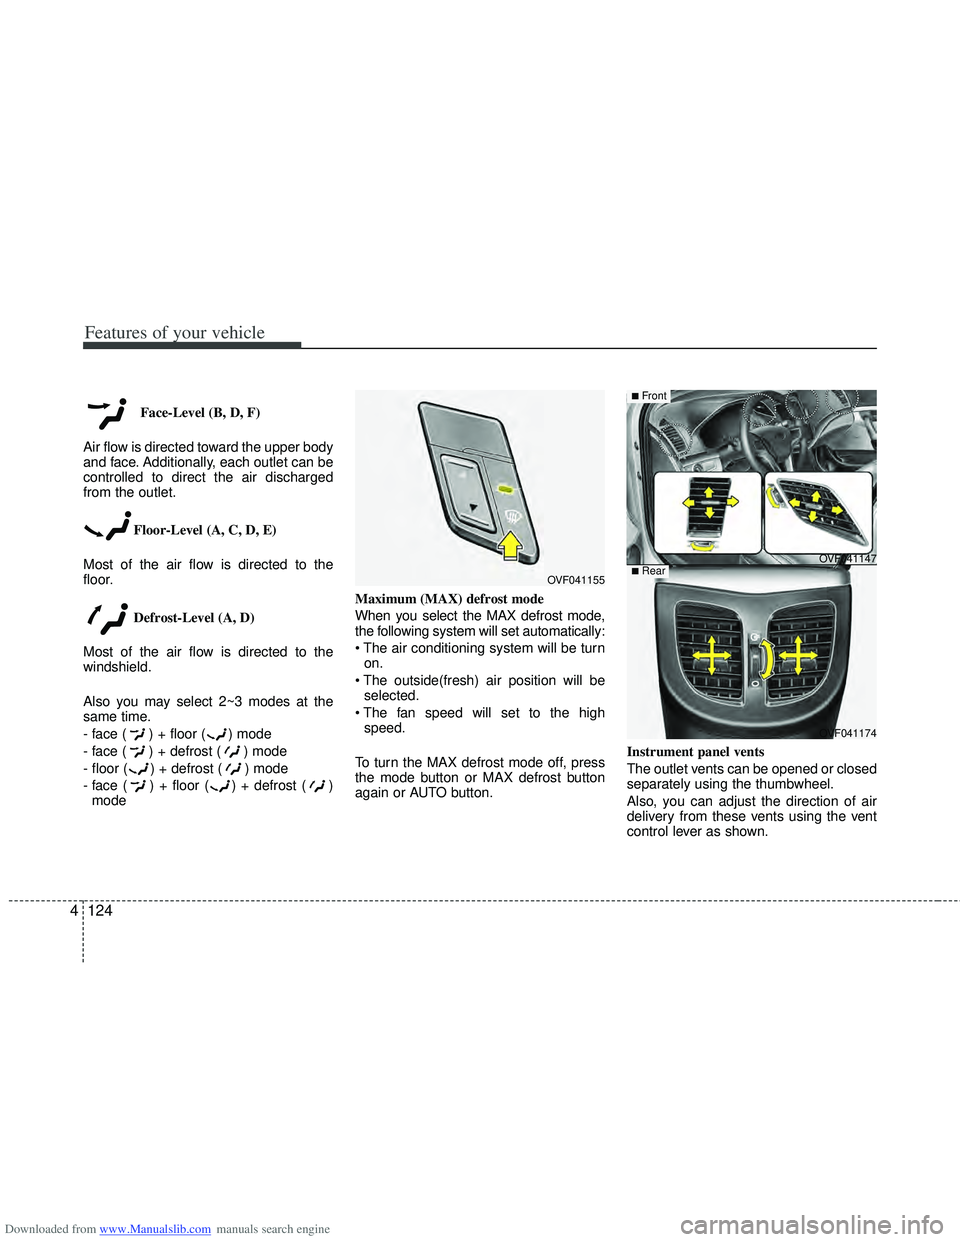
Rear window defroster
The defroster heats the window to
remove frost, fog and thin ice from the
interior and exterior of the rear window,
while engine is running.
To activate the rear window defroster,
press the rear window defroster button
located in the center facia switch
panel. The indicator on the rear win-
dow defroster button illuminates when
the defroster is ON.
To turn off the defroster, press the rear window defroster button again.
✽ ✽ NOTICE
• If there is heavy accumulation of snow
on the rear window, brush it off before
operating the rear defroster.
• The rear window defroster automati- cally turns off after approximately 20
minutes or when the ignition switch is
turned off.
Outside mirror defroster
(if equipped)
The outside mirror defroster will operate
at the same time you turn on the rear
window defroster.
Front wiper deicer (if equipped)
The front wiper deicer will operate at the
same time you turn on the rear window
defroster.
DEFROSTER
CAUTION
To prevent damage to the conduc-tors bonded to the inside surface ofthe rear window, never use sharpinstruments or window cleanerscontaining abrasives to clean the window.
OVF041140
Page 202 of 534
Downloaded from www.Manualslib.com manuals search engine 4115
Features of your vehicle
Instrument panel vents
The outlet vents can be opened or closed
separately using the thumbwheel.
Also, you can adjust the direction of air
delivery from these vents using the vent
control lever as shown.
Temperature control
The temperature control switch allows
you to control the temperature of the air-
flow in the vehicle.
To change the temperature:
Press the ▲(red) switch to increase
temperature.
Press the ▼ (blue) switch to decrease
temperature.
Air intake control
The air intake control is used to select
the outside (fresh) air position or recircu-
lated air position.
To change the air intake control position,
press the control button.
OVF041147
OVF041143OVF041148
■Front
OVF041174
■Rear
Page 209 of 534

Downloaded from www.Manualslib.com manuals search engine Features of your vehicle
122
4
Automatic heating and air condi-
tioning
The automatic climate control system is
controlled by simply setting the desired
temperature.
The Full Automatic Temperature Control
(FATC) system automatically controls the
heating and cooling system as follows: 1. Press the AUTO button. The modes,
fan speeds, air intake and air-condi-
tioning will be controlled automatically
by setting the temperature.
2. Set the temperature to the desired temperature.
3. To turn the automatic operation off, select any button of the following:
The selected function will be controlled manually while other functions operate
automatically.
For your convenience and to improve the
effectiveness of the climate control, use
the AUTO button and set the temperature
to 22°C/71°F (23°C/73°F-Except Europe).
✽ ✽ NOTICE
Placing any object over the sensor on
the instrument panel may interfere with
the heating and cooling system.
OVF041153OVF041152
Page 211 of 534

Downloaded from www.Manualslib.com manuals search engine Features of your vehicle
124
4
Face-Level (B, D, F)
Air flow is directed toward the upper body
and face. Additionally, each outlet can be
controlled to direct the air discharged
from the outlet.
Floor-Level (A, C, D, E)
Most of the air flow is directed to the
floor.
Defrost-Level (A, D)
Most of the air flow is directed to the
windshield.
Also you may select 2~3 modes at the
same time.
- face ( ) + floor ( ) mode
- face ( ) + defrost ( ) mode
- floor ( ) + defrost ( ) mode
- face ( ) + floor ( ) + defrost ( ) mode Maximum (MAX) defrost mode
When you select the MAX defrost mode,
the following system will set automatically:
on.
selected.
speed.
To turn the MAX defrost mode off, press
the mode button or MAX defrost button
again or AUTO button. Instrument panel vents
The outlet vents can be opened or closed
separately using the thumbwheel.
Also, you can adjust the direction of air
delivery from these vents using the vent
control lever as shown.
OVF041155
OVF041174
■Rear
OVF041147
■Front
Page 369 of 534

Downloaded from www.Manualslib.com manuals search engine Driving your vehicle
76
5
Turn signals when towing a trailer
When you tow a trailer, your vehicle has
to have a different turn signal flasher and
extra wiring. The green arrows on your
instrument panel will flash whenever you
signal a turn or lane change. Properly
connected, the trailer lights will also flash
to alert other drivers you’re about to turn,
change lanes, or stop.
When towing a trailer, the green arrows
on your instrument panel will flash for
turns even if the bulbs on the trailer are
burned out. Thus, you may think drivers
behind you are seeing your signals
when, in fact, they are not. It is important
to check occasionally to be sure the trail-
er bulbs are still working. You must also
check the lights every time you discon-
nect and then reconnect the wires.
Do not connect a trailer lighting system
directly to your vehicle’s lighting system.
Use only an approved trailer wiring har-
ness.
An authorized HYUNDAI dealer can
assist you in installing the wiring harness.
Driving on grades
Reduce speed and shift to a lower gear
before you start down a long or steep
downgrade. If you don’t shift down, you
might have to use your brakes so much
that they would get hot and no longer
operate efficiently.
On a long uphill grade, shift down and
reduce your speed to around 70 km/h (45
mph) to reduce the possibility of engine
and transaxle overheating.
If your trailer weighs more than the max-
imum trailer weight without trailer brakes
and you have an automatic transaxle,
you should drive in D (Drive) when tow-
ing a trailer.
Operating your vehicle in D (Drive) when
towing a trailer will minimize heat build up
and extend the life of your transaxle.
WARNING
Failure to use an approved trailer
wiring harness could result in dam-
age to the vehicle electrical system
and/or personal injury.
CAUTION
When towing a trailer on steep
grades (in excess of 6%) payclose attention to the engine coolant temperature gauge toensure the engine does not over-heat.
If the needle of the coolant tem-perature gauge moves across thedial towards “130/H (HOT)”, pull over and stop as soon as it is safeto do so, and allow the engine to idle until it cools down. You mayproceed once the engine has cooled sufficiently.
You must decide driving speed depending on trailer weight anduphill grade to reduce the possi-bility of engine and transaxleoverheating.