2013 HYUNDAI I10 tow
[x] Cancel search: towPage 127 of 343
Features of your vehicle
66 4
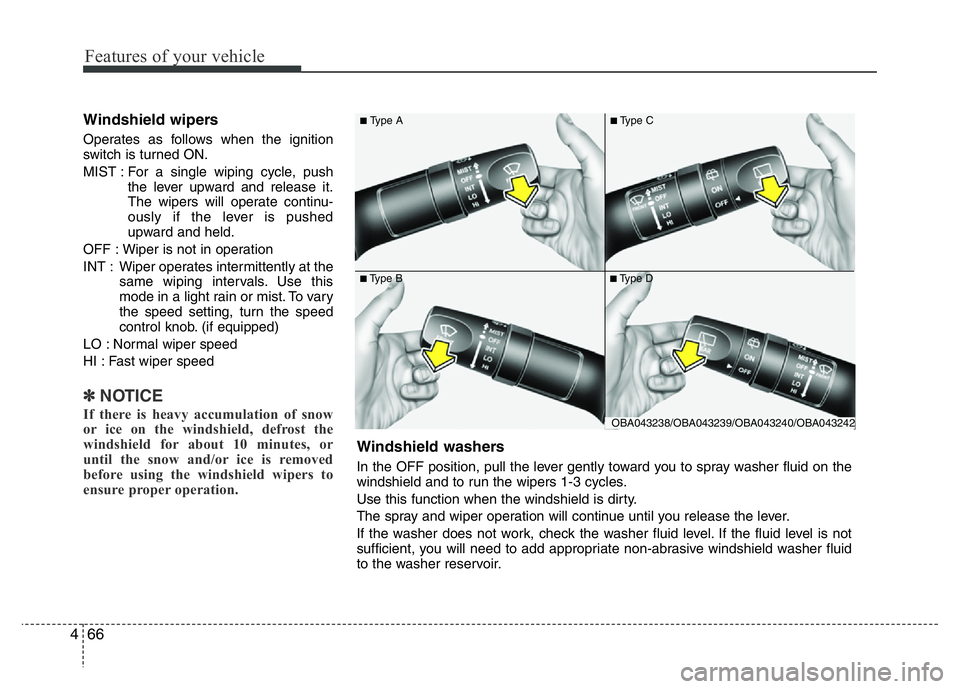
Windshield wipers
Operates as follows when the ignition
switch is turned ON.
MIST : For a single wiping cycle, push
the lever upward and release it.
The wipers will operate continu-
ously if the lever is pushed
upward and held.
OFF : Wiper is not in operation
INT : Wiper operates intermittently at the
same wiping intervals. Use this
mode in a light rain or mist. To vary
the speed setting, turn the speed
control knob. (if equipped)
LO : Normal wiper speed
HI : Fast wiper speed
✽NOTICE
If there is heavy accumulation of snow
or ice on the windshield, defrost the
windshield for about 10 minutes, or
until the snow and/or ice is removed
before using the windshield wipers to
ensure proper operation.
■Type A■Type C
■Type B■Type D
OBA043238/OBA043239/OBA043240/OBA043242
Windshield washers
In the OFF position, pull the lever gently toward you to spray washer fluid on the
windshield and to run the wipers 1-3 cycles.
Use this function when the windshield is dirty.
The spray and wiper operation will continue until you release the lever.
If the washer does not work, check the washer fluid level. If the fluid level is not
sufficient, you will need to add appropriate non-abrasive windshield washer fluid
to the washer reservoir.
Page 134 of 343
473
Features of your vehicle
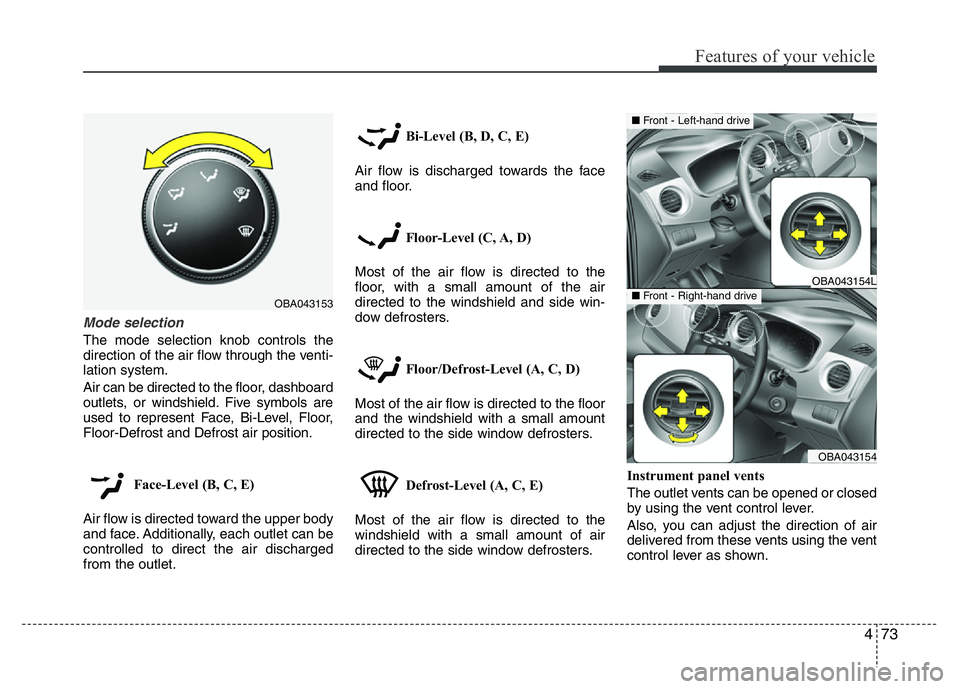
Mode selection
The mode selection knob controls the
direction of the air flow through the venti-
lation system.
Air can be directed to the floor, dashboard
outlets, or windshield. Five symbols are
used to represent Face, Bi-Level, Floor,
Floor-Defrost and Defrost air position.
Face-Level (B, C, E)
Air flow is directed toward the upper body
and face. Additionally, each outlet can be
controlled to direct the air discharged
from the outlet.Bi-Level (B, D, C, E)
Air flow is discharged towards the face
and floor.
Floor-Level (C, A, D)
Most of the air flow is directed to the
floor, with a small amount of the air
directed to the windshield and side win-
dow defrosters.
Floor/Defrost-Level (A, C, D)
Most of the air flow is directed to the floor
and the windshield with a small amount
directed to the side window defrosters.
Defrost-Level (A, C, E)
Most of the air flow is directed to the
windshield with a small amount of air
directed to the side window defrosters.Instrument panel vents
The outlet vents can be opened or closed
by using the vent control lever.
Also, you can adjust the direction of air
delivered from these vents using the vent
control lever as shown.
OBA043153
OBA043154L
OBA043154
■Front - Left-hand drive
■Front - Right-hand drive
Page 152 of 343
491
Features of your vehicle
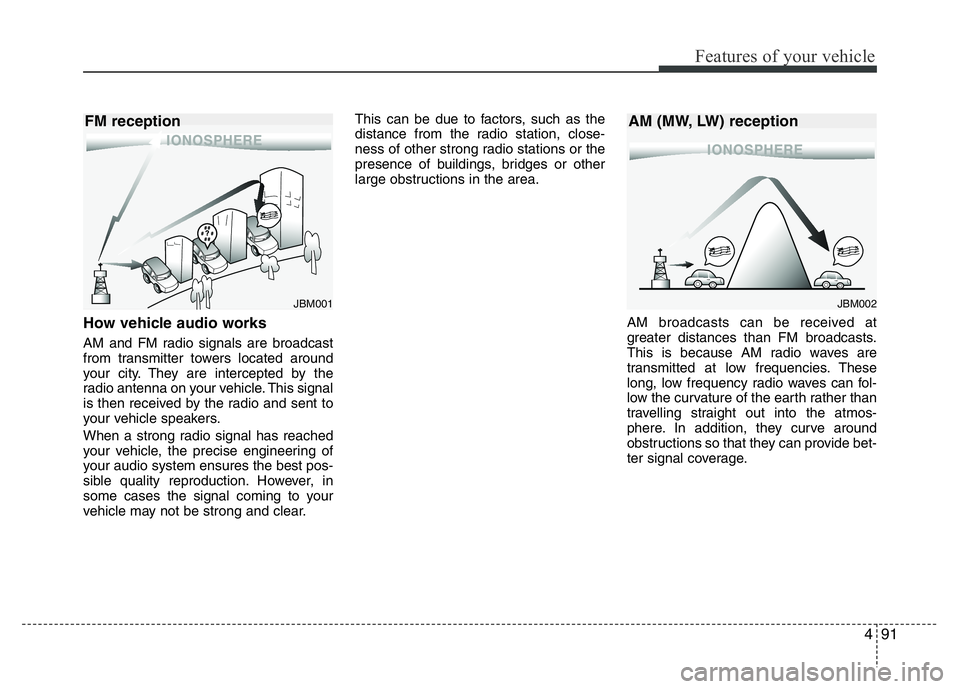
How vehicle audio works
AM and FM radio signals are broadcast
from transmitter towers located around
your city. They are intercepted by the
radio antenna on your vehicle. This signal
is then received by the radio and sent to
your vehicle speakers.
When a strong radio signal has reached
your vehicle, the precise engineering of
your audio system ensures the best pos-
sible quality reproduction. However, in
some cases the signal coming to your
vehicle may not be strong and clear.This can be due to factors, such as the
distance from the radio station, close-
ness of other strong radio stations or the
presence of buildings, bridges or other
large obstructions in the area.
AM broadcasts can be received at
greater distances than FM broadcasts.
This is because AM radio waves are
transmitted at low frequencies. These
long, low frequency radio waves can fol-
low the curvature of the earth rather than
travelling straight out into the atmos-
phere. In addition, they curve around
obstructions so that they can provide bet-
ter signal coverage.
JBM001JBM002
FM reception AM (MW, LW) reception
Page 197 of 343

Driving your vehicle
4 5
Ignition switch position
LOCK
The steering wheel locks to protect
against theft. The ignition key can be
removed only in the LOCK position.
When turning the ignition switch to the
LOCK position, push the key in slightly at
the ACC position and turn the key
towards the LOCK position.
ACC (Accessory)
The steering wheel is unlocked and elec-
trical accessories are usable.
✽NOTICE
If difficulty is experienced turning the
ignition switch to the ACC position, turn
the key while turning the steering wheel
right and left to release the tension.
ON
The warning lights can be checked
before the engine is started. This is the
normal running position after the engine
has started.
Do not leave the ignition switch in the ON
position when the engine is not running
to prevent the battery from discharging.
START
Turn the ignition switch to the START
position to start the engine. The switch
returns to the ON position when you let
go of the key.
KEY IGNITION SWITCH (IF EQUIPPED)
ORBC050001
WARNING - Ignition switch
• NEVER turn the ignition switch
to the LOCK or ACC position
while the vehicle is in motion
except in an emergency. This will
result in the engine turning off
and loss of power assist for the
steering and brake systems. This
may lead to loss of directional
control and braking function,
which could cause an accident.
• Before leaving the driver's seat,
always make sure the shift lever
is in 1st gear (for manual
transaxle vehicle) or P (Park, for
automatic transaxle vehicle)
position, apply the parking brake,
and turn ignition switch to the
LOCK position. Unexpected vehi-
cle movement may occur if these
precautions are not followed.
• NEVER reach through the steer-
ing wheel for the ignition switch,
or any other control, while the
vehicle is in motion. The pres-
ence of your hand or arm in this
area may cause a loss of vehicle
control resulting in an accident.
Page 198 of 343
55
Driving your vehicle
Starting the engine
1. Make sure the parking brake is
applied.
2.Manual Transaxle- Depress the
clutch pedal fully and shift the
transaxle into Neutral. Keep the clutch
pedal and brake pedal depressed
while turning the ignition switch to the
start position.
Automatic Transaxle- Place the
transaxle shift lever in P (Park).
Depress the brake pedal fully.
You can also start the engine when
the shift lever is in the N (Neutral)
position.
3. Turn the ignition switch to the START
position. Hold the key (maximum of 10
seconds) until the engine starts and
release it.
✽NOTICE
• Whether the engine is cold or warm,
always start the vehicle with your foot
on the brake pedal. Do not depress the
accelerator while starting the vehicle.
Do not race the engine while warming
it up.
• In extremely cold weather (below
- 18°C / 0°F) or after the vehicle has
not been operated for several days, let
the engine warm up without depress-
ing the accelerator pedal.
WARNING
Always wear appropriate shoes
when operating your vehicle.
Unsuitable shoes (high heels, ski
boots,etc.) may interfere with your
ability to use the brake, accelerator,
and clutch (pedals).
CAUTION
To prevent damage to the vehicle:
• Do not hold the ignition key in the
START position for more than 10
seconds. Wait 5 to 10 seconds
before trying again.
• If traffic and road conditions per-
mit, you may put the shift lever in
the N (Neutral) position while the
vehicle is still moving and turn
the ignition switch to the START
position in an attempt to restart
the engine.
• Do not push or tow your vehicle
to start the engine.
Page 227 of 343
Driving your vehicle
34 5
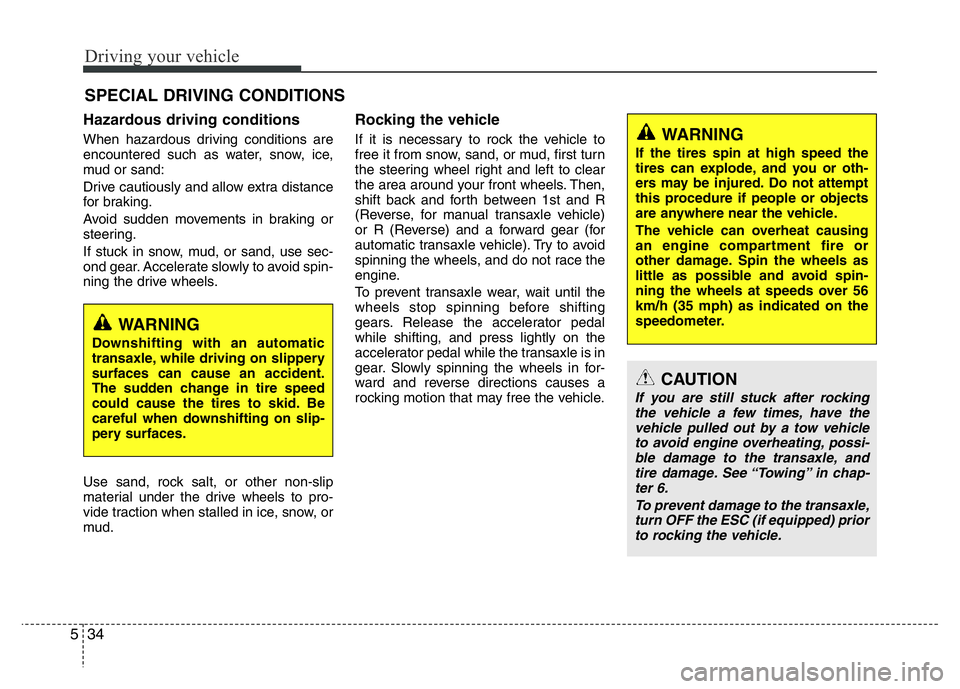
Hazardous driving conditions
When hazardous driving conditions are
encountered such as water, snow, ice,
mud or sand:
Drive cautiously and allow extra distance
for braking.
Avoid sudden movements in braking or
steering.
If stuck in snow, mud, or sand, use sec-
ond gear. Accelerate slowly to avoid spin-
ning the drive wheels.
Use sand, rock salt, or other non-slip
material under the drive wheels to pro-
vide traction when stalled in ice, snow, or
mud.
Rocking the vehicle
If it is necessary to rock the vehicle to
free it from snow, sand, or mud, first turn
the steering wheel right and left to clear
the area around your front wheels. Then,
shift back and forth between 1st and R
(Reverse, for manual transaxle vehicle)
or R (Reverse) and a forward gear (for
automatic transaxle vehicle). Try to avoid
spinning the wheels, and do not race the
engine.
To prevent transaxle wear, wait until the
wheels stop spinning before shifting
gears. Release the accelerator pedal
while shifting, and press lightly on the
accelerator pedal while the transaxle is in
gear. Slowly spinning the wheels in for-
ward and reverse directions causes a
rocking motion that may free the vehicle.
SPECIAL DRIVING CONDITIONS
WARNING
Downshifting with an automatic
transaxle, while driving on slippery
surfaces can cause an accident.
The sudden change in tire speed
could cause the tires to skid. Be
careful when downshifting on slip-
pery surfaces.
WARNING
If the tires spin at high speed the
tires can explode, and you or oth-
ers may be injured. Do not attempt
this procedure if people or objects
are anywhere near the vehicle.
The vehicle can overheat causing
an engine compartment fire or
other damage. Spin the wheels as
little as possible and avoid spin-
ning the wheels at speeds over 56
km/h (35 mph) as indicated on the
speedometer.
CAUTION
If you are still stuck after rocking
the vehicle a few times, have the
vehicle pulled out by a tow vehicle
to avoid engine overheating, possi-
ble damage to the transaxle, and
tire damage. See “Towing” in chap-
ter 6.
To prevent damage to the transaxle,
turn OFF the ESC (if equipped) prior
to rocking the vehicle.
Page 230 of 343

537
Driving your vehicle
Snow or icy conditions
You need to keep sufficient distance
between your vehicle and the vehicle
in front of you.
Apply the brakes gently. Speeding,
rapid acceleration, sudden brake
applications, and sharp turns are
potentially very hazardous practices.
During deceleration, use engine
braking to the fullest extent. Sudden
brake applications on snowy or icy
roads may cause skids to occur.
To drive your vehicle in deep snow, it may
be necessary to use snow tires or to
install tire chains on your tires.
Always carry emergency equipment.
Some of the items you may want to carry
include tire chains, tow straps or chains,
a flashlight, emergency flares, sand, a
shovel, jumper cables, a window scraper,
gloves, ground cloth, coveralls, a blanket,
etc.Snow tires
If you mount snow tires on your vehicle,
make sure to use radial tires of the same
size and load range as the original tires.
Mount snow tires on all four wheels to
balance your vehicle’s handling in all
weather conditions. The traction provided
by snow tires on dry roads may not be as
high as your vehicle's original equipment
tires. Check with the tire dealer for maxi-
mum speed recommendations.
✽NOTICE
Do not install studded tires without first
checking local and municipal regula-
tions for possible restrictions against
their use.
WINTER DRIVING
OLMB053045
WARNING
Snow tires should be equivalent in
size and type to the vehicle's stan-
dard tires. Otherwise, the safety
and handling of your vehicle may
be adversely affected.
Page 234 of 343
What to do in an emergency
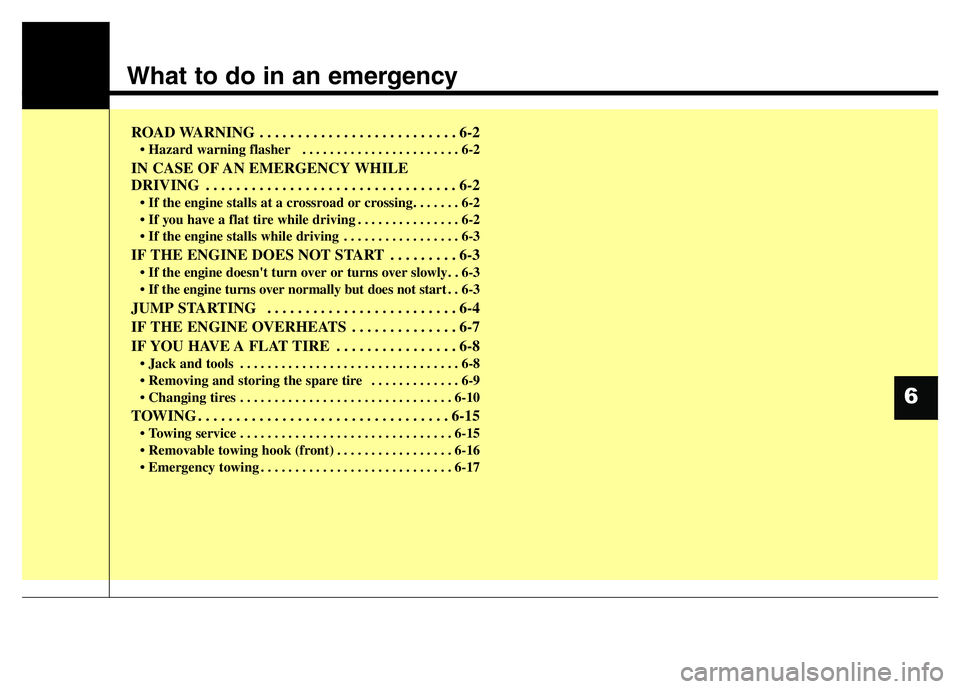
ROAD WARNING . . . . . . . . . . . . . . . . . . . . . . . . . . 6-2
• Hazard warning flasher . . . . . . . . . . . . . . . . . . . . . . . 6-2
IN CASE OF AN EMERGENCY WHILE
DRIVING . . . . . . . . . . . . . . . . . . . . . . . . . . . . . . . . . 6-2
• If the engine stalls at a crossroad or crossing. . . . . . . 6-2
• If you have a flat tire while driving . . . . . . . . . . . . . . . 6-2
• If the engine stalls while driving . . . . . . . . . . . . . . . . . 6-3
IF THE ENGINE DOES NOT START . . . . . . . . . 6-3
• If the engine doesn't turn over or turns over slowly. . 6-3
• If the engine turns over normally but does not start . . 6-3
JUMP STARTING . . . . . . . . . . . . . . . . . . . . . . . . . 6-4
IF THE ENGINE OVERHEATS . . . . . . . . . . . . . . 6-7
IF YOU HAVE A FLAT TIRE . . . . . . . . . . . . . . . . 6-8
• Jack and tools . . . . . . . . . . . . . . . . . . . . . . . . . . . . . . . . 6-8
• Removing and storing the spare tire . . . . . . . . . . . . . 6-9
• Changing tires . . . . . . . . . . . . . . . . . . . . . . . . . . . . . . . 6-10
TOWING . . . . . . . . . . . . . . . . . . . . . . . . . . . . . . . . . 6-15
• Towing service . . . . . . . . . . . . . . . . . . . . . . . . . . . . . . . 6-15
• Removable towing hook (front) . . . . . . . . . . . . . . . . . 6-16
• Emergency towing . . . . . . . . . . . . . . . . . . . . . . . . . . . . 6-17
6