2013 HYUNDAI GENESIS G80 oil
[x] Cancel search: oilPage 14 of 432

17
Introduction
INDICATOR SYMBOLS ON THE INSTRUMENT CLUSTER
Seat belt warning light
High beam indicator
Turn signal indicator
ABS warning light
Parking brake & Brake fluid
warning light
Engine oil pressure warning light ESC indicator
ESC OFF indicator
Malfunction indicator light
Air bag warning light
Cruise indicator (if equipped)
Cruise SET indicator
(if equipped)
Immobilizer indicator
Low fuel level warning light
* For more detailed explanations, refer to “Instrument cluster” in section 4.
Charging system warning light
Low windshield washer fluid
level warning light (if equipped)
A050000ABH-EU
Door ajar warning light
AFLS malfunction indicator
(if equipped)
Tail light indicator
Trunk ajar warning light
Front fog light indicator
(if equipped)
ESC
ESC
OFF
AFLS
ECO
TPMS (Tire Pressure Monitoring
System) malfunction indicator
(if equipped)
Low tire pressure telltale
(if equipped)
Low tire pressure position tell-
tale (if equipped)
SCC malfunction indicator
(if equipped)
SCC sensor malfunction indica-
tor (if equipped)EPB malfunction indicator
(if equipped)
AUTO HOLD indicator
(if equipped)
EPB
AUTO
HOLD
LDWS indicator (if equipped)LDWS
LDWS malfunction indicator
(if equipped)LDWS
FAIL
ECO indicator (if equipped)
Page 18 of 432
Your vehicle at a glance
4 2
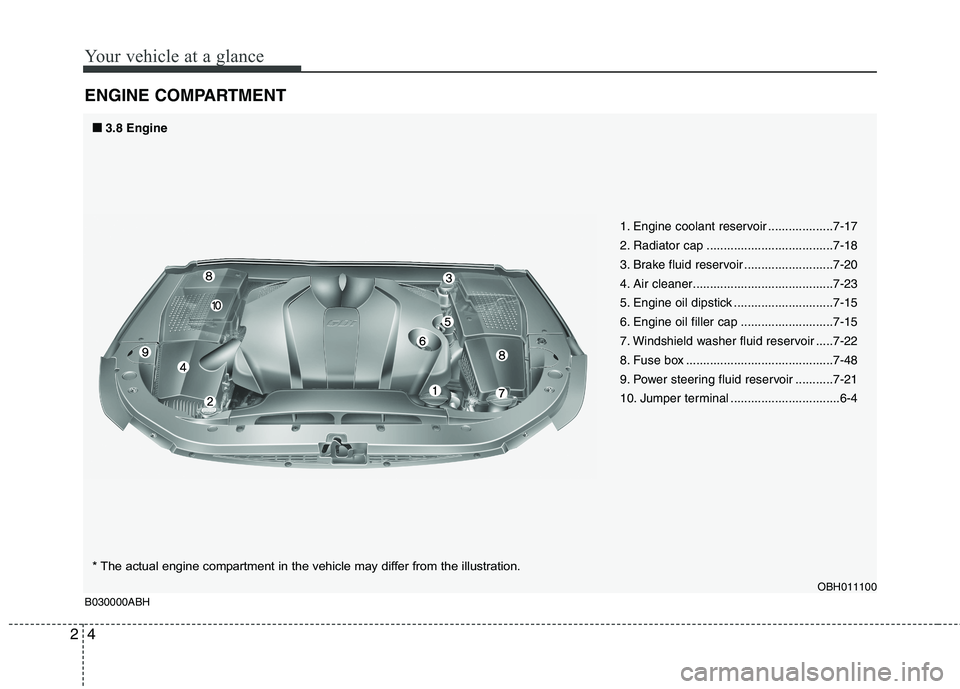
ENGINE COMPARTMENT
OBH011100
B030000ABH
* The actual engine compartment in the vehicle may differ from the illustration.1. Engine coolant reservoir ...................7-17
2. Radiator cap .....................................7-18
3. Brake fluid reservoir ..........................7-20
4. Air cleaner.........................................7-23
5. Engine oil dipstick .............................7-15
6. Engine oil filler cap ...........................7-15
7. Windshield washer fluid reservoir .....7-22
8. Fuse box ...........................................7-48
9. Power steering fluid reservoir ...........7-21
10. Jumper terminal ................................6-4
■ ■
3.8 Engine
Page 19 of 432
25
Your vehicle at a glance
OBH011101
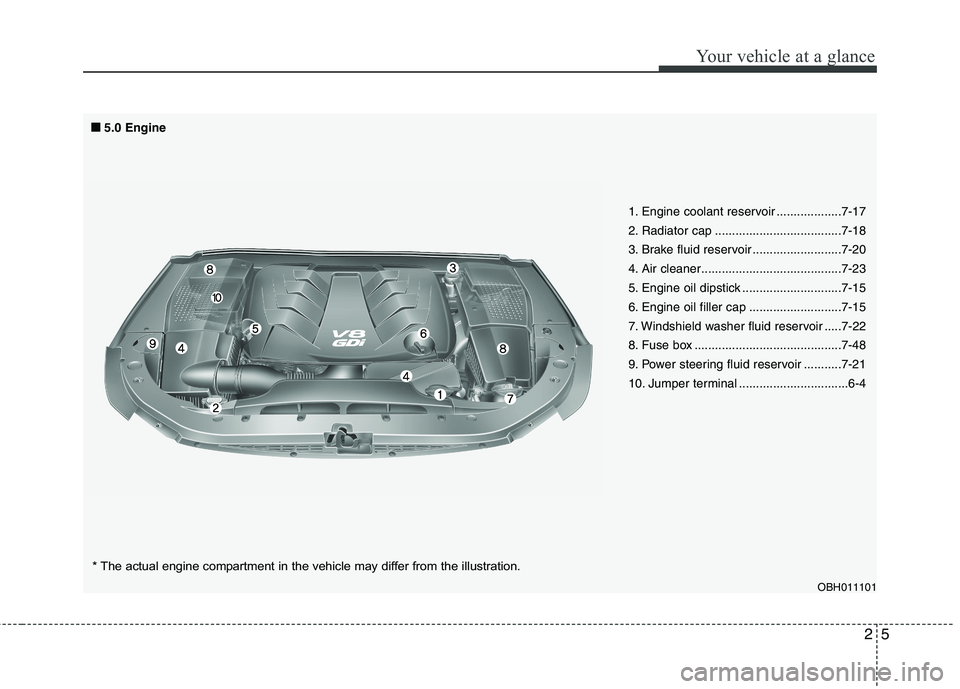
1. Engine coolant reservoir ...................7-17
2. Radiator cap .....................................7-18
3. Brake fluid reservoir ..........................7-20
4. Air cleaner.........................................7-23
5. Engine oil dipstick .............................7-15
6. Engine oil filler cap ...........................7-15
7. Windshield washer fluid reservoir .....7-22
8. Fuse box ...........................................7-48
9. Power steering fluid reservoir ...........7-21
10. Jumper terminal ................................6-4 ■ ■
5.0 Engine
* The actual engine compartment in the vehicle may differ from the illustration.
Page 35 of 432
Safety features of your vehicle
16 3
(Continued)
Care should be taken to avoid con-
tamination of the webbing with pol-
ishes, oils and chemicals and par-
ticularly battery acid. Cleaning may
safely be carried out using mild
soap and water. The belt should be
replaced if webbing becomes
frayed, contaminated or damaged.
It is essential to replace the entire
assembly after it has been worn in
a severe impact even if damage to
the assembly is not obvious. Belts
should not be worn with straps
twisted. Each seat belt assembly
must only be used by one occu-
pant; it is dangerous to put a belt
around a child being carried on the
occupant's lap.C020100AUN
Seat belt restraint system
WARNING
Seat belts are designed to bear
upon the bony structure of the
body, and should be worn low
across the front of the pelvis, or the
pelvis, chest and shoulders, as
applicable; wearing the lap section
of the belt across the abdominal
area must be avoided.
Seat belts should be adjusted as
firmly as possible, consistent with
comfort, to provide the protection
for which they have been designed.
A slack belt will greatly reduce the
protection afforded to the occu-
pant.
(Continued)
(Continued)
Avoid wearing twisted seat belts.
A twisted belt can't do its job as
well. In a collision, it could even
cut into you. Be sure the belt
webbing is straight and not twist-
ed.
Be careful not to damage the belt
webbing or hardware. If the belt
webbing or hardware is dam-
aged, replace it.
WARNING
For maximum restraint system
protection, the seat belts must
always be used whenever the car
is moving.
Seat belts are most effective
when seatbacks are in the
upright position.
Children age 12 and under must
always be properly restrained in
the rear seat. Never allow chil-
dren to ride in the front passen-
ger seat. If a child over 12 must
be seated in the front seat, he/she
must be properly belted and the
seat should be moved as far back
as possible.
Never wear the shoulder belt
under your arm or behind your
back. An improperly positioned
shoulder belt can cause serious
injuries in a crash. The shoulder
belt should be positioned midway
over your shoulder across your
collarbone.
(Continued)
SEAT BELTS
Page 139 of 432
Features of your vehicle
60 4
D150304CBH-EU
Seat belt warning
As a reminder to the driver, the seat belt
warning light will blink for approximately
6 seconds each time you turn the ignition
switch ON, regardless of belt fastening.
The warning light will blink again for
approximately 6 seconds when starting
the engine.
If the driver's seat belt is not fastened
when the ignition switch is turned on, the
seat belt warning light and chime will oper-
ate for approximately 6 seconds. But if it is
fastened within the 6 seconds, the warning
light will blink for the 6 seconds and the
warning chime will turn off immediately.
If the driver's seat belt is disconnected
after the ignition switch is turned to the
ON position, the seat belt warning light
will turn on for approximately 6 seconds.
But if it is fastened within the 6 seconds,
the warning light will turn off immediately.
If the driver's seat belt is not fastened
when the vehicle speed exceeds 6 mph
(10 km/h), the seat belt warning light and
chime will operate for approximately 11
times with a pattern of 6 seconds on and
24 seconds off until the belt is fastened
or the vehicle speed decreases below 3
mph (5 km/h).
D150305AUN
Turn signal indicator
The blinking green arrows on the instru-
ment panel show the direction indicated
by the turn signals. If the arrow comes on
but does not blink, blinks more rapidly
than normal, or does not illuminate at all,
a malfunction in the turn signal system is
indicated. Your dealer should be consult-
ed for repairs.
D150306AUN
High beam indicator
This indicator illuminates when the head-
lights are on and in the high beam posi-
tion or when the turn signal lever is pulled
into the Flash-to-Pass position.
D150331ABH
Tail light indicator
This indicator illuminates when the tail
lights are on.
D150307AEN
Engine oil pressure
warning light
This warning light indicates the engine oil
pressure is low.
If the warning light illuminates while driv-
ing:
1. Drive safely to the side of the road and
stop.
2. With the engine off, check the engine
oil level. If the level is low, add oil as
required.
If the warning light remains on after
adding oil or if oil is not available, call an
authorized HYUNDAI dealer.
CAUTION
If the engine is not stopped imme-
diately after the engine oil pressure
warning light is illuminated, severe
damage could result.
Page 140 of 432
461
Features of your vehicle
D150308ABH-EU
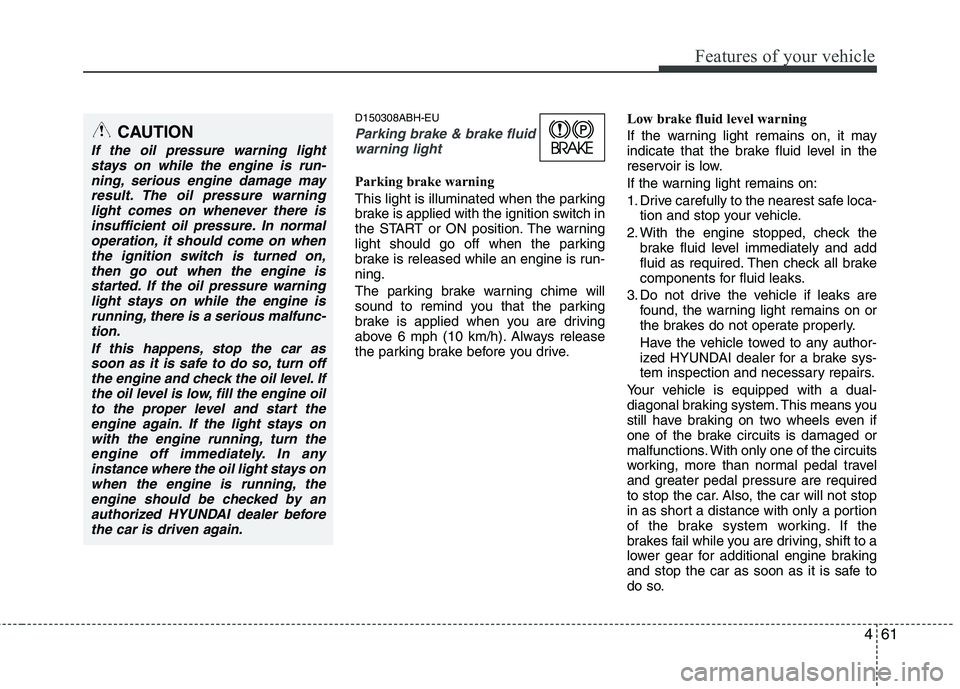
Parking brake & brake fluid
warning light
Parking brake warning
This light is illuminated when the parking
brake is applied with the ignition switch in
the START or ON position. The warning
light should go off when the parking
brake is released while an engine is run-
ning.
The parking brake warning chime will
sound to remind you that the parking
brake is applied when you are driving
above 6 mph (10 km/h). Always release
the parking brake before you drive.Low brake fluid level warning
If the warning light remains on, it may
indicate that the brake fluid level in the
reservoir is low.
If the warning light remains on:
1. Drive carefully to the nearest safe loca-
tion and stop your vehicle.
2. With the engine stopped, check the
brake fluid level immediately and add
fluid as required. Then check all brake
components for fluid leaks.
3. Do not drive the vehicle if leaks are
found, the warning light remains on or
the brakes do not operate properly.
Have the vehicle towed to any author-
ized HYUNDAI dealer for a brake sys-
tem inspection and necessary repairs.
Your vehicle is equipped with a dual-
diagonal braking system. This means you
still have braking on two wheels even if
one of the brake circuits is damaged or
malfunctions. With only one of the circuits
working, more than normal pedal travel
and greater pedal pressure are required
to stop the car. Also, the car will not stop
in as short a distance with only a portion
of the brake system working. If the
brakes fail while you are driving, shift to a
lower gear for additional engine braking
and stop the car as soon as it is safe to
do so.
CAUTION
If the oil pressure warning light
stays on while the engine is run-
ning, serious engine damage may
result. The oil pressure warning
light comes on whenever there is
insufficient oil pressure. In normal
operation, it should come on when
the ignition switch is turned on,
then go out when the engine is
started. If the oil pressure warning
light stays on while the engine is
running, there is a serious malfunc-
tion.
If this happens, stop the car as
soon as it is safe to do so, turn off
the engine and check the oil level. If
the oil level is low, fill the engine oil
to the proper level and start the
engine again. If the light stays on
with the engine running, turn the
engine off immediately. In any
instance where the oil light stays on
when the engine is running, the
engine should be checked by an
authorized HYUNDAI dealer before
the car is driven again.
Page 179 of 432
Features of your vehicle
100
4
D230400AEN
Checking the amount of air con-
ditioner refrigerant and compres-
sor lubricant
When the amount of refrigerant is low,
the performance of the air conditioning is
reduced. Overfilling also has a negative
impact on the air conditioning system.
Therefore, if abnormal operation is
found, have the system inspected by an
authorized HYUNDAI dealer.
✽ ✽
NOTICEIt is important when servicing the air
conditioning system that the correct
type and amount of oil and refrigerant is
used. Otherwise, damage to the com-
pressor and abnormal system operation
may occur. D231000BBH-EU
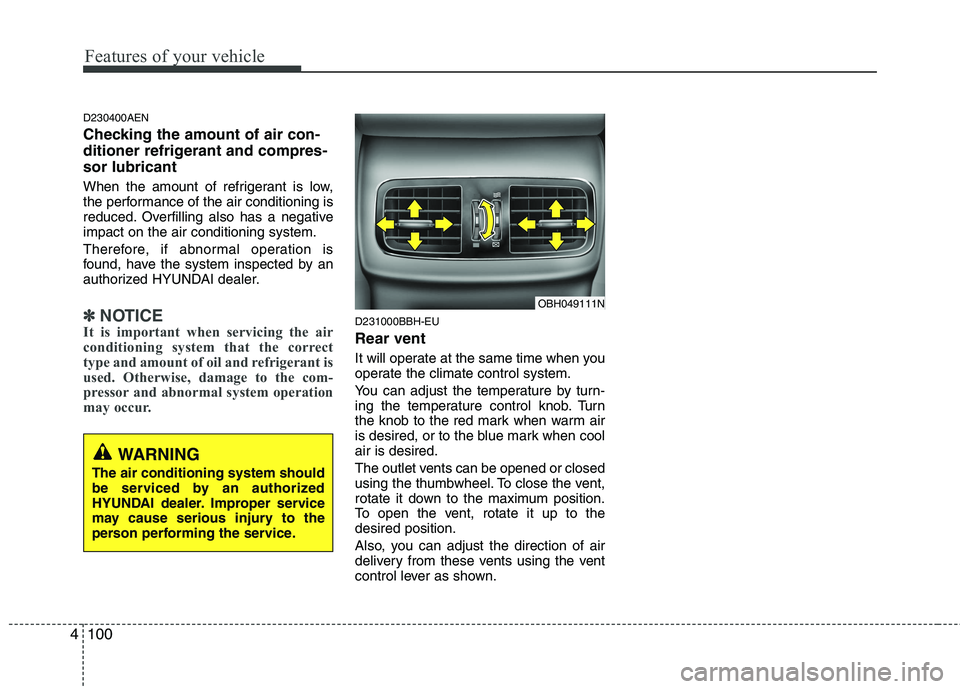
Rear vent
It will operate at the same time when you
operate the climate control system.
You can adjust the temperature by turn-
ing the temperature control knob. Turn
the knob to the red mark when warm air
is desired, or to the blue mark when cool
air is desired.
The outlet vents can be opened or closed
using the thumbwheel. To close the vent,
rotate it down to the maximum position.
To open the vent, rotate it up to the
desired position.
Also, you can adjust the direction of air
delivery from these vents using the vent
control lever as shown.
OBH049111N
WARNING
The air conditioning system should
be serviced by an authorized
HYUNDAI dealer. Improper service
may cause serious injury to the
person performing the service.
Page 191 of 432
Features of your vehicle
112 4
D281000AEN
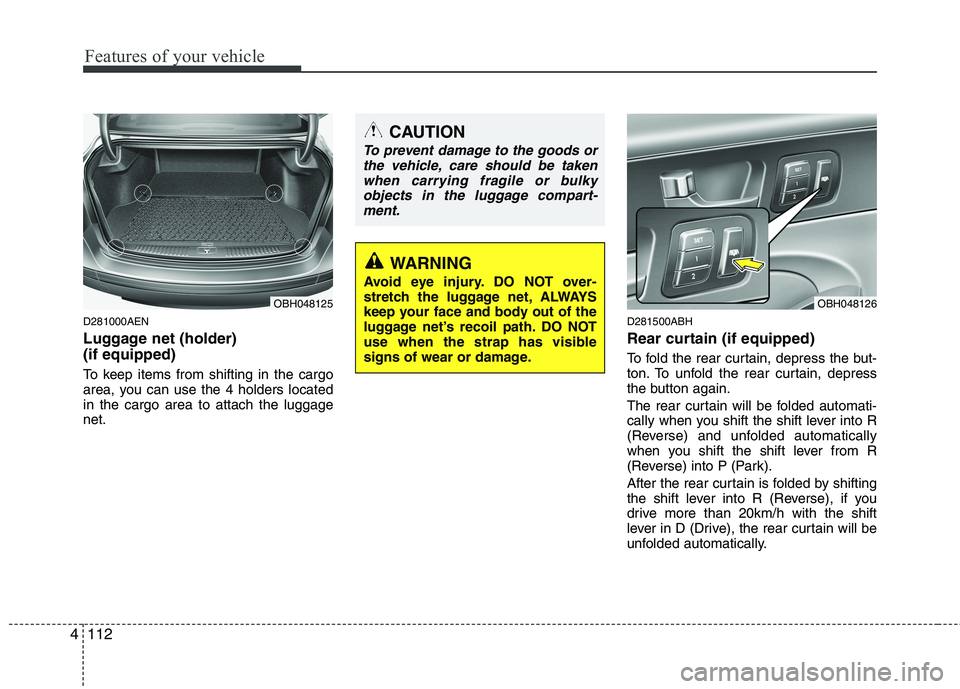
Luggage net (holder)
(if equipped)
To keep items from shifting in the cargo
area, you can use the 4 holders located
in the cargo area to attach the luggage
net.
D281500ABH
Rear curtain (if equipped)
To fold the rear curtain, depress the but-
ton. To unfold the rear curtain, depress
the button again.
The rear curtain will be folded automati-
cally when you shift the shift lever into R
(Reverse) and unfolded automatically
when you shift the shift lever from R
(Reverse) into P (Park).
After the rear curtain is folded by shifting
the shift lever into R (Reverse), if you
drive more than 20km/h with the shift
lever in D (Drive), the rear curtain will be
unfolded automatically.
OBH048126
CAUTION
To prevent damage to the goods or
the vehicle, care should be taken
when carrying fragile or bulky
objects in the luggage compart-
ment.
WARNING
Avoid eye injury. DO NOT over-
stretch the luggage net, ALWAYS
keep your face and body out of the
luggage net’s recoil path. DO NOT
use when the strap has visible
signs of wear or damage.
OBH048125