Page 118 of 479
429
Features of your vehicle
Power windows
The engine start/stop button must be
in the ON position for power windows
to operate.
Each door has a power window
switch that controls the door's win-
dow. The driver has a power window
lock switch which can block the oper-
ation of passenger windows. The
power windows can be operated for
approximately 30 seconds after the
engine start/stop button turned to the
ACC or OFF position. However, if the
front doors are opened, the power
windows cannot be operated even
within the 30 second period.
✽NOTICE
While driving with the rear windows
down or with the sunroof (if
equipped) in an open (or partially
open position), your vehicle may
demonstrate a wind buffeting or
pulsation noise. This noise is a nor-
mal occurrence and can be reduced
or eliminated by taking the follow-
ing actions. If the noise occurs with
one or both of the rear windows
down, partially lower both front
windows approximately one inch.
If you experience the noise with the
sunroof open, slightly reduce the
size of the sunroof opening.
Window opening and closing
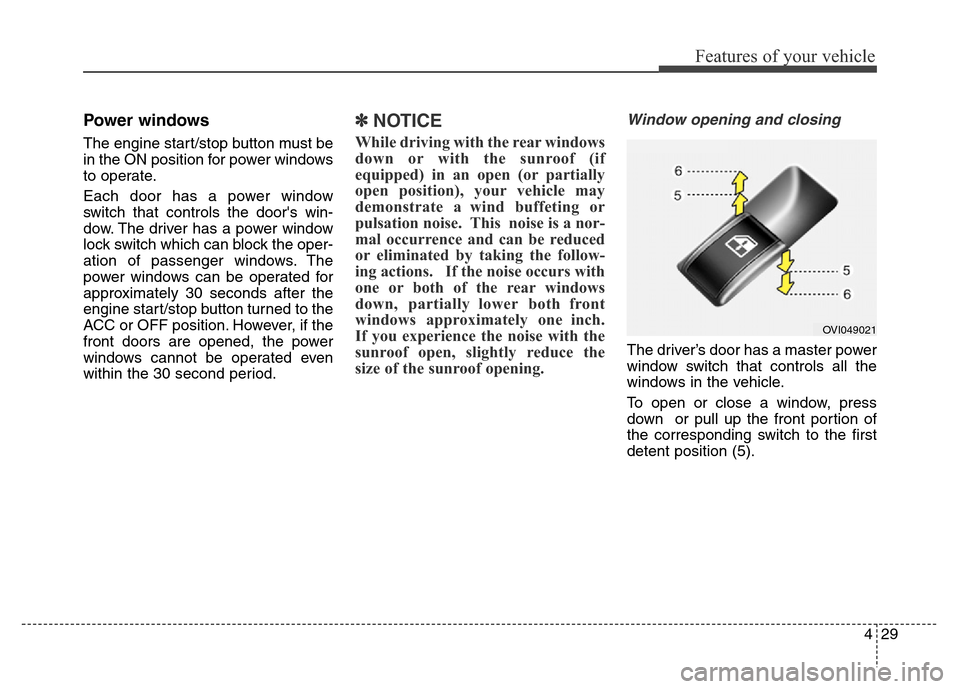
The driver’s door has a master power
window switch that controls all the
windows in the vehicle.
To open or close a window, press
down or pull up the front portion of
the corresponding switch to the first
detent position (5).
OVI049021
Page 120 of 479
431
Features of your vehicle
Rear door window curtains
(if equipped)
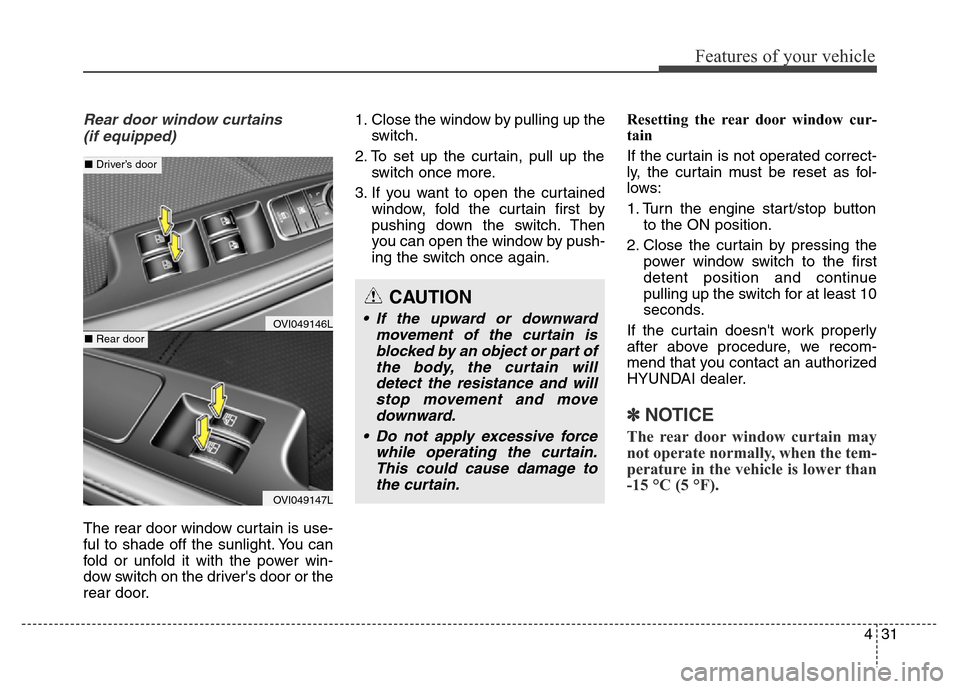
The rear door window curtain is use-
ful to shade off the sunlight. You can
fold or unfold it with the power win-
dow switch on the driver's door or the
rear door.1. Close the window by pulling up the
switch.
2. To set up the curtain, pull up the
switch once more.
3. If you want to open the curtained
window, fold the curtain first by
pushing down the switch. Then
you can open the window by push-
ing the switch once again.Resetting the rear door window cur-
tain
If the curtain is not operated correct-
ly, the curtain must be reset as fol-
lows:
1. Turn the engine start/stop button
to the ON position.
2. Close the curtain by pressing the
power window switch to the first
detent position and continue
pulling up the switch for at least 10
seconds.
If the curtain doesn't work properly
after above procedure, we recom-
mend that you contact an authorized
HYUNDAI dealer.
✽NOTICE
The rear door window curtain may
not operate normally, when the tem-
perature in the vehicle is lower than
-15 °C (5 °F).
CAUTION
• If the upward or downward
movement of the curtain is
blocked by an object or part of
the body, the curtain will
detect the resistance and will
stop movement and move
downward.
• Do not apply excessive force
while operating the curtain.
This could cause damage to
the curtain.OVI049146L
OVI049147L
■Driver’s door
■Rear door
Page 122 of 479
433
Features of your vehicle
HOOD
Opening the hood
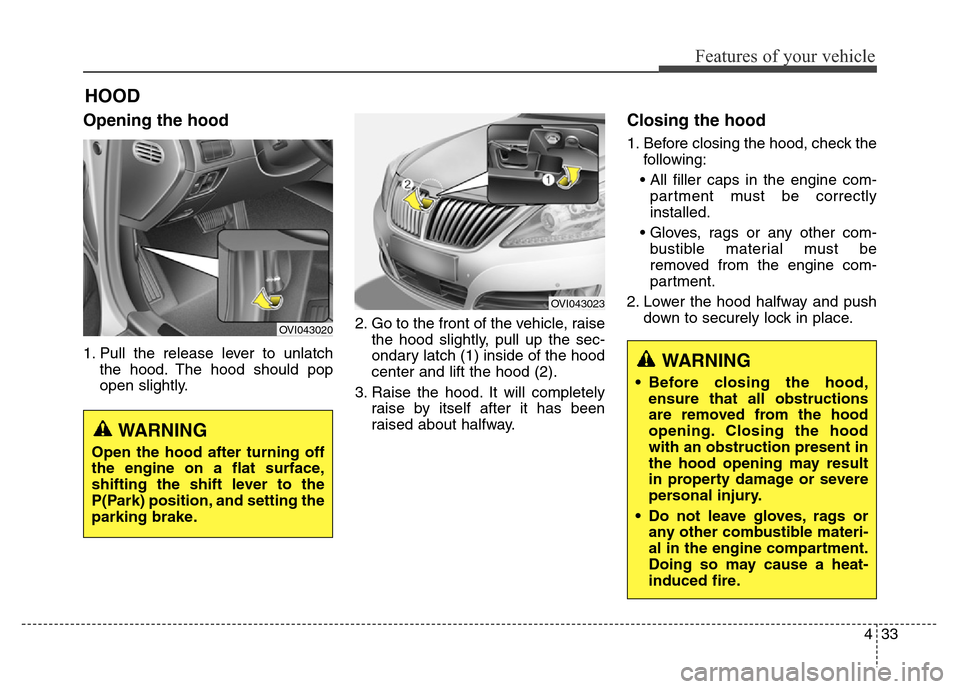
1. Pull the release lever to unlatch
the hood. The hood should pop
open slightly.2. Go to the front of the vehicle, raise
the hood slightly, pull up the sec-
ondary latch (1) inside of the hood
center and lift the hood (2).
3. Raise the hood. It will completely
raise by itself after it has been
raised about halfway.
Closing the hood
1. Before closing the hood, check the
following:
• All filler caps in the engine com-
partment must be correctly
installed.
• Gloves, rags or any other com-
bustible material must be
removed from the engine com-
partment.
2. Lower the hood halfway and push
down to securely lock in place.
OVI043020
WARNING
Open the hood after turning off
the engine on a flat surface,
shifting the shift lever to the
P(Park) position, and setting the
parking brake.
OVI043023
WARNING
• Before closing the hood,
ensure that all obstructions
are removed from the hood
opening. Closing the hood
with an obstruction present in
the hood opening may result
in property damage or severe
personal injury.
• Do not leave gloves, rags or
any other combustible materi-
al in the engine compartment.
Doing so may cause a heat-
induced fire.
Page 124 of 479

435
Features of your vehicle
Opening the fuel filler lid
The fuel filler lid must be opened
from inside the vehicle by pressing
the fuel filler lid open button located
on the driver’s door.
✽NOTICE
If the fuel filler lid does not open
because ice has formed around it,
tap lightly or push on the lid to break
the ice and release the lid. Do not pry
on the lid. If necessary, spray around
the lid with an approved de-icer fluid
(do not use radiator anti-freeze) or
move the vehicle to a warm place
and allow the ice to melt.
1. Stop the engine.
2. Push the fuel filler lid opener but-
ton, then the fuel filler lid slowly
open (1).
3. To remove the cap, turn the fuel
tank cap (2) counterclockwise.
4. Refuel as needed.
Closing the fuel filler lid
1. To install the cap, turn it clockwise
until it “clicks”. This indicates that
the cap is securely tightened.
2. Close the fuel filler lid and push it
lightly and make sure that it is
securely closed.
FUEL FILLER LID
OVI049024
OVI043025N
WARNING - Refueling
• If pressurized fuel sprays out,
it can cover your clothes or
skin and thus subject you to
the risk of fire and burns.
Always remove the fuel cap
carefully and slowly. If the cap
is venting fuel or if you hear a
hissing sound, wait until the
condition stops before com-
pletely removing the cap.
• Do not "top off" after the noz-
zle automatically shuts off
when refueling.
• Always check that the fuel cap
is installed securely to pre-
vent fuel spillage in the event
of an accident.
Page 126 of 479
437
Features of your vehicle
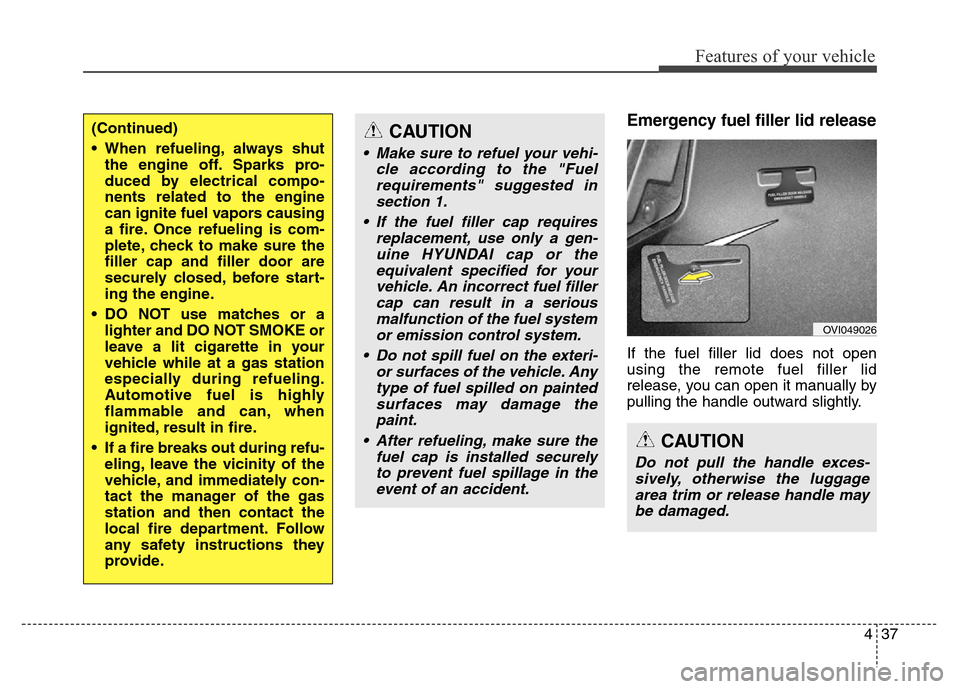
Emergency fuel filler lid release
If the fuel filler lid does not open
using the remote fuel filler lid
release, you can open it manually by
pulling the handle outward slightly.
(Continued)
• When refueling, always shut
the engine off. Sparks pro-
duced by electrical compo-
nents related to the engine
can ignite fuel vapors causing
a fire. Once refueling is com-
plete, check to make sure the
filler cap and filler door are
securely closed, before start-
ing the engine.
• DO NOT use matches or a
lighter and DO NOT SMOKE or
leave a lit cigarette in your
vehicle while at a gas station
especially during refueling.
Automotive fuel is highly
flammable and can, when
ignited, result in fire.
• If a fire breaks out during refu-
eling, leave the vicinity of the
vehicle, and immediately con-
tact the manager of the gas
station and then contact the
local fire department. Follow
any safety instructions they
provide.CAUTION
• Make sure to refuel your vehi-
cle according to the "Fuel
requirements" suggested in
section 1.
• If the fuel filler cap requires
replacement, use only a gen-
uine HYUNDAI cap or the
equivalent specified for your
vehicle. An incorrect fuel filler
cap can result in a serious
malfunction of the fuel system
or emission control system.
• Do not spill fuel on the exteri-
or surfaces of the vehicle. Any
type of fuel spilled on painted
surfaces may damage the
paint.
• After refueling, make sure the
fuel cap is installed securely
to prevent fuel spillage in the
event of an accident.
CAUTION
Do not pull the handle exces-
sively, otherwise the luggage
area trim or release handle may
be damaged.
OVI049026
Page 130 of 479
441
Features of your vehicle
Resetting the sunroof
Sunroof needs to be reset if (in the
followings)
- Battery is discharged or disconnect-
ed or the related fuse has been
replaced or disconnected.
- The one-touch sliding function of the
sunroof does not normally operate.
1.Turn the engine start/stop button to
the ON position and close the sun-
roof completely.
2.Release the control lever.
3.Pull and hold the control lever
downward until the sunroof tilts
and slightly moves up and down.
Then, release the lever.
4.Pull and hold the control lever
downward until the sunroof is oper-
ated as follows;
TILT DOWN
→SLIDE OPEN →
SLIDE CLOSE
Then, release the control lever.
When this is complete, the sunroof
system is reset.❈For more detailed information, we
recommend that you contact an
authorized HYUNDAI dealer.
CAUTION
If the sunroof is not reset when
the vehicle battery is discon-
nected or discharged, or related
fuse is blown, the sunroof may
operate improperly.
Page 134 of 479
445
Features of your vehicle
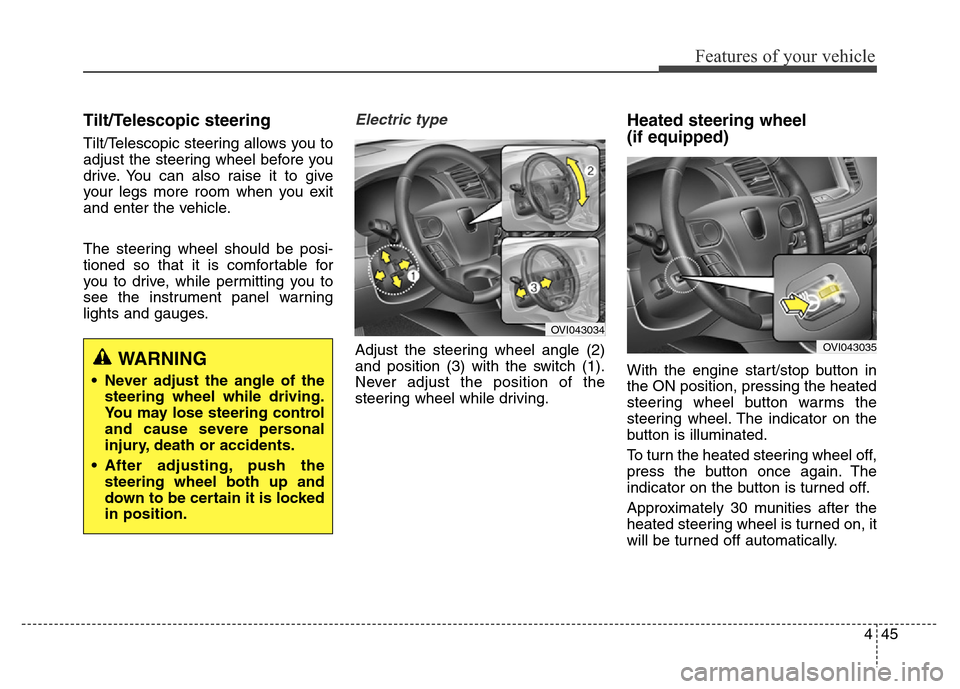
Tilt/Telescopic steering
Tilt/Telescopic steering allows you to
adjust the steering wheel before you
drive. You can also raise it to give
your legs more room when you exit
and enter the vehicle.
The steering wheel should be posi-
tioned so that it is comfortable for
you to drive, while permitting you to
see the instrument panel warning
lights and gauges.
Electric type
Adjust the steering wheel angle (2)
and position (3) with the switch (1).
Never adjust the position of the
steering wheel while driving.
Heated steering wheel
(if equipped)
With the engine start/stop button in
the ON position, pressing the heated
steering wheel button warms the
steering wheel. The indicator on the
button is illuminated.
To turn the heated steering wheel off,
press the button once again. The
indicator on the button is turned off.
Approximately 30 munities after the
heated steering wheel is turned on, it
will be turned off automatically.WARNING
• Never adjust the angle of the
steering wheel while driving.
You may lose steering control
and cause severe personal
injury, death or accidents.
• After adjusting, push the
steering wheel both up and
down to be certain it is locked
in position.
OVI043034
OVI043035
Page 136 of 479
447
Features of your vehicle
Inside rearview mirror
Adjust the rearview mirror so that the
center view through the rear window
is seen. Make this adjustment before
you start driving.
Electric chromic mirror (ECM)
with compass
1. On/Off button
2. Status Indicator
3. Rear Light Sensor
4. Display Window (if equipped)
MIRRORS
WARNING - Rear visibility
Do not place objects in the rear
seat which would interfere with
your vision through the rear
window.
WARNING
Do not adjust the rearview mir-
ror while the vehicle is moving.
This could result in loss of con-
trol, and an accident which
could cause death, serious
injury or property damage.
WARNING
Do not modify the inside mirror
and do not install a wide mirror.
It could result in injury, during
an accident or deployment of
the air bag.
OVI049037L