Page 139 of 479

Features of your vehicle
50 4
3. Press the button until the new zone
number appears in the display.
After you stop pressing the button
in, the display will show a compass
direction within a few seconds.
4. Changing Mirror Angle setting
(if equipped):
Due to mirror positions being angled
towards the driver, the compass mir-
ror can also compensate for drivers
seated on the Left Hand side of the
vehicle (steering wheel on the LH
side of the vehicle) or Right Hand
side of the vehicle (steering wheel on
the RH side of the vehicle).To adjust the Left Hand, “L” or Right
Hand, “R”, setting:
1. Press and hold the button for more
than 12 seconds.
2. Release then press the button to
toggle between “L” and “R”.
✽NOTICE
This procedure also causes the com-
pass to be de-calibrated.
3. To re-calibrate the compass, drive
the vehicle in 2 complete circles at
less than 8km/h (5mph).
CAUTION
1.Do not install the ski rack,
antenna, etc. which are
attached to the vehicle by
means of a magnet. They affect
the operation of the compass.
2.If the compass deviates from
the correct indication soon
after repeated adjustment, we
recommend that the system
be checked by an authorized
HYUNDAI dealer.
3.The compass may not indicate
the correct compass point in
tunnels or while driving up or
down a steep hill.
(The compass returns to the
correct compass point when
the vehicle moves to an area
where the geomagnetism is
stabilized.)
4.When cleaning the mirror, use
a paper towel or similar materi-
al dampened with glass clean-
er. Do not spray glass cleaner
directly on the mirror as that
may cause the liquid cleaner to
enter the mirror housing.
Page 146 of 479
457
Features of your vehicle
LCD Display Control
The LCD display modes can be
changed by using the control buttons
on the steering wheel.
(1) button : Changing LCD modes
(right to left), or returning to pre-
vious position
(2) button : Changing LCD
modes (left to right)
(3) , button : Changing items
(upper or lower)
(4) OK button : selecting or resetting
❈For the LCD modes, refer to "LCD
Display" in this chapter.(1) Haptic switch : changing LCD
modes or items
(2) OK button : selecting or resetting
(3) RETURN button : returning to
previous position
You can adjust the rotating effort of
the haptic switch on the "User Set-
tings Mode" of the LCD Display
❈For more details, refer to "LCD
Display" to in this chapter.
OVI043410
■Type A
OVI043411
■Type B
Page 162 of 479

473
Features of your vehicle
ItemsExplanation
Seat Easy Access
• Off: The seat easy access function will be deactivated.
• Normal/Enhanced:
- When you turn off the engine, the driver’s seat will automatically move rearward by 5 cm
(Normal) or 7.5 cm (Enhanced) for you to enter or exit the vehicle more comfortably.
- If you change the Engine Start/Stop Button from OFF position to the ACC, ON, or START posi-
tion, the driver’s seat will return to the original position.
❈For more details, refer to “Driver Position Memory System” in chapter 4.
Steering Easy Access
• On: The steering wheel will automatically move forward or rearward for the driver to enter or exit
the vehicle comfortably.
• Off: The steering easy access function will be deactivated.
❈For more details, refer to “Driver Position Memory System” in chapter 4.
Driver Convenience
Haptic Steering System Switch (if equipped)
Adjust the rotating effort of the haptic switch on the steering wheel for LCD display control (Strong, Normal, Mild).
❈For the haptic switch, refer to "LCD Display Control" in this chapter.
Page 167 of 479
Features of your vehicle
78 4
Key not in vehicle
• This warning message illuminates
if the smart key is not in the vehicle
when you press the Engine
Start/Stop Button.
• It means that you should always
have the smart key with you.
Press start button while turn
steering
• This warning message illuminates
if the steering wheel does not
unlock normally when the Engine
Start/Stop Button is pressed.
• It means that you should press the
Engine Start/Stop Button while
turning the steering wheel right
and left.
Steering wheel unlocked
• This warning message illuminates
if the steering wheel does not lock
when the Engine Start/Stop Button
changes to the OFF position.
OVIEDI3932
OVIEDI3933
OVIEDI3934
Page 168 of 479
479
Features of your vehicle
Check steering wheel lock system
• This warning message illuminates
if the steering wheel does not lock
normally when the Engine
Start/Stop Button changes to the
OFF position.
Align steering wheel
• This warning message illuminates
if you start the engine when the
steering wheel is turned to more
than 90 degrees to the left or right.
• It means that you should turn the
steering wheel and make the angle
of the steering wheel be less than
30 degrees.
Door / Hood / Trunk Open
• It means that any door, hood, or
trunk is open.
OVIEDI3935OVIEDI3936OVIEDI3937
Page 176 of 479

487
Features of your vehicle
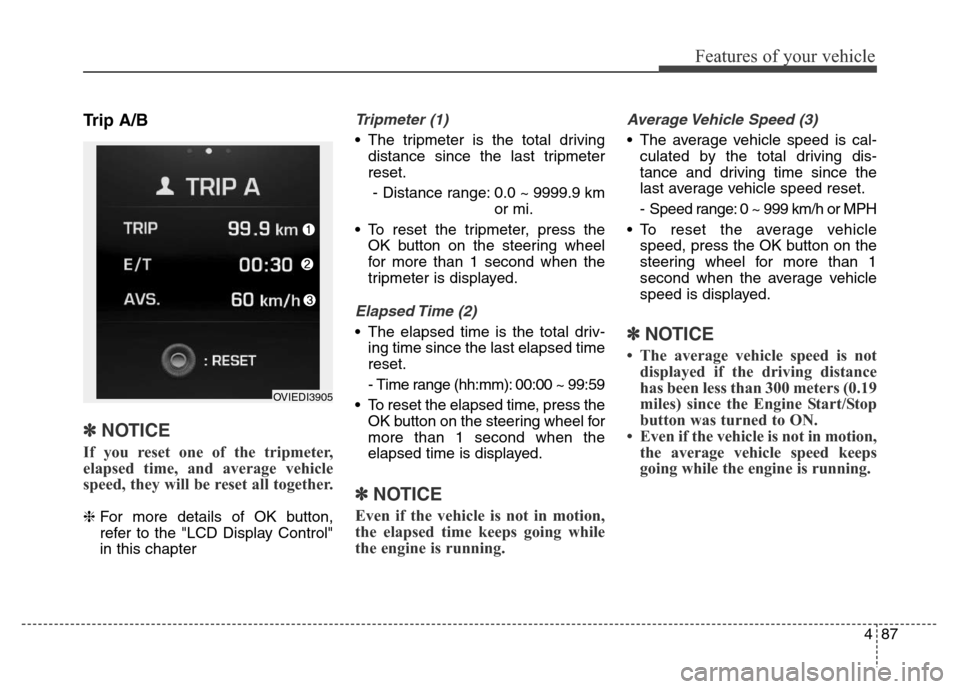
Trip A/B
✽NOTICE
If you reset one of the tripmeter,
elapsed time, and average vehicle
speed, they will be reset all together.
❈For more details of OK button,
refer to the "LCD Display Control"
in this chapter
Tripmeter (1)
• The tripmeter is the total driving
distance since the last tripmeter
reset.
- Distance range: 0.0 ~ 9999.9 km
or mi.
• To reset the tripmeter, press the
OK button on the steering wheel
for more than 1 second when the
tripmeter is displayed.
Elapsed Time (2)
• The elapsed time is the total driv-
ing time since the last elapsed time
reset.
- Time range (hh:mm): 00:00 ~ 99:59
• To reset the elapsed time, press the
OK button on the steering wheel for
more than 1 second when the
elapsed time is displayed.
✽NOTICE
Even if the vehicle is not in motion,
the elapsed time keeps going while
the engine is running.
Average Vehicle Speed (3)
• The average vehicle speed is cal-
culated by the total driving dis-
tance and driving time since the
last average vehicle speed reset.
- Speed range: 0 ~ 999 km/h or MPH
• To reset the average vehicle
speed, press the OK button on the
steering wheel for more than 1
second when the average vehicle
speed is displayed.
✽NOTICE
• The average vehicle speed is not
displayed if the driving distance
has been less than 300 meters (0.19
miles) since the Engine Start/Stop
button was turned to ON.
• Even if the vehicle is not in motion,
the average vehicle speed keeps
going while the engine is running.
OVIEDI3905
Page 178 of 479
489
Features of your vehicle
Manual reset
To clear the average fuel economy
manually, press the OK button on the
steering wheel for more than 1 sec-
ond when the average fuel economy
is displayed.
❈For more details of OK button,
refer to the "LCD Display Control"
in this chapterAutomatic reset
To make the average fuel economy
be reset automatically whenever refu-
eling, select the "Auto Reset" mode in
User Setting menu of the LCD display
(Refer to "LCD Display").
Under "Auto Reset" mode, the aver-
age fuel economy will be cleared to
zero (---) when the vehicle speed
exceeds 1 km/h after refueling more
than 6 liters (1.6 gallons).
✽NOTICE
The average fuel economy is not dis-
played for more accurate calculation
if the vehicle does not drive more
than 300 meters (0.19 miles) since
the Engine Start/Stop button is
turned to ON.
Page 203 of 479
Features of your vehicle
114 4
5. Turn the steering wheel so that the
parking guide line is aligned with
the parking area.
6. Hold the steering wheel and care-
fully back up the vehicle until the
screen changes.7. Carefully back up the vehicle while
fitting the steering wheel guide line
to the parking area by turning the
steering wheel.
8. After parking, you can check the
bottom of the rear bumper by
selecting the icon "Top View" on
the screen.
Parallel parking
1. Stop the vehicle at a distance of
approximately 1 meter (3 feet) par-
allel to the parked vehicle (1) that
is in front of the desired parking
space. Make sure that the front of
the parked vehicle (1) is parallel to
your rear wheel.
2. Stop the vehicle and shift the trans-
mission lever to the R position.
3. Select the parallel parking mode
by touching the icon on
the screen.
OVI049173OVI049172
OVI049177