2013 Hyundai Azera ESP
[x] Cancel search: ESPPage 360 of 403
Maintenance
48 7
Wheel replacement
When replacing the metal wheels for
any reason, make sure the new
wheels are equivalent to the original
factory units in diameter, rim width
and offset.Tire traction
Tire traction can be reduced if you
drive on worn tires, tires that are
improperly inflated or on slippery
road surfaces. Tires should be
replaced when tread wear indicators
appear. To reduce the possibility of
losing control, slow down whenever
there is rain, snow or ice on the road.
Tire maintenance
In addition to proper inflation, correct
wheel alignment helps to decrease
tire wear. If you find a tire is worn
unevenly, have your dealer check the
wheel alignment.
When you have new tires installed,
make sure they are balanced. This
will increase vehicle ride comfort and
tire life. Additionally, a tire should
always be rebalanced if it is removed
from the wheel.
WARNING
A wheel that is not the correct
size may adversely affect wheel
and bearing life, braking and
stopping abilities, handling
characteristics, ground clear-
ance, body-to-tire clearance,
snow chain clearance,
speedometer and odometer cal-
ibration, headlight aim and
bumper height.
(Continued)
• The ABS works by comparing
the speed of the wheels. Tire
size can affect wheel speed.
When replacing tires, all 4 tires
must use the same size original-
ly supplied with the vehicle.
Using tires of a different size
can cause the ABS (Anti-lock
Brake System) and ESP
(Electronic Stability Program) (if
equipped) to work irregularly.
Page 362 of 403
Maintenance
50 7
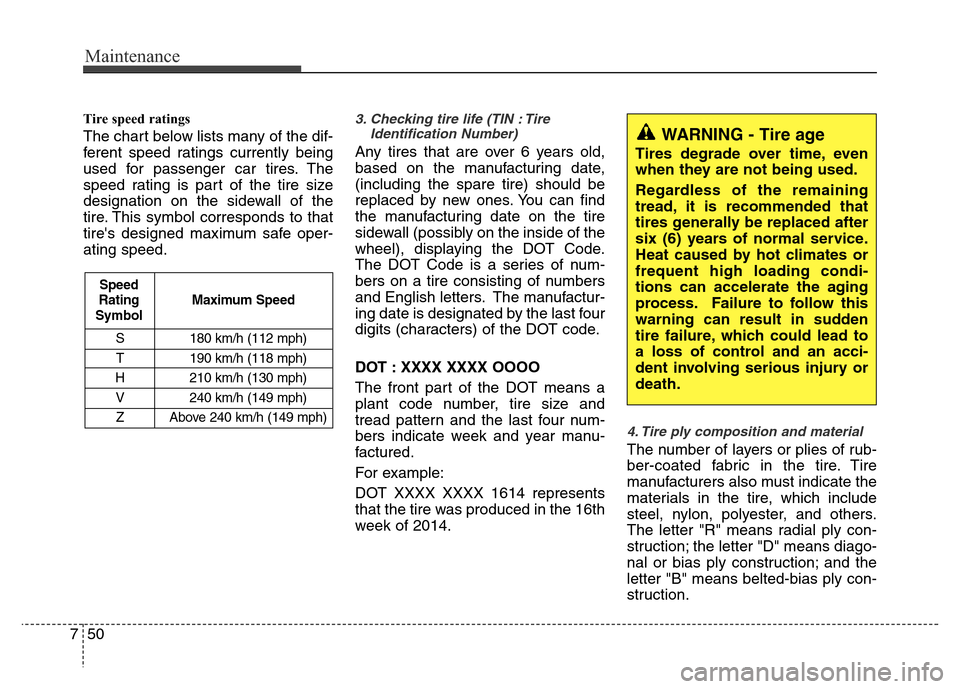
Tire speed ratings
The chart below lists many of the dif-
ferent speed ratings currently being
used for passenger car tires. The
speed rating is part of the tire size
designation on the sidewall of the
tire. This symbol corresponds to that
tire's designed maximum safe oper-
ating speed.
3. Checking tire life (TIN : Tire
Identification Number)
Any tires that are over 6 years old,
based on the manufacturing date,
(including the spare tire) should be
replaced by new ones. You can find
the manufacturing date on the tire
sidewall (possibly on the inside of the
wheel), displaying the DOT Code.
The DOT Code is a series of num-
bers on a tire consisting of numbers
and English letters. The manufactur-
ing date is designated by the last four
digits (characters) of the DOT code.
DOT : XXXX XXXX OOOO
The front part of the DOT means a
plant code number, tire size and
tread pattern and the last four num-
bers indicate week and year manu-
factured.
For example:
DOT XXXX XXXX 1614 represents
that the tire was produced in the 16th
week of 2014.
4. Tire ply composition and material
The number of layers or plies of rub-
ber-coated fabric in the tire. Tire
manufacturers also must indicate the
materials in the tire, which include
steel, nylon, polyester, and others.
The letter "R" means radial ply con-
struction; the letter "D" means diago-
nal or bias ply construction; and the
letter "B" means belted-bias ply con-
struction.
WARNING - Tire age
Tires degrade over time, even
when they are not being used.
Regardless of the remaining
tread, it is recommended that
tires generally be replaced after
six (6) years of normal service.
Heat caused by hot climates or
frequent high loading condi-
tions can accelerate the aging
process. Failure to follow this
warning can result in sudden
tire failure, which could lead to
a loss of control and an acci-
dent involving serious injury or
death.
S 180 km/h (112 mph)
T 190 km/h (118 mph)
H 210 km/h (130 mph)
V 240 km/h (149 mph)
Z Above 240 km/h (149 mph)
Maximum Speed Speed
Rating
Symbol
Page 363 of 403
751
Maintenance
5. Maximum permissible inflation
pressure
This number is the greatest amount
of air pressure that should be put in
the tire. Do not exceed the maximum
permissible inflation pressure. Refer
to the Tire and Loading Information
label for recommended inflation
pressure.
6. Maximum load rating
This number indicates the maximum
load in kilograms and pounds that
can be carried by the tire. When
replacing the tires on the vehicle,
always use a tire that has the same
load rating as the factory installed
tire.
7. Uniform tire quality grading
Quality grades can be found where
applicable on the tire sidewall
between tread shoulder and maxi-
mum section width.
For example:
TREADWEAR 200
TRACTION AA
TEMPERATURE A
Tread wear
The tread wear grade is a compara-
tive rating based on the wear rate of
the tire when tested under controlled
conditions on a specified govern-
ment test course. For example, a tire
graded 150 would wear one-and-a-
half times (1½) as well on the gov-
ernment course as a tire graded 100.
The relative performance of tires
depends upon the actual conditions
of their use, however, and may
depart significantly from the norm
due to variations in driving habits,
service practices and differences in
road characteristics and climate.
These grades are molded on the
side-walls of passenger vehicle tires.
The tires available as standard or
optional equipment on your vehicle
may vary with respect to grade.
Traction - AA, A, B & C
The traction grades, from highest to
lowest, are AA, A, B and C. Those
grades represent the tire’s ability to
stop on wet pavement as measured
under controlled conditions on spec-
ified government test surfaces of
asphalt and concrete. A tire marked
C may have poor traction perform-
ance.
WARNING
The traction grade assigned to
this tire is based on straight-
ahead braking traction tests,
and does not include accelera-
tion, cornering, hydroplaning,
or peak traction characteristics.
Page 370 of 403
Maintenance
58 7
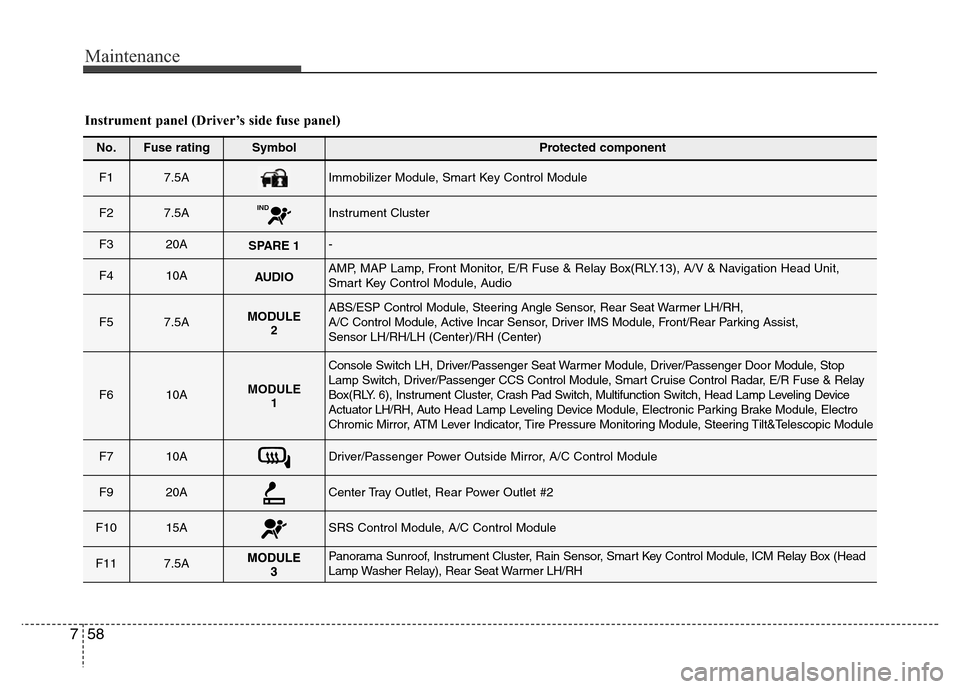
Instrument panel (Driver’s side fuse panel)
No.Fuse ratingSymbol Protected component
F1 7.5AImmobilizer Module, Smart Key Control Module
F2 7.5A INDInstrument Cluster
F3 20ASPARE 1-
F410AAUDIOAMP, MAP Lamp, Front Monitor, E/R Fuse & Relay Box(RLY.13), A/V & Navigation Head Unit,
Smart Key Control Module, Audio
F57.5AMODULE
2ABS/ESP Control Module, Steering Angle Sensor, Rear Seat Warmer LH/RH,
A/C Control Module, Active Incar Sensor, Driver IMS Module, Front/Rear Parking Assist,
Sensor LH/RH/LH (Center)/RH (Center)
F610AMODULE
1
Console Switch LH, Driver/Passenger Seat Warmer Module, Driver/Passenger Door Module, Stop
Lamp Switch, Driver/Passenger CCS Control Module, Smart Cruise Control Radar, E/R Fuse & Relay
Box(RLY. 6), Instrument Cluster, Crash Pad Switch, Multifunction Switch, Head Lamp Leveling Device
Actuator LH/RH, AutoHead Lamp Leveling Device Module, Electronic Parking Brake Module, Electro
Chromic Mirror, ATM Lever Indicator, Tire Pressure Monitoring Module, Steering Tilt&Telescopic Module
F710ADriver/Passenger Power Outside Mirror, A/C Control Module
F920ACenter Tray Outlet, Rear Power Outlet #2
F1015ASRS Control Module, A/C Control Module
F117.5APanorama Sunroof, Instrument Cluster, Rain Sensor, Smart Key Control Module, ICM Relay Box (Head
Lamp Washer Relay), Rear Seat Warmer LH/RH
Page 373 of 403
761
Maintenance
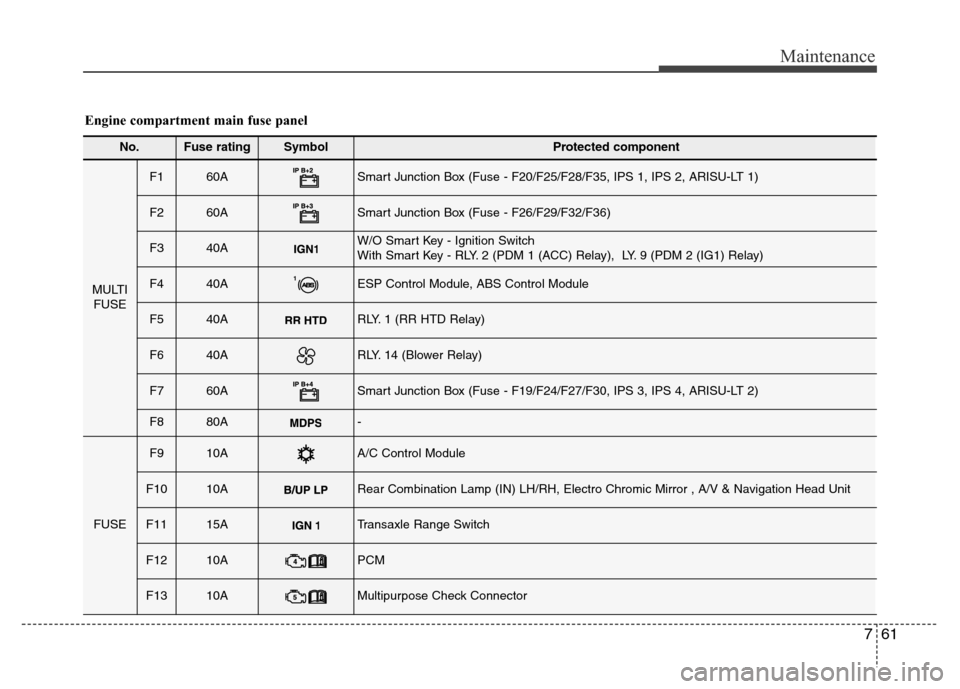
No.Fuse ratingSymbol Protected component
MULTI
FUSE
F1 60ASmart Junction Box (Fuse - F20/F25/F28/F35, IPS 1, IPS 2, ARISU-LT 1)
F2 60ASmart Junction Box (Fuse - F26/F29/F32/F36)
F3 40AW/O Smart Key - Ignition Switch
With Smart Key - RLY. 2 (PDM 1 (ACC) Relay), LY. 9 (PDM 2 (IG1) Relay)
F440AESP Control Module, ABS Control Module
F540ARLY. 1 (RR HTD Relay)
F640ARLY. 14 (Blower Relay)
F760ASmart Junction Box (Fuse - F19/F24/F27/F30, IPS 3, IPS 4, ARISU-LT 2)
F880A-
FUSE
F910AA/C Control Module
F1010ARear Combination Lamp (IN) LH/RH, Electro Chromic Mirror , A/V & Navigation Head Unit
F1115ATransaxle Range Switch
F1210APCM
F1310AMultipurpose Check Connector
Engine compartment main fuse panel
Page 374 of 403
Maintenance
62 7
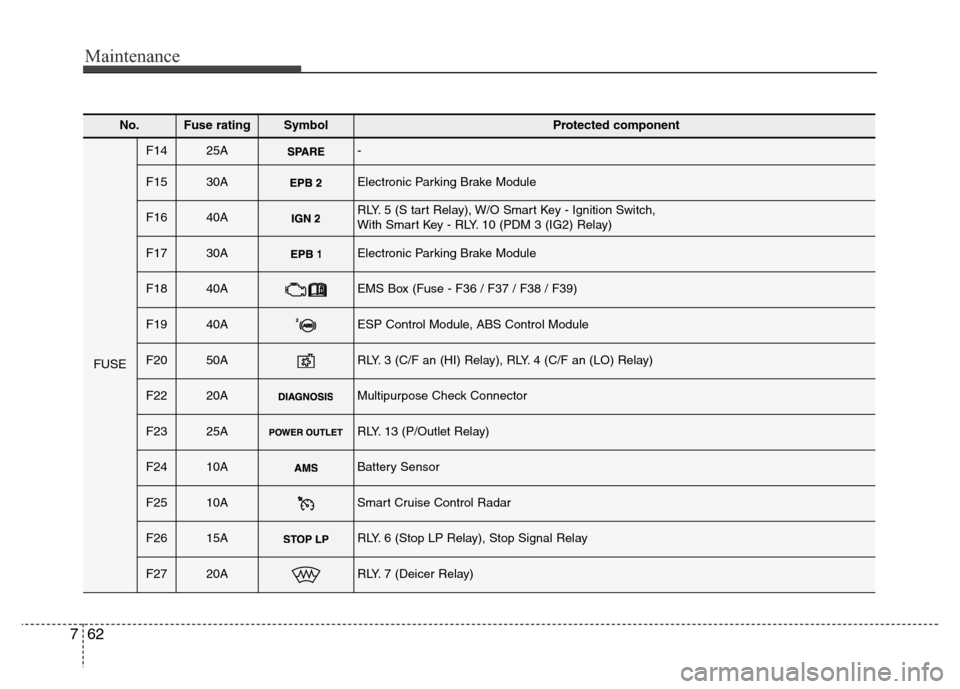
No.Fuse ratingSymbol Protected component
FUSE
F1425A-
F1530AElectronic Parking Brake Module
F1640ARLY. 5 (S tart Relay), W/O Smart Key - Ignition Switch,
With Smart Key - RLY. 10 (PDM 3 (IG2) Relay)
F1730AElectronic Parking Brake Module
F1840AEMS Box (Fuse - F36 / F37 / F38 / F39)
F1940AESP Control Module, ABS Control Module
F2050ARLY. 3 (C/F an (HI) Relay), RLY. 4 (C/F an (LO) Relay)
F2220AMultipurpose Check Connector
F2325ARLY. 13 (P/Outlet Relay)
F2410ABattery Sensor
F2510ASmart Cruise Control Radar
F2615ARLY. 6 (Stop LP Relay), Stop Signal Relay
F2720ARLY. 7 (Deicer Relay)
Page 377 of 403
765
Maintenance
LIGHT BULBS
Use only the bulbs of the specified
wattage.
✽NOTICE
After driving in heavy rain or washing
the vehicle, headlight and taillight lenses
could appear frosty. This condition is
caused by the temperature difference
between the lamp inside and outside.
This is similar to the condensation on
your windows inside your vehicle during
the rain and doesn’t indicate a problem
with your vehicle. If the water leaks into
the lamp bulb circuitry, have the vehicle
checked by an authorized HYUNDAI
dealer.
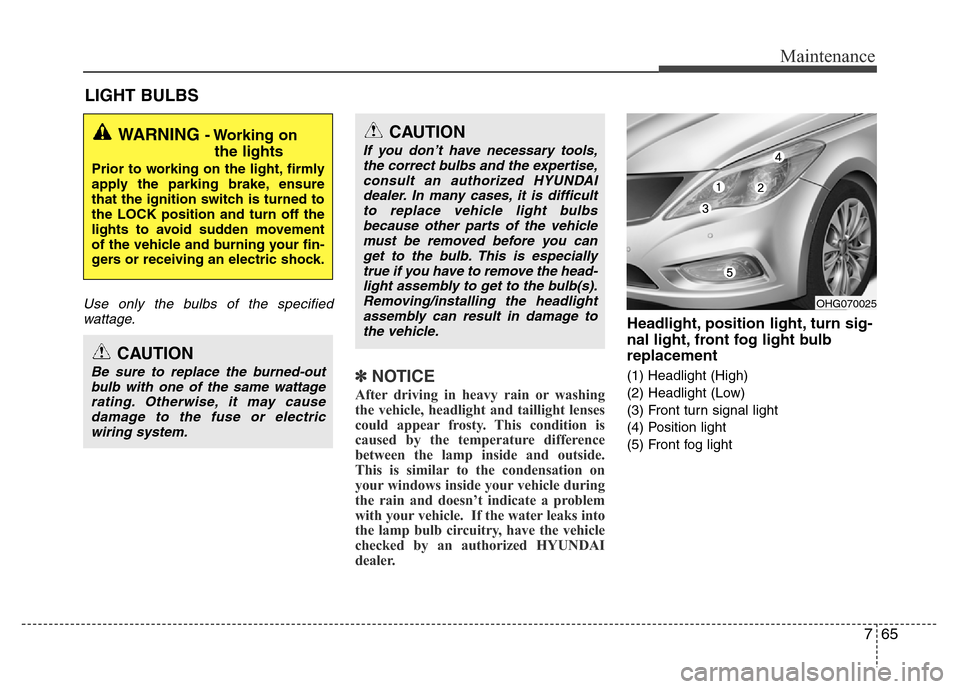
Headlight, position light, turn sig-
nal light, front fog light bulb
replacement
(1) Headlight (High)
(2) Headlight (Low)
(3) Front turn signal light
(4) Position light
(5) Front fog light
WARNING - Working on
the lights
Prior to working on the light, firmly
apply the parking brake, ensure
that the ignition switch is turned to
the LOCK position and turn off the
lights to avoid sudden movement
of the vehicle and burning your fin-
gers or receiving an electric shock.
CAUTION
Be sure to replace the burned-out
bulb with one of the same wattage
rating. Otherwise, it may cause
damage to the fuse or electric
wiring system.
CAUTION
If you don’t have necessary tools,
the correct bulbs and the expertise,
consult an authorized HYUNDAI
dealer. In many cases, it is difficult
to replace vehicle light bulbs
because other parts of the vehicle
must be removed before you can
get to the bulb. This is especially
true if you have to remove the head-
light assembly to get to the bulb(s).
Removing/installing the headlight
assembly can result in damage to
the vehicle.
OHG070025
Page 386 of 403
Maintenance
74 7
Exterior care
Exterior general caution
It is very important to follow the label
directions when using any chemical
cleaner or polish. Read all warning and
caution statements that appear on the
label.
Finish maintenance
Washing
To help protect your vehicle’s finish from
rust and deterioration, wash it thoroughly
and frequently at least once a month with
lukewarm or cold water.
If you use your vehicle for off-road driv-
ing, you should wash it after each off-
road trip. Pay special attention to the
removal of any accumulation of salt, dirt,
mud, and other foreign materials. Make
sure the drain holes in the lower edges of
the doors and rocker panels are kept
clear and clean.
Insects, tar, tree sap, bird droppings,
industrial pollution and similar deposits
can damage your vehicle’s finish if not
removed immediately.
Even prompt washing with plain water
may not completely remove all these
deposits. A mild soap, safe for use on
painted surfaces, may be used.
After washing, rinse the vehicle thor-
oughly with lukewarm or cold water. Do
not allow soap to dry on the finish.
APPEARANCE CARE
CAUTION
• Do not use strong soap, chemical
detergents or hot water, and do
not wash the vehicle in direct
sunlight or when the body of the
vehicle is warm.
• Be careful when washing the side
windows of your vehicle.
Especially, with high-pressure
water, water may leak through the
windows and wet the interior.
• To prevent damage to the plastic
parts and lamps, do not clean
with chemical solvents or strong
detergents.
WARNING - Wet brakes
After washing the vehicle, test the
brakes while driving slowly to see if
they have been affected by water. If
braking performance is impaired,
dry the brakes by applying them
lightly while maintaining a slow for-
ward speed.