2013 Hyundai Azera air conditioning
[x] Cancel search: air conditioningPage 187 of 403
4111
Features of your vehicle
• During cooling operation, you may
occasionally notice a misty air flow
because of rapid cooling and humid air
intake. This is a normal system opera-
tion characteristic.
• If you operate air conditioner exces-
sively, the difference between the tem-
perature of the outside air and that of
the windshield could cause the outer
surface of the windshield to fog up,
causing loss of visibility. In this case,
set the mode selection knob or button
to the position and fan speed con-
trol to the lower speed.
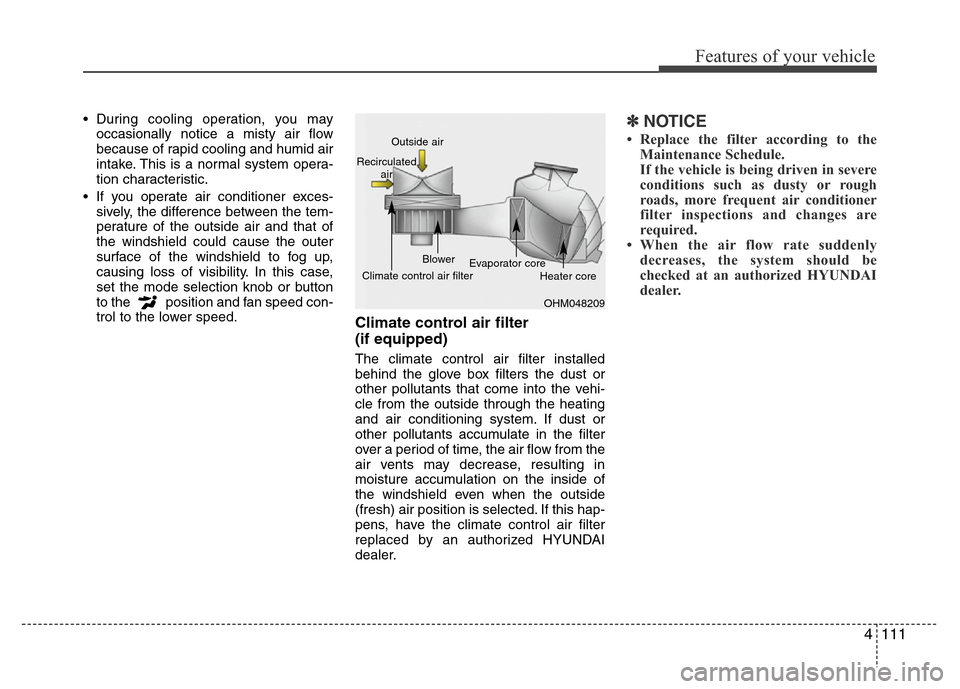
Climate control air filter
(if equipped)
The climate control air filter installed
behind the glove box filters the dust or
other pollutants that come into the vehi-
cle from the outside through the heating
and air conditioning system. If dust or
other pollutants accumulate in the filter
over a period of time, the air flow from the
air vents may decrease, resulting in
moisture accumulation on the inside of
the windshield even when the outside
(fresh) air position is selected. If this hap-
pens, have the climate control air filter
replaced by an authorized HYUNDAI
dealer.
✽NOTICE
• Replace the filter according to the
Maintenance Schedule.
If the vehicle is being driven in severe
conditions such as dusty or rough
roads, more frequent air conditioner
filter inspections and changes are
required.
• When the air flow rate suddenly
decreases, the system should be
checked at an authorized HYUNDAI
dealer.
OHM048209 Outside air
Recirculated
air
Climate control air filterBlower
Evaporator core
Heater core
Page 188 of 403

Features of your vehicle
112 4
Checking the amount of air con-
ditioner refrigerant and compres-
sor lubricant
When the amount of refrigerant is low,
the performance of the air conditioning is
reduced. Overfilling also has a negative
impact on the air conditioning system.
Therefore, if abnormal operation is
found, have the system inspected by an
authorized HYUNDAI dealer.
✽NOTICE
It is important that the correct type and
amount of oil and refrigerant is used.
Otherwise, damage to the compressor
and abnormal system operation may
occur.
WARNING
The air conditioning system should
be serviced by an authorized
HYUNDAI dealer. Improper service
may cause serious injury to the
person performing the service.
Page 189 of 403
4113
Features of your vehicle
• For maximum defrosting, set the tem-
perature control to the extreme
right/hot position and the fan speed
control to the highest speed.
• If warm air to the floor is desired while
defrosting or defogging, set the mode
to the floor-defrost position.
• Before driving, clear all snow and ice
from the windshield, rear window, out-
side rear view mirrors, and all side win-
dows.
• Clear all snow and ice from the hood
and air inlet in the cowl grill to improve
heater and defroster efficiency and to
reduce the probability of fogging up the
inside of the windshield.
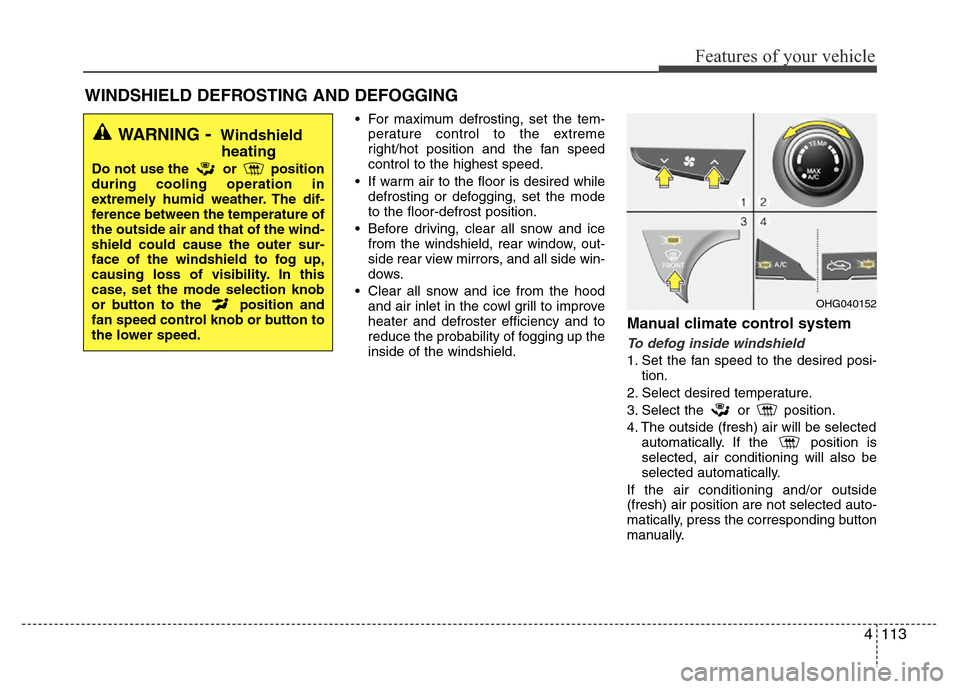
Manual climate control system
To defog inside windshield
1. Set the fan speed to the desired posi-
tion.
2. Select desired temperature.
3. Select the or position.
4. The outside (fresh) air will be selected
automatically. If the position is
selected, air conditioning will also be
selected automatically.
If the air conditioning and/or outside
(fresh) air position are not selected auto-
matically, press the corresponding button
manually.
WINDSHIELD DEFROSTING AND DEFOGGING
WARNING- Windshield
heating
Do not use the or position
during cooling operation in
extremely humid weather. The dif-
ference between the temperature of
the outside air and that of the wind-
shield could cause the outer sur-
face of the windshield to fog up,
causing loss of visibility. In this
case, set the mode selection knob
or button to the position and
fan speed control knob or button to
the lower speed.
OHG040152
Page 190 of 403
Features of your vehicle
114 4
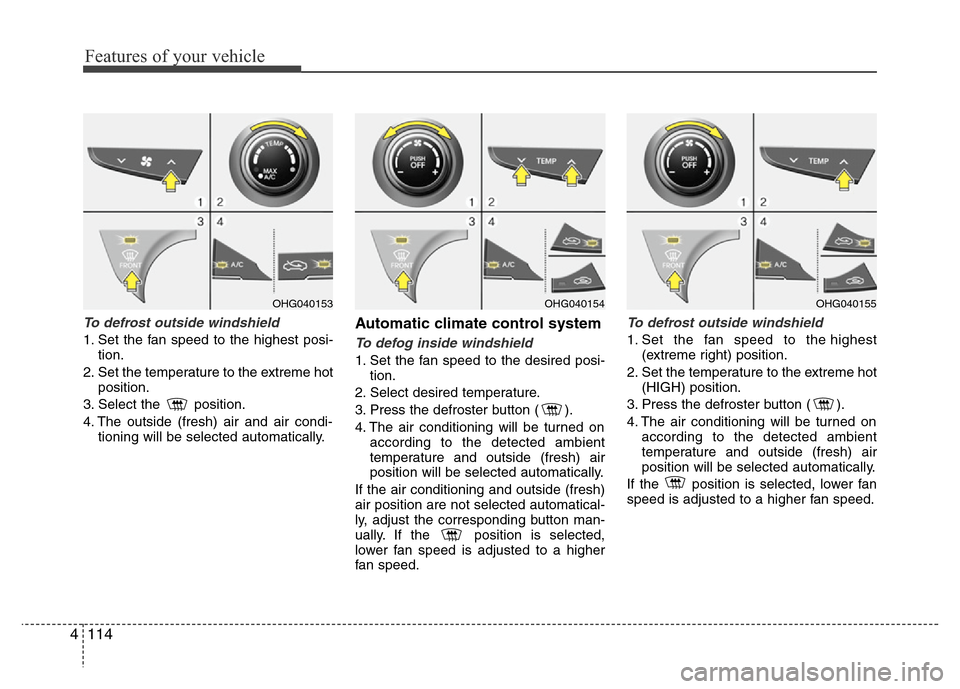
To defrost outside windshield
1. Set the fan speed to the highest posi-
tion.
2. Set the temperature to the extreme hot
position.
3. Select the position.
4. The outside (fresh) air and air condi-
tioning will be selected automatically.
Automatic climate control system
To defog inside windshield
1. Set the fan speed to the desired posi-
tion.
2. Select desired temperature.
3. Press the defroster button ( ).
4. The air conditioning will be turned on
according to the detected ambient
temperature and outside (fresh) air
position will be selected automatically.
If the air conditioning and outside (fresh)
air position are not selected automatical-
ly, adjust the corresponding button man-
ually. If the position is selected,
lower fan speed is adjusted to a higher
fan speed.
To defrost outside windshield
1. Set the fan speed to the highest
(extreme right) position.
2. Set the temperature to the extreme hot
(HIGH) position.
3. Press the defroster button ( ).
4. The air conditioning will be turned on
according to the detected ambient
temperature and outside (fresh) air
position will be selected automatically.
If the position is selected, lower fan
speed is adjusted to a higher fan speed.
OHG040154OHG040155OHG040153
Page 191 of 403
4115
Features of your vehicle
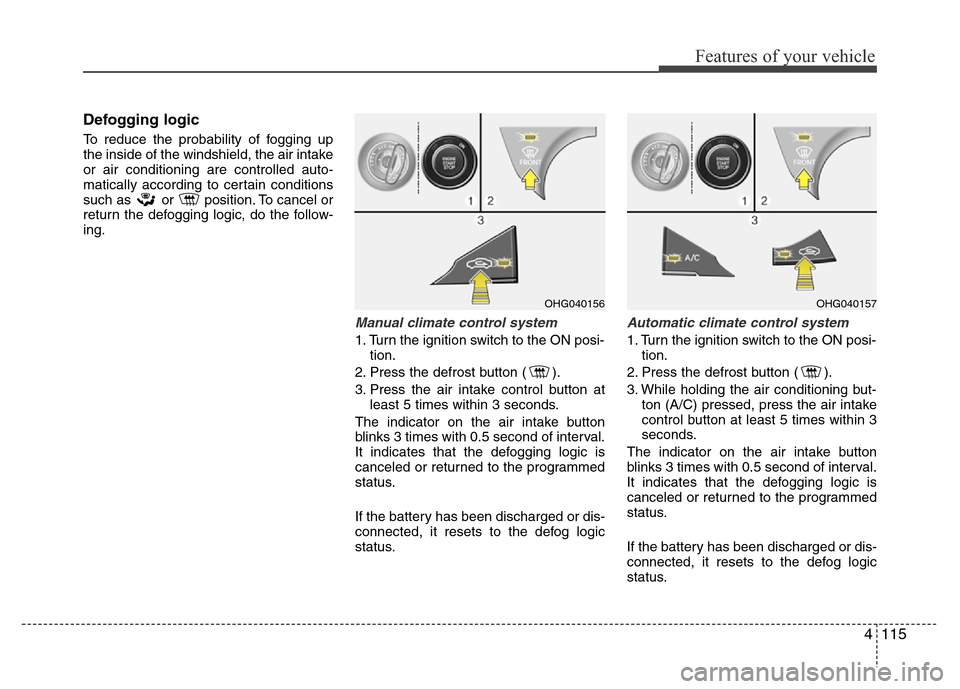
Defogging logic
To reduce the probability of fogging up
the inside of the windshield, the air intake
or air conditioning are controlled auto-
matically according to certain conditions
such as or position. To cancel or
return the defogging logic, do the follow-
ing.
Manual climate control system
1. Turn the ignition switch to the ON posi-
tion.
2. Press the defrost button ( ).
3. Press the air intake control button at
least 5 times within 3 seconds.
The indicator on the air intake button
blinks 3 times with 0.5 second of interval.
It indicates that the defogging logic is
canceled or returned to the programmed
status.
If the battery has been discharged or dis-
connected, it resets to the defog logic
status.
Automatic climate control system
1. Turn the ignition switch to the ON posi-
tion.
2. Press the defrost button ( ).
3. While holding the air conditioning but-
ton (A/C) pressed, press the air intake
control button at least 5 times within 3
seconds.
The indicator on the air intake button
blinks 3 times with 0.5 second of interval.
It indicates that the defogging logic is
canceled or returned to the programmed
status.
If the battery has been discharged or dis-
connected, it resets to the defog logic
status.
OHG040156OHG040157
Page 192 of 403
Features of your vehicle
116 4
Auto defogging system
(Only for automatic climate control
system, if equipped)
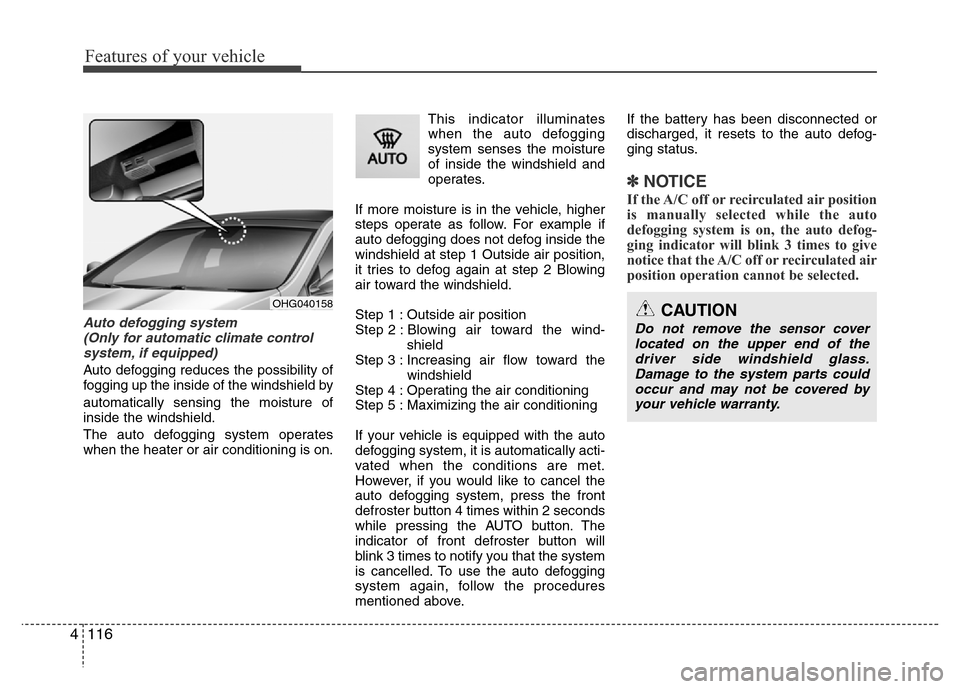
Auto defogging reduces the possibility of
fogging up the inside of the windshield by
automatically sensing the moisture of
inside the windshield.
The auto defogging system operates
when the heater or air conditioning is on.This indicator illuminates
when the auto defogging
system senses the moisture
of inside the windshield and
operates.
If more moisture is in the vehicle, higher
steps operate as follow. For example if
auto defogging does not defog inside the
windshield at step 1 Outside air position,
it tries to defog again at step 2 Blowing
air toward the windshield.
Step 1 : Outside air position
Step 2 : Blowing air toward the wind-
shield
Step 3 : Increasing air flow toward the
windshield
Step 4 : Operating the air conditioning
Step 5 : Maximizing the air conditioning
If your vehicle is equipped with the auto
defogging system, it is automatically acti-
vated when the conditions are met.
However, if you would like to cancel the
auto defogging system, press the front
defroster button 4 times within 2 seconds
while pressing the AUTO button. The
indicator of front defroster button will
blink 3 times to notify you that the system
is cancelled. To use the auto defogging
system again, follow the procedures
mentioned above.If the battery has been disconnected or
discharged, it resets to the auto defog-
ging status.
✽NOTICE
If the A/C off or recirculated air position
is manually selected while the auto
defogging system is on, the auto defog-
ging indicator will blink 3 times to give
notice that the A/C off or recirculated air
position operation cannot be selected.
OHG040158CAUTION
Do not remove the sensor cover
located on the upper end of the
driver side windshield glass.
Damage to the system parts could
occur and may not be covered by
your vehicle warranty.
Page 222 of 403
Features of your vehicle
146 4
✽NOTICEIn the following situations, you or the
other party may have difficulty hearing
each other:
1. Speaking at the same time, your voice
may not reach each other parties.
(This is not a malfunction.) Speak
alternately with the other party on the
phone.
2. Keep the Bluetooth
®Wireless
Technology volume to a low level.
High-level volume may result in dis-
tortion and echo.
3. When driving on a rough road.
4. When driving at high speeds.
5. When the window is open.
6. When the air conditioning vents are
facing the microphone.
7. When the sound of the air condition-
ing fan is loud.
■Bluetooth®Wireless Technology
Audio Music Streaming
This audio system supports A2DP (Audio
Advanced Distribution Profile) and
AVRCP (Audio Video Remote Control
Profile).
Both profiles are available for listening to
the MP3 music via
Bluetooth®Wireless
Technology cellular phone supporting
above
Bluetooth®Wireless Technology
profiles.
To play MP3 music from the
Bluetooth®
Wireless Technology cellular phone,
press the button until “MP3
Play” is displayed on the LCD.
Then try playing music by phone.
When playing music from the
Bluetooth®
Wireless Technology cellular phone, the
head unit displays MP3 MODE.
NOTE:
• Not only MP3 files, all the sounds
that the phone supports can be
heard by the audio system.
• The
Bluetooth®Wireless Technology
cellular phones shall feature A2DP
and AVRCP functions.
• Some A2DP and AVRCP
Bluetooth®
Wireless Technology cellular
phones may not play music through
the head unit on first try. Please try
the below;
i.e : Menu
➟Filemanager➟Music➟Option➟Play via Bluetooth
Page 277 of 403
Driving your vehicle
54 5
• Remember, your vehicle does not
require extended warm-up. After the
engine has started, allow the engine to
run for 10 to 20 seconds prior to plac-
ing the vehicle in gear. In very cold
weather, however, give your engine a
slightly longer warm-up period.
• Do not "lug" or "over-rev" the engine.
Lugging is driving very slowly in too
high a gear resulting in engine bucking.
If this happens, shift to a lower gear.
Over-revving is racing the engine
beyond its safe limit. This can be avoid-
ed by shifting at the recommended
speeds.• Use your air conditioning sparingly.
The air conditioning system is operat-
ed by engine power so your fuel econ-
omy is reduced when you use it.
• Open windows at high speeds can
reduce fuel economy.
• Fuel economy is less in crosswinds
and headwinds. To help offset some of
this loss, slow down when driving in
these conditions.
Keeping a vehicle in good operating con-
dition is important both for economy and
safety. Therefore, have an authorized
HYUNDAI dealer perform scheduled
inspections and maintenance.
WARNING - Engine off dur-
ing motion
Never turn the engine off to coast
down hills or anytime the vehicle is
in motion. The power steering and
power brakes will not function
properly without the engine run-
ning. Instead, keep the engine on
and downshift to an appropriate
gear for engine braking effect. In
addition, turning off the ignition
while driving could engage the
steering wheel lock resulting in
loss of vehicle steering which
could cause serious injury or
death.