Page 160 of 488
Continued159
uuInterior Lights/Interior Convenience ItemsuInterior Convenience Items
Controls
There are coat hooks near the third row seats.
Use the cargo net to store small and light
items.
■Coat Hooks1Coat Hooks
The coat hooks are not designed for large or heavy items.
■Cargo Net*1Cargo Net*
NOTICE
To prevent damage, do not place more than 22 lbs
(10 kg) on this cargo net. Make sure to use the cargo net securely hooked.
3WARNING
Do not use this cargo net if the third row
seats are folded down.
Objects placed on the cargo net could be
thrown forward during a crash or sudden
stop and hurt someone.
* Not available on all models
Page 163 of 488
uuInterior Lights/Interior Convenience ItemsuInterior Convenience Items
162
Controls
The ignition switch must be in ON (w to use
the seat heaters. The HI setting heats the seats
faster than the LO setting.
There is no heater in the passenger's seat-
back due to the side airbag cutoff system.
The appropriate indicator will be on while the
seat heater is on. Each time you press the
switch, the mode changes to HI, LO and OFF.
■Seat Heaters*1Seat Heaters*
Do not use the seat heaters even in LO when the engine is off. Under such conditions, the battery may
be weakened, making the engine difficult to start.
In the LO setting, the heater runs continuously and
does not automatically turn off.
3WARNING
Heat induced burns are possible when
using seat heaters.
Persons with a diminished ability to sense
temperature (e.g., persons with diabetes,
lower-limb nerve damage, or paralysis) or
with sensitive skin should not use seat
heaters.
* Not available on all models
Page 328 of 488

327
uuBefore DrivinguMaximum Load Limit
Continued
Driving
Maximum Load Limit
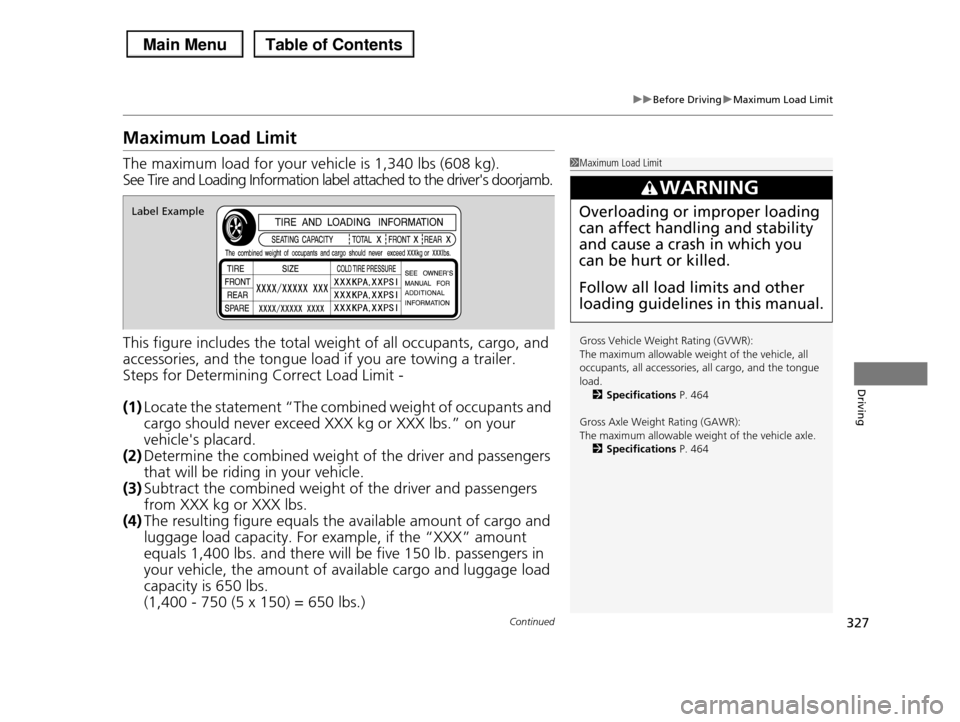
The maximum load for your vehicle is 1,340 lbs (608 kg).
See Tire and Loading Information label attached to the driver's doorjamb.
This figure includes the total weight of all occupants, cargo, and
accessories, and the tongue load if you are towing a trailer.
Steps for Determining Correct Load Limit -
(1)Locate the statement “The combined weight of occupants and
cargo should never exceed XXX kg or XXX lbs.” on your
vehicle's placard.
(2)Determine the combined weight of the driver and passengers
that will be riding in your vehicle.
(3)Subtract the combined weight of the driver and passengers
from XXX kg or XXX lbs.
(4)The resulting figure equals the available amount of cargo and
luggage load capacity. For example, if the “XXX” amount
equals 1,400 lbs. and there will be five 150 lb. passengers in
your vehicle, the amount of available cargo and luggage load
capacity is 650 lbs.
(1,400 - 750 (5 x 150) = 650 lbs.)
1Maximum Load Limit
Gross Vehicle Weight Rating (GVWR): The maximum allowable weight of the vehicle, all
occupants, all accessories, all cargo, and the tongue
load.2Specifications P. 464
Gross Axle Weight Rating (GAWR):
The maximum allowable weight of the vehicle axle.2Specifications P. 464
3WARNING
Overloading or improper loading
can affect handling and stability
and cause a crash in which you
can be hurt or killed.
Follow all load limits and other
loading guidelines in this manual.
Label Example
Page 330 of 488

329Continued
Driving
Towing a Trailer
Towing Preparation
Your vehicle can tow a trailer if you carefully observe the load limits, use the proper
equipment, and follow the towing guidelines. Check the load limits before driving.
■Total trailer weight
Do not exceed the maximum allowable
weight of the trailer, cargo, and everything in
or on it shown in the table.
Towing loads in excess of this can seriously
affect vehicle handling and performance and
can damage the engine and drivetrain.
Each weight limit is calculated based on the following conditions:
•Occupants fill seats from the front of the vehicle to the back
•Each occupant weights 150 lbs (68 kg)
•Each occupant has 15 lbs (7 kg) of cargo in the cargo area
Any additional weight, cargo or accessories reduce the maximum trailer weight and
maximum tongue load.
■Towing Load Limits1Towing Load Limits
Check if all loads are within limits at a public scale.
If a public scale is not available, add the estimated
weight of your cargo load to the weight of your trailer (as quoted by the manufacturer), and then
measure the tongue load with an appropriate scale or
tongue gauge or estimate it based on cargo distribution.
Refer to the trailer owner's manual for additional information.
Break-in Period Avoid towing a trailer during your vehicle's first 600
miles (1,000 km).
Never exceed the gross weight ratings.
Gross weight information
2Vehicle Specifications P. 464
3WARNING
Exceeding any load limit or improperly
loading your vehicle and trailer can cause a
crash in which you can be seriously hurt or
killed.
Check the loading of your vehicle and
trailer carefully before starting to drive.
Total Load
Number of
occupants4WD models2WD models with
ATF cooler
2WD models
without ATF cooler
24,500 lbs (2,041 kg)3,500 lbs (1,588 kg)2,000 lbs (905 kg)
34,300 lbs (1,950 kg)3,300 lbs (1,497 kg)
Towing not
recommended
44,100 lbs (1,860 kg)3,100 lbs (1,406 kg)
54,000 lbs (1,814 kg)3,000 lbs (1,361 kg)
63,800 lbs (1,724 kg)2,800 lbs (1,270 kg)
72,000 lbs (905 kg)2,000 lbs (905 kg)
8Towing not
recommended
Towing not
recommended
Page 341 of 488

340
Driving
Off-Highway Driving Guidelines
General Information
Your vehicle has been designed primarily for use on pavement, however, its higher
ground clearance allows you to occasionally travel on unpaved roads. It is not
designed for trail-blazing, or other challenging off-road activities.
If you decide to drive on unpaved roads, you will find that it requires somewhat
different driving skills and that your vehicle will handle somewhat differently than it
does on pavement. Pay attention to the precautions and tips in this section, and get
acquainted with your vehicle before leaving the pavement.
Important Safety Precautions
To avoid loss of control or rollover, be sure to follow all precautions and
recommendations:
•Be sure to store cargo properly and do not exceed your cargo load limits.
2Maximum Load Limit P. 327
•Whenever you drive, make sure you and your passengers always wear seat belts.
•Keep your speed low, and never go faster than the conditions allow.
•It’s up to you to continually assess the situation and drive within the limits.
1Off-Highway Driving Guidelines
Failure to operate your vehicle correctly might result
in a crash or a rollover.
2Important Handling Information P. 262Precautions While Driving P. 344
3WARNING
Improperly operating this vehicle on or off
pavement can cause a crash or rollover in
which you and your passengers can be
seriously injured or killed.
•Follow all instructions and guidelines in
this owner’s manual.
•Keep your speed low, and don’t drive
faster than conditions permit.
Page 349 of 488
348
uuWhen DrivinguCruise Control
Driving
Cruise Control
Maintains a constant vehicle speed without having to keep your foot on the
accelerator. Use cruise control on freeways or open roads where you can travel at a
constant speed with little acceleration or deceleration.
1Cruise Control
It may not be possible to maintain a constant speed
when driving uphill or downhill.
When not using cruise control:
Turn off cruise control by pressing the CRUISE button.
3WARNING
Improper use of the cruise control can lead
to a crash.
Use the cruise control only when traveling
on open highways in good weather.
■Shift positions for cruise control: In (D or (d
Always keep sufficient distance between you and the vehicle in front of you.
■Vehicle speed for cruise control:
Desired speed in a range above roughly 25 mph (40 km/h) ~
CRUISE MAIN is on in the instrument panel.
Cruise control is ready to use.
■Press the CRUISE button on the steering wheel.
When to use
When to use
Page 361 of 488
360
Driving
Braking
Brake System
Use the parking brake to keep the vehicle stationary when parking.
To apply:
Depress the parking brake pedal down with
your foot.
To release:
1.Depress the brake pedal.
2.Pull the release handle fully.
■Parking Brake1Parking Brake
NOTICE
Release the parking brake fully before driving. The rear brakes and axle can be damaged if you drive
with the parking brake applied.
If you start driving without fully releasing the parking
brake, a buzzer sounds as a warning, and RELEASE
PARKING BRAKE appears on the multi-information display*.
Always apply the parking brake when parking.
* Not available on all models
Page 369 of 488

uuParking Your VehicleuParking Sensor System*
368
Driving
■The parking sensor system on navigation screen
•An appropriate indicator blinks when there
are any obstacles around the parking
sensors. The color of the indicator changes
in accordance with the distance between
your vehicle and obstacles.
•An appropriate indicator stays on in red
when there is a problem with the
corresponding parking sensor.
2Multi-Information Display Warning
and Information Messages* P. 78
1.Make sure that the parking sensor system is not activated. Turn the ignition
switch to LOCK (0.
2.Press and hold the parking sensor system button, and turn the ignition switch to
ON (w.
3.Keep pressing the button for ten seconds. Release the button when the indicator
in the button flashes.
4.Press the button again. The indicator in the button goes off.
uThe beeper sounds twice. The rear sensors are now turned off.
To turn the rear sensors on again, follow the above procedure. The beeper sounds
three times when the rear sensors come back on.
■Turning off All Rear Sensors1Turning off All Rear Sensors
When you shift to (R, the indicator in the parking
sensor system button blinks as a reminder that the
rear sensors have been turned off.
* Not available on all models