2013 HONDA PILOT tow
[x] Cancel search: towPage 347 of 488

346
uuWhen DrivinguShifting
Driving
Shifting
Change the shift position in accordance with your driving needs.
■Shift lever positions
1Shifting
You cannot turn the ignition switch to LOCK (0 and remove the key unless the shift lever is in (P.
The vehicle may move forward very slightly even in (N while the engine is cold.
Depress the brake pedal firmly and, when necessary,
apply the parking brake.
Park
Used when parking or starting the engine
Reverse
Used when reversing
Neutral
Used when idling
Drive
Used for normal driving (gears change between 1st and 5th automatically)
Drive (D3)
Press the (d button while the shift lever is in (D.
Used when:●Going up or down hills●Towing a trailer in hilly terrain
Second
Used to increase engine braking (the transmission is locked in 2nd gear)
First
Used to further increase engine braking (the transmission is locked in 1st gear)
Release Button
(d Button
Page 380 of 488

379
uuBefore Performing MaintenanceuSafety When Performing Maintenance
Maintenance
Safety When Performing Maintenance
Some of the most important safety precautions are given here.
However, we cannot warn you of every conceivable hazard that can arise in
performing maintenance. Only you can decide whether or not you should perform
a given task.
•To reduce the possibility of fire or explosion, keep cigarettes, sparks, and flames
away from the battery and all fuel related parts.
•Never leave rags, towels, or other flammable objects under the hood.
uHeat from the engine and exhaust can ignite them causing a fire.
•To clean parts, use a commercially available degreaser or parts cleaner, not
gasoline.
•Wear eye protection and protective clothing when working with the battery or
compressed air.
•Engine exhaust contains carbon monoxide, which is poisonous and can kill you.
uOnly operate the engine if there is sufficient ventilation.
•The vehicle must be in a stationary condition.
uMake sure your vehicle is parked on level ground, the parking brake is set, and
the engine is off.
•Be aware that hot parts can burn you.
uMake sure to let the engine and exhaust system cool thoroughly before
touching vehicle parts.
•Be aware that moving parts can injure you.
uDo not start the engine unless instructed, and keep your hands and limbs away
from moving parts.
■Maintenance Safety
■Vehicle Safety
1Safety When Performing Maintenance
3WARNING
Improperly maintaining this vehicle or
failing to correct a problem before driving
can cause a crash in which you can be
seriously hurt or killed.
Always follow the inspection and
maintenance recommendations according
to the schedules in this owner's manual.
3WARNING
Failure to properly follow maintenance
instructions and precautions can cause you
to be seriously hurt or killed.
Always follow the procedures and
precautions in this owner's manual.
Page 384 of 488

383
uuMaintenance Minder™uTo Use Maintenance MinderTM
Continued
Maintenance
■Maintenance Service Items1Maintenance Service Items
•Independent of the Maintenance Minder information, replace the brake fluid every 3 years.
•Inspect idle speed every 160,000 miles (256,000
km).•Adjust the valves during services A, B, 1, 2, or 3 if
they are noisy.
Maintenance Minder MessageMaintenance Minder Indicator
Sub Items
Main Item
*1: If a message SERVICE does not appear more than 12 months after the display is reset, change the engine oil every year.*2: If you drive in dusty conditions, replace the air cleaner element every 15,000 miles (24,000 km). *3: If you drive primarily in urban areas that have high concentrations of soot in the air from industry and from diesel-powered vehicles, replace the dust and pollen filter every 15,000 miles (24,000 km).# : See information on maintenance and emissions warranty.
CODEMaintenance Main Items
A●Replace engine oil*1
B●Replace engine oil*1 and oil filter●Inspect front and rear brakes/service as necessary●Check parking brake adjustment●Inspect tie rod ends, steering gearbox, and boots●Inspect suspension components●Inspect driveshaft boots●Inspect brake hoses and lines (Including ABS/VSA)●Inspect all fluid levels and condition of fluids●Inspect exhaust system#
●Inspect fuel lines and connections#
*4: If you drive regularly in very high temperatures (over 110ºF, 43ºC), in very low temperatures (under -20ºF, -29ºC), or tow a trailer, replace every 60,000 miles/100,000 km.*5: Driving in mountainous areas at very low vehicle speeds or trailer towing results in higher level of mechanical (shear) stress to fluid. This requires differential fluid changes more frequently than recommended by the Maintenance Minder. If you regularly drive your vehicle under these conditions, have the differential fluid changed at 7,500 miles (12,000 km), then every 15,000 miles (24,000 km).
CODEMaintenance Sub Items
1●Rotate tires
2●Replace air cleaner element*2
●Replace dust and pollen filter*3
●Inspect drive belt
3●Replace transmission and transfer* fluid
4●Replace spark plugs●Replace timing belt and inspect water pump*4
●Inspect valve clearance
5●Replace engine coolant
6●Replace VTM-4r* rear differential fluid*5
* Not available on all models
Page 388 of 488

387
uuMaintenance Minder™uTo Use Maintenance MinderTM
Continued
Maintenance
■Maintenance Service Items1Maintenance Service Items
•Independent of the Maintenance Minder information, replace the brake fluid every 3 years.
•Inspect idle speed every 160,000 miles (256,000
km).•Adjust the valves during services A, B, 1, 2, or 3
only if they are noisy.
Maintenance Minder MessageSystem Message Indicator
Sub ItemsMain Item
*1: If a message SERVICE does not appear more than 12 months after the display is reset, change the engine oil every year.*2: If you drive in dusty conditions, replace the air cleaner element every 15,000 miles (24,000 km). *3: If you drive primarily in urban areas that have high concentrations of soot in the air from industry and from diesel-powered vehicles, replace the dust and pollen filter every 15,000 miles (24,000 km).# : See information on maintenance and emissions warranty.
CODEMaintenance Main Items
A●Replace engine oil*1
B●Replace engine oil*1 and oil filter●Inspect front and rear brakes/service as necessary●Check parking brake adjustment●Inspect tie rod ends, steering gearbox, and boots●Inspect suspension components●Inspect driveshaft boots●Inspect brake hoses and lines (Including ABS/VSA)●Inspect all fluid levels and condition of fluids●Inspect exhaust system#
●Inspect fuel lines and connections#
*4: If you drive regularly in very high temperatures (over 110ºF, 43ºC), in very low temperatures (under -20ºF, -29ºC), or tow a trailer, replace every 60,000 miles/100,000 km.*5: Driving in mountainous areas at very low vehicle speeds or trailer towing results in higher level of mechanical (shear) stress to fluid. This requires differential fluid changes more frequently than recommended by the Maintenance Minder. If you regularly drive your vehicle under these conditions, have the differential fluid changed at 7,500 miles (12,000 km), then every 15,000 miles (24,000 km).
CODEMaintenance Sub Items
1●Rotate tires
2●Replace air cleaner element*2
●Replace dust and pollen filter*3
●Inspect drive belt
3●Replace transmission and transfer* fluid
4●Replace spark plugs●Replace timing belt and inspect water pump*4
●Inspect valve clearance
5●Replace engine coolant
6●Replace VTM-4r* rear differential fluid*5
* Not available on all models
Page 391 of 488

390
uuMaintenance Under the HooduOpening the Hood
Maintenance
Opening the Hood
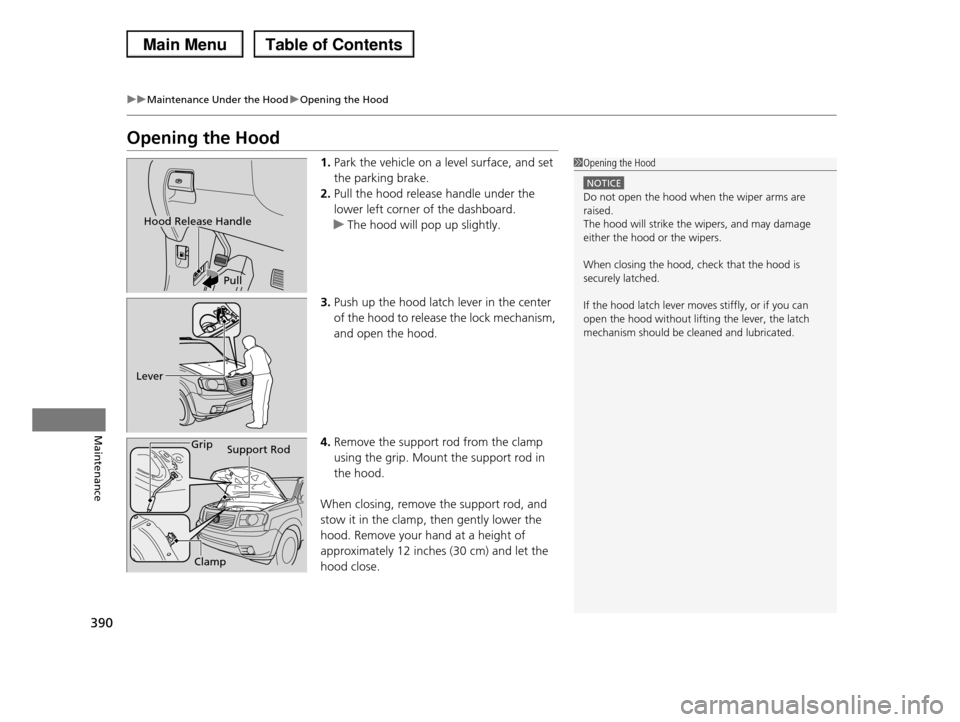
1.Park the vehicle on a level surface, and set
the parking brake.
2.Pull the hood release handle under the
lower left corner of the dashboard.
uThe hood will pop up slightly.
3.Push up the hood latch lever in the center
of the hood to release the lock mechanism,
and open the hood.
4.Remove the support rod from the clamp
using the grip. Mount the support rod in
the hood.
When closing, remove the support rod, and
stow it in the clamp, then gently lower the
hood. Remove your hand at a height of
approximately 12 inches (30 cm) and let the
hood close.
1Opening the Hood
NOTICE
Do not open the hood when the wiper arms are
raised. The hood will strike the wipers, and may damage
either the hood or the wipers.
When closing the hood, check that the hood is
securely latched.
If the hood latch lever moves stiffly, or if you can open the hood without lifting the lever, the latch
mechanism should be cleaned and lubricated.
Hood Release Handle
Pull
Lever
Support RodGrip
Clamp
Page 394 of 488

393
uuMaintenance Under the HooduOil Check
Maintenance
Oil Check
We recommend that you check the engine oil level every time you refuel.
Park the vehicle on level ground.
Wait approximately three minutes after turning the engine off before you check the
oil.
1.Remove the dipstick (orange loop).
2.Wipe the dipstick with a clean cloth or
paper towel.
3.Insert the dipstick back all the way into its
hole.
4.Remove the dipstick again, and check the
level. It should be between the upper and
lower marks. Add oil if necessary.
1Oil Check
If the oil level is near or below the lower mark, slowly
add oil being careful not to overfill.
Upper Mark
Lower Mark
Page 403 of 488

402
Maintenance
Replacing Light Bulbs
Headlight Bulbs
When replacing, use the following bulbs.
1.Remove the clips using a flat-tip
screwdriver, then remove the upper part of
the air intake duct.
2Engine Compartment Covers P. 391
2.Push the tab to remove the coupler.
3.Rotate the old bulb to the left to remove.
4.Insert a new bulb into the headlight
assembly and turn it to the right.
5.Insert the coupler into the connector of the
bulb.
High beam headlight:60W (HB3)
Low beam headlight:55 W (H11)
■High Beam Headlight
1Headlight Bulbs
NOTICE
Halogen bulbs get very hot when lit.
Oil, perspiration, or a scratch on the glass can cause the bulb to overheat and shatter.
The headlight aim is set by the factory, and does not need to be adjusted. However, if you regularly carry
heavy items in the cargo area or tow a trailer, have
the aiming readjusted at a dealer or by a qualified technician.
The HB3 and H11 types are halogen bulbs.
When replacing a bulb, handle it by its base, and protect the glass from contact with your skin or hard
objects. If you touch the glass, clean it with
denatured alcohol and a clean cloth.
The exterior lights' inside lenses (headlights, brake
lights, etc.) may fog temporarily after a car wash or while driving in the rain. This does not impact the
exterior light function.
However, if you see a large amount of water or ice accumulated inside the lenses, have your vehicle
inspected by a dealer.
Tab
Coupler
Bulb
Driver's side
Driver and passenger side
Page 424 of 488

423
Maintenance
Battery
Checking the Battery
Check the battery condition monthly. Look at
the test indicator window and check the
terminals for corrosion.
If your vehicle's battery is disconnected or goes dead:
•The audio system is disabled.
2Reactivating the audio system P. 174
•The clock resets.
2Setting the Clock P. 98
•The navigation system* is disabled.
2Refer to the navigation system manual
Charging the Battery
Disconnect both battery cables to prevent damaging your vehicle's electrical system.
Always disconnect the negative (–) cable first, and reconnect it last.
1Battery
WARNING: Battery post, terminals,
and related accessories contain lead
and lead compounds.
Wash your hands after handling.
The test indicator's color information is on the battery.
When you find corrosion, clean the battery terminals by applying a baking powder and water solution.
Clean terminals with a damp towel. Cloth/towel dry
the battery. Coat the terminals with grease to help prevent future corrosion.
3WARNING
The battery gives off explosive hydrogen
gas during normal operation.
A spark or flame can cause the battery to
explode with enough force to kill or
seriously hurt you.
When conducting any battery
maintenance, wear protective clothing and
a face shield, or have a skilled technician do
it.
Test Indicator Window
* Not available on all models