Page 150 of 433

149
uuOperating the Switches Around the Steering WheeluDriving Position Memory System
*
Controls
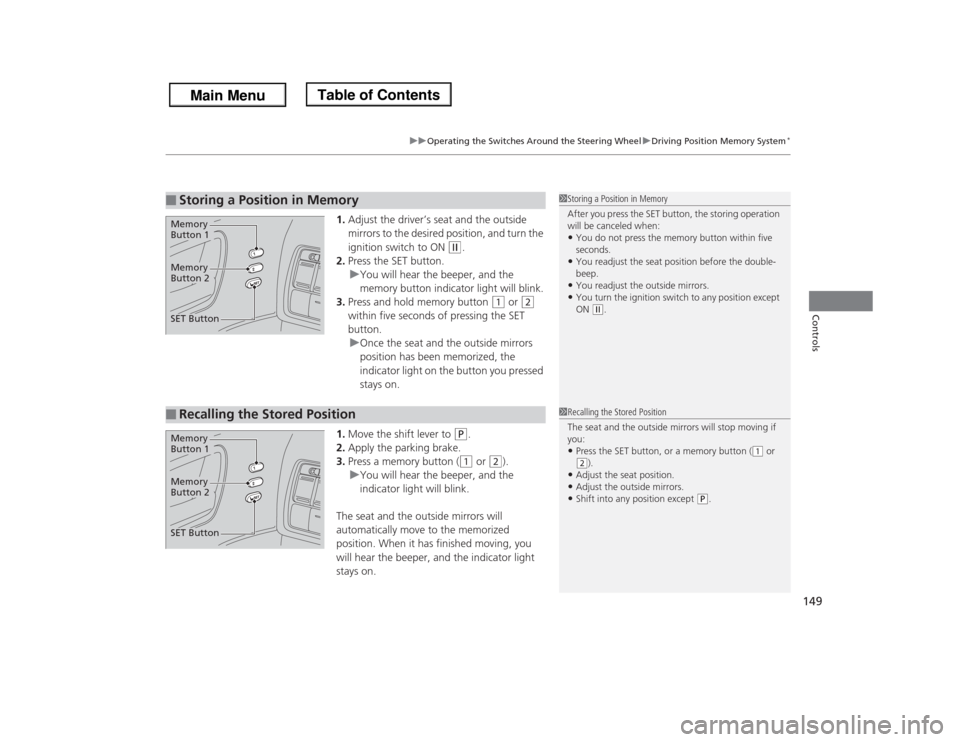
1.Adjust the driver’s seat and the outside
mirrors to the desired position, and turn the
ignition switch to ON
(w
.
2.Press the SET button.
uYou will hear the beeper, and the
memory button indicator light will blink.
3.Press and hold memory button
(1
or
(2
within five seconds of pressing the SET
button.
uOnce the seat and the outside mirrors
position has been memorized, the
indicator light on the button you pressed
stays on.
1.Move the shift lever to
(P
.
2.Apply the parking brake.
3.Press a memory button ((1
or
(2
).
uYou will hear the beeper, and the
indicator light will blink.
The seat and the outside mirrors will
automatically move to the memorized
position. When it has finished moving, you
will hear the beeper, and the indicator light
stays on.
■
Storing a Position in Memory
1Storing a Position in Memory
After you press the SET button, the storing operation
will be canceled when: •You do not press the memory button within five
seconds.•You readjust the seat position before the double-
beep.•You readjust the outside mirrors.•You turn the ignition switch to any position except
ON
(w.
Memory
Button 1Memory
Button 2SET Button■
Recalling the Stored Position
1Recalling the Stored Position
The seat and the outside mirrors will stop moving if
you: •Press the SET button, or a memory button (
(1 or
(2).
•Adjust the seat position.•Adjust the outside mirrors.•Shift into any position except
(P.
Memory
Button 1Memory
Button 2SET Button
Page 153 of 433
152
uuAdjusting the MirrorsuPower Door Mirrors
Controls
Power Door Mirrors
You can adjust the door mirrors when the
ignition switch is in ON
(w
.
■Mirror position adjustment
L/R selector switch: Select the left or right
mirror. After adjusting the mirror, return the
switch to the center position.
Mirror position adjustment switch: Press
the switch left, right, up, or down to move the
mirror.
If activated, either side door mirror
automatically tilts downward when you put
the shift lever in
(R
; this improves close-in
visibility on the selected side of the vehicle
when backing up. The mirror automatically
returns to its original position when you shift
out of
(R
.
To activate this feature, turn the ignition
switch to ON
(w
and slide the selector switch
to the left or right side.
Selector
Switch
Adjustment
Switch■
Reverse Tilt Door MirrorSlide the selector switch to left or
right to tilt down either side
door mirror.
Page 169 of 433

168Controls
Interior Lights/Interior Convenience ItemsInterior Lights
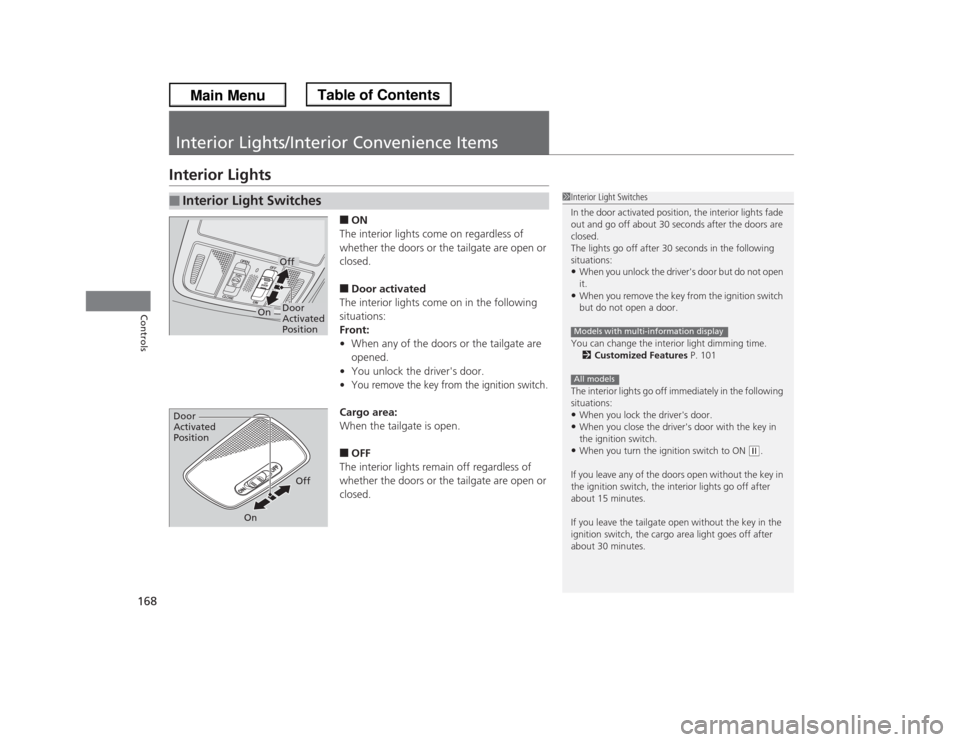
■ON
The interior lights come on regardless of
whether the doors or the tailgate are open or
closed.■Door activated
The interior lights come on in the following
situations:
Front:
•When any of the doors or the tailgate are
opened.
•You unlock the driver's door.•You remove the key from the ignition switch.Cargo area:
When the tailgate is open.■OFF
The interior lights remain off regardless of
whether the doors or the tailgate are open or
closed.
■
Interior Light Switches
1Interior Light Switches
In the door activated position, the interior lights fade
out and go off about 30 seconds after the doors are
closed.
The lights go off after 30 seconds in the following
situations:•When you unlock the driver's door but do not open
it.•When you remove the key from the ignition switch
but do not open a door.
You can change the interior light dimming time.
2Customized Features P. 101
The interior lights go off immediately in the following
situations:•When you lock the driver's door.•When you close the driver's door with the key in
the ignition switch.•When you turn the ignition switch to ON
(w.
If you leave any of the doors open without the key in
the ignition switch, the interior lights go off after
about 15 minutes.
If you leave the tailgate open without the key in the
ignition switch, the cargo area light goes off after
about 30 minutes.
Models with multi-information displayAll models
Door
Activated
PositionOff
On
Door
Activated
Position
Off
On
Page 173 of 433
uuInterior Lights/Interior Convenience ItemsuInterior Convenience Items
172Controls
Press the button to open the center pocket.
■Using the center pocket as a cool box
*
While the air conditioner is in use, you can
store items in the center pocket to keep them
cool.
Press the COOL BOX button to cool inside the
center pocket (indicator on).
■
Center PocketButton
1Using the center pocket as a cool box
*
NOTICEDo not put opened cans, or uncovered containers
with loose ice inside the cool box. Spilled liquids can
damage the upholstery and electrical components in
and around the cool box.
The cool box is not a refrigerator. It only keeps chilled
beverages cool.
The climate control system continues to cool the cool
box when the heater is turned on.
Pressing the COOL BOX button automatically turns
on the air conditioning system.
The cool box automatically turns off if:•The air conditioning system is turned off•You turn the ignition switch to LOCK
(0
* Not available on all models
Page 176 of 433
Continued
175
uuInterior Lights/Interior Convenience ItemsuInterior Convenience Items
Controls
The accessory power sockets can be used when the ignition switch is in ACCESSORY (q
or ON
(w
.
■Accessory power socket(s) (console
panel)
Open the cover to use it.■Accessory power socket (cargo area)
Open the cover to use it.
■
Accessory Power Sockets
1Accessory Power SocketsNOTICEDo not insert an automotive type cigarette lighter
element.
This can overheat the power socket.
The accessory power socket is designed to supply
power for 12 volt DC accessories that are rated 120
watts or less (10 amps).
To prevent battery drain, only use the power socket
with the engine run.
When each socket is being used simultaneously, the
combined power rating of the accessories should not
exceed 120 watts (10 amps).
Page 181 of 433
uuInterior Lights/Interior Convenience ItemsuInterior Convenience Items
180Controls
The ignition switch must be in ON
(w
to use
the seat heaters. The HI setting heats the seats
faster than the LO setting.
There is no heater in the passenger's seat-
back due to the side airbag cutoff system.
The appropriate indicator will be on while the
seat heater is on. Each time you press the
switch, the mode changes to HI, LOW and
OFF.
■
Seat Heaters
*
1Seat Heaters
*
Do not use the seat heaters even in LO when the
engine is off. Under such conditions, the battery may
be weakened, making the engine difficult to start.
3
WARNING
Heat induced burns are possible when
using seat heaters.
Persons with a diminished ability to sense
temperature (e.g., persons with diabetes,
lower-limb nerve damage, or paralysis) or
with sensitive skin should not use seat
heaters.
* Not available on all models
Page 197 of 433

196
uuAudio SystemuAudio System Theft Protection
Features
Audio System Theft ProtectionThe audio system is disabled when it is disconnected from the power source, such as
when the battery is disconnected or goes dead.■Reactivating the audio system
1.Turn the ignition switch to ON
(w
, and turn on the audio system.
uIf you turn the ignition switch to ACCESSORY
(q
, you will be requested to
enter the audio security code. See step 3.
2.Press and hold the power volume knob again for more than two seconds.
uThe audio system is reactivated when the system’s control unit recognizes that
the system is in your vehicle.
If the control unit fails to recognize, ENTER CODE appears on the audio/
information screen.
3.Enter the audio security code using the preset buttons. If you enter an incorrect
digit, continue to the last digit, then try again. If you do not enter the code
correctly after 10 tries, leave the system for one hour before trying again, or visit
a dealer to have the system reset.
1Audio System Theft Protection
You can find out about your serial number and
security code from a dealer.
You can register the security code at Owner Link
(owners.honda.com.), and find information on how
to retrieve the serial number and obtain the code at
radio-navicode.honda.com.U.S. models
Page 198 of 433
197Features
Audio System Basic OperationTo use the audio system function, the ignition switch must be in ACCESSORY
(q
or
ON
(w
.
Use the selector knob or SETUP button to
access some audio functions.
Press to switch between the normal and
extended display for some functions.
Selector knob: Rotate left or right to scroll
through the available choices. Press to set
your selection.
SETUP button: Press to select any mode such
as the Auto Select, Sound Settings, Play
Mode, Resume/Pause, or compass.
RETURN button: Press to go back to the
previous display.
button: Press to change the audio/
information screen brightness. The brightness
can be set differently for the day time and
night time. Press once for the day time mode.
Press twice for the night time mode.
Adjust the brightness using .
1Audio System Basic Operation
These indications are used to show how to operate
the selector knob.
Rotate to select.
Press to enter.
Selector Knob
SETUP
Button
RETURN Button
Button